SIOS SANless clusters

SIOS SANless clusters High-availability Machine Learning monitoring

  • Home
  • Products
    • SIOS DataKeeper for Windows
    • SIOS Protection Suite for Linux
  • News and Events
  • Clustering Simplified
  • Success Stories
  • Contact Us
  • English
  • 中文 (中国)
  • 中文 (台灣)
  • 한국어
  • Bahasa Indonesia
  • ไทย

Archives for December 2018

How To Set Up Low Cost SAN With Linux Software iSCSI Target

December 12, 2018 by Jason Aw Leave a Comment

Set up Low Cost SAN with Linux Software iSCSI Target

Step-By-Step Guide To Set Up Low Cost SAN With Linux Software iSCSI Target

A software iSCSI target can be a great way to set up shared storage when you don’t have enough dough to afford pricey SAN hardware. The iSCSI target acts just like a real hardware iSCSI array, except it’s just a piece of software running on a traditional server (or even a VM!). Setting up an iSCSI target is an easy and low cost way to get the shared storage you need. It does not matter if you’re using a clustering product like Microsoft Windows Server Failover Clustering (WSFC), a cluster filesystem such as GFS or OCFS. Or even if you’re wanting to get the most out of your virtualization platform (be it VMware, XenServer, or Hyper-V) by enabling storage pooling and live migration.

About Lio-Target

Recently, the Linux kernel has adopted LIO-Target as the standard iSCSI target for Linux. LIO-Target is available in Linux kernels 3.1 and higher. LIO-Target supports SCSI-3 Persistent Reservations, which are required by Windows Server Failover Clustering, VMware vSphere, and other clustering products. The LUNs (disks) presented by the iSCSI target can be entire disks, partitions, or even just plain old files on the filesystem. LIO-Target supports all of these options.

Below, we’ll walk through the steps to configure LIO-Target on an Ubuntu 12.04 server. Other recent distros will probably work also, but the steps may vary slightly.

Configuration Steps

First, install the Lio-target packages:

# apt-get install –no-install-recommends targetcli python-urwid

Lio-target is controlled using the targetcli command line utility.

The first step is to create the backing store for the LUN. In this example, we’ll use a file-backed LUN, which is just a normal file on the filesystem of the iSCSI target server.

# targetcli

/> cd backstores/
/backstores> ls
o- backstores …………………………………………………… […]
o- fileio …………………………………………. [0 Storage Object]
o- iblock …………………………………………. [0 Storage Object]
o- pscsi ………………………………………….. [0 Storage Object]
o- rd_dr ………………………………………….. [0 Storage Object]
o- rd_mcp …………………………………………. [0 Storage Object]

/backstores> cd fileio

/backstores/fileio> help create  (for help)

/backstores/fileio> create lun0 /root/iscsi-lun0 2g  (create 2GB file-backed LUN)

Second Step

Now the LUN is created. Half way there to Set up Low Cost SAN with Linux Software iSCSI Target. Next we’ll set up the target so client systems can access the storage.

/backstores/fileio/lun0> cd /iscsi

/iscsi> create   (create iqn and target port group)

Created target iqn.2003-01.org.linux-iscsi.murray.x8664:sn.31fc1a672ba1.
Selected TPG Tag 1.
Successfully created TPG 1.
Entering new node /iscsi/iqn.2003-01.org.linux-iscsi.murray.x8664:sn.31fc1a672ba1/tpgt1

/iscsi/iqn.20…a672ba1/tpgt1> set attribute authentication=0   (turn off chap auth)

/iscsi/iqn.20…a672ba1/tpgt1> cd luns

/iscsi/iqn.20…a1/tpgt1/luns> create /backstores/fileio/lun0   (create the target LUN)
Selected LUN 0.
Successfully created LUN 0.
Entering new node /iscsi/iqn.2003-01.org.linux-iscsi.murray.x8664:sn.31fc1a672ba1/tpgt1/luns/lun0

/iscsi/iqn.20…gt1/luns/lun0> cd ../../portals

iSCSI traffic can consume a lot of bandwidth. You’ll probably want the iSCSI traffic to be on a dedicated (or SAN) network, rather than your public network.

/iscsi/iqn.20…tpgt1/portals> create 10.10.102.164  (create portal to listen for connections)
Using default IP port 3260
Successfully created network portal 10.10.102.164:3260.
Entering new node /iscsi/iqn.2003-01.org.linux-iscsi.murray.x8664:sn.31fc1a672ba1/tpgt1/portals/10.10.102.164:3260

/iscsi/iqn.20….102.164:3260> cd ..

/iscsi/iqn.20…tpgt1/portals> create 10.11.102.164
Using default IP port 3260
Successfully created network portal 10.11.102.164:3260.
Entering new node /iscsi/iqn.2003-01.org.linux-iscsi.murray.x8664:sn.31fc1a672ba1/tpgt1/portals/10.11.102.164:3260

/iscsi/iqn.20…102.164:3260> cd ../../acls

Final Step

Register the iSCSI initiators (client systems) to Set up Low Cost SAN with Linux Software iSCSI Target. To do this, you’ll need to find the initiator names of the systems. For Linux, this will usually be in /etc/iscsi/initiatorname.iscsi. For Windows, the initiator name is found in the iSCSI Initiator Properties Panel in the Configuration Tab.

/iscsi/iqn.20…a1/tpgt1/acls> create iqn.1994-05.com.redhat:f5b312caf756   (register initiator — this IQN is the IQN of the initiator — do this for each initiator that will access the target)
Successfully created Node ACL for iqn.1994-05.com.redhat:f5b312caf756
Created mapped LUN 0.
Entering new node /iscsi/iqn.2003-01.org.linux-iscsi.murray.x8664:sn.31fc1a672ba1/tpgt1/acls/iqn.1994-05.com.redhat:f5b312caf756

/iscsi/iqn.20….102.164:3260> cd /

Now, remember to save the configuration. Without this step, the configuration will not be persistent.
/> saveconfig  (SAVE the configuration!)

/> exit


You’ll now need to connect your initiators to the target. Generally you’ll need to provide the IP address of the target to connect to it. After the connection is made, the client systems will see a new disk. The disk will need to be formatted before use.

And that’s it! You’re ready to use your new SAN. Have fun!

Having problems to Set up Low Cost SAN with Linux Software iSCSI Target, read our other helpful articles
Reproduced with permission from Linuxclustering

Filed Under: Clustering Simplified Tagged With: iscsi, set up low cost san with linux software iscsi target, storage

Platforms to replicate data (Host-Based Replication vs SAN Replication)

December 10, 2018 by Jason Aw Leave a Comment

Choosing Platforms To Replicate Data - Host-Based Or Storage-Based?

Choosing Platforms To Replicate Data – Host-Based Or Storage-Based?

Two common platforms to replicate data are from the server host that operates against the data and from the storage array that holds the data.

When creating remote replicas for business continuity, the decision whether to deploy a host- or storage-based solution depends heavily on the platform that is being replicated and the business requirements for the applications that are in use. If the business demands zero impact to operations in the event of a site disaster, then host-based techniques provide the only feasible solution.

Host-Based Replication

One of the two platforms to replicate data is Host-based replication. It doesn’t lock users into a particular storage array from any one vendor. SIOS SteelEye DataKeeper, for example, can replicate from any array to any array, regardless of vendor. This ability ultimately lowers costs and provides users the flexibility to choose what is right for their environment. Most host-based replication solutions can also replicate data natively over IP networks, so users don’t need to buy expensive hardware to achieve this functionality.

Host-based solutions are storage-agnostic, providing IT managers complete freedom to choose any storage that matches the needs of the enterprise. The replication software functions with any storage hardware that can be mounted to the application platform, offering heterogeneous storage support. It can operate at the block or volume level are also ideally suited for cluster configurations.

One disadvantage is that host-based solutions consume server resources and can affect overall server performance. Despite this possibility, a host-based solution might still be appropriate when IT managers need a multi-vendor storage infrastructure or have a legacy investment or internal expertise in a specific host-based application.

Storage-Based Replication

Another platforms to replicate data is the storage-based replication is OS-independent and adds no processing overhead. However, vendors often demand that users replicate from and to similar arrays. This requirement can be costly, especially when you use a high-performance disk at your primary site — and now must use the same at your secondary site. Also, storage-based solutions natively replicate over Fibre Channel and often require extra hardware to send data over IP networks, further increasing costs.

A storage-based alternative does provide the benefit of an integrated solution from a dedicated storage vendor. These solutions leverage the controller of the storage array as an operating platform for replication functionality. The tight integration of hardware and software gives the storage vendor unprecedented control over the replication configuration and allows for service-level guarantees that are difficult to match with alternative replication approaches. Most storage vendors have also tailored their products to complement server virtualization and use key features such as virtual machine storage failover. Some enterprises might also have a long-standing business relationship with a particular storage vendor; in such cases, a storage solution might be a relevant fit.

Choices

High quality of service comes at a cost, however. Storage-based replication invariably sets a precondition of like-to-like storage device configuration. This means that two similarly configured high-end storage arrays must be deployed to support replication functionality, increasing costs and tying the organization to one vendor’s storage solution.

This locking in to a specific storage vendor can be a drawback. Some storage vendors have compatibility restrictions within their storage-array product line, potentially making technology upgrades and data migration expensive. When investigating storage alternatives, IT managers should pay attention to the total cost of ownership: The cost of future license fees and support contracts will affect expenses in the longer term.

Cost is a key consideration, but it is affected by several factors beyond the cost of the licenses. Does the solution require dedicated hardware, or can it be used with pre-existing hardware? Will the solution require network infrastructure expansion and if so, how much? If you are using replication to place secondary copies of data on separate servers, storage, or sites, realize that this approach implies certain hardware redundancies. Replication products that provide options to redeploy existing infrastructure to meet redundant hardware requirements demand less capital outlay.

Pros And Cons

Before deciding between a host- or storage-based replication solution, carefully consider the pros and cons of each, as illustrated in the following table.

Host-Based Replication Storage-Based Replication
Pros
  • Storage agnostic
  • Sync and async
  • Data can reside on any storage
  • Unaffected by storage upgrades
  • Single vendor for storage and replication
  • No burden on host system
  • OS agnostic
Cons
  • Use of computing resources on host


  • Vendor lock-in
  • Higher cost
  • Data must reside on array
  • Distance limitations of Fibre Channel
Best Fit
  • Multi-vendor storage environment
  • Need option of sync or async
  • Implementing failover cluster
  • Replicating to multiple targets
  • Prefer single vendor
  • Limited distance and controlled environment
  • Replicating to single target


To understand how SIOS can work on platforms to replicate data, do read our success stories

Reproduced with permission from Linuxclustering

Filed Under: Clustering Simplified Tagged With: data replication, platforms to replicate data, storage

The Availability Equation – High Availability Solutions

December 9, 2018 by Jason Aw Leave a Comment

The Availability Equation – High Availability Solutions.jpg

The Availability Equation

Are you familiar with the Availability Equation? In a nutshell, this equation shows how the total time needed to restore an application to usability is equal to the time required to detect that an application is experiencing a problem plus the time required to perform a recovery action:

TRESTORE = TDETECT + TRECOVER

Key Concepts Of High Availability Solutions

The equation introduces the key concepts of high availability (HA): clustering, problem detection, and subsequent recovery. HA solutions monitor the health of business application components; when problems are detected, these solutions act to restore them to service. The objective of deploying high availability solutions is to minimize downtime.

Reducing detection and recovery times are two important tasks of any HA solution that you choose to deploy. Today’s applications are combinations of technologies: servers, storage, network infrastructure, and so on. When reviewing your HA options, be certain that you understand the technologies that each solution uses to detect and recover from all outage types. Each technology has a direct impact on service restoration times.

Local Detection And Recovery

High availability solutions are straightforward. One technology that is crucial to providing the fastest possible restoration time is known as local detection and recovery (aka service-level problem detection and recovery). In a basic clustering solution, servers are connected. They are configured that one or more servers can take over the operations of another in the event of a server failure. The server nodes in the cluster continuously send small data packets, often called heartbeat signals, to each other to indicate that they are “alive”.

In simple clustered environments, when one server stops generating heartbeats, other cluster members assume that this server is down. It will then begin the process of taking over responsibility for that server’s domain of operation. This approach is adequate for detecting failure at the server level. But unless problems cause the interruption or cessation of heartbeat signals, server-level detection is inadequate. More than that, it can actually magnify the extent and impact of an outage.

For example, if Apache processes hang, the server may still send heartbeats. Even though the Web server subsystem has ceased to perform its primary function. Rather than restart the Apache subsystem on the same or a different server, a basic server-level clustering solution would restart the entire software stack of the failed server on a backup server, thereby causing interruption to users and extending recovery time.

How It Works

Using local detection and recovery, advanced clustering solutions deploy health-monitoring agents within individual cluster servers, to monitor individual system components such as a file system, a database, user-level application, IP address, and so on. These agents use heuristics that are specific to the monitored component. Therefore, the agents can predict and detect operational issues and then take the most appropriate recovery action. Often, the most efficient recovery method is to stop and restart the problem subsystem on the same server.

The time to restore an application to user availability can be greatly reduced by enabling recovery within the same physical server. Also, by detecting failures at a more granular level than simply by observing server-level heartbeats. Solutions such as the SteelEye Protection Suite for Linux from SIOS  provides this level of detection and recovery for your environment.  Make certain that whichever HA solution you deploy can also support local detection and recovery.

Would you like to enjoy high availability solutions for your projects? Check in with us. Need more references, here are our success stories.
Reproduced with permission from Linuxclustering

Filed Under: Clustering Simplified, Datakeeper Tagged With: Clustering, high availability solutions

12 Checklist Items for Selecting a High-Availability Solution

December 6, 2018 by Jason Aw Leave a Comment

Selecting a High-Availability Solution

12 Checklist Items For Selecting A High-Availability Solution

When selecting a high-availability solution, you should consider several criteria. These range from the total cost of the solution, to the ease with which you can configure and manage the cluster, to the specific restrictions placed on hardware and software. This post touches briefly on 12 of the most important checklist items.

1. Support For Standard OS And Application Versions

Solutions that require enterprise or advanced versions of the OS, database, or application software can greatly reduce the cost benefits of moving to a commodity server environment. Deploy the proper HA middleware. This way, you can make standard versions of applications and OSs highly available. And at the same time, meet the uptime requirements of your business environment.

2. Support For A Variety Of Data Storage Configurations

When you deploy an HA cluster, the data that the protected applications require must be available to all systems that might need to bring the applications into service. You can share this data via data replication, by using shared SCSI or Fibre Channel storage, or by using a NAS device. Whichever method you decide to deploy, the HA product that you use must be able to support all data configurations so that you can change as your business needs dictate.

3. Ability To Use Heterogeneous Solution Components

Some HA clustering solutions require that every system within the cluster has identical configurations. This requirement is common among hardware-specific solutions in which clustering technology is meant to differentiate servers or storage and among OS vendors that want to limit the configurations they are required to support. This restriction limits your ability to deploy scaled-down servers as temporary backup nodes and to reuse existing hardware in your cluster deployment. Deploying identically configured servers might be the correct choice for your needs, but the decision shouldn’t be dictated by your HA solution provider.

4. Support For More Than Two Nodes Within A Cluster

The number of nodes that can be supported in a cluster is an important measure of scalability. Entry-level HA solutions typically limit you to one two-node cluster, usually in active/passive mode. Although this configuration provides increased availability (via the addition of a standby server), it can still leave you exposed to application downtime. In a two-node cluster configuration, if one server is down for any reason, then the remaining server becomes a single point of failure. By clustering three or more nodes, you gain the ability to provide higher levels of protection. At the same time, you can also build highly scalable configurations.

5. Support For Active/Active And Active/Standby Configurations

Selecting a High-Availability Solution to suit your project is key. In an active/standby configuration, one server is idle, waiting to take over the workload of its cluster member. This setup has the obvious disadvantage of underutilizing your compute resource investment. To get the most benefit from your IT expenditure, ensure that cluster nodes can run in an active/active configuration.

6. Detection Of Problems At Node And Individual Service Levels

All HA software products can detect problems with cluster server functionality. This task is done by sending heartbeat signals between servers within the cluster and initiating a recovery if a cluster member stops delivering the signals. But advanced HA solutions can also detect another class of problems. One that occurs when individual processes or services encounter problems that render them unavailable but that do not cause servers to stop sending or responding to heartbeat signals. Given that the primary function of HA software is to ensure that applications are available to end users, detecting and recovering from these service level interruptions is a crucial feature. Ensure that your HA solution can detect both node- and service-level problems.

7. Support For In-Node And Cross-Node Recovery

The ability to perform recovery actions both across cluster nodes and within a node is also important. In cross-node recovery, one node takes over the complete domain of responsibility for another. When systems-level heartbeats are missed, the server which should have sent the heartbeats is assumed to be out of operation, and other cluster members begin recovery operations. With in-node or local recovery, failed system services first attempt to be restored within the server on which they are running. This task is typically done by stopping and restarting the service and any dependent system resources. This recovery method is much faster and minimizes downtime.

8. Transparency To Client Connections Of Server-Side Recovery

Server-side recovery of an application or even of an entire node should be transparent to client-side users. Through the use of virtualized IP addresses or server names, the mapping of virtual compute resources onto physical cluster entities during recovery, and automatic updating of network routing tables, no changes to client systems are necessary for the systems to access recovered applications and data. Solutions that require manual client-side configuration changes to access recovered applications greatly increase recovery time. They introduce the risk of additional errors due to required human interaction. Recovery should be automated on both the servers and clients.

9. Protection For Planned And Unplanned Downtime

In addition to providing protection against unplanned service outages, the HA solution that you deploy should be usable as an administration tool to lessen downtime caused by maintenance activities. By providing a facility to allow on-demand movement of applications between cluster members, you can migrate applications and users onto a second server while performing maintenance on the first. This can eliminate the need for maintenance windows in which IT resources are unavailable to end users. Ensure that your HA solution provides a simple and secure method for performing manual (on-demand) movement of applications and needed resources among cluster nodes.

10. Off-The-Shelf Protection For Common Business Functions

Every HA solution that you evaluate should include tested and supported agents or modules that are designed to monitor the health of specific system resources: file systems, IP addresses, databases, applications, and so on. These modules are often called recovery modules. By deploying vendor-supplied modules, you benefit from both the run-time that the vendor and other customers have already done. You also have the assurance of ongoing support and maintenance of these solution components.

11. Ability To Easily Incorporate Protection For Custom Business Applications

There will likely be applications, perhaps custom to your corporation, that you want to protect but for which there are no vendor-supplied recovery modules. It is important, therefore, that you have a method for easily incorporating your business application into your HA solution’s protection schema. You should be able to do this without modifying your application, and especially without having to embed any vendor-specific APIs. A software developer’s kit that provides examples and a step-by-step process for protecting your application should be available. Also, along with vendor-supplied support services to assist as needed.

12. Ease Of Cluster Deployment And Management

A common myth surrounding HA clusters is that they are costly and complex to deploy and administer. This is not necessarily true. Cluster administration interfaces should be wizard-driven to assist with initial cluster configuration. It should include auto-discovery of new elements as they are added to the cluster. Similarly, it should allow for at-a-glance status monitoring of the entire cluster. Finally, any cluster metadata must be stored in an HA fashion. Not on a single quorum disk within the cluster, where corruption or an outage could cause the entire cluster to fall apart.

By looking for the capabilities on this checklist, you can make the best decision for your particular HA needs.

Selecting a High-Availability Solution isn’t rocket science. Here are our success stories

Reproduced with permission from Linuxclustering

Filed Under: Clustering Simplified Tagged With: High Availability, selecting a high availability solution

Do You Know How Much Bandwidth To Support Real-Time Replication?

December 5, 2018 by Jason Aw Leave a Comment

Bandwidth To Support Real-Time Replication

How Much Bandwidth To Support Real-Time Replication?

When you want to replicate data across multi-site or wide area network (WAN) configurations, you first need to answer one important question: Is there sufficient bandwidth to successfully replicate the partition and keep the mirror in the mirroring state as the source partition is updated throughout the day? Keeping the mirror in the mirroring state is crucial. A partition switchover is allowed only when the mirror is in the mirroring state.

Therefore, an important early step to figure out how much Bandwidth To Support Real-Time Replication is determining your network bandwidth requirements. How can you measure the rate of change—the value that indicates the amount of network bandwidth needed to replicate your data?

Establish Basic Rate of Change

First, use these commands to determine the basic daily rate of change for the files or partitions that you want to mirror; for example, to measure the amount of data written in a day for /dev/sda3, run this command at the beginning of the day:

MB_START=`awk ‘/sda3 / { print $10 / 2 / 1024 }’ /proc/diskstats`

Wait for 24 hours, then run this command:

MB_END=`awk ‘/sda3 / { print $10 / 2 / 1024 }’ /proc/diskstats`

The daily rate of change, in megabytes, is then MB_END – MB_START.

The amounts of data that you can push through various network connections are as follows:

  • For T1 (1.5Mbps): 14,000 MB/day (14 GB)
  • For T3 (45Mbps): 410,000 MB/day (410 GB)
  • For Gigabit (1Gbps): 5,000,000 MB/day (5 TB)

Establish Detailed Rate of Change

What’s next to calculate Bandwidth To Support Real-Time Replication? You’ll need to measure detailed rate of change. The best way to collect this data is to log disk write activity for some period (e.g., one day) to determine the peak disk write periods. To do so, create a cron job that will log the timestamp of the system followed by a dump of /proc/diskstats. For example, to collect disk stats every 2 minutes, add this link to /etc/crontab:

*/2 * * * * root ( date ; cat /proc/diskstats ) >> /path_to/filename.txt

Wait for the determined period (e.g., one day, one week), then disable the cron job and save the resulting /proc/diskstats output file in a safe location.

Analyze and Graph Detailed Rate of Change Data

Next you should analyze the detailed rate of change data. You can use the roc-calc-diskstats utility for this task. This utility takes the /proc/diskstats output file and calculates the rate of change of the disks in the dataset. To run the utility, use this command:

# ./roc-calc-diskstats <interval> <start_time> <diskstats-data-file> [dev-list]

For example, the following dumps a summary (with per-disk peak I/O information) to the output file results.txt:

# ./roc-calc-diskstats 2m “Jul 22 16:04:01” /root/diskstats.txt sdb1,sdb2,sdc1 > results.txt

Here are sample results from the results.txt file:

Sample start time: Tue Jul 12 23:44:01 2011

Sample end time: Wed Jul 13 23:58:01 2011

Sample interval: 120s #Samples: 727 Sample length: 87240s

(Raw times from file: Tue Jul 12 23:44:01 EST 2011, Wed Jul 13 23:58:01 EST 2011)

Rate of change for devices dm-31, dm-32, dm-33, dm-4, dm-5, total

dm-31 peak:0.0 B/s (0.0 b/s) (@ Tue Jul 12 23:44:01 2011) average:0.0 B/s (0.0 b/s)

dm-32 peak:398.7 KB/s (3.1 Mb/s) (@ Wed Jul 13 19:28:01 2011) average:19.5 KB/s (156.2 Kb/s)

dm-33 peak:814.9 KB/s (6.4 Mb/s) (@ Wed Jul 13 23:58:01 2011) average:11.6 KB/s (92.9 Kb/s)

dm-4 peak:185.6 KB/s (1.4 Mb/s) (@ Wed Jul 13 15:18:01 2011) average:25.7 KB/s (205.3 Kb/s)

dm-5 peak:2.7 MB/s (21.8 Mb/s) (@ Wed Jul 13 10:18:01 2011) average:293.0 KB/s (2.3 Mb/s)

total peak:2.8 MB/s (22.5 Mb/s) (@ Wed Jul 13 10:18:01 2011) average:349.8 KB/s (2.7 Mb/s)

To help you understand your specific bandwidth needs over time, you can graph the detailed rate of change data. The following dumps graph data to results.csv (as well as dumping the summary to results.txt):

# export OUTPUT_CSV=1

# ./roc-calc-diskstats 2m “Jul 22 16:04:01” /root/diskstats.txt sdb1,sdb2,sdc1 2> results.csv > results.txt

SIOS has created a template spreadsheet, diskstats-template.xlsx, which contains sample data that you can overwrite with your data from roc-calc-diskstats. The following series of images show the process of using the spreadsheet.

  1. Open results.csv, and select all rows, including the total column.

Bandwidth To Support Real-Time Replication

  1. Open diskstats-template.xlsx, select the diskstats.csv worksheet.

2-diskstats-worksheet

  1. In cell 1-A, right-click and select Insert Copied Cells.
  2. Adjust the bandwidth value in the cell towards the bottom left of the worksheet (as marked in the following figure) to reflect the amount of bandwidth (in megabits per second) that you have allocated for replication. The cells to the right are automatically converted to bytes per second to match the collected raw data.

3-extend-existing-bandwidth_536x96

  1. Take note of the following row and column numbers:
    • Total (row 6 in the following figure)
    • Bandwidth (row 9 in the following figure)
    • Last datapoint (column R in the following figure)

4-note-row-colums_535x86

  1. Select the bandwidth vs ROC worksheet.

5-bandwidth-worksheet

  1. Right-click the graph and choose Select Data.
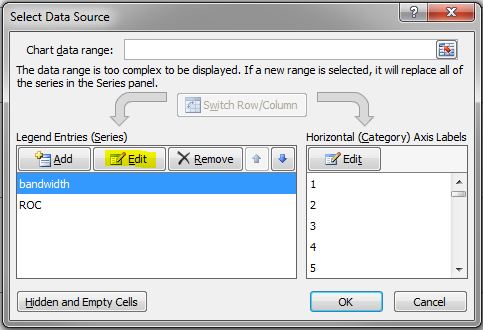
  2. In the Select Data Source dialog box, choose bandwidth in the Legend Entries (Series) list, and then click Edit.

6-edit-bandwidth

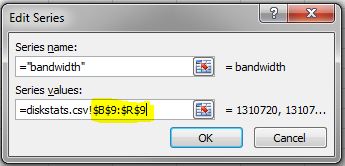
  1. In the Edit Series dialog box, use the following syntax in the Series values field: =diskstats.csv!$B$<row>:$<final_column>$<row> The following figure shows the series values for the spread B9 to R9.

7-bandwidth-values

  1. Click OK to close the Edit Series box.
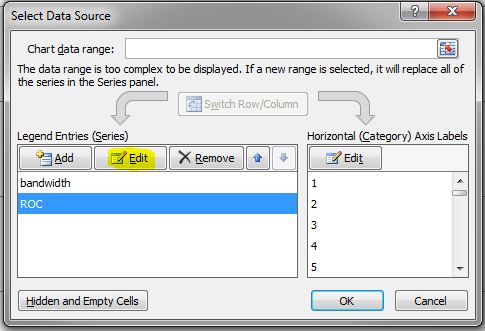
  2. In the Select Data Source box, choose ROC in the Legend Entries (Series) list, and then click Edit.

8-edit-roc

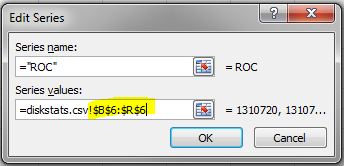
  1. In the Edit Series dialog box, use the following syntax in the Series values field: =diskstats.csv!$B$<row>:$<final_column>$<row> The following figure shows the series values for the spread B6 to R6.

9-roc-values

  1. Click OK to close the Edit Series box, then click OK to close the Select Data Source box.

The Bandwidth vs ROC graph updates. Analyze your results to determine whether you have sufficient bandwidth to support data replication.

Next Steps

If your Rate of Change exceeds your available bandwidth, you will need to consider some of the following points to ensure your replication solution performs optimally:

  • Enable compression in your replication solution or in the network hardware. (DataKeeper for Linux, which is part of the SteelEye Protection Suite for Linux, supports this type of compression.)
  • Create a local, non-replicated storage repository for temporary data and swap files that don’t need to be replicated.
  • Reduce the amount of data being replicated.
  • Increase your network capacity.

For quick how-tos like figuring Bandwidth To Support Real-Time Replication, read our blog

Reproduced with permission from Linuxclustering

Filed Under: Clustering Simplified Tagged With: bandwidth to support real time replication, data replication

  • « Previous Page
  • 1
  • 2
  • 3
  • Next Page »

Recent Posts

  • Transitioning from VMware to Nutanix
  • Are my servers disposable? How High Availability software fits in cloud best practices
  • Data Recovery Strategies for a Disaster-Prone World
  • DataKeeper and Baseball: A Strategic Take on Disaster Recovery
  • Budgeting for SQL Server Downtime Risk

Most Popular Posts

Maximise replication performance for Linux Clustering with Fusion-io
Failover Clustering with VMware High Availability
create A 2-Node MySQL Cluster Without Shared Storage
SAP for High Availability Solutions For Linux
Bandwidth To Support Real-Time Replication
The Availability Equation – High Availability Solutions.jpg
Choosing Platforms To Replicate Data - Host-Based Or Storage-Based?
Guide To Connect To An iSCSI Target Using Open-iSCSI Initiator Software
Best Practices to Eliminate SPoF In Cluster Architecture
Step-By-Step How To Configure A Linux Failover Cluster In Microsoft Azure IaaS Without Shared Storage azure sanless
Take Action Before SQL Server 20082008 R2 Support Expires
How To Cluster MaxDB On Windows In The Cloud

Join Our Mailing List

Copyright © 2025 · Enterprise Pro Theme on Genesis Framework · WordPress · Log in