Quick Start Guide to High Availability for SQL Server Using SIOS Protection Suite for Linux
This guide is intended to illustrate Microsoft SQL Server protection using SIOS Protection Suite for Linux. The environment used here is VMware ESXi with virtual machines added running CentOS 7.6. Microsoft SQL 2017 is being used to create a database server. Database and transaction logs will be stored on local disks that will be replicated between nodes using DataKeeper – demonstrating that shared storage could be used as a simple replacement for local disks.
This guide is available here as a pdf.
Download Required Microsoft Software
- Open the following Microsoft guide to installing SQL at https://docs.microsoft.com/en-us/sql/linux/sql-server-linux-setup?view=sql-server-ver15
Plan SQL Environment Configuration
The following configuration settings will be used for creating the cluster environment described by this quick-start guide. Adapt your configuration settings according to your specific system environment.
General Configuration
- The example we installed during this quick start guide uses CentOS. The Red Hat instructions apply since CentOS is binary compatible with Red Hat.
- The example in this quick start guide will be very similar, whether they are running in a VMware environment, cloud or physical installations.
Node 1 configuration
- Hostname: IMAMSSQL-1
- Public IP: 192.168.4.21
- Private IP: 10.1.4.21
- /dev/sdb (10GiB)
- /dev/sdc (10GiB)
Node 2 configuration
- Hostname: IMAMSSQL-2
- Public IP: 192.168.4.22
- Private IP: 10.1.4.22
- /dev/sdb (10GiB)
- /dev/sdc (10GiB)
Virtual IP used for SQL Access
- 168.4.20, this will be protected by LifeKeeper and “floats” between nodes
Operating System
- CentOS 7.6
SQL Database Configuration
- SQL Database:
- SQL Virtual Hostname: IMAMSSQL
- SQL Virtual IP: 192.168.4.20
SQL File System Mount Points
- /database/data
- /database/xlog
PREPARE SYSTEM FOR INSTALLATION
Installing MS-SQL
Initial SQL install
In this section we will add the Microsoft package location into our Linux OS and then instruct the OS to install SQL Server.
- Open the following Microsoft guide to installing SQL Server:
https://docs.microsoft.com/en-us/sql/linux/sql-server-linux-setup?view=sql-server-ver15 - Login with root privilege or you use sudo before each command
- curl -o /etc/yum.repos.d/mssql-server.repo
https://packages.microsoft.com/config/rhel/7/mssql-server-2017.repo - yum install -y mssql-server
- /opt/mssql/bin/mssql-conf setup, I installed my SQL Server with an Evaluation license
- yum install -y mssql-tools unixODBC-devel
- echo ‘export PATH=”$PATH:/opt/mssql-tools/bin”‘ >> ~/.bash_profile
- echo ‘export PATH=”$PATH:/opt/mssql-tools/bin”‘ >> ~/.bashrc
- source ~/.bashrc
- systemctl stop mssql-server.service, we stop the SQL service and cannot start the SQL service
until we have configured the disks used as storage in the section titled
“Create database and transaction log file-systems and mount points”. - /opt/mssql/bin/mssql-conf set filelocation.masterdatafile /database/data/master.mdf
- /opt/mssql/bin/mssql-conf set filelocation.masterlogfile /database/xlog/mastlog.ldf
Create database and transaction log file-systems and mount points
We will use the xfs file-system type for this installation. Refer to LifeKeeper supported file-system types to determine which file-system you want to configure. Make sure you configure the disk to use GUID identifiers. Here we will partition and format the locally attached disks; mount, create and permission the database locations we want SQL to use, finally we will start SQL which will create new Master DB and transaction logs in the location we specified. Note when creating the partition, DataKeeper requires the number of blocks in the partition to be odd. E.g. 20973567 (end) – 2048 (start) = 20971519.
- fdisk /dev/sdb
- mkfs -t xfs /dev/sdb1
- fdisk /dev/sdc
- mkfs -t xfs /dev/sdc1
- mkdir /database; mkdir /database/data; mkdir /database/xlog
- chown mssql /database/; chgrp mssql /database/
- chown mssql /database/data/; chgrp mssql /database/data/
- chown mssql /database/xlog/; chgrp mssql /database/xlog/
- vi /etc/fstab
- Add /dev/sdb1 mounting to /database/data, e.g. /dev/sdb1 /database/data xfs defaults 0 0
- Add /dev/sdb1 mounting to /database/xlog, e.g. /dev/sdb1 /database/xlog xfs defaults 0 0
- mount /dev/sdb1
- mount /dev/sdc1
- chown mssql /database/data/; chgrp mssql /database/data/
- chown mssql /database/xlog/; chgrp mssql /database/xlog/
- systemctl start mssql-server.service, we start the SQL service now that local disks are mounted
– this will create new Master DB and transaction logs
Installing LifeKeeper
Refer to the Installation Guide
http://docs.us.sios.com/spslinux/9.5.1/en/topic/sios-protection-suite-for-linux-installation-guide
Create LifeKeeper Resource Hierarchies
Open the LifeKeeper GUI on the primary node:
# /opt/LifeKeeper/bin/lkGUIapp &
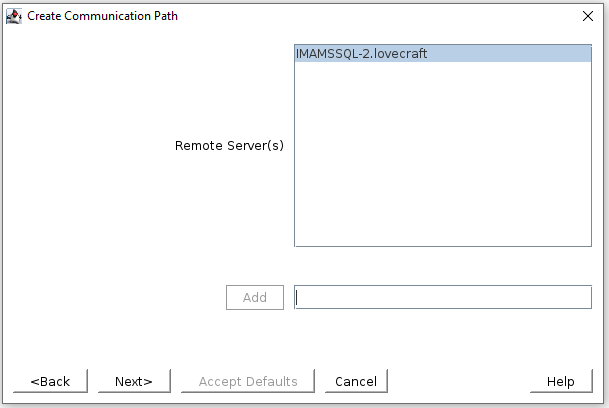
Communication Paths
Create backend and/or frontend IP routes, in our case backend is 10.2.4.21 & 22 and frontend is 192.168.4.21 & 22
- [AWS only] Right-click on each instance in the AWS Management Console and select Networking → Change Source/Dest. Check and ensure that source/destination checking is disabled.
- In the LifeKeeper GUI, click Create Comm Path.
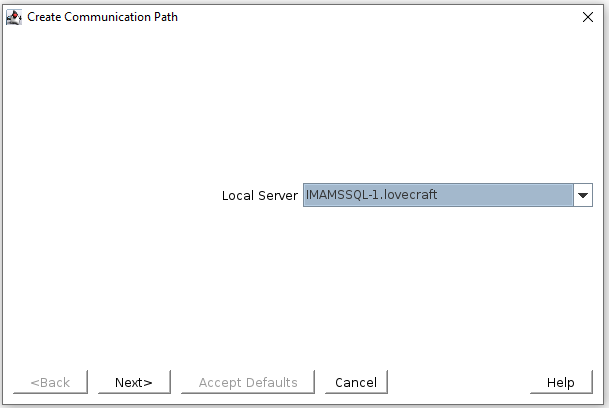
- In the Remote Server(s) dialog, add the host names of the other cluster nodes and select them.
- Select the appropriate local (10.2.4.21) and remote (10.2.4.22) IP addresses.
- Repeat this process, creating communication paths between all pairs of remote nodes for each network (e.g., 12.0.1.30 and 12.0.2.30). After completion, communication paths should exist between all pairs of cluster nodes.
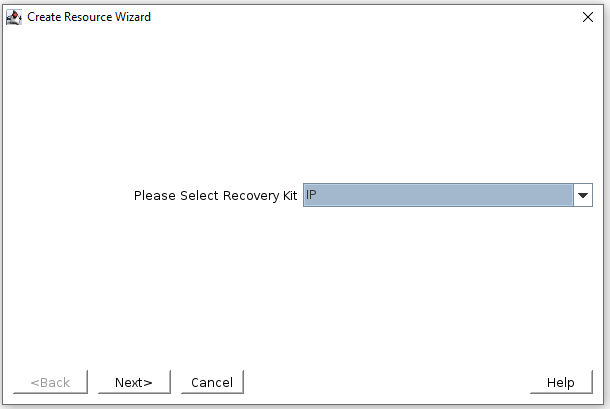
IP Resources
The IP resource is the virtual IP that will be used to access the SQL server – in this case 192.168.4.20
- Verify that all of the virtual IP’s have been removed from the network interface by running
‘ip addr show’. - Create the IP resource for the MSSQL virtual IP.
- In the LifeKeeper GUI, click Create Resource Hierarchy and select IP.
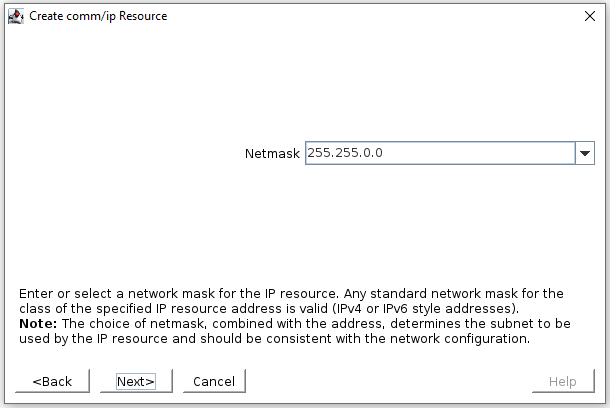
4. When prompted, enter the IP 192.168.4.20 and choose the subnet mask 255.255.0.0.
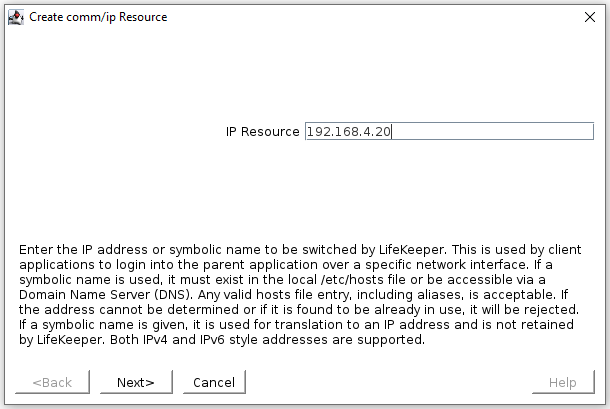
5. Enter a tag name such as ip-192.168.4.20-MSSQL.
DataKeeper Resources
This is the drives used to store the database and transaction logs, /database/data and /database/xlog
Data Replication Resources
- Ensure that all SQL file systems are mounted at the appropriate mount points under /database on the primary cluster node.
# mount
…
/dev/sdb1 on /database/data type xfs (rw,relatime,attr2,inode64,noquota)
/dev/sdc1 on /database/xlog type xfs (rw,relatime,attr2,inode64,noquota)
…
2.Ensure that the file systems are not mounted on the backup cluster node(s).
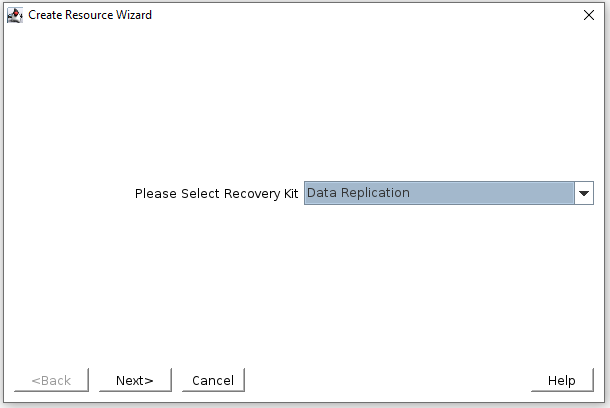
3. In the LifeKeeper GUI, click Create Resource Hierarchy and select Data Replication.
4. For Hierarchy Type, select Replicate Existing Filesystem.
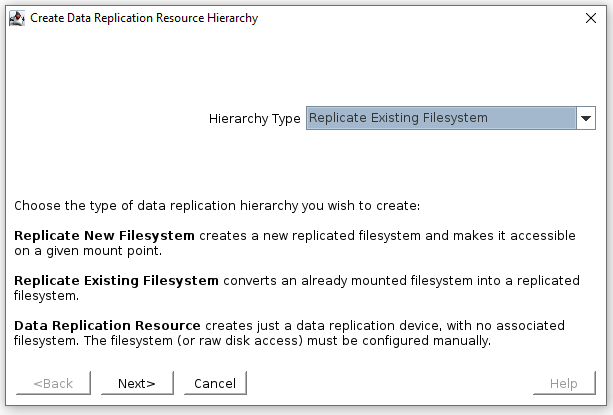
5. For Existing Mount Point, select /database/data
6. Select the appropriate values for the rest of the creation dialogs as appropriate for your environment
Repeat steps 3-6 for the /database/data and /database/xlog file systems.
Quick-Service Protection
We will use LifeKeeper’s Quick Service Protection ARK to protect the mssql-server service, this will monitor the MSSQL service and make sure it’s running.
- Use systemctl status mssql-server.service on node 1 to ensure MSSQL is running
- Use systemctl status mssql-server.service on node 2 to ensure that MSSQL isn’t running, if it is then you will need to stop the service using systemctl stop mssql-server.service, then unmount the /database/data and /database/xlog directories.
- In the LifeKeeper GUI, click add resource
- Select the QSP ARK from the drop-down
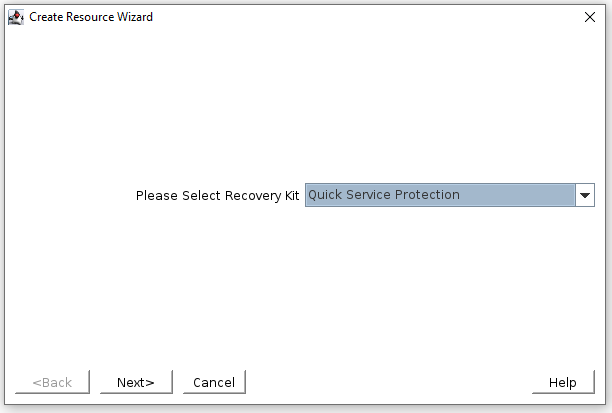
- When the list of services available populates, choose mssql-server.service
- Select the appropriate values for the rest of the creation dialogs as appropriate for your environment
- Extend the hierarchy to node 2
- At the linux CLI on node 1, run “/opt/LifeKeeper/bin/lkpolicy -g –v”, output will look similar to this:
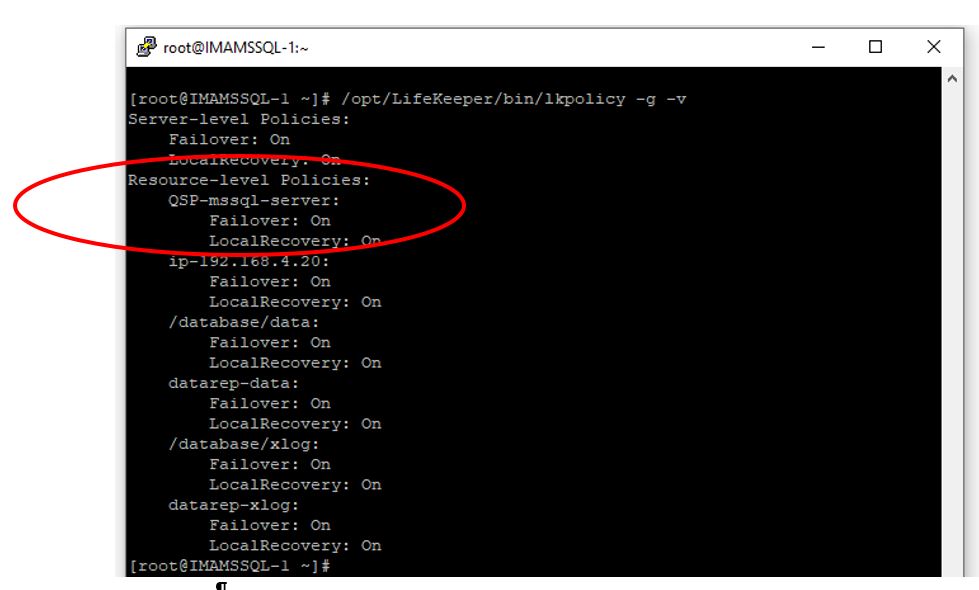
- If LocalRecovery: On is set for QSP-mssql-server then we need to disable local recovery on both nodes, this is done by executing (on both nodes):
- /opt/LifeKeeper/bin/lkpolicy -s LocalRecovery -E tag=”QSP-mssql-server”
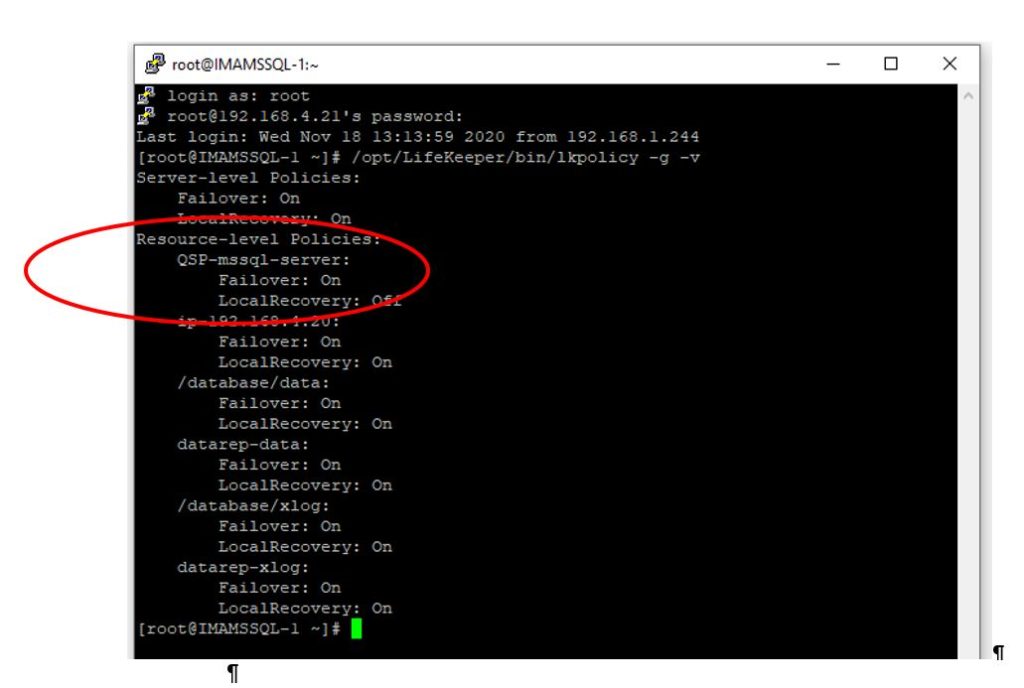
- Confirm that Local Recovery is disabled on both nodes, “/opt/LifeKeeper/bin/lkpolicy -g –v” :
Reproduced from SIOS