SIOS SANless clusters

SIOS SANless clusters High-availability Machine Learning monitoring

  • Home
  • Products
    • SIOS DataKeeper for Windows
    • SIOS Protection Suite for Linux
  • News and Events
  • Clustering Simplified
  • Success Stories
  • Contact Us
  • English
  • 中文 (中国)
  • 中文 (台灣)
  • 한국어
  • Bahasa Indonesia
  • ไทย

Archives for February 2021

How to Fix Inherited Application Availability Problems

February 26, 2021 by Jason Aw Leave a Comment

How to Fix Inherited Application Availability Problems


How to Fix Inherited Application Availability Problems

What to do when you inherit a mess

I grew up in a large immediate family, and an even larger group of well-meaning aunts, uncles, and family friends.  Anyone who has ever been a part of a large family has probably, on more than one occasion, received a hand-me-down or had well-intentioned relatives give you a freebie. And if so, you know that beneath the surface of that cool-sounding inheritance, the rumored stylish clothes, or the old “family car” a nightmare could be lurking.  Suddenly, your sudden fortune on four wheels feels like a curse that is two-thirds money pit and one third eye-sore.

So what do you do when you inherit a mess of Application Availability Problems?  Well some DIYers bring in the dumpsters and start fresh. But this isn’t HGTV and we aren’t talking about inherited furniture but an inherited application availability problem. You usually know you have a mess on your hands the first time you try to do a cluster switchover for simple, planned maintenance and your application goes offline.  Now, what do you do when you have inherited a high availability mess.

Two Practical Tips For When You Inherit A High Availability Mess (I mean responsibility)

I. Research

Perhaps one of the best things you can do before taking action is to gather as much data as quickly as possible.  Of course, the state of your inheritance might indicate the speed at which you’ll need to gather your data.  Some key things to consider during your research of to solve your Application Availability Problems:

  1. Previous owner. Research the previous owner of the configuration including their chain of command, reach of authority, background, team dynamics and if possible, charter.  Find out what were the original organizational structures.
  2. Research what was done in the past to achieve high or higher availability, and what was left out.  In some environments, the focus for high availability falls squarely on a portion of the infrastructure while neglecting the larger workflow. Dig into any available requirements. As well as what changes have been implemented or added since the requirements were originally instated.  If you’re in the midst of a cloud migration, understand the goals of moving this environment to the cloud.
  3. Owners and requirements provide a lot of history. However, you’ll also want to research why key decision makers made the choices and tradeoffs on designs and solutions, as well as software and hardware architecture requirements.  Evaluate whether these choices were either successful or unsuccessful. Your research should focus on original problems and proposed solutions.
  4. You may also want to consider why the environment you inherited feels like a mess.  For example, is it due to lack of documentation, training, poor or missing design details, the absence of a run book, or other specification details.
  5. Research what, if any, enterprise grade high availability software solutions have been used to complement the architecture of virtual machines, networks, and applications. Is there a current incumbent?  If not, what were the previous methods for availability?

II. Act

Once you’ve gathered this research, your next step is to act: update, improve, implement, or replace.  Don’t make the mistake of crossing your fingers and hoping you never need a cluster failover.

  1. Upgrade

    In some cases, your research will lead to a better understanding of the incumbent solution and a path to upgrade that solution to the latest version.  Honestly, we have been there with our own customers.  Transitions are mishandled. A solution that works flawlessly for years becomes outdated.

  2. Improve

    Consider alternatives if an upgrade is not warranted. If the data points to other areas of improvement such as software or hardware tuning, migration to cloud or hybrid, network tuning, or some other identified risk or single point of failure.  Perhaps your environment is due for a health check or the increases in your workload warrants an improvement in your instance sizes, disk types, or other parameters.

  3. Implement

    In other cases, your research will uncover some startling details regarding the lack of a higher availability strategy or solution. In which case, you will use your research as a catalyst to design and implement a high availability solution. This solution might necessitate private cloud, public cloud, or hybrid cloud architectures coupled with the enterprise grade HA software to enable successful monitoring and recovery.

  4. Replace

    In extreme cases, your research will lead you to a full replacement of the current environment. Sometimes this is required when a customer or partner migrated to the cloud. But their high availability software offering was not cloud ready. While many applications boast of being cloud ready, in some cases this is more slideware than reality.  Your on-premise solution is not cloud ready? Then your only recourse may be to go with a solution that is capable of making the cloud journey with you, such as the SIOS Protection Suite products.

As VP of Customer Experience for SIOS Technology I experienced a situation that shows the importance of these steps – when our Services team was engaged by an enterprise partner to deploy SIOS Protection Suite products.  As we worked jointly with the customer, doing research, we uncovered a wealth of history. The customer professed to have a limited number of downtime or availability issues. But our research revealed an unsustainable and highly complex hierarchy of alerts, manually executed scripts, global teams, and hodgepodge of tools kludged together. We were able to successfully architect and replace their homemade solution with a much more elegant and automated solution with this information. Best part, it was wizard based, including automated monitoring, recovery, and system failover protection. No more kludge. No more trial-and-error DIY. Just simple, reliable application failover and failback for HA/DR protection.

If you have inherited a host of Application Availability Problems, contact the deployment and availability experts at SIOS Technology Corp. Our team can walk you through the research process, help you hone your requirements. Finally, upgrade, improve, replace or implement the solution to provide your enterprise with higher availability.

– Cassius Rhue, Vice President, Customer Experience

Reproduced from SIOS

Filed Under: Clustering Simplified Tagged With: Application availability, High Availability, high availability - SAP, sios protection suite

Quick Start Guide to High Availability for SQL Server Using SIOS Protection Suite for Linux

February 18, 2021 by Jason Aw Leave a Comment

Quick Start Guide to High Availability for SQL Server Using SIOS Protection Suite for Linux


Quick Start Guide to High Availability for SQL Server Using SIOS Protection Suite for Linux

This guide is intended to illustrate Microsoft SQL Server protection using SIOS Protection Suite for Linux. The environment used here is VMware ESXi with virtual machines added running CentOS 7.6. Microsoft SQL 2017 is being used to create a database server. Database and transaction logs will be stored on local disks that will be replicated between nodes using DataKeeper – demonstrating that shared storage could be used as a simple replacement for local disks.

This guide is available here as a pdf.

Download Required Microsoft Software

  1. Open the following Microsoft guide to installing SQL at https://docs.microsoft.com/en-us/sql/linux/sql-server-linux-setup?view=sql-server-ver15

Plan SQL Environment Configuration

The following configuration settings will be used for creating the cluster environment described by this quick-start guide. Adapt your configuration settings according to your specific system environment.

General Configuration

  1. The example we installed during this quick start guide uses CentOS. The Red Hat instructions apply since CentOS is binary compatible with Red Hat.
  2. The example in this quick start guide will be very similar, whether they are running in a VMware environment, cloud or physical installations.

Node 1 configuration

  • Hostname: IMAMSSQL-1
  • Public IP: 192.168.4.21
  • Private IP: 10.1.4.21
  • /dev/sdb (10GiB)
  • /dev/sdc (10GiB)

Node 2 configuration

  • Hostname: IMAMSSQL-2
  • Public IP: 192.168.4.22
  • Private IP: 10.1.4.22
  • /dev/sdb (10GiB)
  • /dev/sdc (10GiB)

Virtual IP used for SQL Access

  • 168.4.20, this will be protected by LifeKeeper and “floats” between nodes

Operating System

  • CentOS 7.6

SQL Database Configuration

  • SQL Database:
  • SQL Virtual Hostname: IMAMSSQL
  • SQL Virtual IP: 192.168.4.20

SQL File System Mount Points

  • /database/data
  • /database/xlog

PREPARE SYSTEM FOR INSTALLATION

Installing MS-SQL

Initial SQL install

In this section we will add the Microsoft package location into our Linux OS and then instruct the OS to install SQL Server.

  1. Open the following Microsoft guide to installing SQL Server:
    https://docs.microsoft.com/en-us/sql/linux/sql-server-linux-setup?view=sql-server-ver15
  2. Login with root privilege or you use sudo before each command
  3. curl -o /etc/yum.repos.d/mssql-server.repo
    https://packages.microsoft.com/config/rhel/7/mssql-server-2017.repo
  4. yum install -y mssql-server
  5. /opt/mssql/bin/mssql-conf setup, I installed my SQL Server with an Evaluation license
  6. yum install -y mssql-tools unixODBC-devel
  7. echo ‘export PATH=”$PATH:/opt/mssql-tools/bin”‘ >> ~/.bash_profile
  8. echo ‘export PATH=”$PATH:/opt/mssql-tools/bin”‘ >> ~/.bashrc
  9. source ~/.bashrc
  10. systemctl stop mssql-server.service, we stop the SQL service and cannot start the SQL service
    until we have configured the disks used as storage in the section titled
    “Create database and transaction log file-systems and mount points”.
  11. /opt/mssql/bin/mssql-conf set filelocation.masterdatafile /database/data/master.mdf
  12. /opt/mssql/bin/mssql-conf set filelocation.masterlogfile /database/xlog/mastlog.ldf

Create database and transaction log file-systems and mount points

We will use the xfs file-system type for this installation. Refer to LifeKeeper supported file-system types to determine which file-system you want to configure. Make sure you configure the disk to use GUID identifiers. Here we will partition and format the locally attached disks; mount, create and permission the database locations we want SQL to use, finally we will start SQL which will create new Master DB and transaction logs in the location we specified. Note when creating the partition, DataKeeper requires the number of blocks in the partition to be odd. E.g. 20973567 (end) – 2048 (start) = 20971519.

  1. fdisk /dev/sdb
  2. mkfs -t xfs /dev/sdb1
  3. fdisk /dev/sdc
  4. mkfs -t xfs /dev/sdc1
  5. mkdir /database; mkdir /database/data; mkdir /database/xlog
  6. chown mssql /database/; chgrp mssql /database/
  7. chown mssql /database/data/; chgrp mssql /database/data/
  8. chown mssql /database/xlog/; chgrp mssql /database/xlog/
  9. vi /etc/fstab
    1. Add /dev/sdb1 mounting to /database/data, e.g. /dev/sdb1 /database/data xfs defaults 0 0
    2. Add /dev/sdb1 mounting to /database/xlog, e.g. /dev/sdb1 /database/xlog xfs defaults 0 0
  10. mount /dev/sdb1
  11. mount /dev/sdc1
  12. chown mssql /database/data/; chgrp mssql /database/data/
  13. chown mssql /database/xlog/; chgrp mssql /database/xlog/
  14. systemctl start mssql-server.service, we start the SQL service now that local disks are mounted
    – this will create new Master DB and transaction logs

Installing LifeKeeper

Refer to the Installation Guide
http://docs.us.sios.com/spslinux/9.5.1/en/topic/sios-protection-suite-for-linux-installation-guide

Create LifeKeeper Resource Hierarchies

Open the LifeKeeper GUI on the primary node:

# /opt/LifeKeeper/bin/lkGUIapp &

Communication Paths

Create backend and/or frontend IP routes, in our case backend is 10.2.4.21 & 22 and frontend is 192.168.4.21 & 22

  1. [AWS only] Right-click on each instance in the AWS Management Console and select Networking → Change Source/Dest. Check and ensure that source/destination checking is disabled.
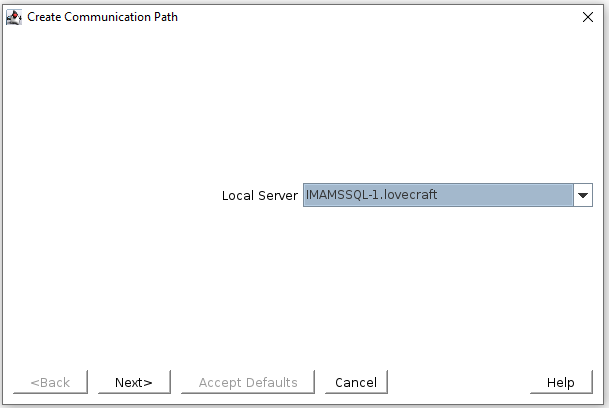
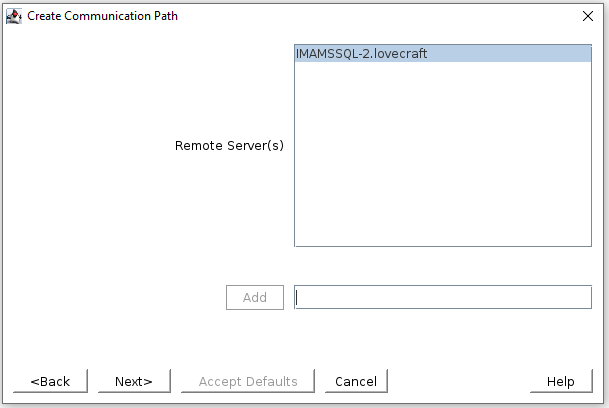
  2. In the LifeKeeper GUI, click Create Comm Path.
  3. In the Remote Server(s) dialog, add the host names of the other cluster nodes and select them.


  1. Select the appropriate local (10.2.4.21) and remote (10.2.4.22) IP addresses.
  2. Repeat this process, creating communication paths between all pairs of remote nodes for each network (e.g., 12.0.1.30 and 12.0.2.30).  After completion, communication paths should exist between all pairs of cluster nodes.

IP Resources

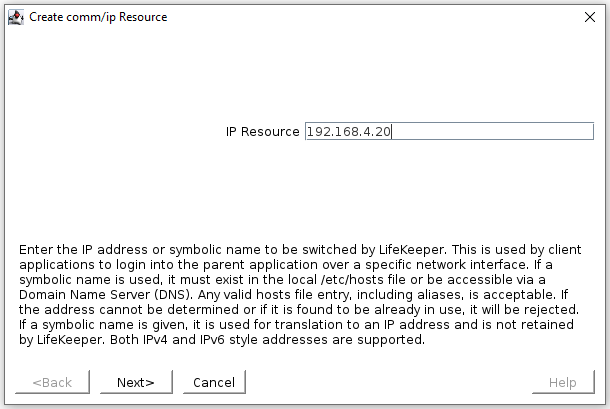
The IP resource is the virtual IP that will be used to access the SQL server – in this case 192.168.4.20

  1. Verify that all of the virtual IP’s have been removed from the network interface by running
    ‘ip addr show’.
  2. Create the IP resource for the MSSQL virtual IP.
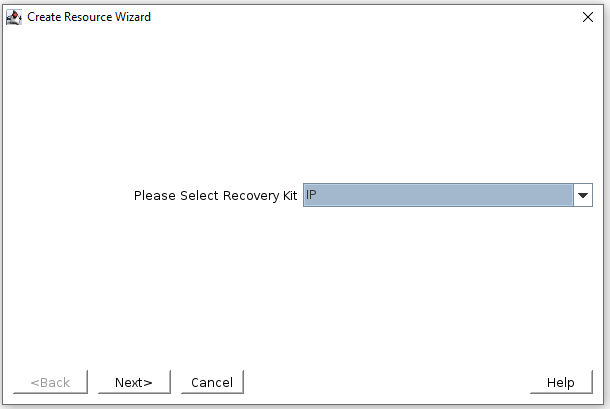
  3. In the LifeKeeper GUI, click Create Resource Hierarchy and select IP.


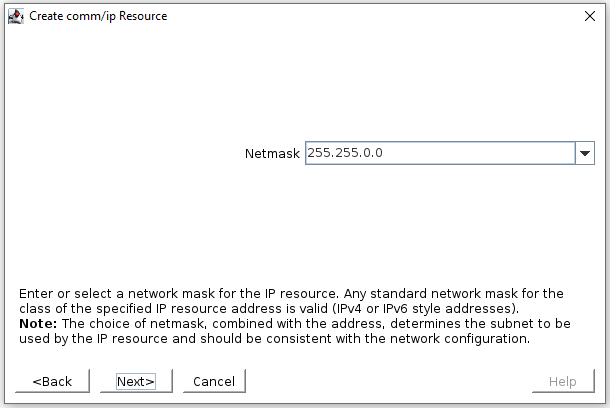
4. When prompted, enter the IP 192.168.4.20 and choose the subnet mask 255.255.0.0.


5. Enter a tag name such as ip-192.168.4.20-MSSQL.

DataKeeper Resources

This is the drives used to store the database and transaction logs, /database/data and /database/xlog

Data Replication Resources

  1. Ensure that all SQL file systems are mounted at the appropriate mount points under /database on the primary cluster node.
    # mount
    …
    /dev/sdb1 on /database/data type xfs (rw,relatime,attr2,inode64,noquota)

/dev/sdc1 on /database/xlog type xfs (rw,relatime,attr2,inode64,noquota)
…

2.Ensure that the file systems are not mounted on the backup cluster node(s).

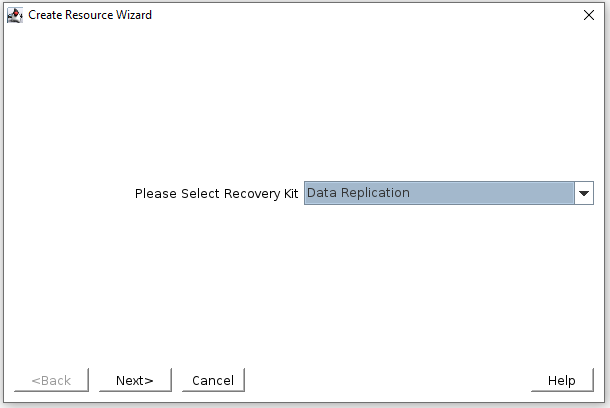
3.  In the LifeKeeper GUI, click Create Resource Hierarchy and select Data Replication.


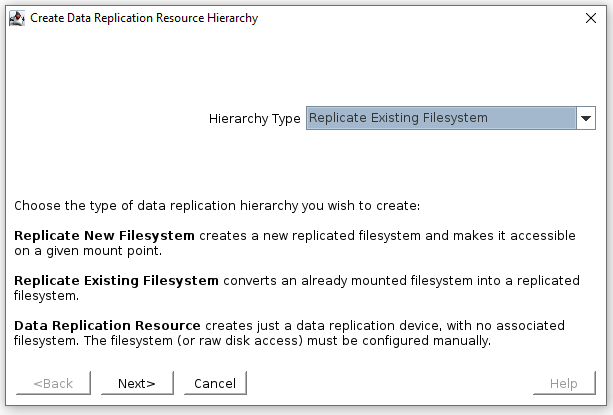
4. For Hierarchy Type, select Replicate Existing Filesystem.

5. For Existing Mount Point, select /database/data

6. Select the appropriate values for the rest of the creation dialogs as appropriate for your environment

Repeat steps 3-6 for the /database/data and /database/xlog file systems.

Quick-Service Protection

We will use LifeKeeper’s Quick Service Protection ARK to protect the mssql-server service, this will monitor the MSSQL service and make sure it’s running.

  1. Use systemctl status mssql-server.service on node 1 to ensure MSSQL is running
  2. Use systemctl status mssql-server.service on node 2 to ensure that MSSQL isn’t running, if it is then you will need to stop the service using systemctl stop mssql-server.service, then unmount the /database/data and /database/xlog directories.
  3. In the LifeKeeper GUI, click add resource
  4. Select the QSP ARK from the drop-down
  5. When the list of services available populates, choose mssql-server.service
  6. Select the appropriate values for the rest of the creation dialogs as appropriate for your environment
  7. Extend the hierarchy to node 2
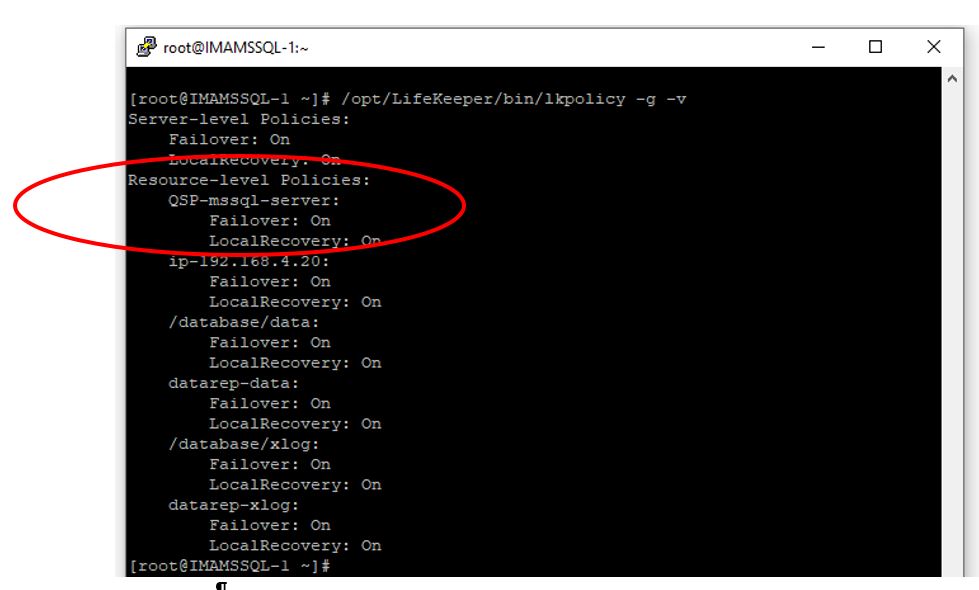
  8. At the linux CLI on node 1, run “/opt/LifeKeeper/bin/lkpolicy -g –v”, output will look similar to this:
  9. If LocalRecovery: On is set for QSP-mssql-server then we need to disable local recovery on both nodes, this is done by executing (on both nodes):
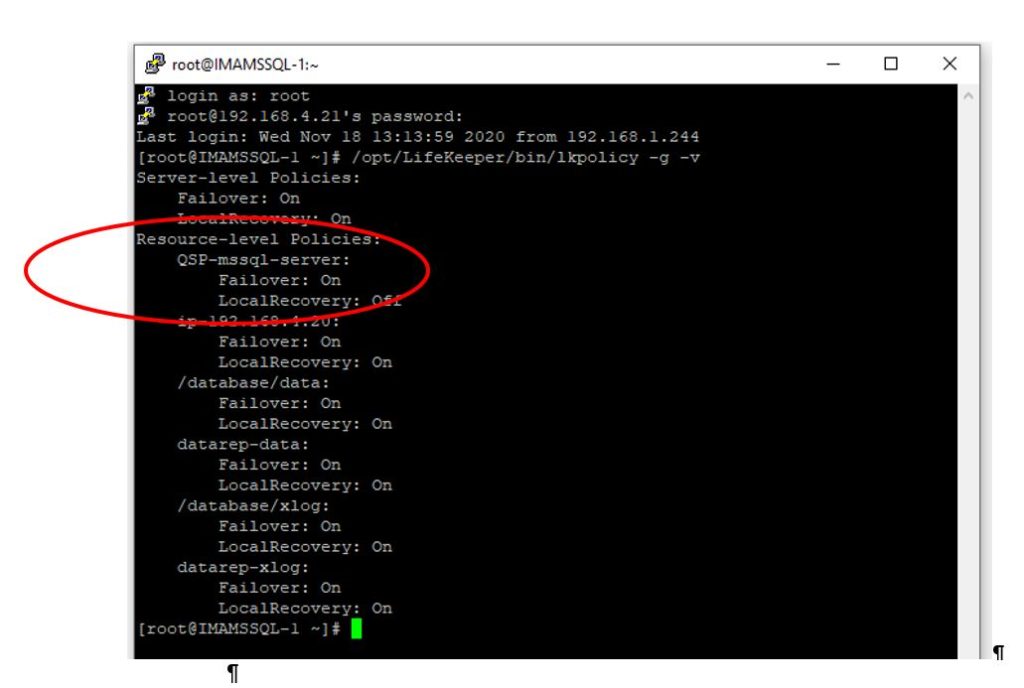
  10. /opt/LifeKeeper/bin/lkpolicy -s LocalRecovery -E tag=”QSP-mssql-server”
  11. Confirm that Local Recovery is disabled on both nodes, “/opt/LifeKeeper/bin/lkpolicy -g –v” :

Reproduced from SIOS

Filed Under: Clustering Simplified Tagged With: High Availability, installation, sios protection suite, SIOS Protection Suite for Linux, VMware ESXi

Version 8.7.2 SIOS Protection Suite-Windows and DataKeeper Cluster Edition

February 17, 2021 by Jason Aw Leave a Comment

Version 8.7.2 of SIOS Protection Suite -Windows and DataKeeper Cluster Edition

Announcing Version 8.7.2 of SIOS Protection Suite-Windows and DataKeeper Cluster Edition

We are pleased to announce the release of SIOS Protection Suite for Windows version 8.7.2 including DataKeeper Cluster Edition.  The new release features the following:

New Oracle Pluggable Databases (PDB) Application Recovery Kit

  • Oracle Pluggable Database is recommended on Oracle 19c and required on Oracle 20c onward
  • No additional SIOS license required for the SIOS Protection Suite PDB application recovery kit but an existing Oracle resource is needed.

Support for additional platforms and operating systems, including: Azure Stack (Hub) (to include Windows Server 2019), vSphere 7, and PostgreSQL 12. For our full list of supported products, visit the SIOS Protection Suite – Windows 8.7.2 support matrix.

Reproduced from SIOS

Filed Under: Clustering Simplified Tagged With: Oracle, PDB, Pluggable Database

About Using Amazon FSX for SQL Server Failover Cluster Instance

February 14, 2021 by Jason Aw Leave a Comment

About Using Amazon FSX for SQL Server Failover Cluster Instance

Using Amazon FSX for SQL Server Failover Cluster Instance – What You Need To Know!

If you are considering deploying your own Microsoft SQL Server instances in AWS EC2, you have some decisions to make regarding the resiliency of the solution. Sure, AWS will offer you a 99.99% SLA on your Compute resources if you deploy two or more instances across different availability zones. But don’t be fooled, there are a lot of other factors you need to consider when calculating your true application availability. I recently blogged about how to calculate your application availability in the cloud. You probably should have a quick read of that article before you move on.

When it comes to ensuring your Microsoft SQL Server instance is highly available, it really comes down to two basic choices: Always On Availability Group (AG) or SQL Server Failover Cluster Instance (FCI). If you are reading this article I’m making an assumption you are well aware of both of these options and are seriously considering using a SQL Server Failover Cluster Instance instead of a SQL Server Always On AG.

Benefits Of A Microsoft SQL Server Failover Cluster Instance

The following list summarize what AWS says are the benefits of a SQL Server FCI:

FCI is generally preferable over AG for SQL Server high availability deployments when the following are priority concerns for your use case:

License cost efficiency: You need the Enterprise Edition license of SQL Server to run AGs, whereas you only need the Standard Edition license to run FCIs. This is typically 50–60% less expensive than the Enterprise Edition. Although you can run a Basic version of AGs on Standard Edition starting from SQL Server 2016, it carries the limitation of supporting only one database per AG. This can become a challenge when dealing with applications that require multiple databases like SharePoint.

Instance-level protection versus database-level protection: With FCI, the entire instance is protected – if the primary node becomes unavailable, the entire instance is moved to the standby node. This takes care of the SQL Server logins, SQL Server Agent jobs, certificates, etc. that are stored in the system databases, which are physically stored in shared storage. With AG, on the other hand, only the databases in the group are protected, and system databases cannot be added to an AG – only user databases are allowed. It is the database administrator’s responsibility to replicate changes to system objects on all AG replicas. This leaves the possibility of human error causing the database to become inaccessible to the application.

DTC feature support: If you’re using SQL Server 2012 or 2014, and your application uses Distributed Transaction Coordinator (DTC), you are not able to use an AG as it is not supported. Use FCI in this situation.

https://aws.amazon.com/blogs/storage/simplify-your-microsoft-sql-server-high-availability-deployments-using-amazon-fsx-for-windows-file-server/

Challenges With FCI In The Cloud

Of course. The challenge with building an FCI that spans availability zones is the lack of a shared storage device that is normally required. Because the nodes of the cluster are distributed across multiple datacenters, a traditional SAN is not a viable option for shared storage. That leaves us with a two choices for cluster storage: 3rd party storage class resources like SIOS DataKeeper or the new Amazon FSx.

Let’s take a look at what you need to know before you make your choice.

SERVICE LEVEL AGREEMENT

As I wrote in how to calculate your application availability, your overall application SLA is only as good as your weakest link. In this case, the FSx SLA of 99.9%.

Normally 99.99% availability represents the starting point of what is considered “highly available”. This is what AWS promises you for your compute resources when two or more are deployed in different availability zones.

In case you didn’t know the difference between three nines and four nines…

  • 99.9% availability allows for 43.83 minutes of downtime per month
  • 99.99% availability allows for only 4.38 minutes of downtime per month

By hosting your cluster storage on FSx despite your 99.99% compute availability, your overall application availability will be 99.9%. In contrast, EBS volumes that span availability zones, such as in a DataKeeper deployment, qualifies for the 99.99% SLA at both the storage and compute layers. This means your overall application availability is 99.99%.

STORAGE LOCATION

When configuring FSx for high availability, you will want to enable multi-AZ support. By enabling multi-AZ you have an effectively have a “preferred” AZ and a “standby” AZ. When you deploy your SQL Server FCI nodes you will want to distribute those nodes across the same AZs.

Now in normal situations, you will want to make sure the active cluster node resides in the same AZ as the preferred FSx storage node. This is to minimize the distance and latency to your storage. But also to minimize the costs associated with data transfer across AZs. As specified in the FSx price guide, “Standard data transfer fees apply for inter-AZ or inter-region access to file systems.”

In the unfortunate circumstance where you have a SQL Server FCI failure, but not a FSx failure, there is no mechanism to tie both the storage and compute together. In the event that FSx fails over, it will automatically fail back to the primary availability zone. However, best practices dictate SQL FCI remain running on the secondary node until root cause analysis is performed and fail back is typically scheduled to occur during maintenance periods. This leaves you in a situation where your storage resides in a different AZ, which will incur additional costs. Currently the cost for transferring data across AZs, both ingress and egress, is $0.01/GB.

Without keeping a close eye on the state of your FSx and SQL Server FCI, you may not even be aware that they are running in different regions until you see the data transfer charge at the end of the month.

In contrast, in a configuration that use SIOS DataKeeper, the storage failover is part of the SQL Server FCI recovery, ensuring that the storage always fails over with the SQL Server instance. This ensures SQL Server is always reading and writing to the EBS volumes that are directly attached to the active node. Keep in mind, DataKeeper will incur a data transfer cost associated with write operations which are replicated between AZs or regions. This data transfer cost can be minimized with the use of compression available in DataKeeper.

CONTROLLING FAILOVER

In an FSx multi-subnet configuration, there is a preferred availability zone and a standby availability. Should the FSx file server in the preferred availability zone experience a failure, the file server in the standby AZ will recover. AWS reports that this recovery time takes about 30 seconds with standard shares. With the use of continuously available file shares, Microsoft reports this failover time can be closer to 15 seconds. During this failover time, there is a brownout that occurs where reads and writes are paused, but will continue once recovery completes.

FSx multi-site has automatic failback enabled. This means that for every unplanned failover of FSx, you also have an unplanned failback. In contrast, typically when a SQL Server FCI experience an unplanned failover you would either just leave it running on the secondary or schedule a failback after hours or during the next maintenance period.

SQL SERVER ANALYSIS SERVICES CLUSTER NOT SUPPORTED WITH FSX

If you want to cluster SSAS, you will need a clustered disk resource like SIOS DataKeeper. The How to Cluster SQL Server Analysis Server white paper clearly states that SMB cannot be used and that cluster drives with drive letters must be used. In contrast, the DataKeeper Volume resource presents itself as a clustered disk and can be used with SSAS.

Summary

While FSx certainly can make sense for typical SMB uses like Windows user files and other non-critical services where 99.9% availability SLA suffices, FSx is an excellent option If you application requires high availability (99.99%) or HA/DR solutions that also span regions, the SIOS DataKeeper is the right fit.

Reproduced with permission from Clusteringformeremortals

Filed Under: Clustering Simplified Tagged With: Amazon FSX, SQL Server Failover Cluster Instance

SIOS Protection Suite for Linux Quick Service Protection

February 6, 2021 by Jason Aw Leave a Comment

How to add custom application support to SIOS Protection Suite - SIOS Protection Suite for Linux Quick Service Protection

Using SIOS Protection Suite for Linux Quick Service Protection Resource

On a recent engagement with the SIOS Professional Services team, a customer inquired about how to protect a custom application with the SIOS Protection Suite for Linux solution. One of the highly experienced high availability experts at SIOS Technology Corp., helped understand the customer’s application and laid out the methods SIOS provides for custom application support.

SIOS Protection Suite for Linux provides multiple methods for adding high availability and application monitoring to custom applications.  These options include the following:

  • Creating a custom application recovery kit (ARK)1
  • Creating a generic application resource hierarchy
  • Creating a quick service protection resource
Type Coding Complexity Monitoring Recovery
Custom Application Recovery Kit Resource1 Highest Highest Highest
Generic Application Resource Medium High High
Quick Service  Protection Resource Low Medium Medium

Definitions Used in Chart

Monitoring – defined as the ability to make a determination of the availability, accessibility and functioning of the protected application, database or service.  A low level of application, database, or service monitoring provides basic coverage, such as a check for a running process, existence of a pid_file, or that the status command returns a ‘true’ result when executed.  Note: A ‘true’ or ‘0 (zero)’ return code does not mean that the application, database, or service is running. But only that the command executed was able to successfully complete with a positive (‘true’ or ‘0 (zero)’) status result.  The highest level of monitoring indicates that application specific knowledge is applied to determine the health and functioning of the application beyond lower level methods such as process status, ps output, or systemd status returns.  The highest level of monitoring typically applies knowledge of recommended order of healthcheck operations, knowledge of dependencies, and analysis of the results obtained from status and monitoring commands.

Recovery – defined as the ability to restart a failed application, database or service.  A low level of recovery capability implies that commands for a restart are issued and expected output are obtained from the issuance of the command.  The highest level of monitoring indicates that application-specific knowledge is applied to determine how to initiate an orderly restart of the application, database, or service, which may require knowledge of recommended order of operations, dependencies, rollbacks or other related remediation of a failed service.

Solution:  Quick Service Protection Resource

In this engagement, the customer’s application had systemd compatibility. Based on their overall requirements for avoiding coding, minimal monitoring needs, and simple recovery procedures, we recommended the Quick Service Protection (QSP) Resource.

The QSP resource works to quickly add support of a systemd service to the SIOS Protection Suite for Linux resource protection.  In the case of Customer Example.com, they have a systemd compatible service, with the minimal required definition needed to start and stop their application.

[Unit]

Description=SIOS ‘as-is’ Example Service 2020

After=network.target

[Service]

Type=simple

Restart=always

RestartSec=3

User=root

ExecStart=/example_app/bin/exampleapp start

ExecStop=/example_app/bin/exampleapp stop

[Install]

WantedBy=multi-user.target

Example.com systemd file

SIOS recommends that prior to attempting the protection of the resource with the SIOS Protection Suite for Linux product, verify via systemctl that the example application stops and starts accordingly:

# systemctl status example

* example.service – SIOS ‘as-is’ Example Service 2020

Loaded: loaded (/usr/lib/systemd/system/example.service; disabled; vendor preset: disabled)

Active: inactive (dead)

# systemctl start example

# systemctl status example

* example.service – SIOS ‘as-is’ Example Service 2020

Loaded: loaded (/usr/lib/systemd/system/example.service; disabled; vendor preset: disabled)

Active: active (running) since Fri 2020-08-21 14:53:27 EDT; 5s ago

Main PID: 19937 (exampleapp)

CGroup: /system.slice/example.service

`-19937 /usr/bin/perl /example_app/bin/exampleapp start

# systemctl stop example

# systemctl status example

* example.service – SIOS ‘as-is’ Example Service 2020

Loaded: loaded (/usr/lib/systemd/system/example.service; disabled; vendor preset: disabled)

Active: inactive (dead)


After verifying that the application functions correctly via systemd, restart the service and ensure that the service is running.

# systemctl start example

# systemctl status example

* example.service – SIOS ‘as-is’ Example Service 2020

Loaded: loaded (/usr/lib/systemd/system/example.service; disabled; vendor preset: disabled)

Active: active (running) since Fri 2020-08-21 15:59:44 EDT; 3min 2s ago

Main PID: 30740 (exampleapp)

Refer to the SIOS Protection Suite for Linux Quick Service Protection Suite documentation for additional details on the resource create process.

Using the SPS-L UI select the Create option, indicated in the Global UI Resource Toolbar by the following icon:   SIOS Global US Resource

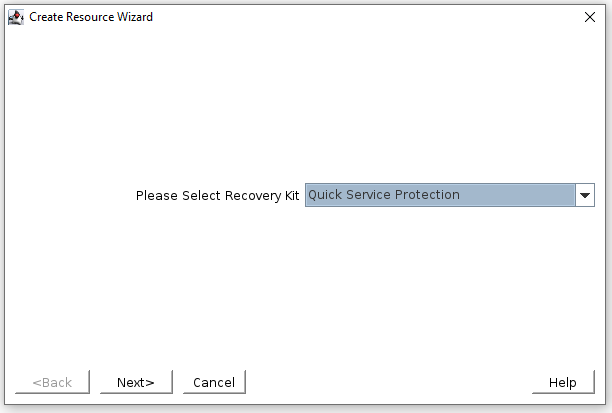
Once the create wizard is launched, select the Quick Service Protection option in the Create Resource Wizard Window


In the next prompt for  ‘Switchback Type’, choose whether you will use intelligent switchback or automatic switchback.

After selecting the ‘Switchback Type’,  the Server dialogue appears allowing you to choose the primary server for the custom application.


(Note: If the service requires storage, be sure to choose the same primary server previously selected for the storage resources.)

In the Service Name dialog box, find the service for your custom application.

Once you’ve selected the correct service, example, determine whether you will enable monitoring or disable the monitoring service.  Refer to the documentation to gain an understanding of the monitoring provided by the QSP resource.2


Next, choose a resource tag.  A resource tag should be a meaningful name that will help your IT team quickly identify which SPS-L resource protects your application or service.

Lastly, follow the final dialogue to complete the resource creation process.  Once the resource is created, use the UI to extend the resource to additional servers. If necessary, create dependencies between the newly protected custom service/application and any other required resources such as storage or IP resources.


NOTES:

1 Creating a customer application recovery kit can be accomplished via an engagement with the SIOS Technology Corp. Professional Services Team.  For more information contact professional-services@us.sios.com

2 The QSP Recovery Kit quickCheck can only perform simple health (using the “status” action of the service command). QSP doesn’t guarantee that the service is provided or the process is functioning. If complicated starting and/or stopping is necessary, or more robust health checking operations are necessary, using a Generic Application or Custom Application ARK is recommended

Reproduced from SIOS

Filed Under: Clustering Simplified Tagged With: Application availability, clusters, High Availability, high availability - SAP, SAP S/4HANA

Recent Posts

  • Three Keys to Mastering High Availability in Your On-Prem Data Center
  • Why High Availability Matters in Manufacturing 4.0
  • Reframing Early Computer Science Education: The Soft Skills of Solution Design Part 1
  • How to Cut SQL Server HA/DR Costs and Gain Advanced Features
  • Commonalities between Disaster Recovery (DR) and your spare tire

Most Popular Posts

Maximise replication performance for Linux Clustering with Fusion-io
Failover Clustering with VMware High Availability
create A 2-Node MySQL Cluster Without Shared Storage
SAP for High Availability Solutions For Linux
Bandwidth To Support Real-Time Replication
The Availability Equation – High Availability Solutions.jpg
Choosing Platforms To Replicate Data - Host-Based Or Storage-Based?
Guide To Connect To An iSCSI Target Using Open-iSCSI Initiator Software
Best Practices to Eliminate SPoF In Cluster Architecture
Step-By-Step How To Configure A Linux Failover Cluster In Microsoft Azure IaaS Without Shared Storage azure sanless
Take Action Before SQL Server 20082008 R2 Support Expires
How To Cluster MaxDB On Windows In The Cloud

Join Our Mailing List

Copyright © 2025 · Enterprise Pro Theme on Genesis Framework · WordPress · Log in