| April 24, 2024 |
SIOS Technology Joins Nutanix Elevate Partner Program |
||||||||||||||||||||||||||||
| April 21, 2024 |
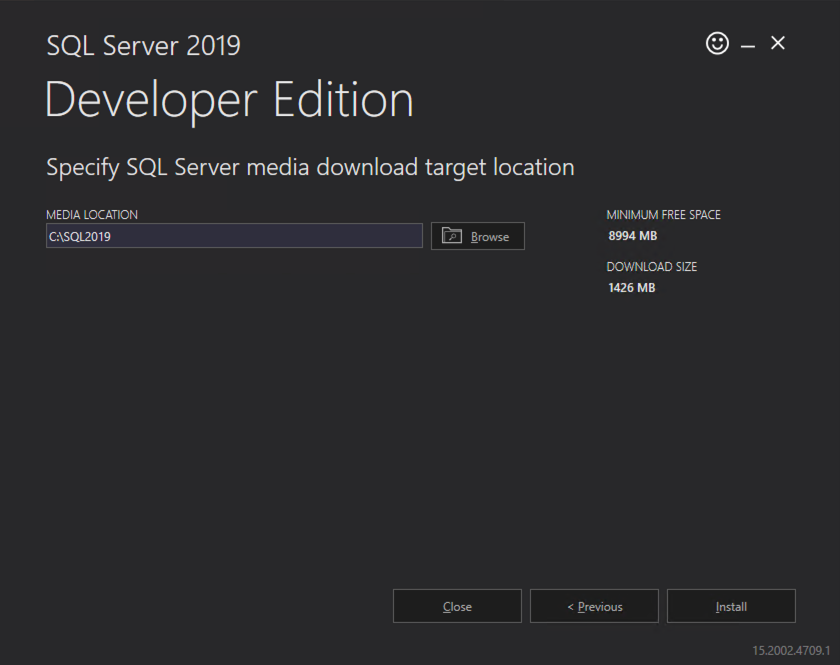
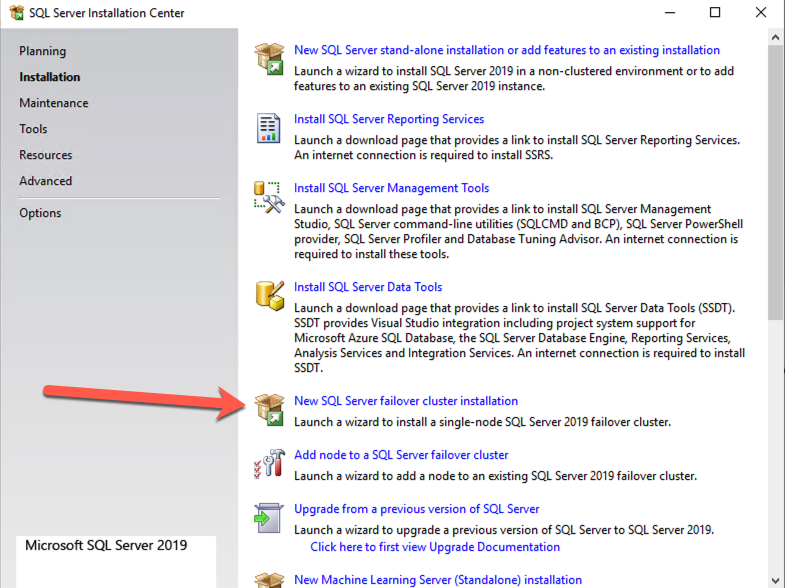
Step-by-Step – SQL Server 2019 Failover Cluster Instance (FCI) in OCI |
||||||||||||||||||||||||||||


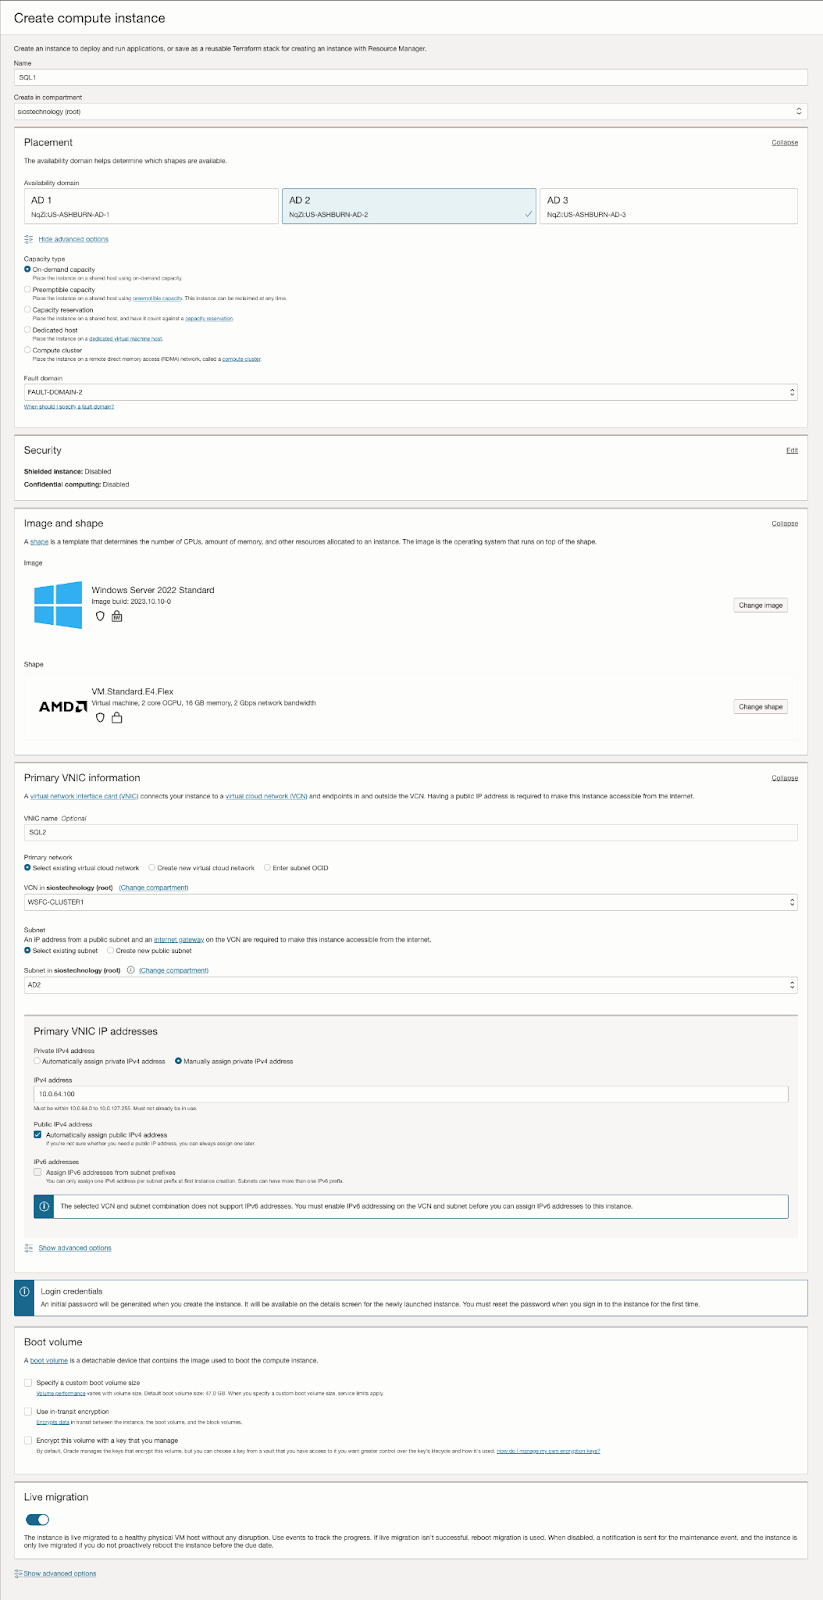
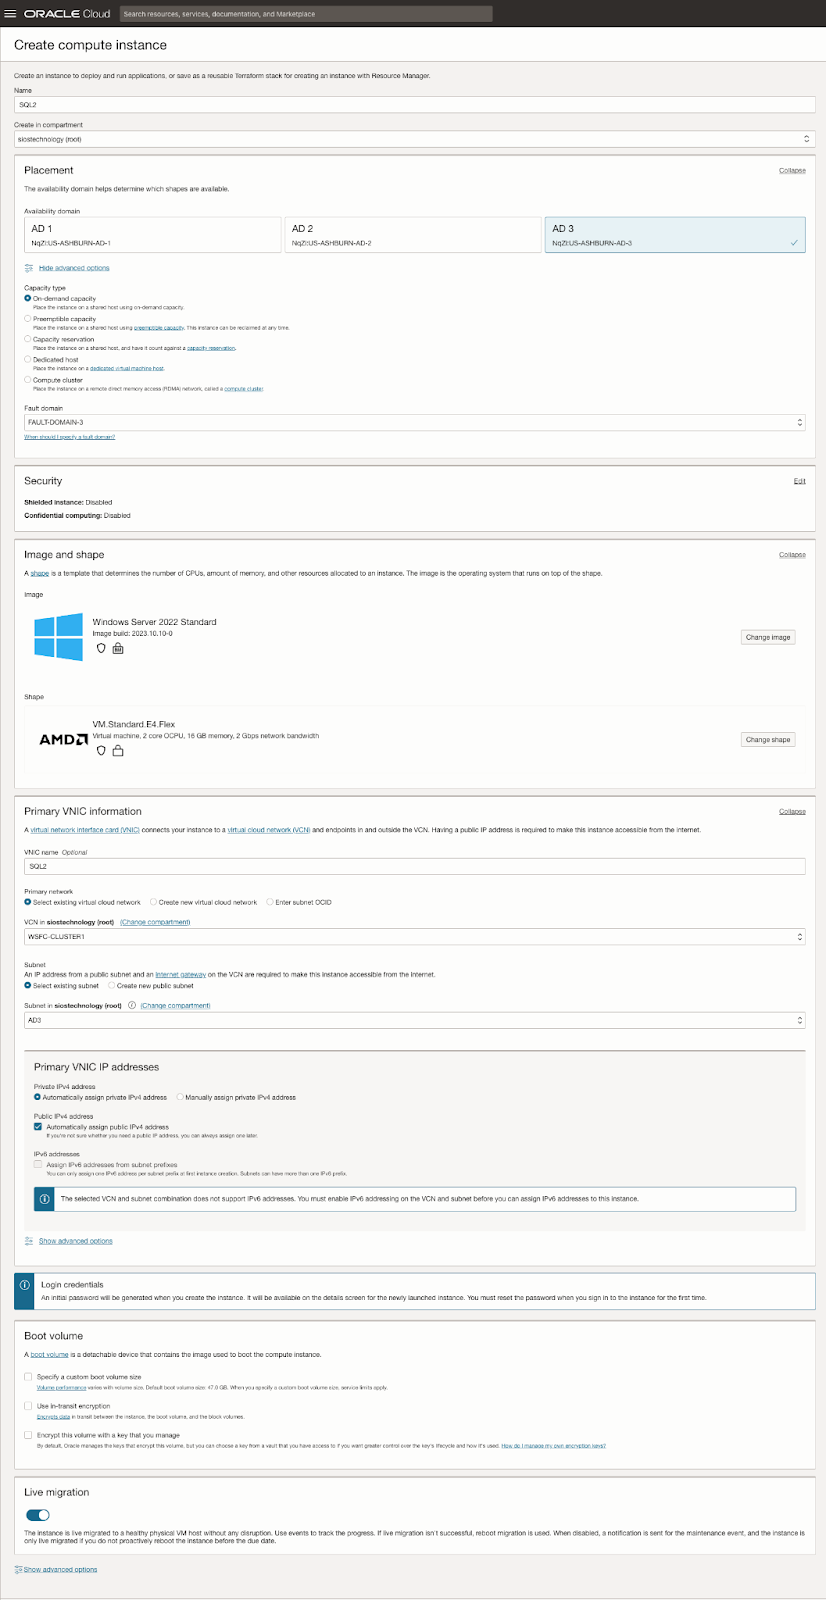
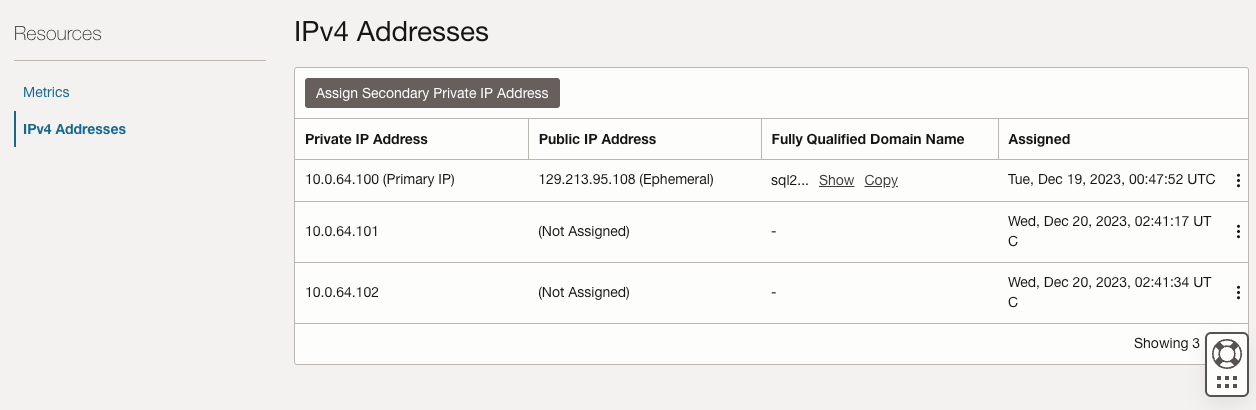
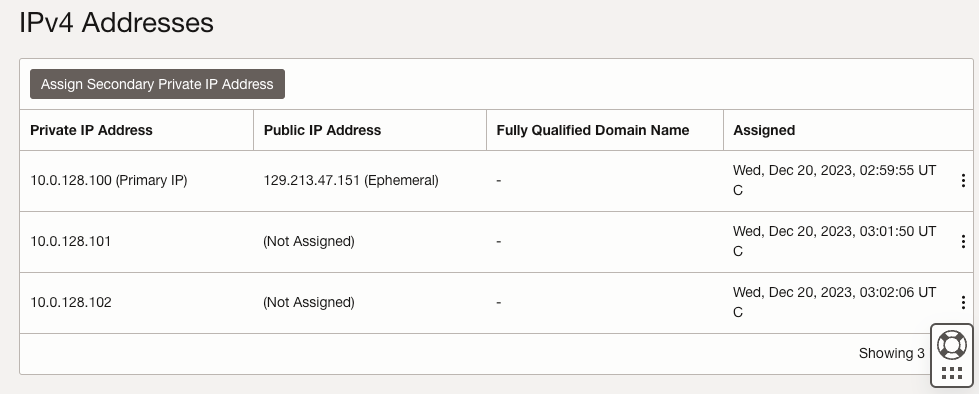
| SQL1 | SQL2 | |
| Primary Address | 10.0.64.100 | 10.0.128.100 |
| Cluster IP 1 (core cluster resource) |
10.0.64.101 | 10.0.128.101 |
| Cluster IP 2 (SQL Server Cluster IP) |
10.0.64.102 | 10.0.128.102 |
On both SQL1 and SQL2, edit the attached VNIC to add the secondary addresses.
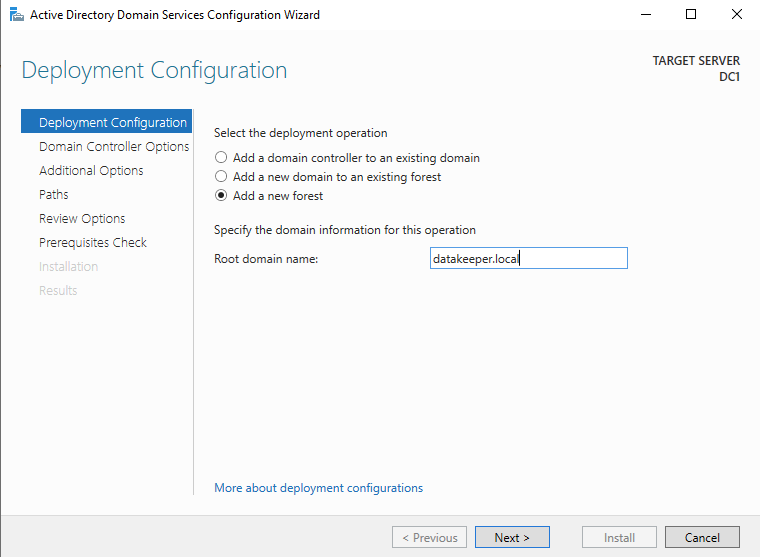
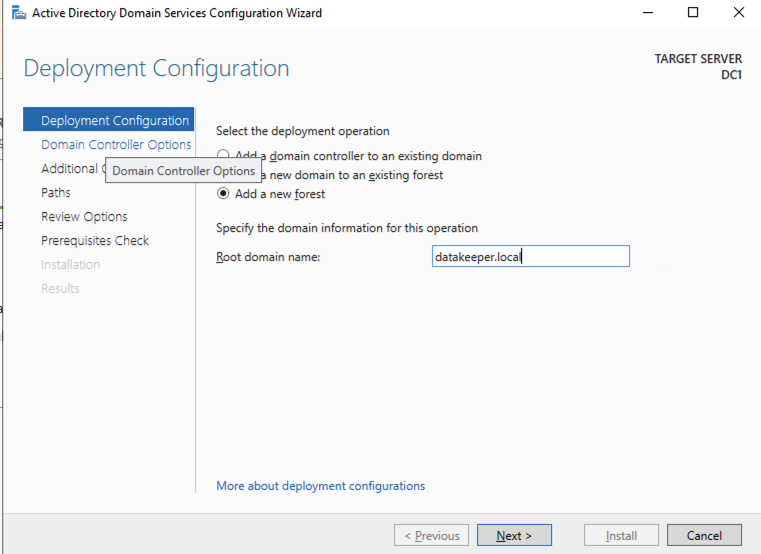
Create the Domain
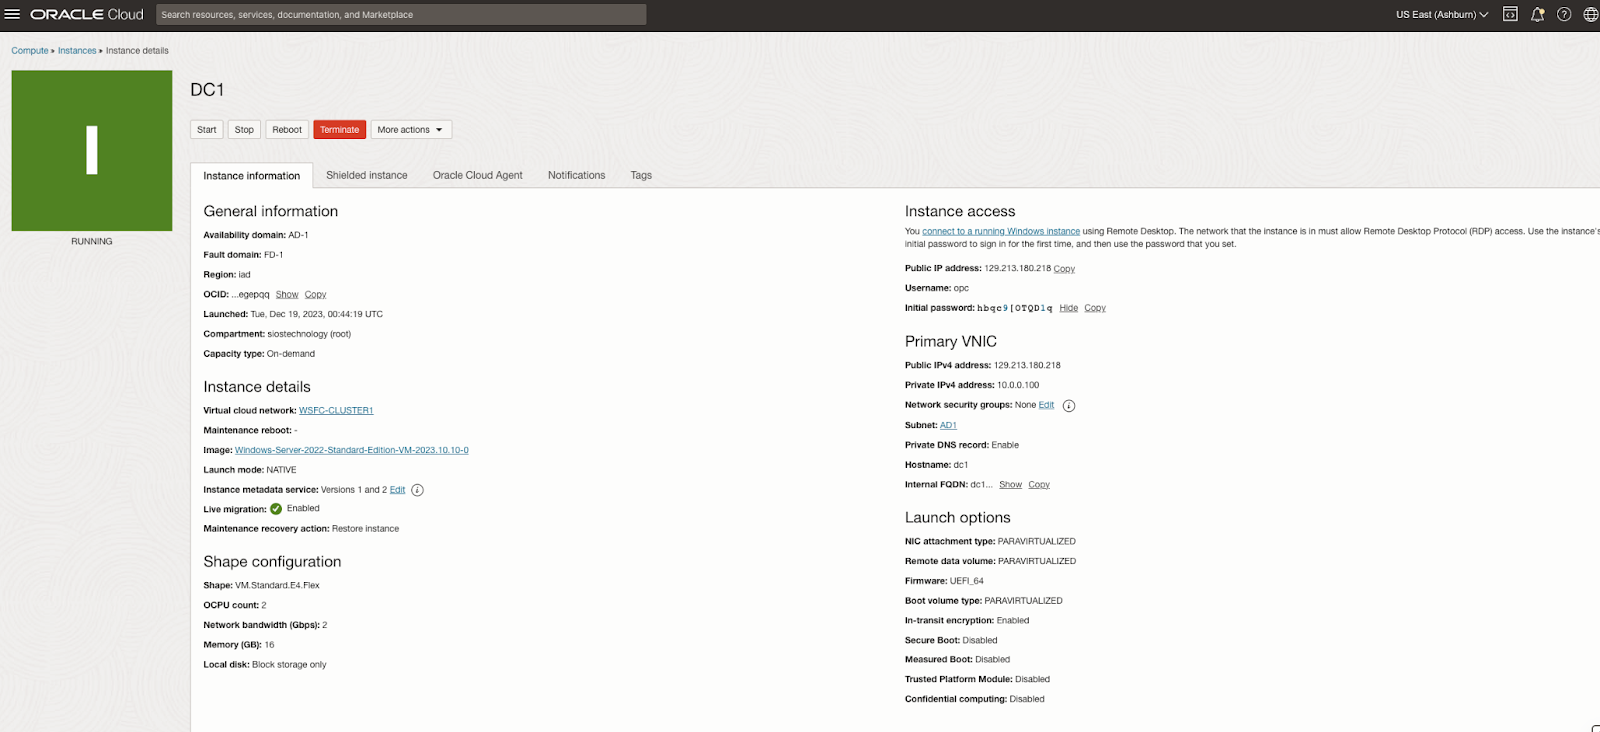
For resilience, you should provision multiple AD controllers across different availability zones, but for the purposes of this guide, we are just going to provision one AD controller. Follow the screenshots below to configure AD on DC1.
Log on using the credentials listed in the Instance Details section. You will be prompted to reset your password.
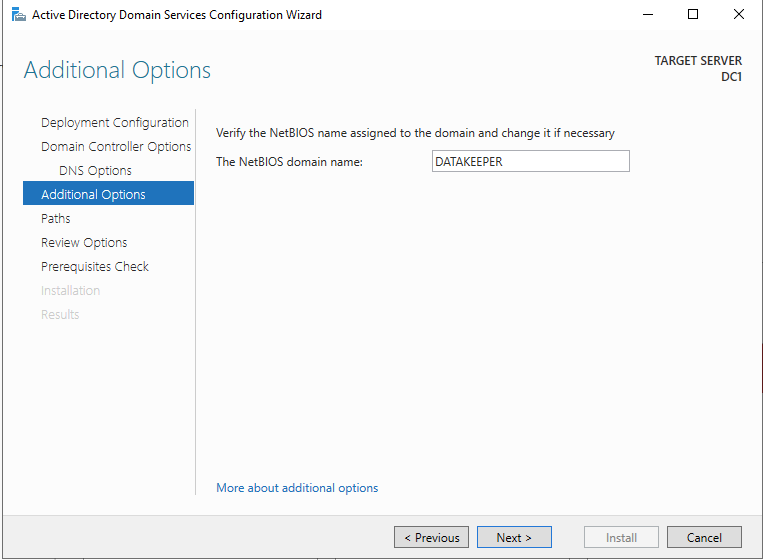
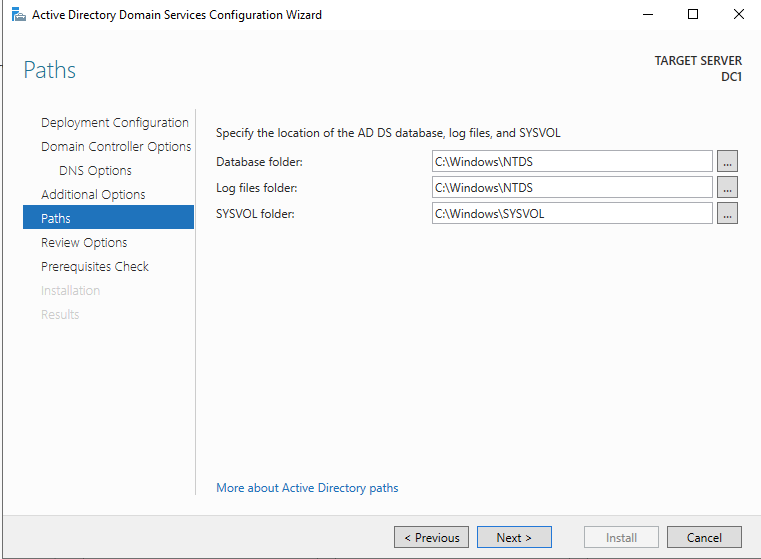
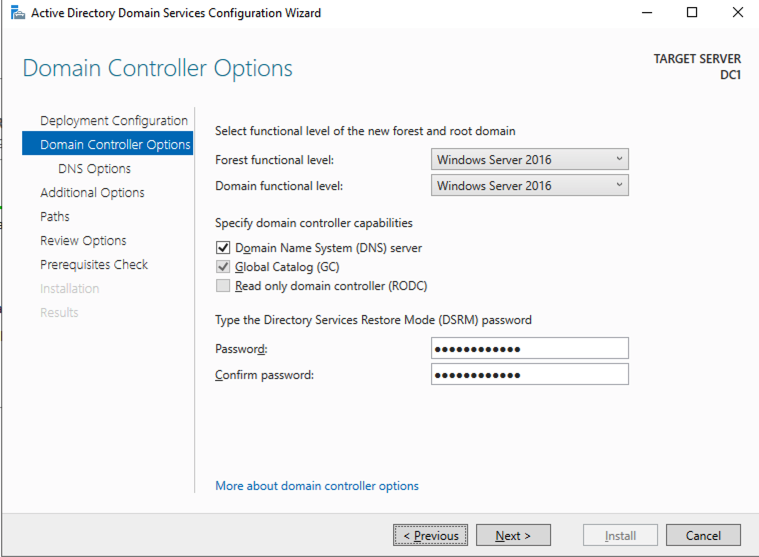
Enable Active Directory Domain Services
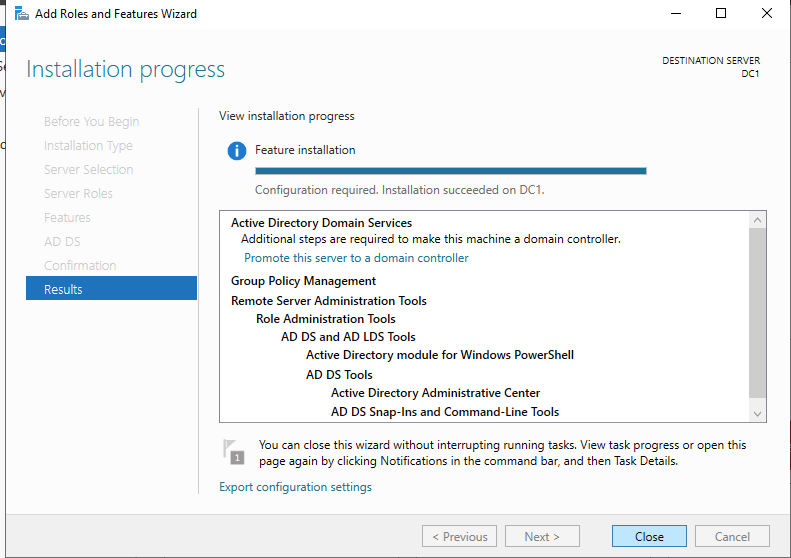
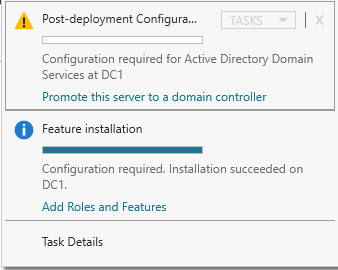
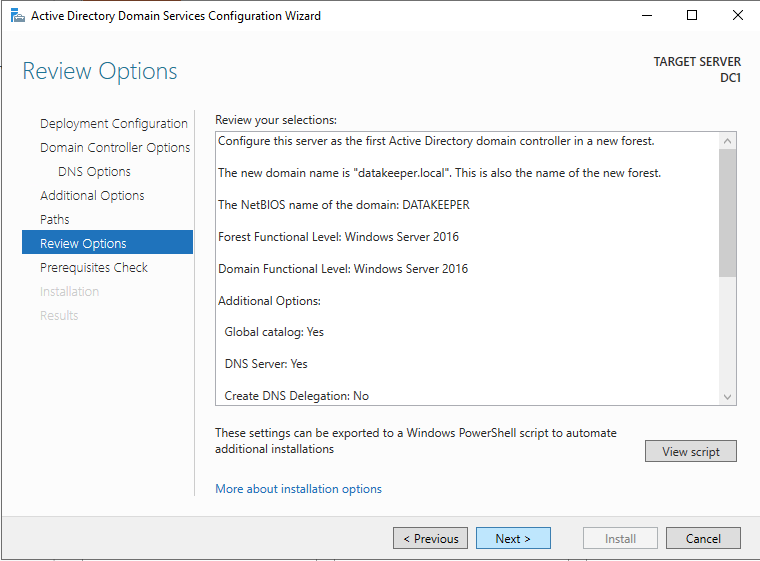
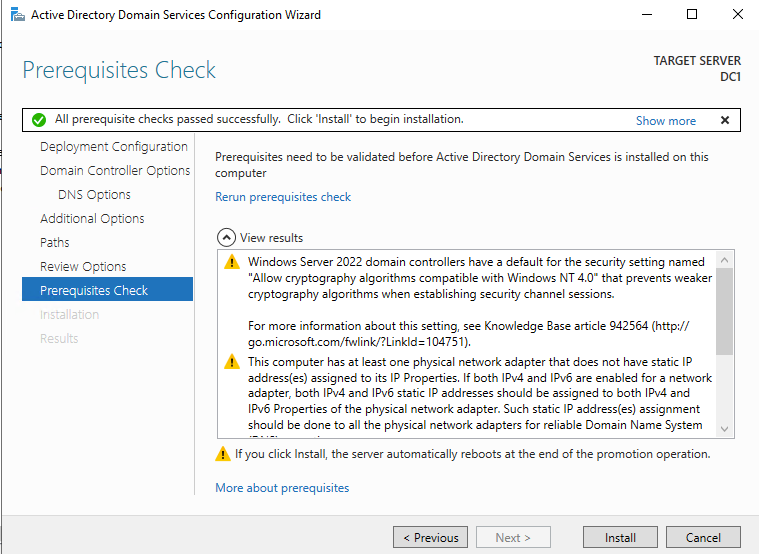
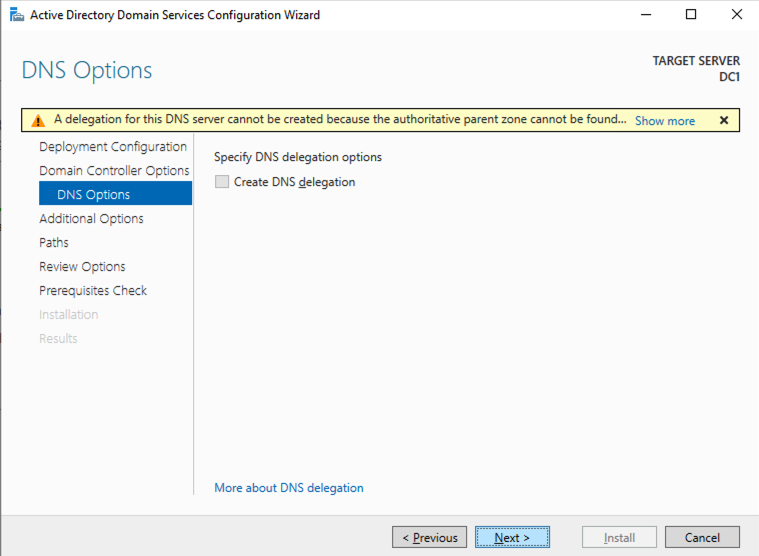
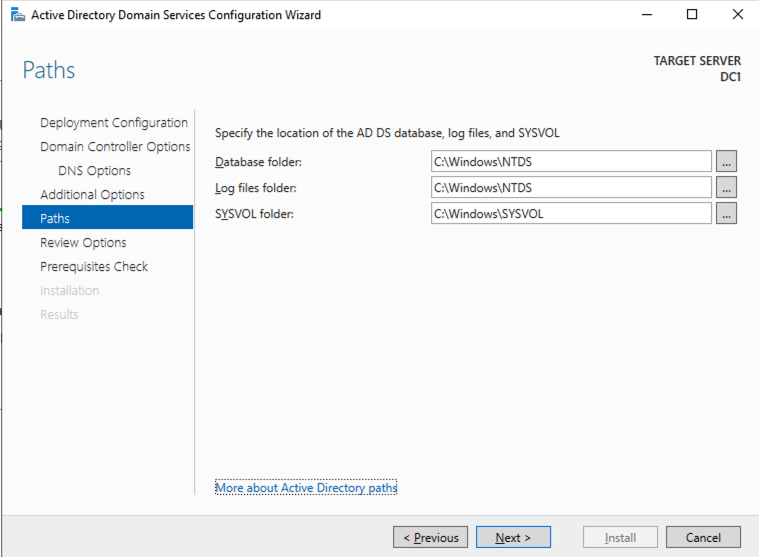
Promote Server to Domain Controller
Before you begin this process, enable the local Administrator account on the server and set the password. If you don’t, you will receive this message when you try to promote the domain controller.
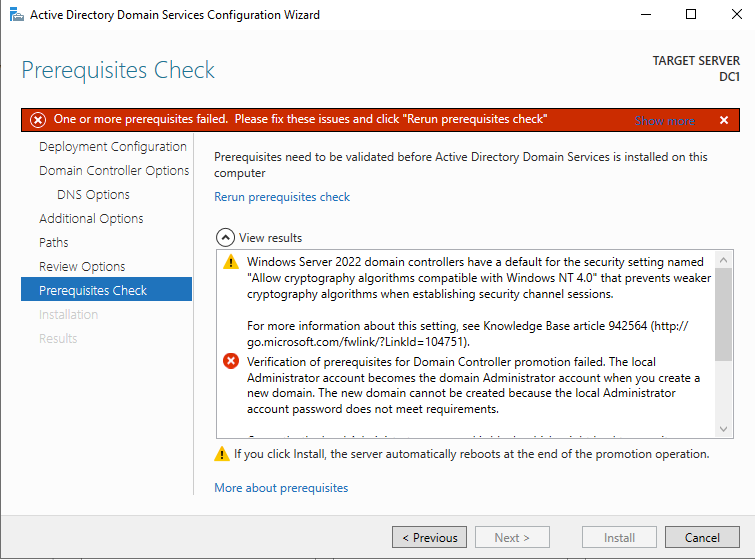
Once you have the Administrator account enabled and the password set, proceed with the Post-Deployment Configuration
Before enabling Active Directory Domain Services, you must enable the local Administrator account and log on with that account.
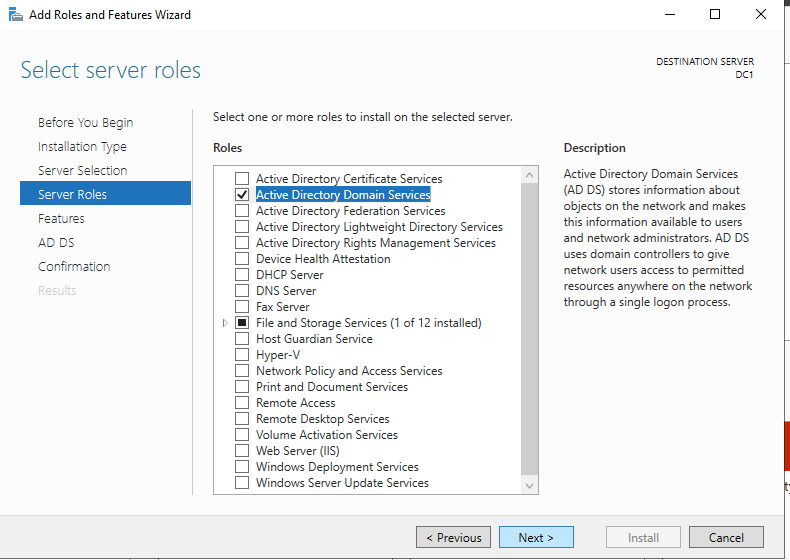
Using your favorite RDP program, connect to DC1 using the public IP address associated with the instance. Add the Active Directory Domain Services role.
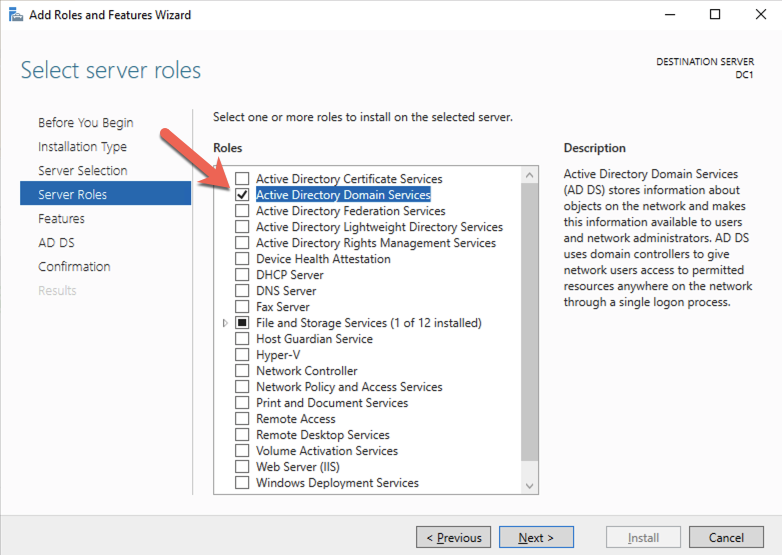
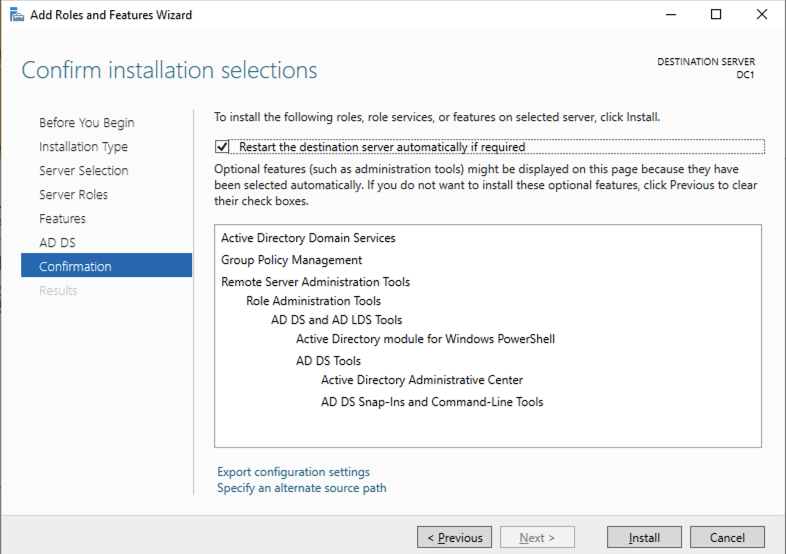
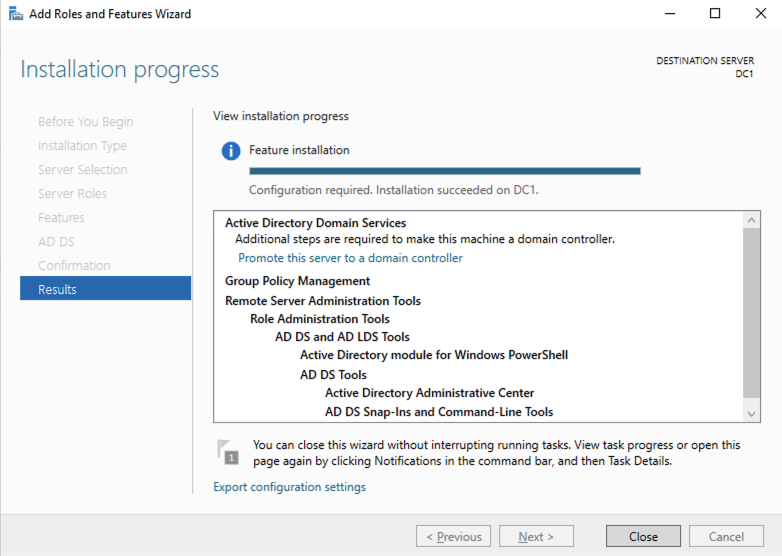
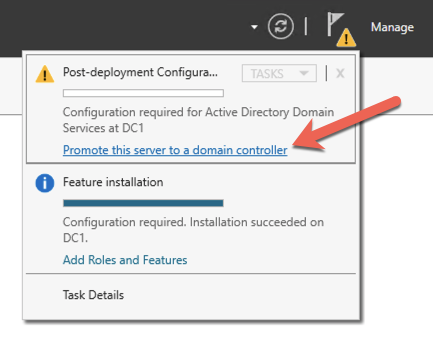
After the installation completes, promote this server to a domain controller.
For our purposes we are going to create a new domain.


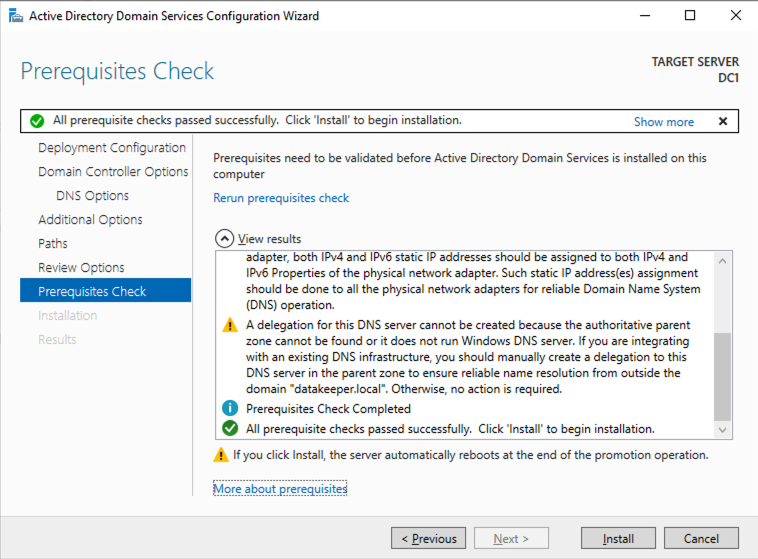
Reboot DC1 and move on to the next section.
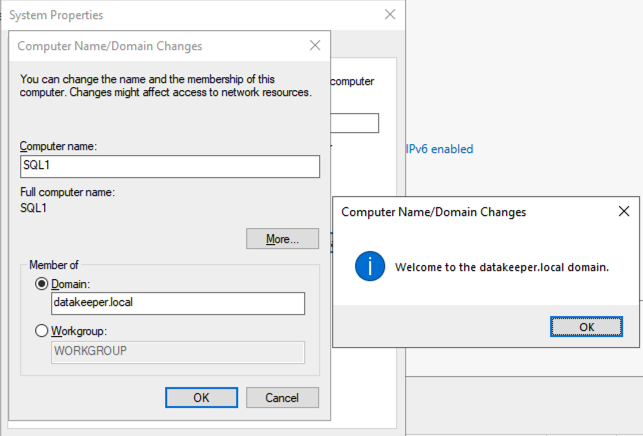
Join SQL1 and SQL2 to the Domain
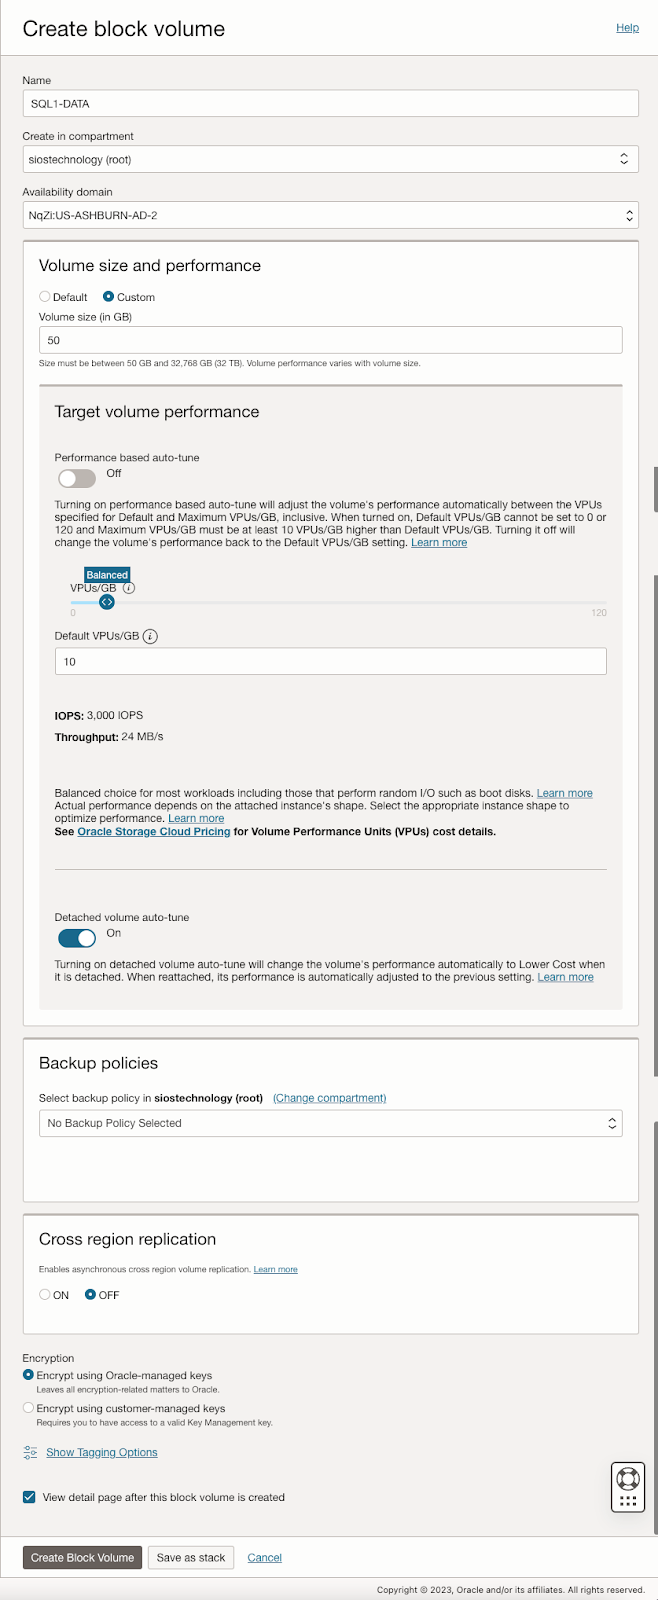
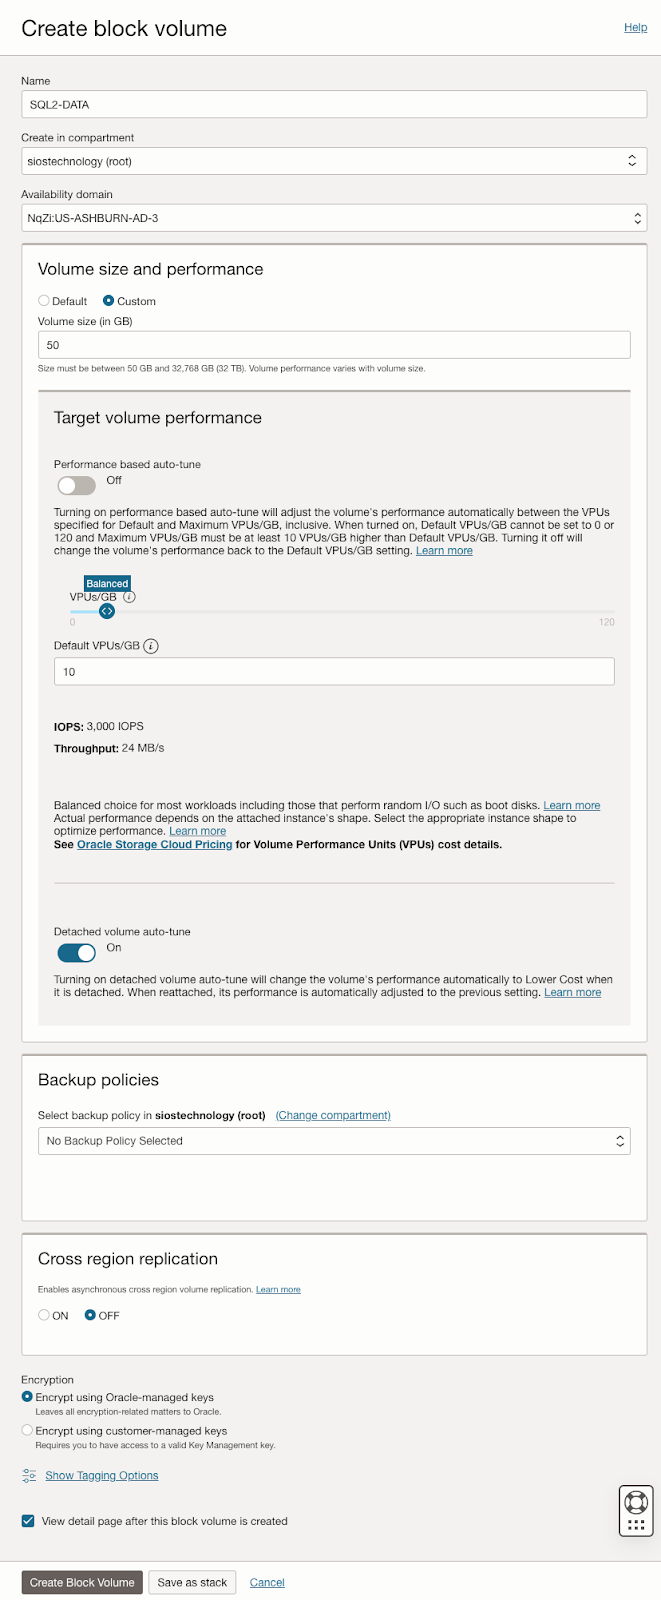
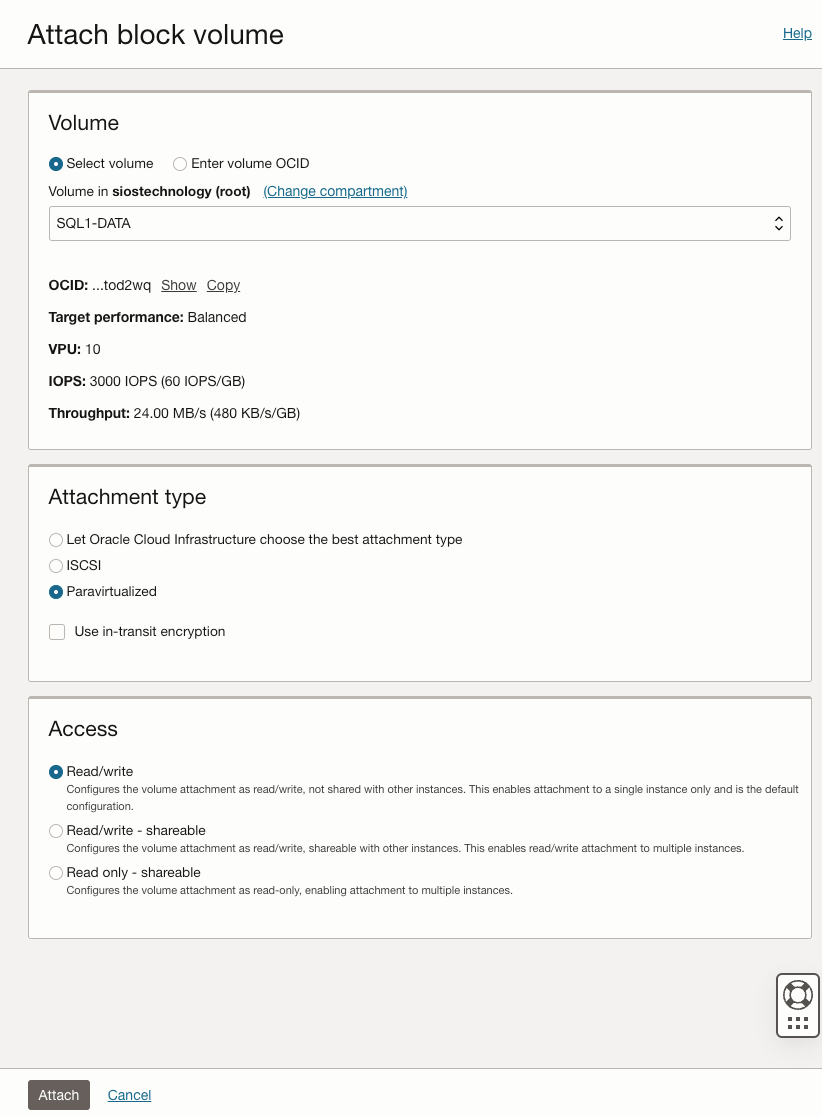
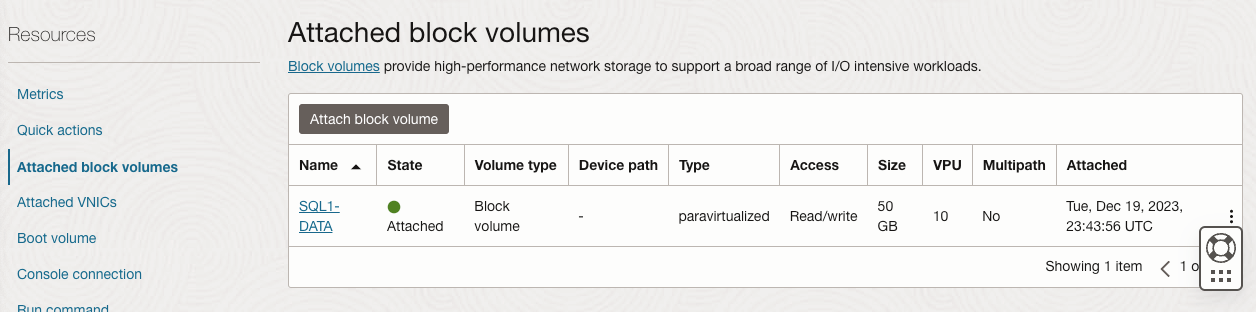
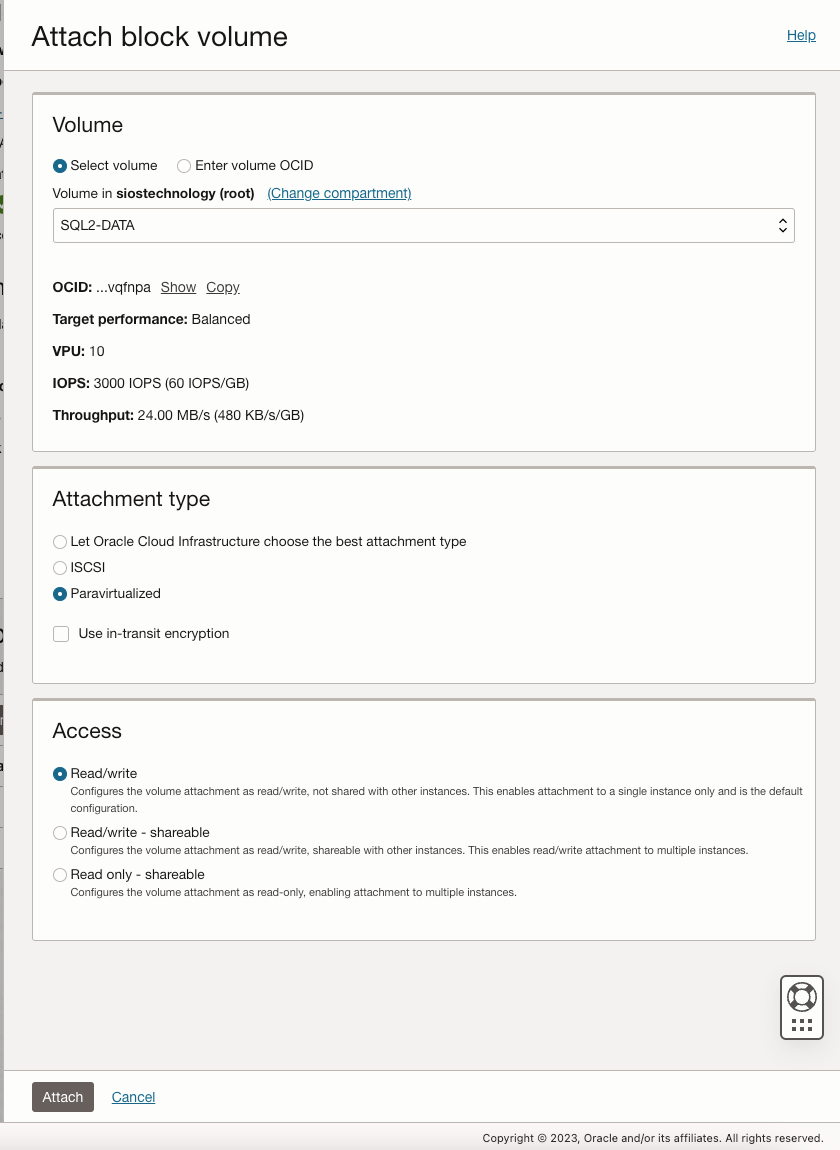
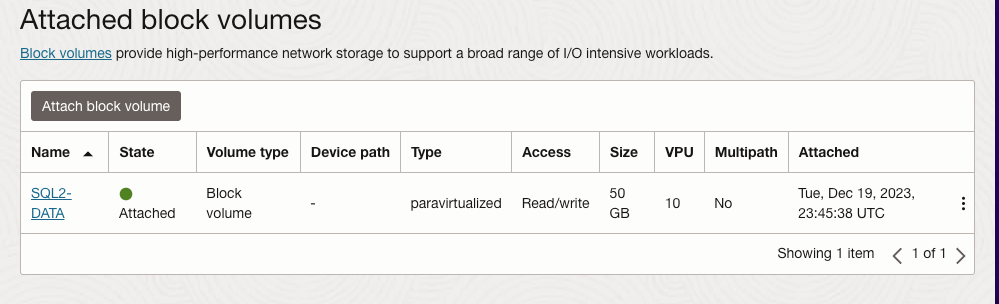
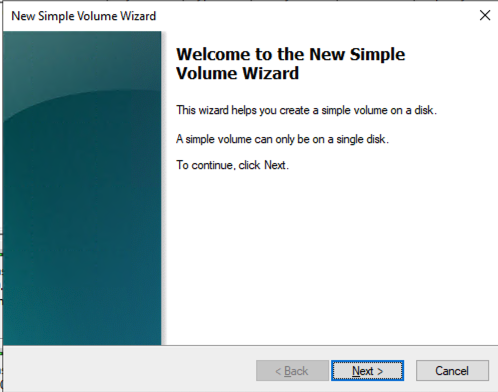
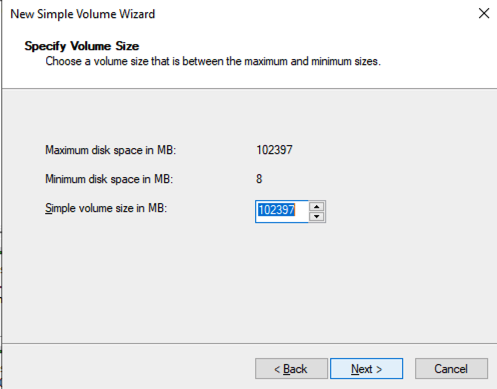
Prepare the Storage
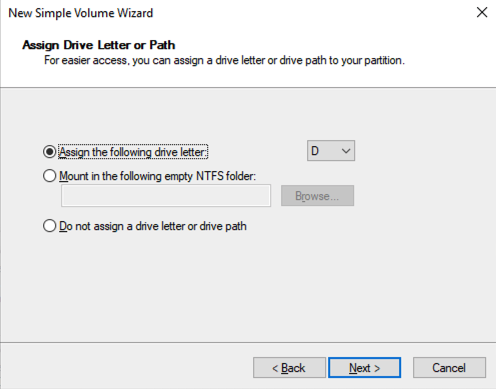
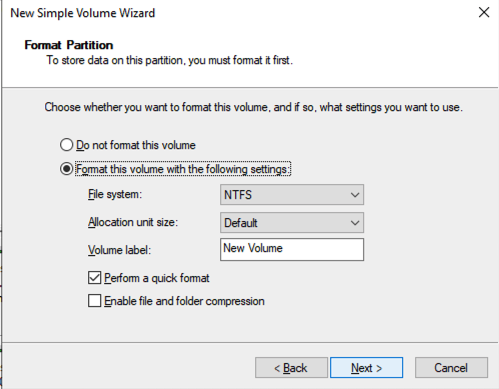
Once SQL1 and SQL2 are added to the domain, connect to the instances with the Domain Admin account you created to complete the rest of the configuration steps. The first thing you need to do is to attach and format the EBS volumes that we added to SQL1 and SQL2 as shown below.
Configure Failover Clustering Feature
Enable the Failover Clustering feature on both SQL1 and SQL2.
Run this PowerShell command on SQL1 and SQL2
Install-WindowsFeature -Name Failover-Clustering -IncludeManagementTools
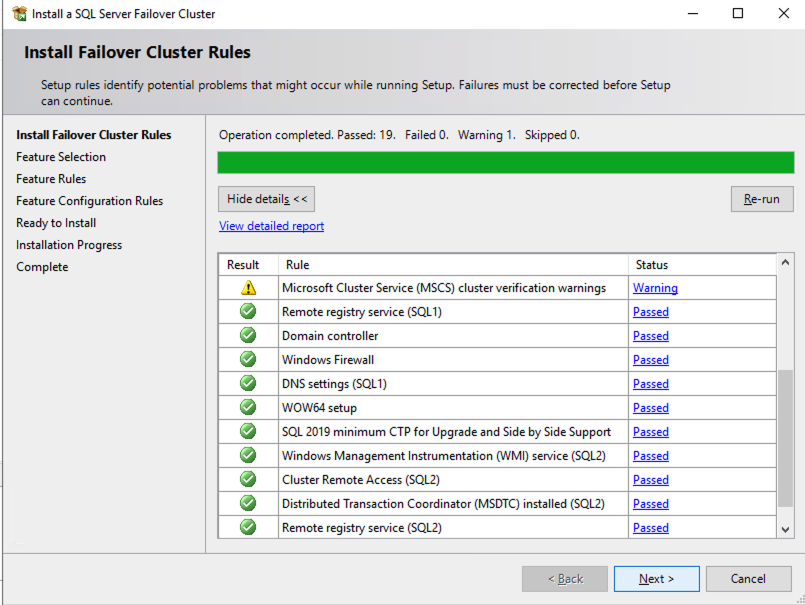
Validate your Cluster
Run this PowerShell command from SQL1 or SQL2
Test-Cluster -Node sql1,sql2
Depending upon the version of Windows Server you are using, you will see some warnings about Network and possibly storage. The network warning will likely tell you that each cluster node is accessible via a single interface. Earlier versions of Windows will warn you about the lack of shared storage.
You can ignore both of those errors as they are expected in a cluster hosted on OCI. As long as you have received no Errors, you can proceed with the next section. If you receive any errors, fix them, then run validation again and continue on to the next section.
Create the Cluster
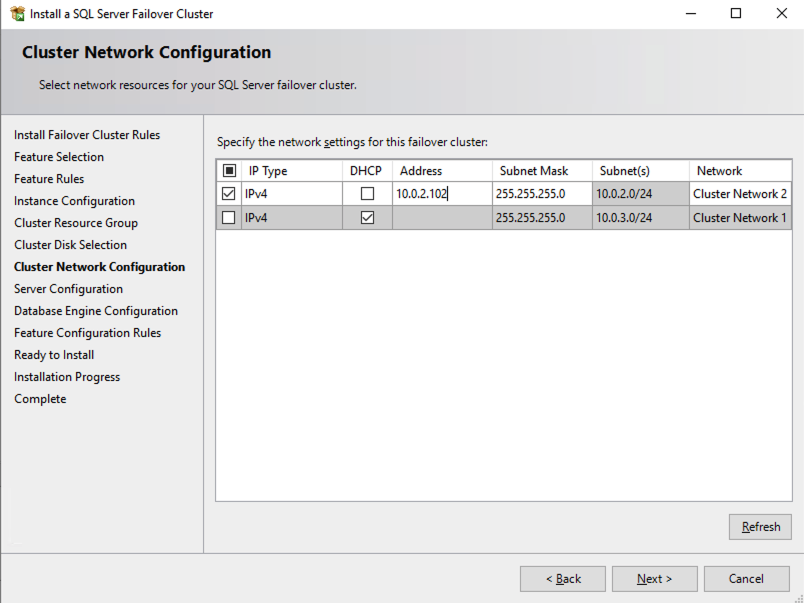
Next, you will create the cluster. In the example below, you will notice I use the two IP addresses we planned to use, 10.0.64.101 and 10.0.128.101. You can run this Powershell from either cluster node.
New-Cluster -Name cluster1 -Node sql1,sql2 -StaticAddress 10.0.64.101, 10.0.128.101
Please Note: do NOT try to create the cluster via the WSFC GUI. You will find that because the instances are using DHCP, the GUI will not give you the option to assign IP addresses for the cluster and instead will hand out duplicate IP addresses.
Add the File Share Witness
To maintain the cluster quorum, you need to add a witness. In OCI, the type of witness you will want to use is a File Share Witness. The file share witness must reside on a server that resides in a different Fault Domain than the two cluster nodes.
In the example below, the file share witness will be created on DC1, which resides in FD1.
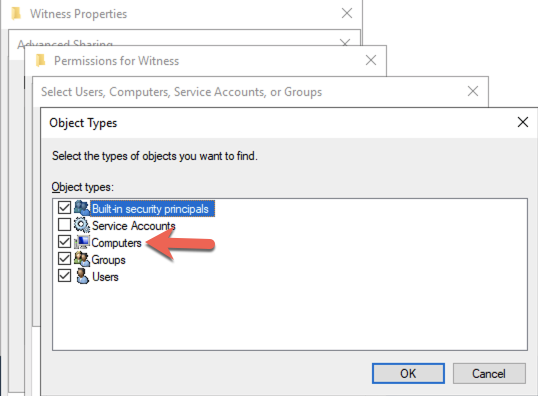
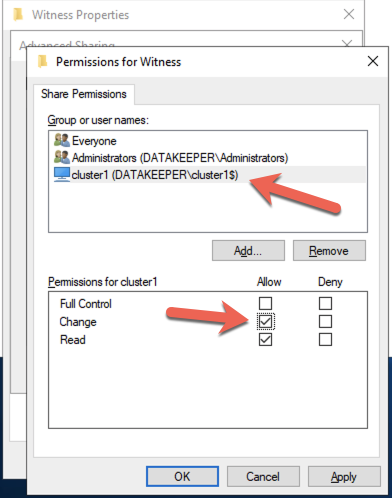
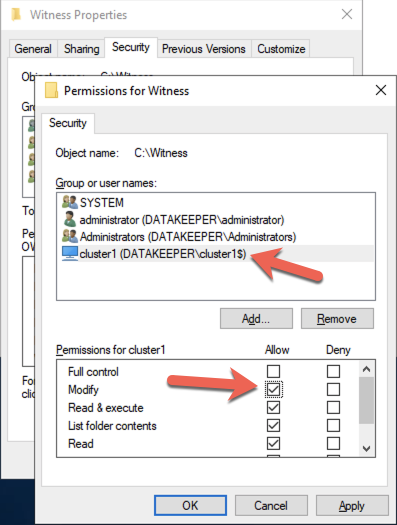
On DC1, create a file share and assign the cluster name object (CNO) read-write permissions on the folder. Add permissions for the CNO on both the Share and Security tab of a folder that you created, In the example below I created a folder called “Witness”.
Once the folder has been created and the appropriate permissions have been assigned to the CNO, run the following PowerShell command on SQL1 or SQL2.
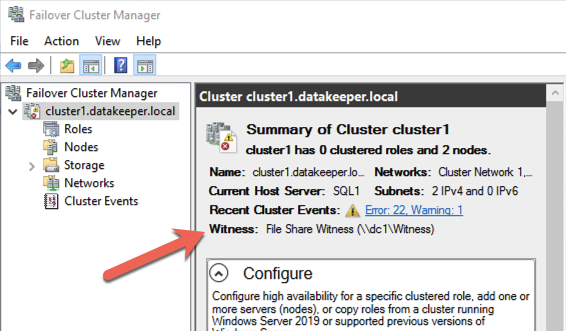
Set-ClusterQuorum -Cluster cluster1 -FileShareWitness \\dc1\Witness
Your cluster should now look like the following when you launch the Failover Cluster Manager on SQL1 or SQL2.
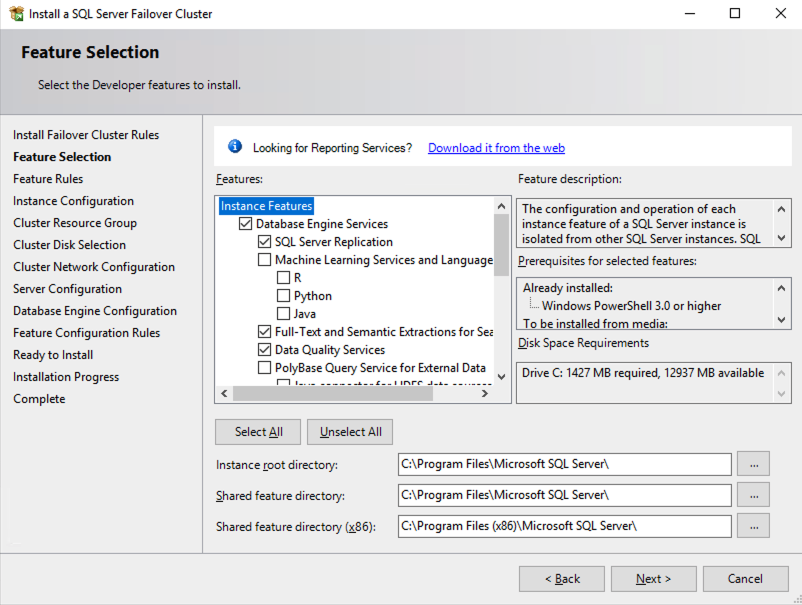
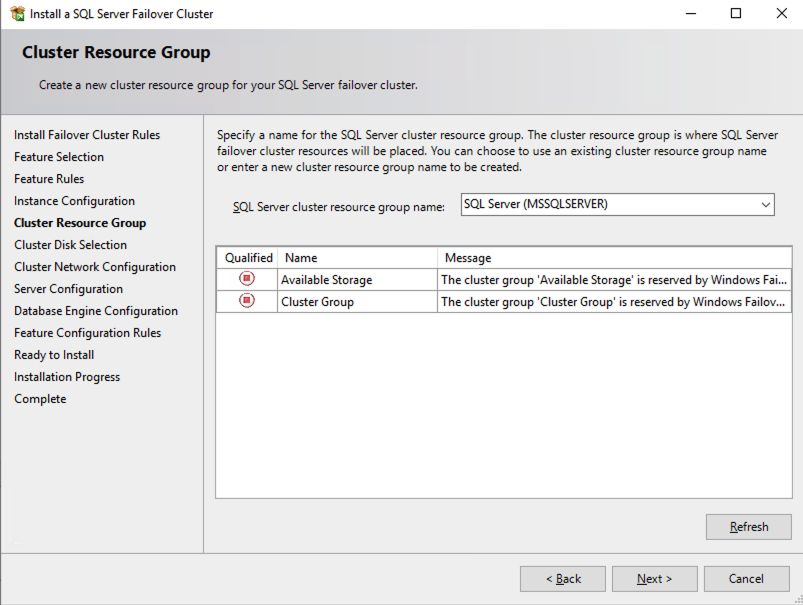
Creating the SQL Server FCI
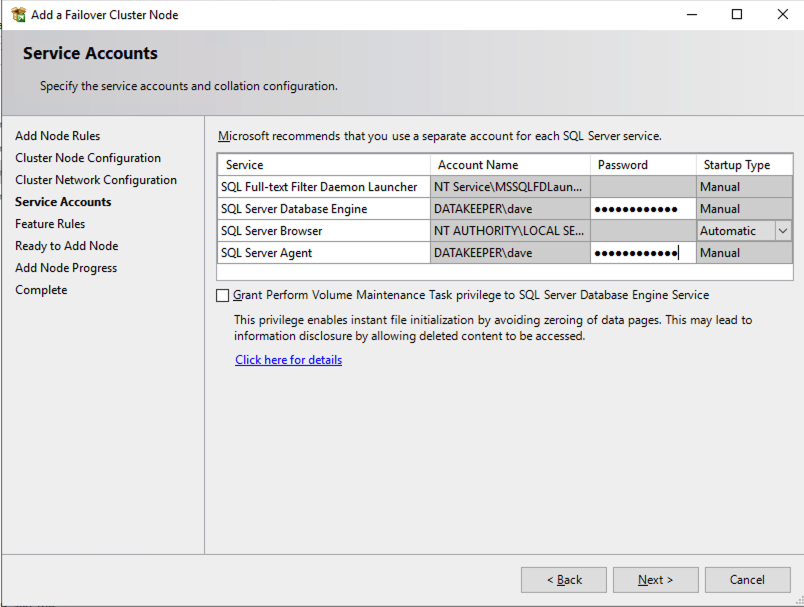
Install DataKeeper Cluster Edition
Before you can move on with the next steps, you will need to install DataKeeper Cluster Edition on both SQL1 and SQL2. Download the setup executable and run the DataKeeper setup on both nodes. Refer to the SIOS documentation for specific guidance on the installation.
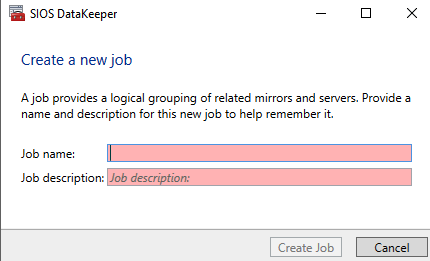
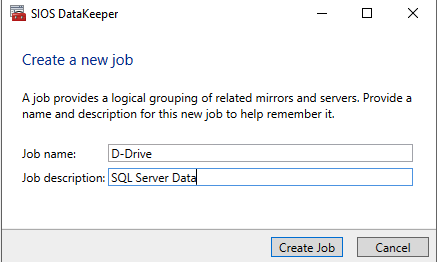
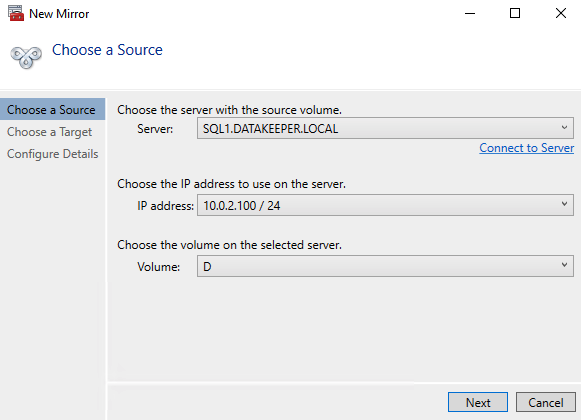
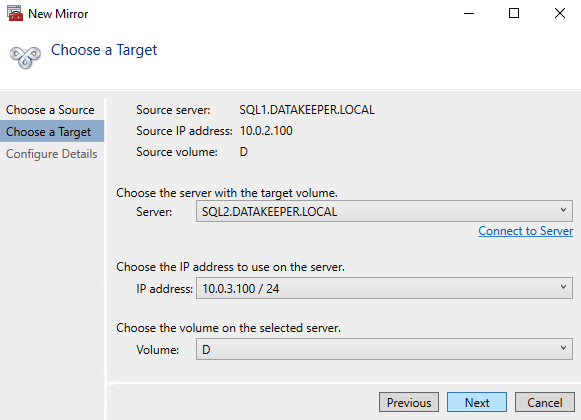
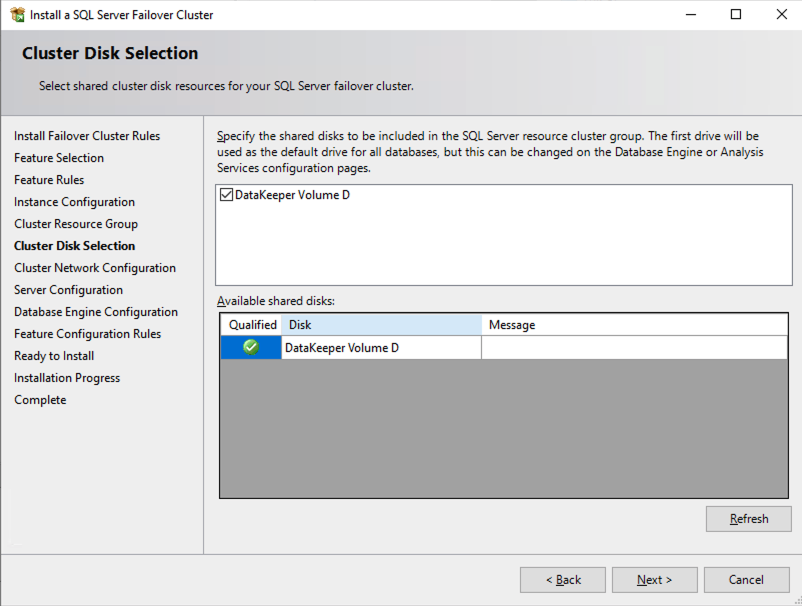
Create the DataKeeper Volume Resource
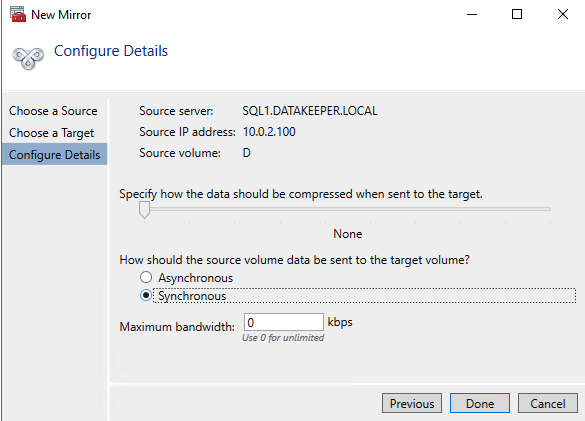
Launch the DataKeeper UI on either of the cluster nodes and create your DataKeeper Volume Resource as shown below.
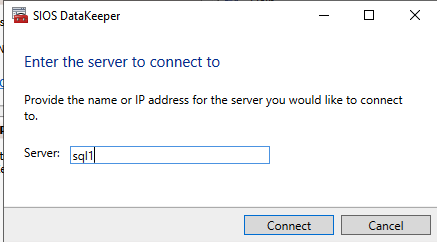
Connect to both servers, first SQL1 and then SQL2
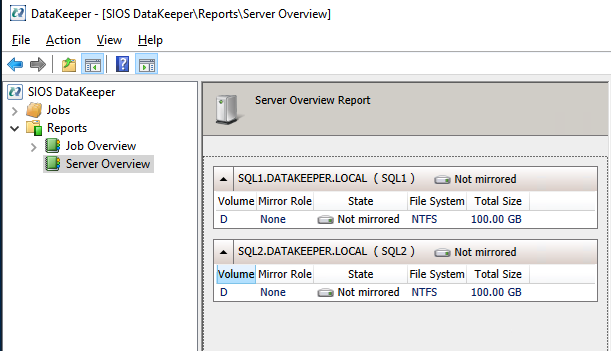
If you have connected to both servers and the storage is configured properly, the Server Overview Report should look something like this.
Click Create Job to start the Job Creation Wizard
DataKeeper supports both synchronous and asynchronous replication. For replication between availability zones in the same region, choose synchronous. If you want to replicate across regions or even across cloud providers, choose asynchronous
Click “Yes” here to register the DataKeeper Volume resource in Available Storage in the cluster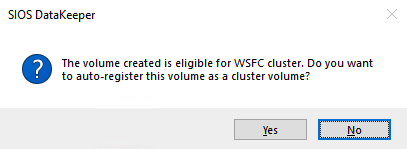
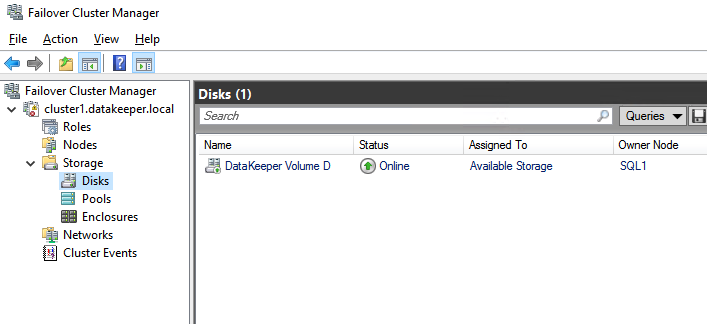
The DataKeeper Volume D now appears in Failover Cluster Manager in Available Storage.
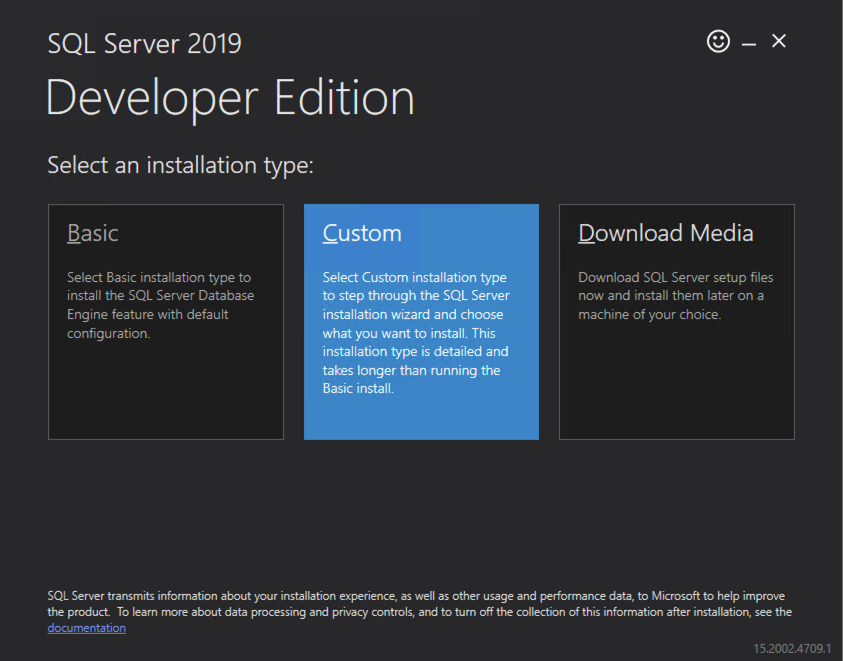
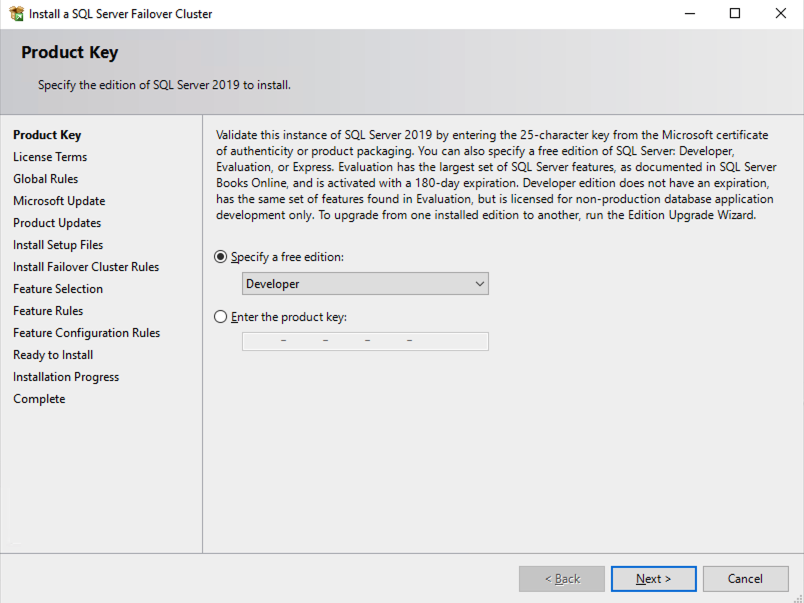
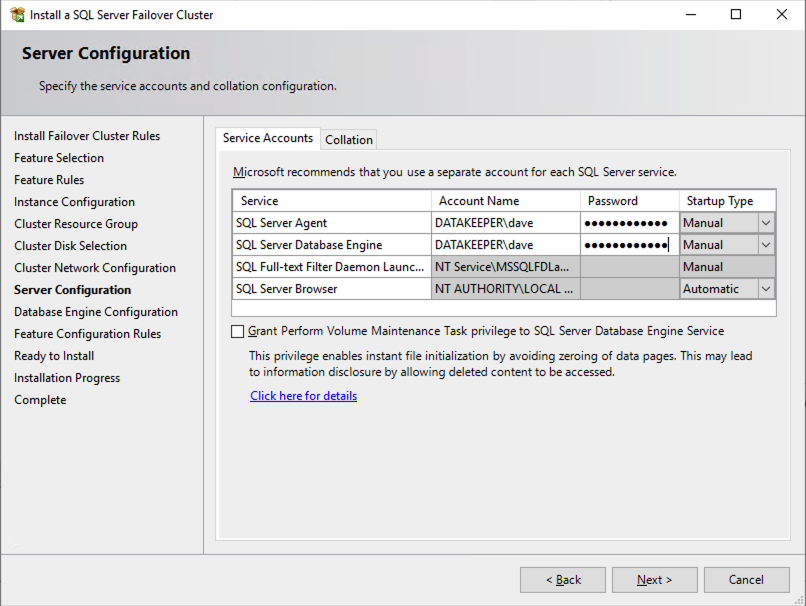
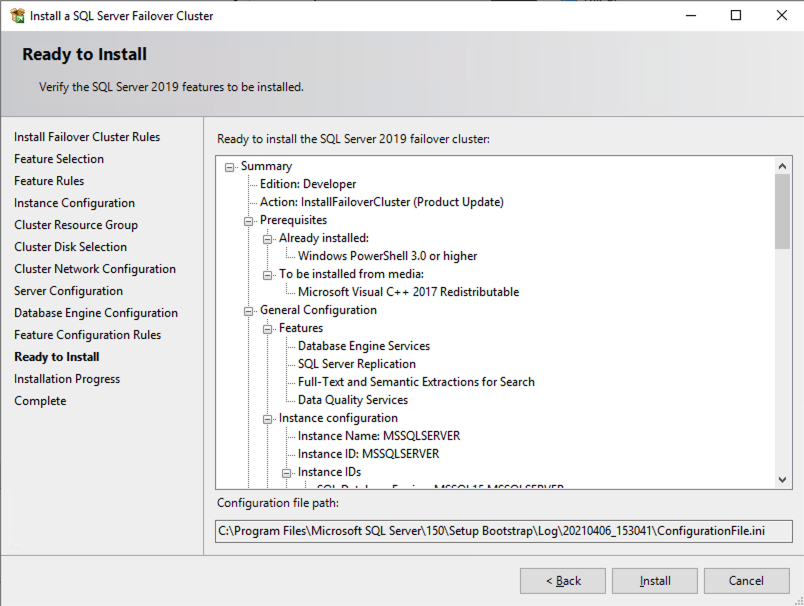
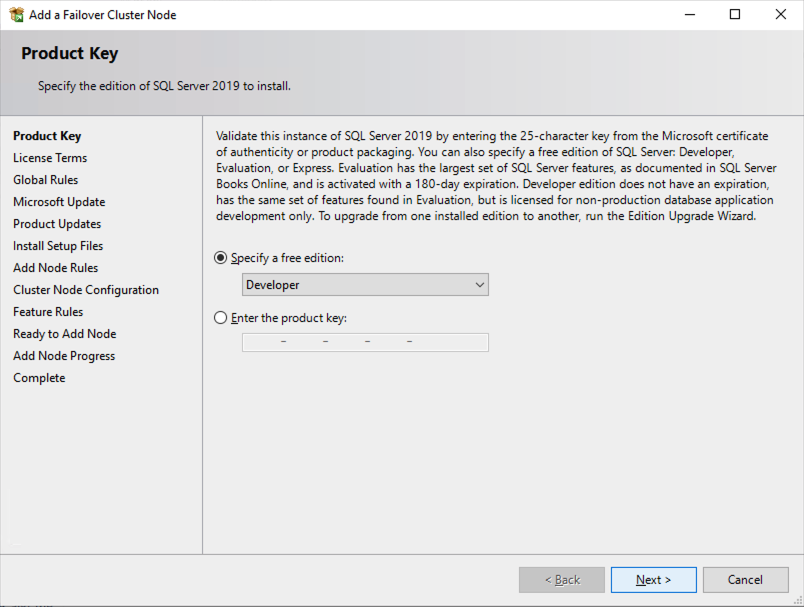
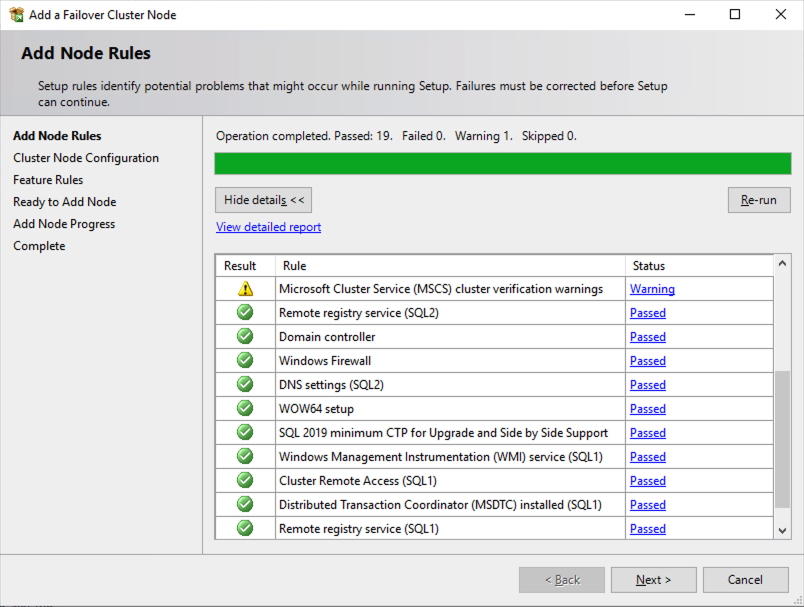
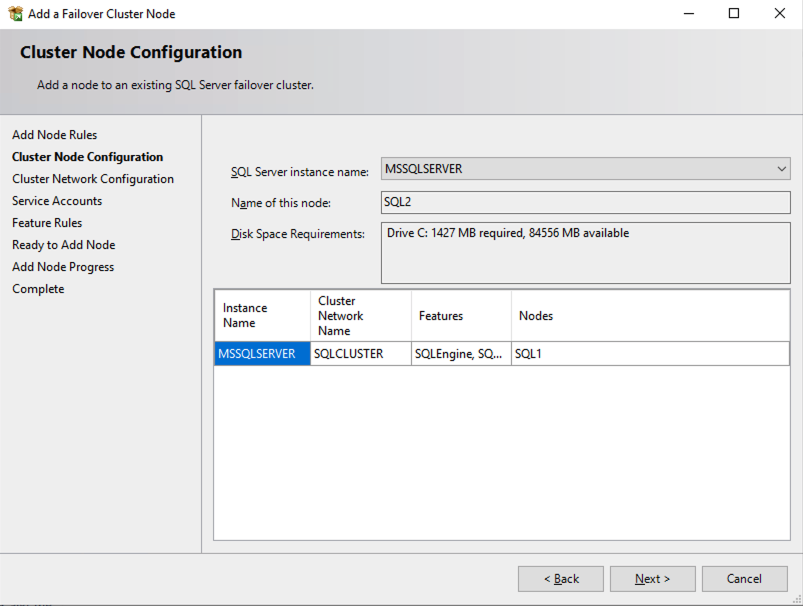
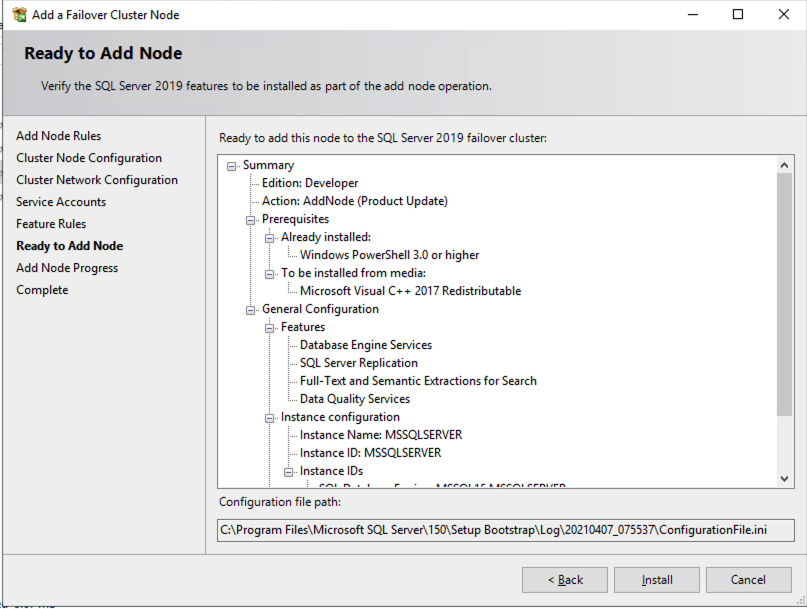
Install the First Node of the SQL Server FCI on SQL1
Now that the core cluster has been created and the DataKeeper volume resource is in Available Storage, it is time to install SQL Server on the first cluster node. As mentioned earlier, the example here illustrates a cluster configuration using SQL 2019 and Windows 2022, but all the steps described in this example are virtually identical, regardless of which version of Windows Server or SQL Server you are trying to deploy.
Follow the example below to install SQL Server on SQL1
The name you specify below is the client access point. This is the name your application servers will use when they want to connect to the SQL Server FCI.
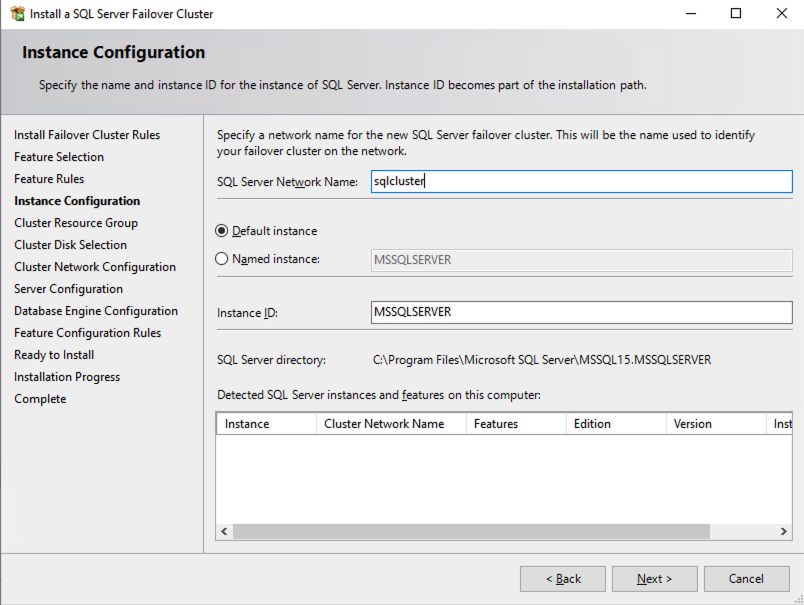
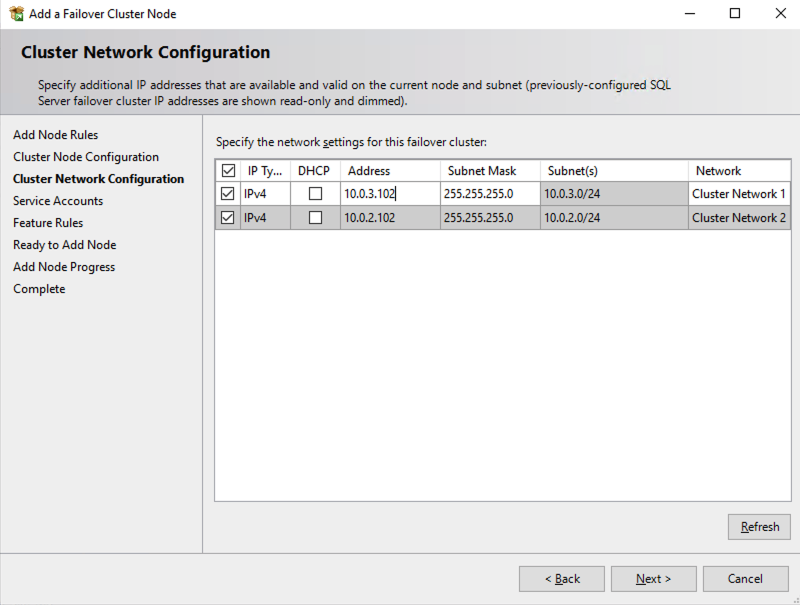
On this screen you will add the SQL1 secondary IP address we identified earlier in the planning section of Part 1 of this series.

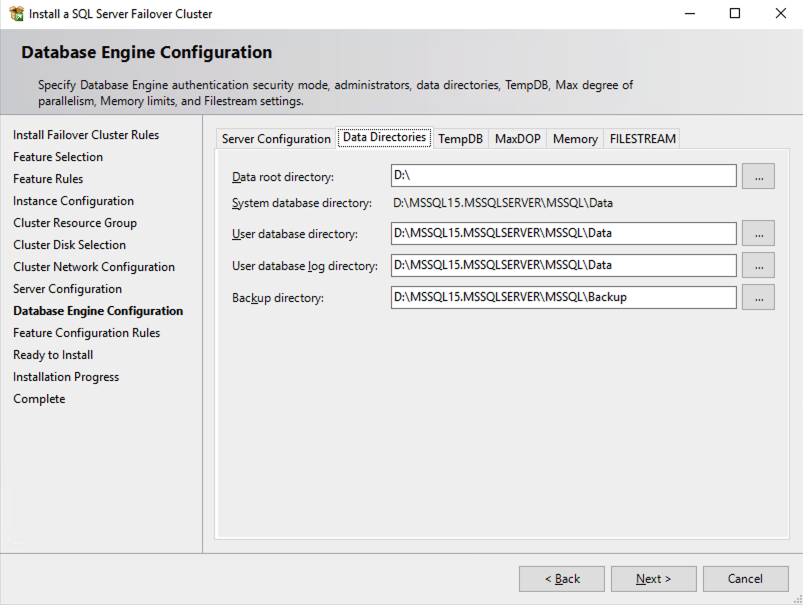
In this example we left tempdb on the D drive. However, for best performance it is recommended that you locate tempdb on a non-replicated volume.
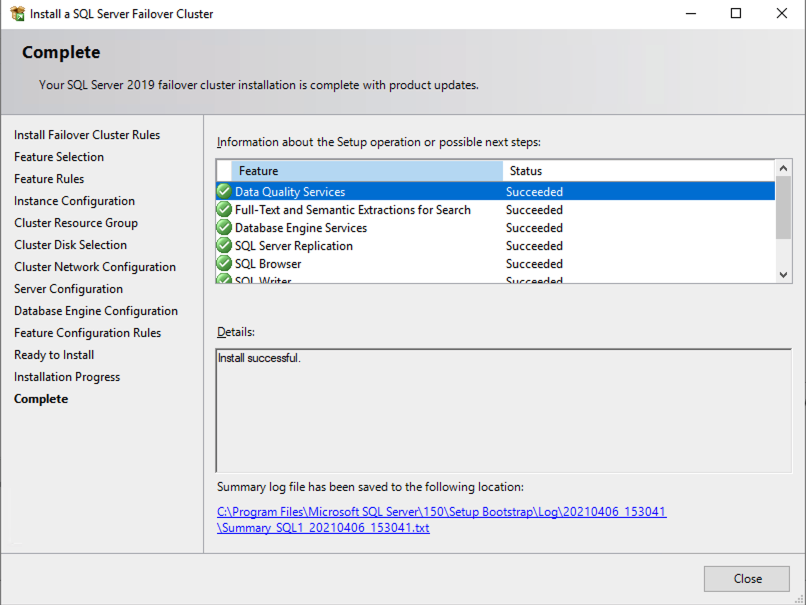
Install the second node of the SQL Server FCI on SQL2
It is now time to install SQL Server on SQL2.
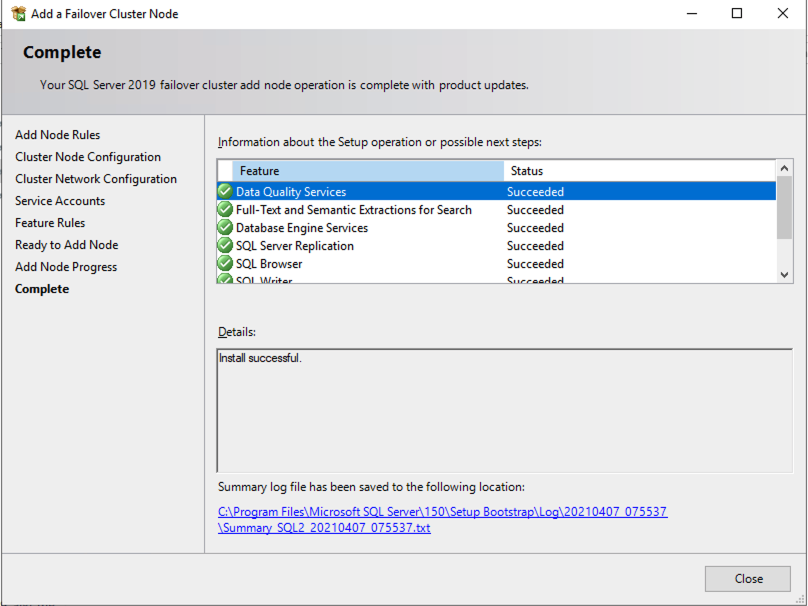
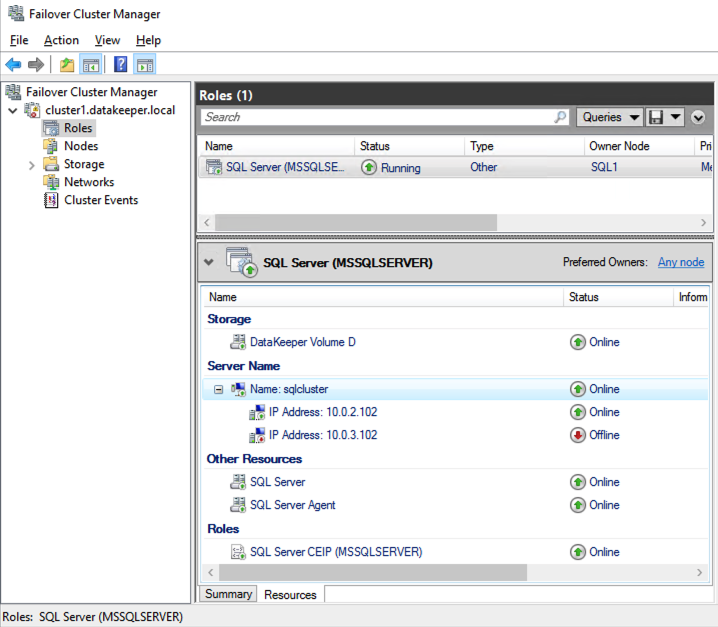
Once you have installed SQL Server on both cluster nodes, Failover Cluster Manager should look like this.
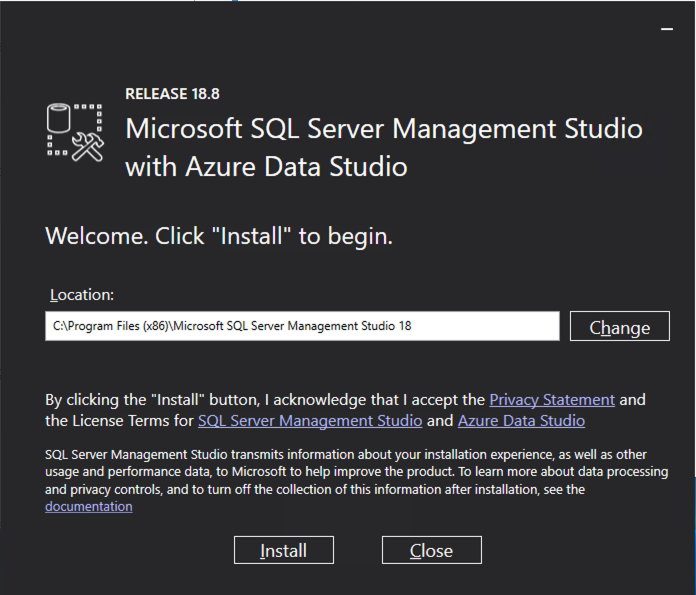
Install SQL Server Management Studio
On SQL Server Versions 2016 and later, you must download and install SSMS as a separate option as shown below. Note: In earlier versions of SQL Server, SQL Server Management Studio (SSMS) was an option that you could choose to install during the SQL installation.
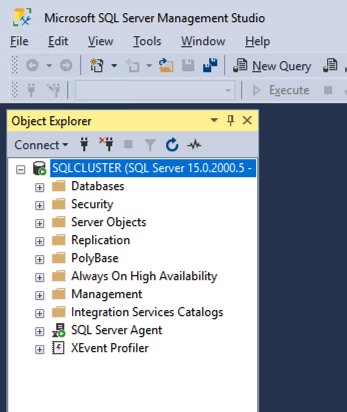
Once SSMS installs, connect to the cluster via the client access point. Your SQL Server FCI should look like this.
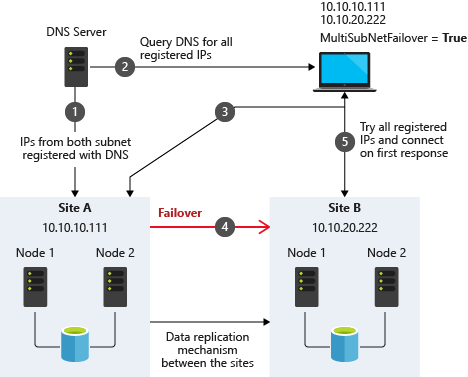
Multi-Subnet Considerations
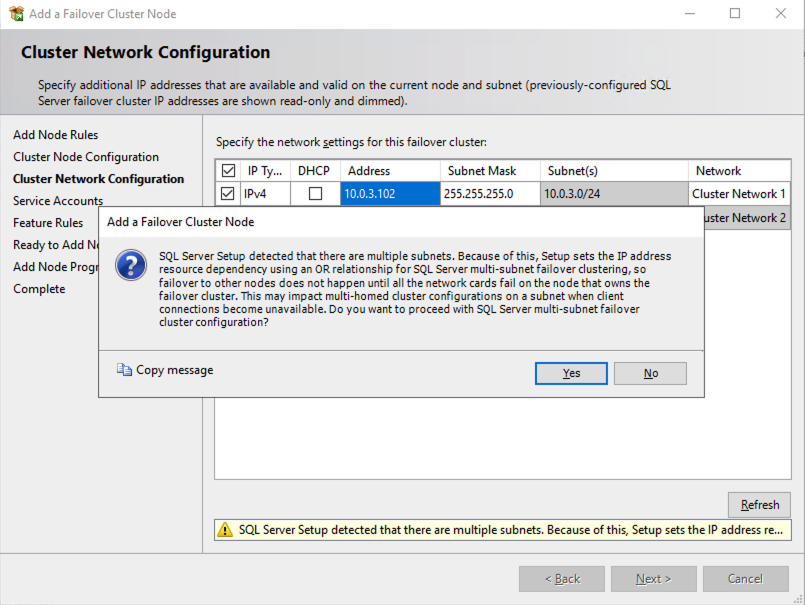
One of the biggest considerations for running a SQL Server FCI in OCI is the fact that the cluster nodes reside in different subnets. Microsoft started to account for the fact that cluster nodes might reside in different subnets by adding the “OR” functionality in Windows Server 2008 R2 as described in the Microsoft documentation.
Taken from SQL Server Multi-Subnet Clustering (SQL Server)
The important thing described in the documentation is the concept of the RegisterAllProvidersIP on the network name resource, which is enabled by default when you create a SQL Server FCI. As described, when this is enabled, two A records will be registered in DNS with the network name resource, one for each IP address.
Using the “OR” functionality, only the IP address associated with the active subnet will ever be online and the other one will be shown as offline. If your client supports adding multisubnetfailover=true to the connection string, then both IP addresses will be tried at the same time and the client will automatically connect to the active node. That is the easiest, and the default method of client redirection in a multi-subnet cluster.
The documentation goes on to say that if your client does NOT support the multisubnetfailover=true functionality, that you should “try to adjust the connection timeout in the client connection string by 21 seconds for each additional IP address. This ensures that the client’s reconnection attempt does not timeout before it is able to cycle through all IP addresses in your multi-subnet FCI.”
Disabling RegisterAllProvidersIP is another option that will work. By disabling the RegisterAllProvidersIP you will only have a single A record in DNS. The DNS A record will be updated each time the cluster fails over with the active cluster IP address associated with the name resource.
The downside of this scenario configuration is that your clients will cache the old IP address until the time to live (TTL) expires. To minimize the delay in reconnection, it is recommended that you change the TTL on the name resource. This process is described here and an example is shown below that sets the TTL to 5 minutes.
Get-ClusterResource -Name sqlcluster | Set-ClusterParameter -Name HostRecordTTL -Value 300
Keep in mind that it also may take some time for the changes to your AD-integrated DNS server to propagate across your entire forest.
Summary
This technical guide provides a comprehensive overview of setting up a SQL Server 2019 Failover Cluster Instance (FCI) in Oracle Cloud Infrastructure (OCI). It begins by highlighting the importance of understanding OCI’s availability SLAs, which differ based on deployment strategies: 99.99% for deployments across Availability Domains, 99.95% across Fault Domains, and 99.9% for single VM deployments. The guide emphasizes that the SLA covers VM availability, not the applications or services running on it, thus necessitating additional measures for application availability.
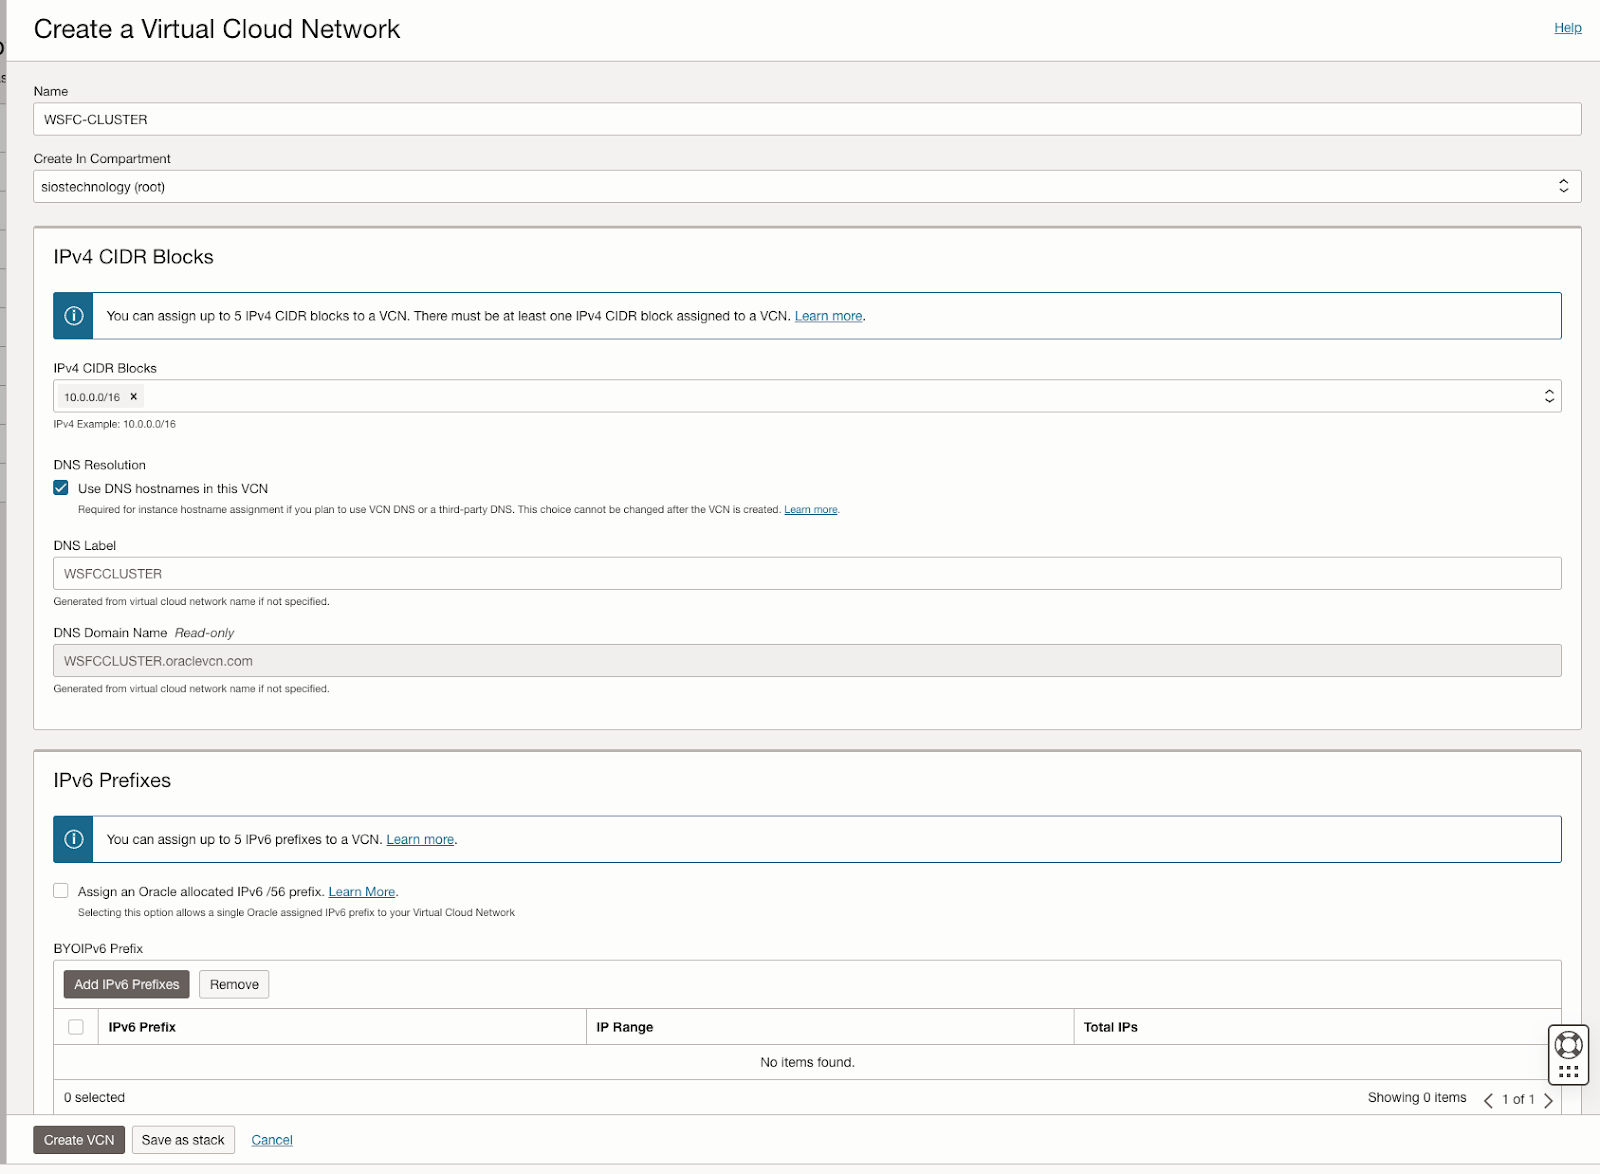
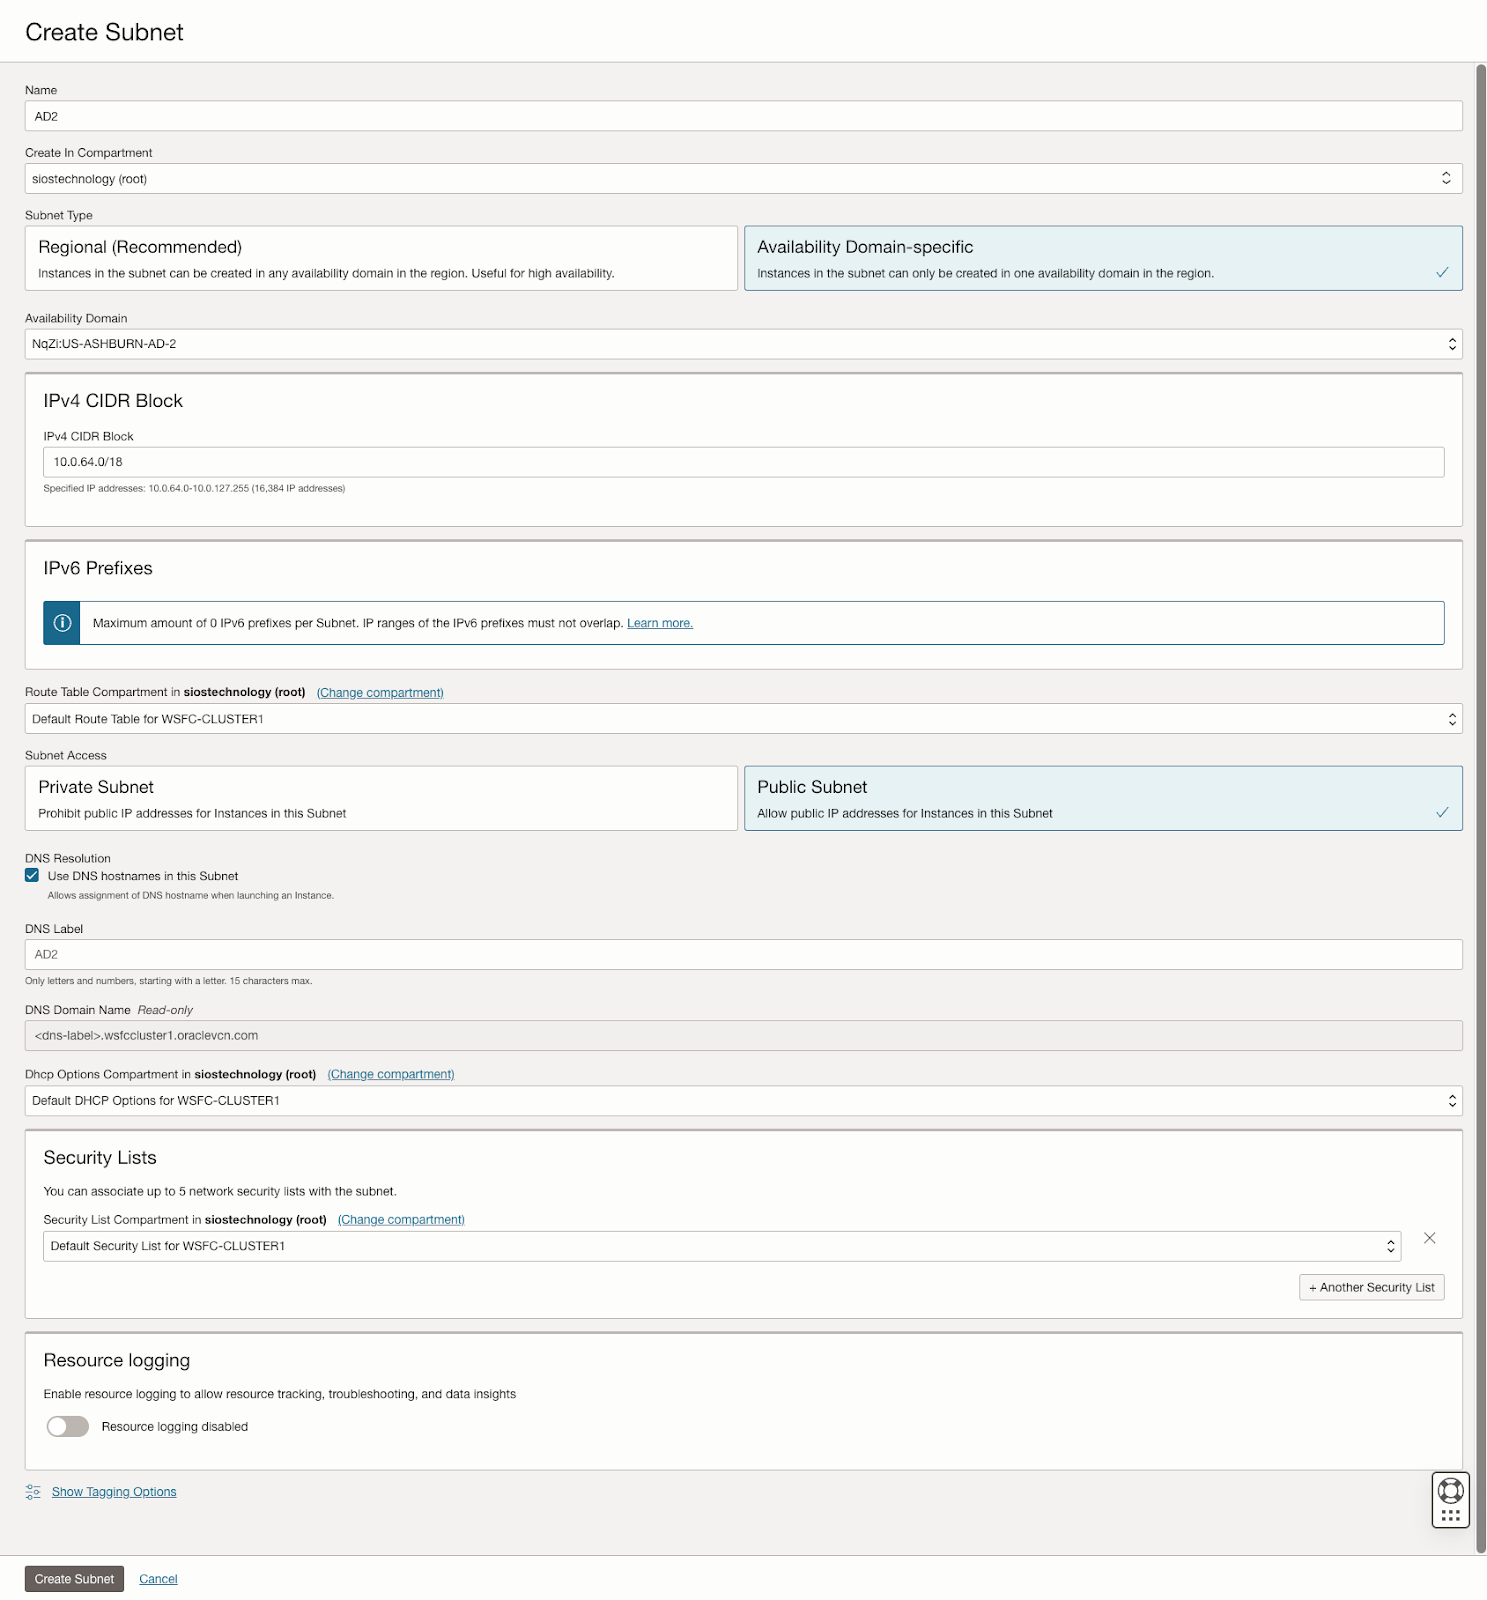
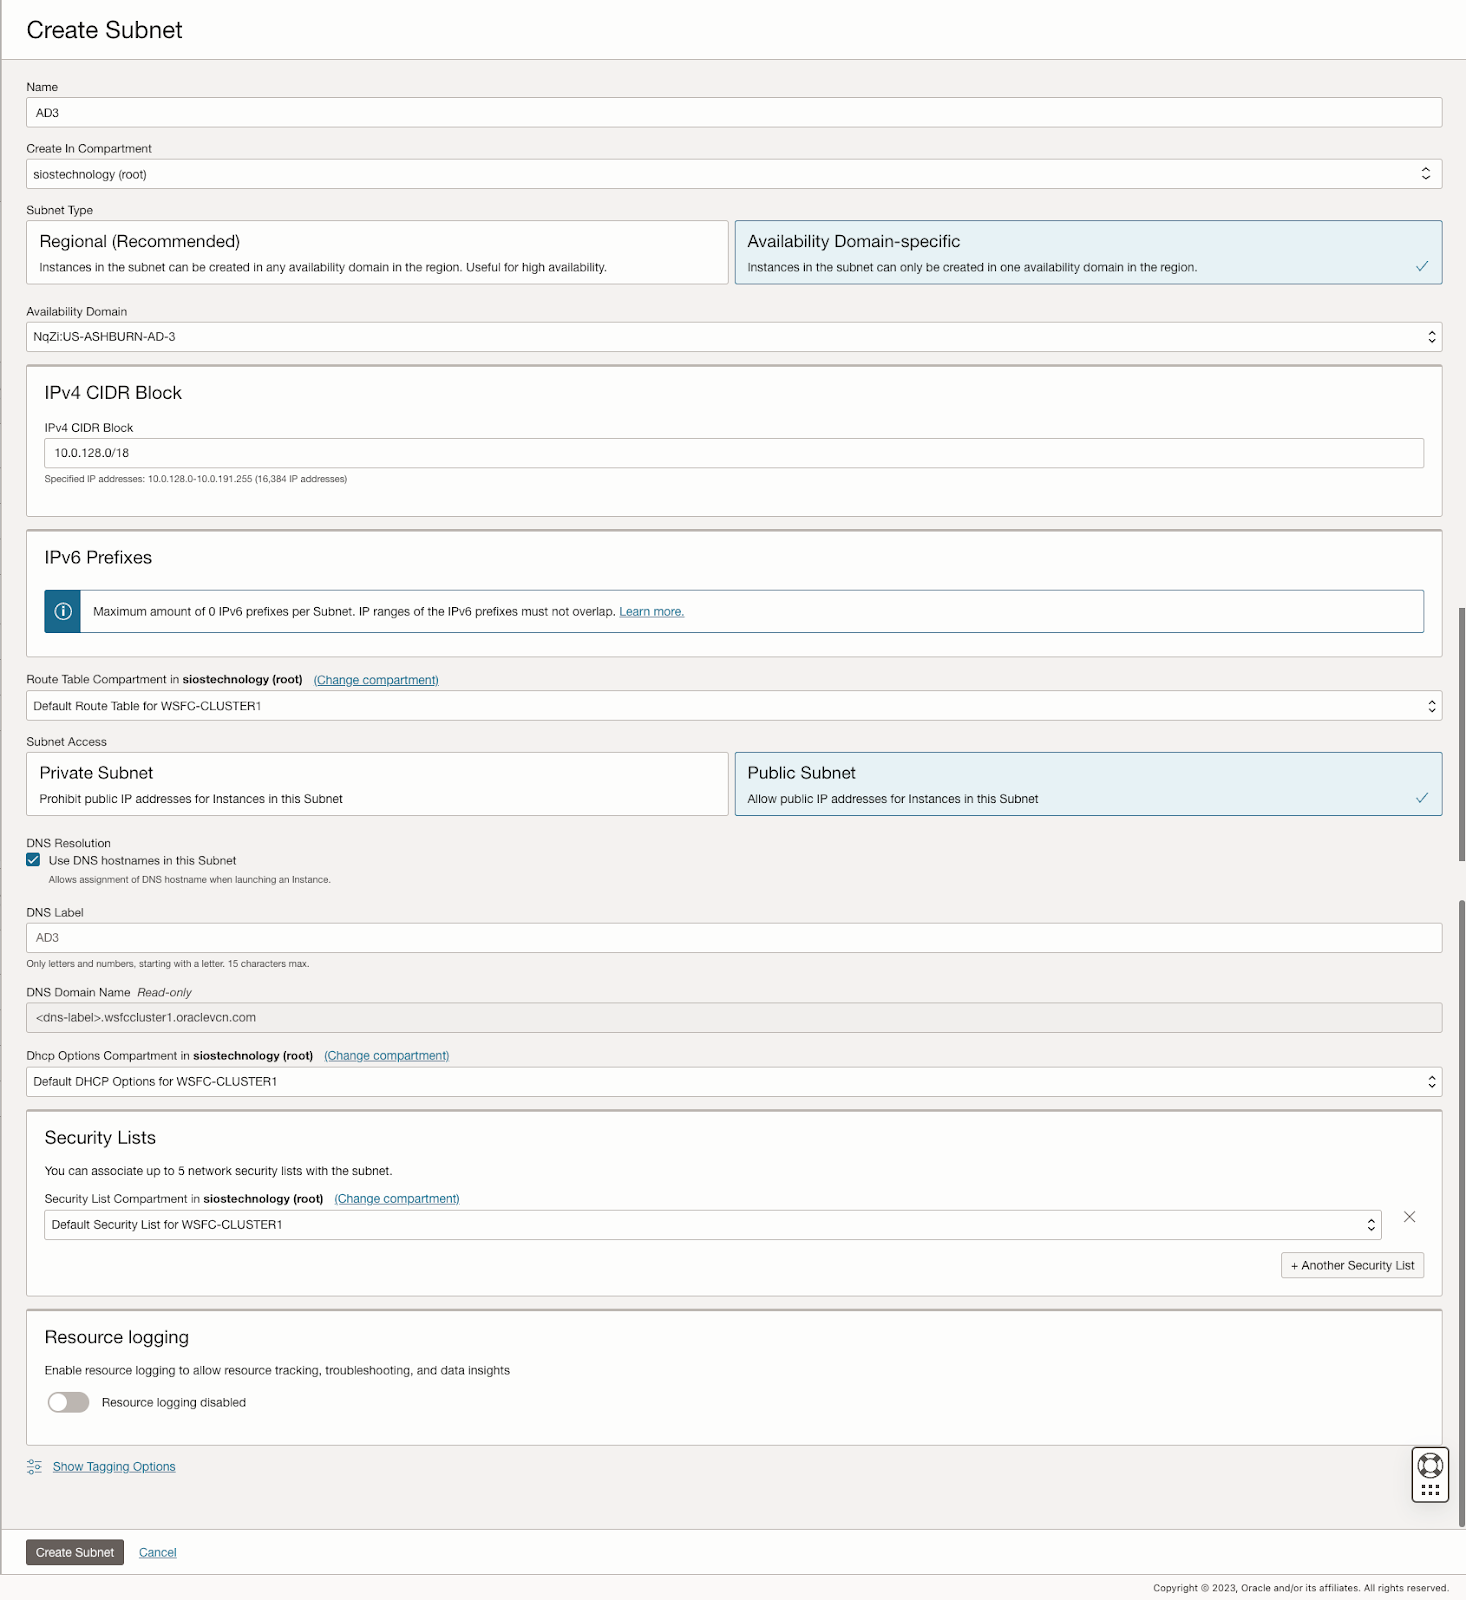
The guide details the initial steps of creating a Virtual Cloud Network (VCN) and subnets in OCI, emphasizing the need for a network plan that accommodates at least three Availability Domains for clustering purposes. Each Availability Domain must be in a different subnet, a requirement applicable to clusters spanning Fault Domains as well. It provides specific configurations for setting up three subnets across different Availability Domains within a single VCN.
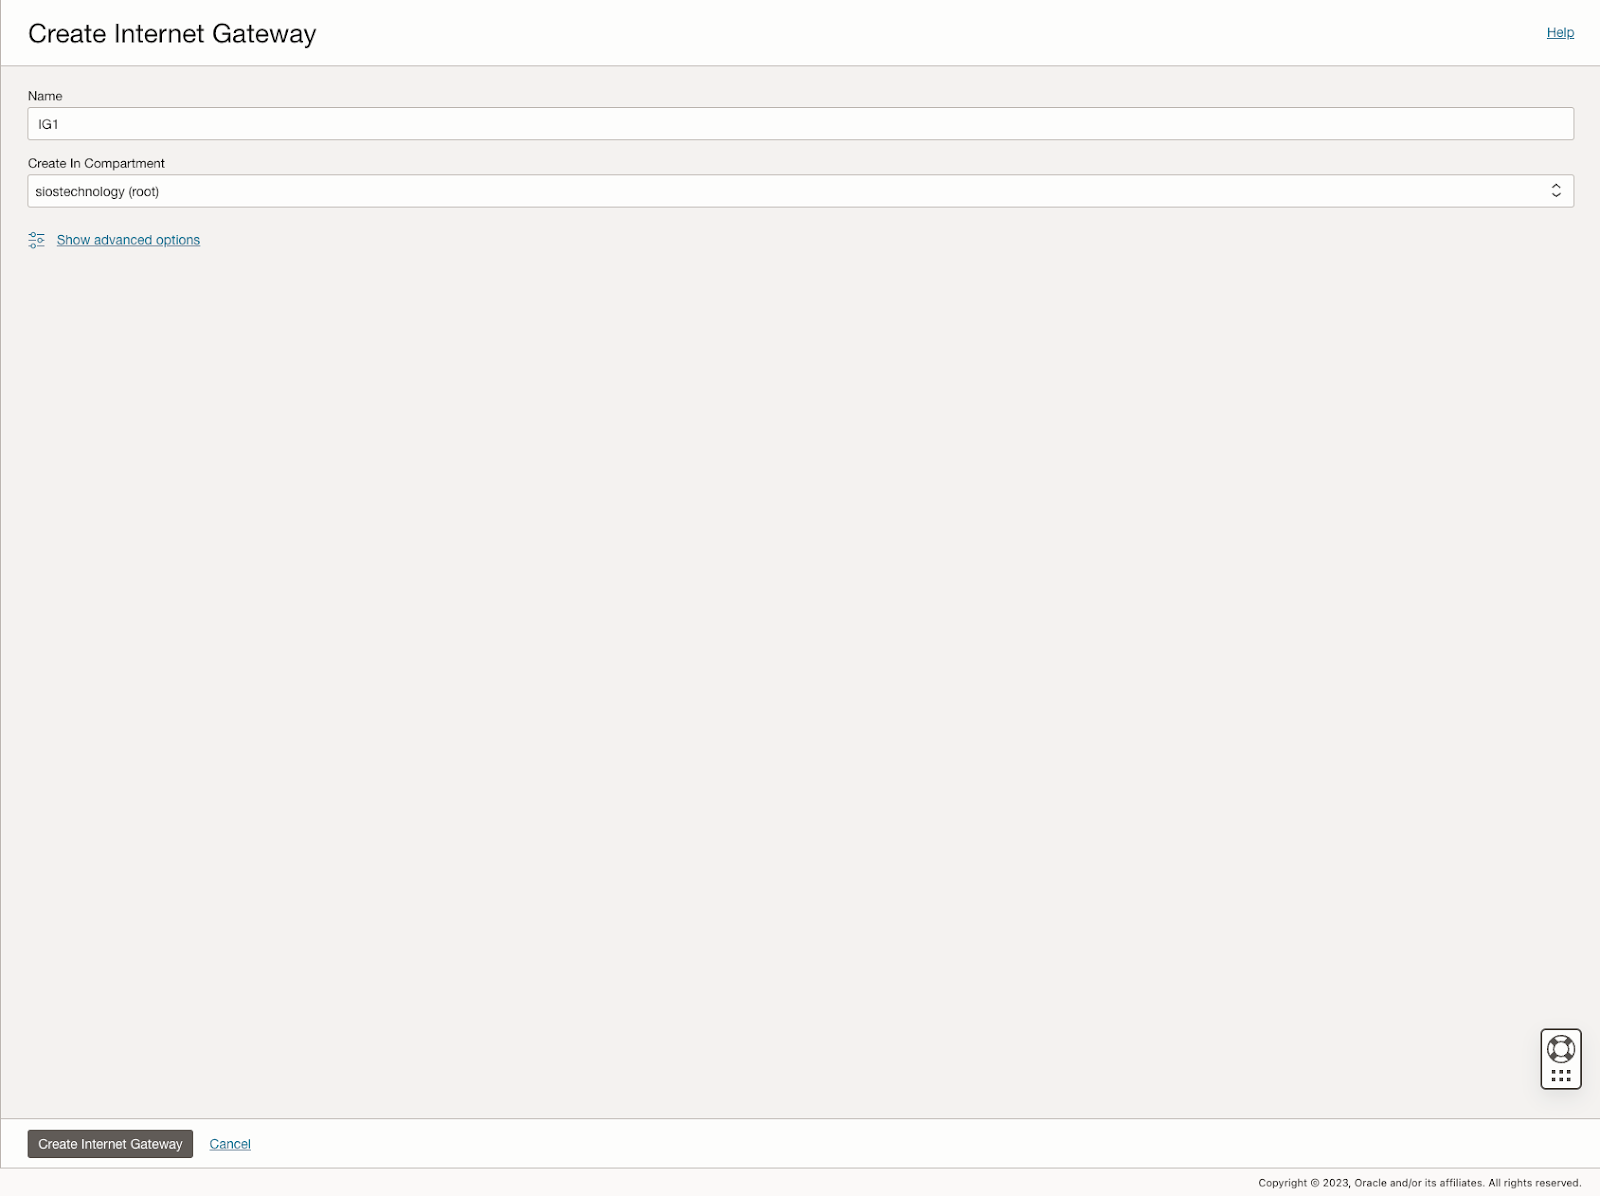
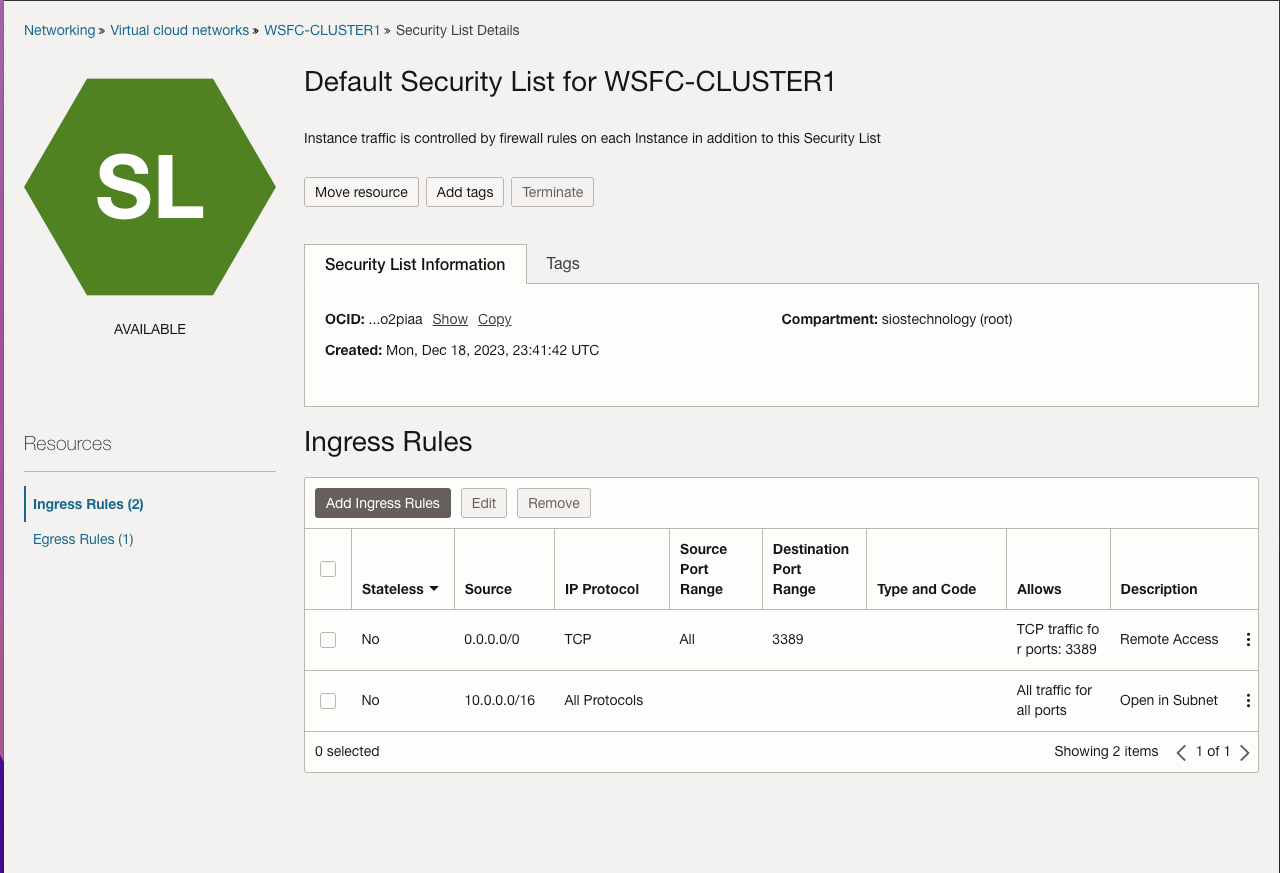
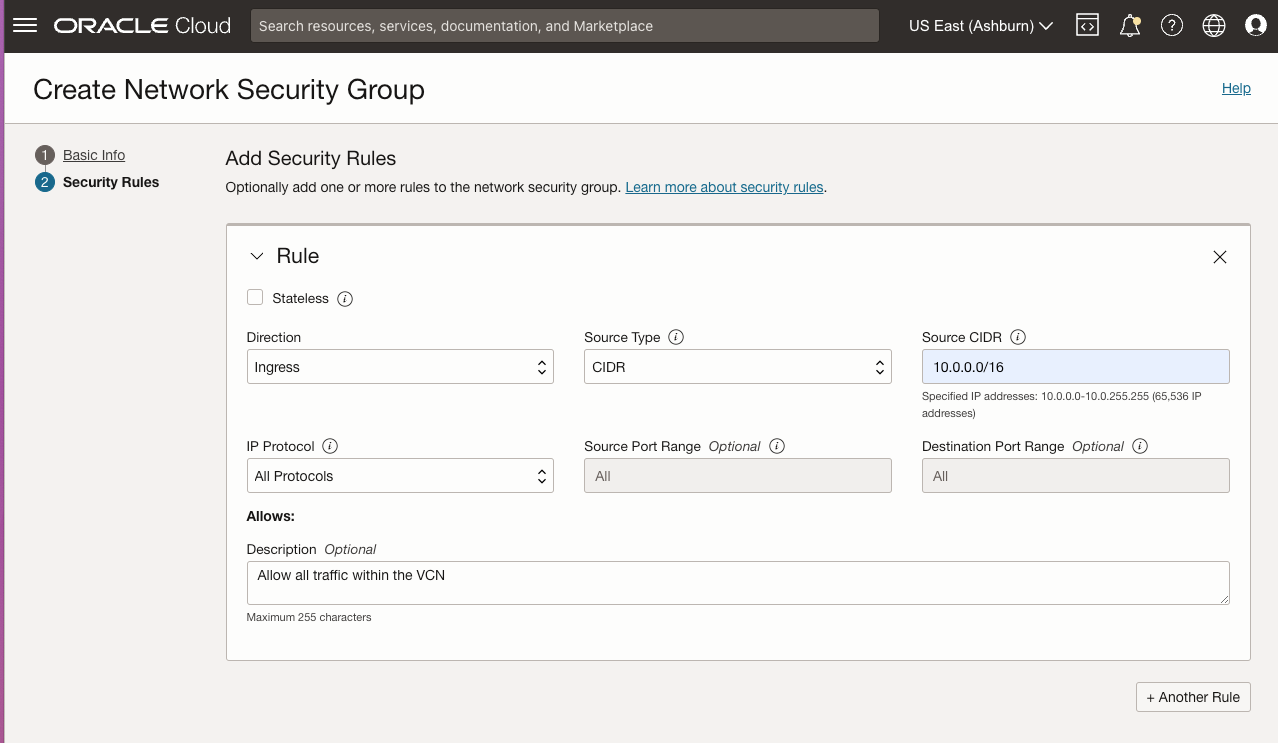
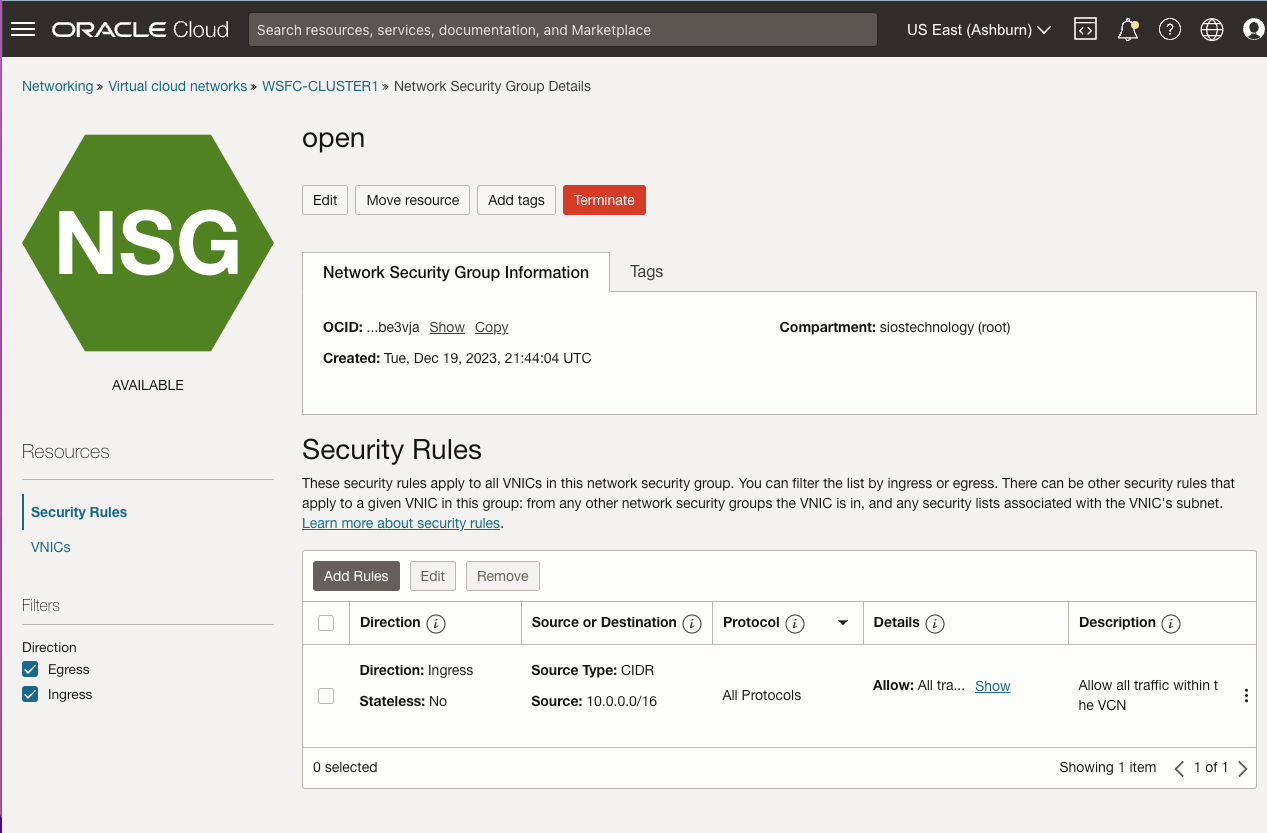
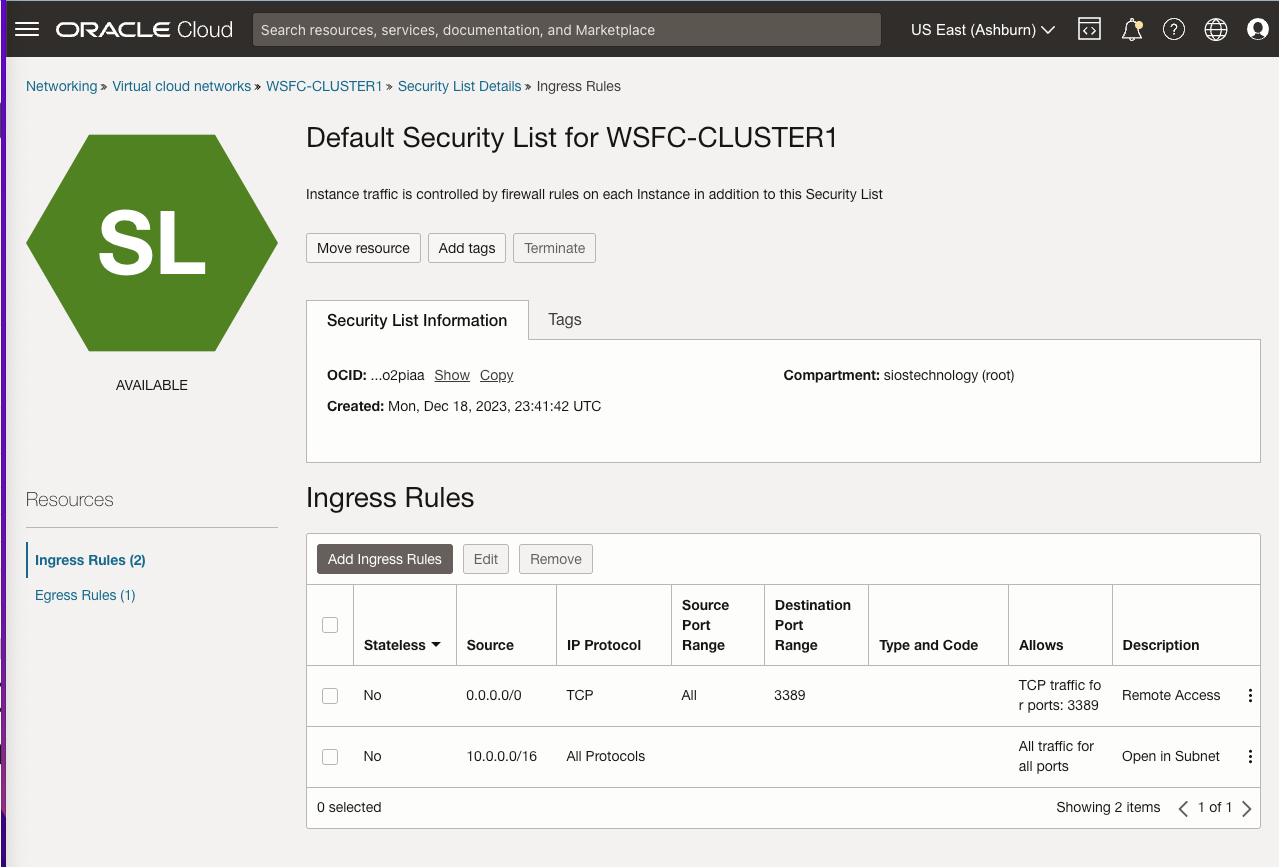
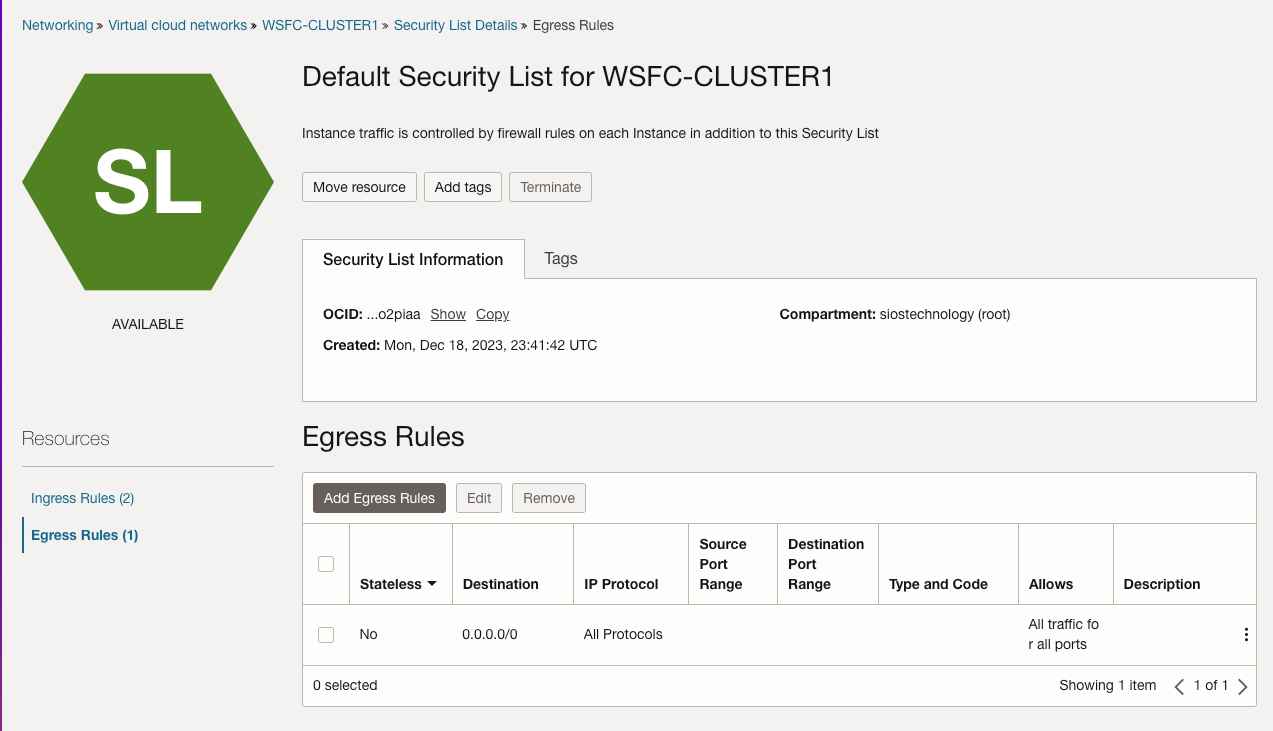
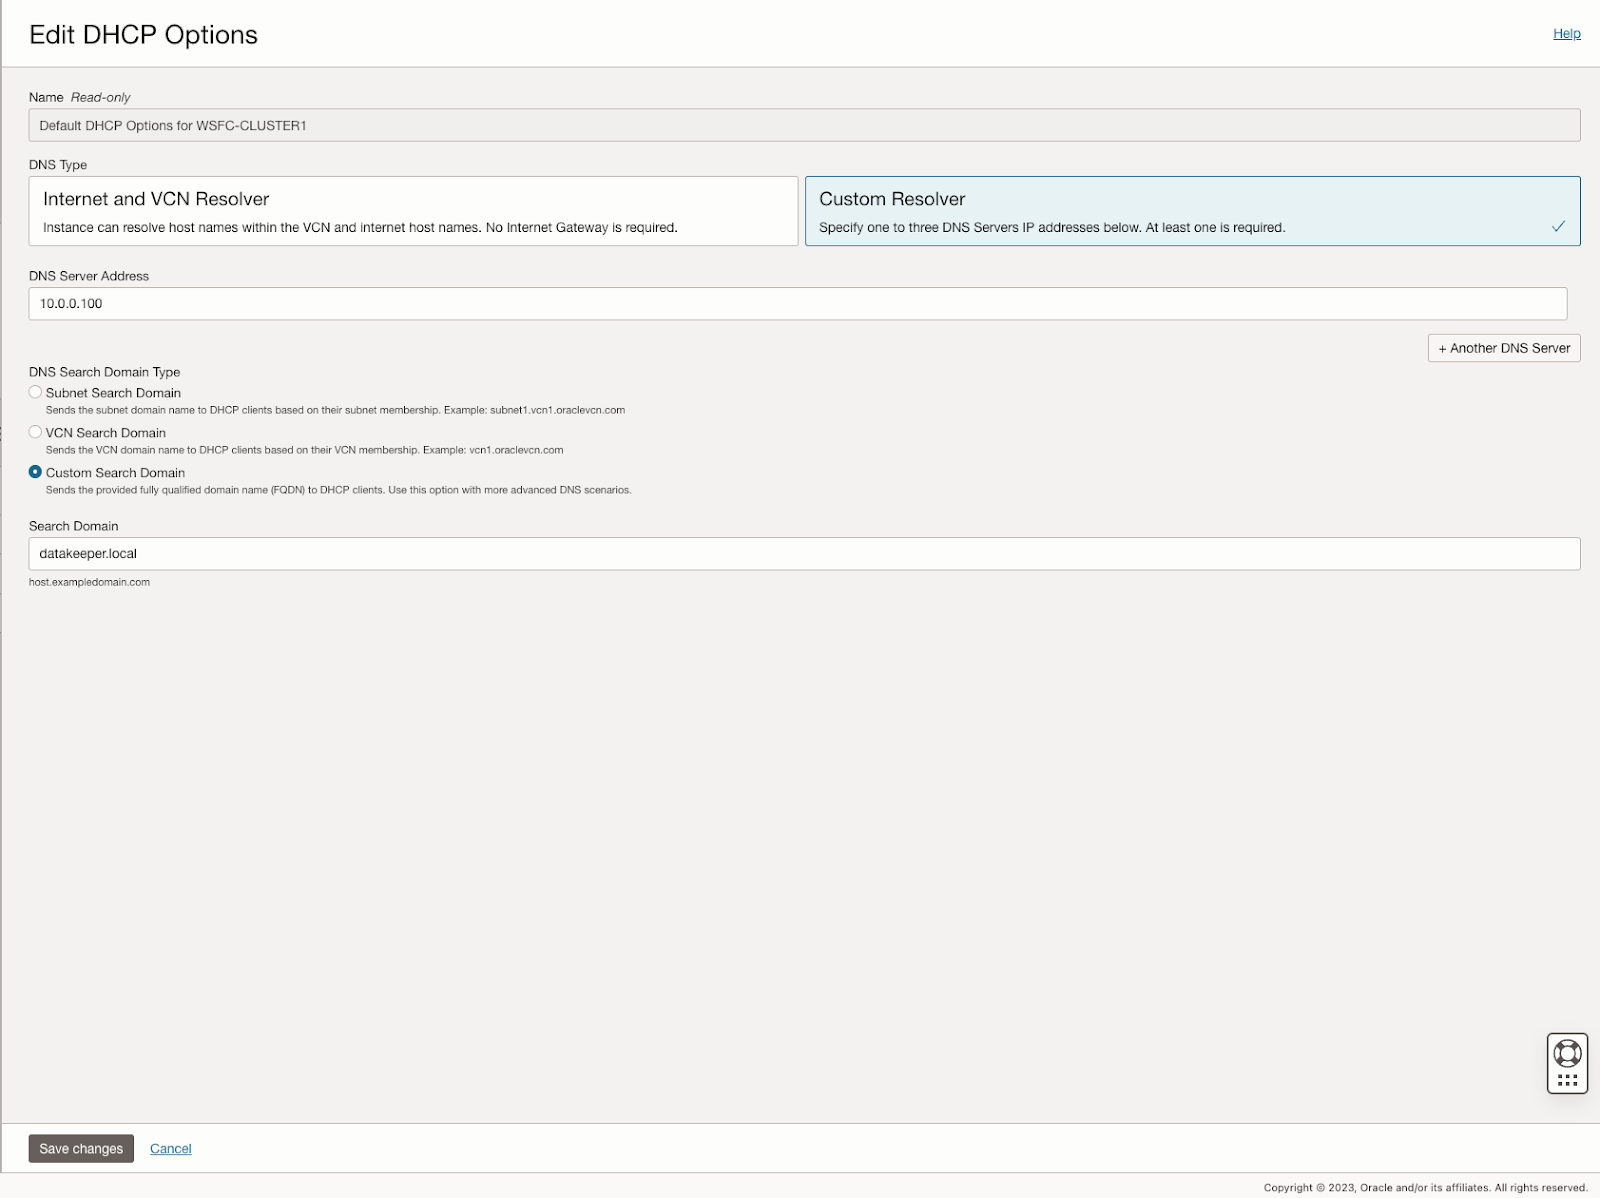
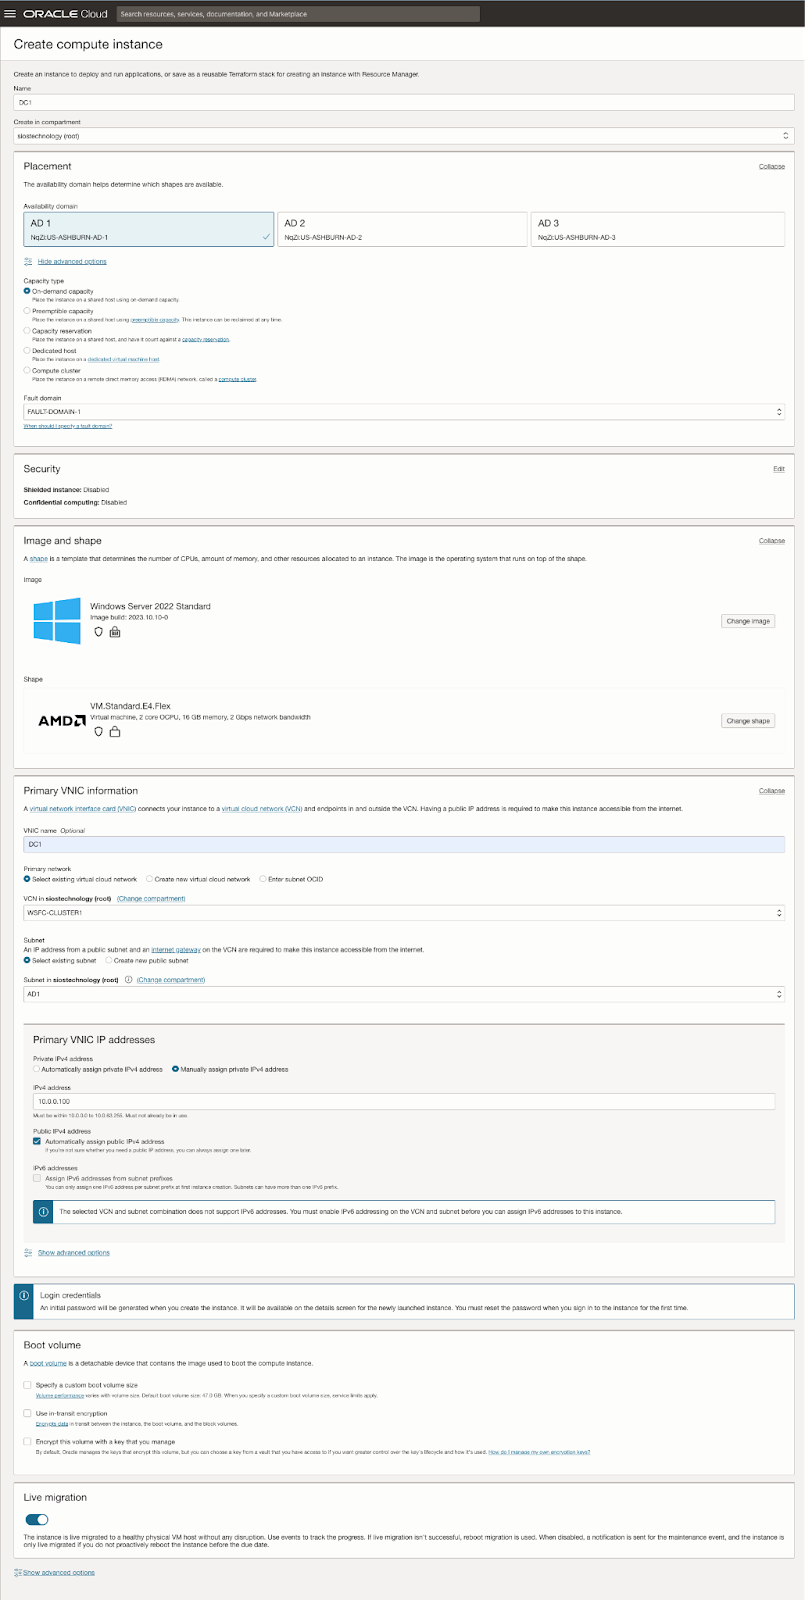
Further, the guide describes the process of creating an internet gateway and editing default security lists and route tables to facilitate access and security across Availability Domains. It also covers the configuration of DHCP options for Active Directory compatibility and outlines the steps for provisioning VMs with Windows Server 2022 and SQL Server 2019, emphasizing the importance of planning server names, IP addresses, and availability zone placements.
The guide then delves into adding additional volumes for SQL Server FCI storage needs, detailing the process of creating and attaching block volumes to instances. It also instructs on configuring secondary IP addresses for Windows Server Failover Clustering in OCI.
Next, the guide addresses domain controller setup, including enabling Active Directory Domain Services and promoting the server to a domain controller. It walks through the preparation of storage and enabling of the Failover Clustering feature on SQL1 and SQL2, along with cluster validation and creation processes.
The guide further discusses adding a File Share Witness to maintain cluster quorum and installing DataKeeper Cluster Edition for volume replication. It provides a step-by-step approach to installing SQL Server on the cluster nodes and SQL Server Management Studio, along with considerations for multi-subnet deployments.
In summary, this guide offers a detailed blueprint for deploying and configuring a SQL Server 2019 FCI in OCI, covering aspects from network setup and VM provisioning to clustering, storage configuration, and domain control setup, ensuring maximum uptime and reliability for business-critical applications.
Download Step-by-Step guide here.
Reproduced with permission from SIOS
Four Tips For Choosing The Right High Availability Solution

Four Tips For Choosing The Right High Availability Solution
High Availability and Lebron is the Greatest Of All Time (G.O.A.T) Debate
I was losing at Spades. I was losing at Kahoot. I was losing at a game of basketball, and all to the same friendly competitor, Brandon. So, to distract him I went back to my go to debate- “Lebron is the greatest of all time!” The next tension filled minutes were filled with back and forth rants tinged with the names of some of basketball’s greats: Michael Jordan, Julius Erving, Wilt Chamberlain, Bob Cousy, Shaq, Bill Russell, Jerry West, Steph Curry, Kevin Durant, Kobe Bryant, Magic and Worthy, and Lebron. He jousted with, “How can you even say Lebron is the greatest, Kobe had a killer instinct!” Our verbal sparring would expand to what are the requirements, what makes someone a part of the conversation of greatness, or even a candidate for part of the discussion. Do they need longevity, scoring records, defensive prowess, other accolades and honors? How many Most Valuable Player awards should they have as a minimum? What about the transcendence of their era? What about this or that, and of course my friend Brandon is always quick to throw in titles!
How to Choose the Best High Availability Solution
But, what does this have to do with High Availability? Glad you asked. How often have you been asked to provide or choose the best availability or higher availability solution from a sea of contenders? You’ve decided that the last weekend ruined by an unplanned application crash or down production server was the last weekend that will be ruined by a lack of automated monitoring and recovery. But, which solution is best among the great names like: Microsoft Failover Clustering, SuSE High Availability Extensions, PaceMaker, NEC ClusterPro, vWare HA, SIOS Protection Suite, and SIOS AppKeeper? Four things I learned in sparring over the Greatest Of All Time that will help you with your high and higher availability quandary.
The Requirements for HA
First, what are the requirements? If I wanted the best pure shooter of all time, I’d easily and readily include Steph Curry. If I wanted the most intimidating physical presence, I’m going with someone like Shaq. If I need the best teammate, assist leader, or all around great then I think Lebron James, Magic Johnson, Jerry West, Larry Bird are in the conversation. Likewise, before you start spinning up an HA solution, understand what you need. Is data replication essential or optional? Do you need SQL or are you equally inclined to use other databases? What other applications and packages are necessary? Do you need a solution that can usher you into the cloud, but first it has to tame legacy, vmWare, and physical systems? Will you be an all Windows application shop, or a mixture? Try to think of your team as well. Do you have high turnover that makes management of multiple solutions difficult, training courses essential, and real live people in support critical? Do you need ease of use or just heavy on robustness? Where does longevity and stability of the offering, product, and company fit?
Second, how are you prioritizing your requirements? How will you prioritize the greats against the established requirements? My friend Brandon is always quick to throw in titles. He always counters, how many titles does Lebron have? Titles are king in his debate. I typically, and sarcastically counter with stating that even the 12th man on the bench gets a ring. I highlight the fact that Robert Horry, an outstanding power forward, has more titles than Lebron and MJ. Have frank and honest conversations about the priority of the requirements. As you pick an HA solution, how important is ease of use, OS support, and application breadth of support as compared to RTO/RPO? What features and requirements are considered a must-have, should have, and are nice to have. As the VP of Customer Experience, we once encountered a customer who insisted that the cluster software supports 32 nodes, despite the fact that they had no plans to build clusters larger than two or three. Prioritize the list.
Measuring RPO and RTO for Disaster Recovery
Third, how are you measuring those requirements? How will you measure the greats against the established requirements? Stats in basketball are fun, informative, and often misleading. Brandon often reminds me to check how scoring titles were won as often as I taught how many were won. We often drop barbs about who is better to start or close the game and how to really measure drive, intensity, and a will to win. Likewise, when you comb through the literature, pour over the proof of concept details, determine and define how you will measure things like RPO and RTO. Is RTO based on the client reconnect time or the time the application is restarted? Are you measuring RTO for a failover (server crash) recovery (application crash), manual switchover (administrative action), or all of the above? If application performance is important to you, what does that measurement look like? Is it read performance, write performance, or based on the client’s actual or characterized workload? Think about where benchmarks fit in, or do they? Also, be honest about what you are comparing the numbers to. Measuring for faster database query times during normal operation and on recovery is important, but what if the rest of the solution creates lags that are experienced higher in the user experience?
Evaluating High Availability and Disaster Recovery
Lastly, keep evaluating. From the time that Julius rocked the baby to sleep on the baseline, to the days when Jordan took off from the freethrow line, to the time when Steph Curry shot a step inside the halfcourt line, the game of basketball has been evolving. The “Jordan Rules” and “Bad Boy Era” swagger has been replaced with a ruleset that favors and highlights the combination of skill, power and finesse. Likewise, the landscape of technology is constantly changing. The solution that made the top ten when Solaris and MP-RAS servers ruled the day, may not have adapted to the nimbleness of Linux, Windows or other variants. The SAN based solution that harnessed the power of Fiber Channel may be obsolete in the cloud and SANless world. So, keep evaluating greatness. Keep monitoring how the solutions in the top ten are moving with the trends, or better yet, still making them.
While my debate with Brandon rages on, and likely generations from now, even our children will not have settled on a winner, you can select the right HA solution to meet your enterprise availability needs. Contact a SIOS representative to help you understand, prioritize, and measure the SIOS Protection Suites ability to exceed your requirements.
Reproduced with permission from SIOS
Disaster Recovery Solutions: How to Handle “Recommendations” Versus “Requirements”

Disaster Recovery Solutions: How to Handle “Recommendations” Versus “Requirements”
Let’s say you experience an issue in your cloud cluster environment, and you have to contact one of your application vendors to get it resolved. They give you the resolution, but they note in their response that the way you have these systems configured is “not recommended”. How do you handle this information? After all, everything’s been working very well so far, and it could take a lot of time and resources to get them reconfigured in the “recommended” way. On the other hand, surely it’s recommended by the vendor for a reason, right? What if it causes other complications down the road? Let’s take a look at what exactly constitutes a recommendation, and ways that you can approach them from either side of acceptance.
DR Solution Recommended Configuration
You should start looking at how to handle a recommendation by taking it completely literally, defined as “a suggestion or proposal as to the best course of action”. Already we could see a couple of hints here as to how we can approach them with the words “suggestion” and “proposal” being used to identify it. Looking at it this way, it is easy to turn down a vendor recommendation because it is inconvenient, or perhaps it is deemed unnecessary.
However, before taking any action on a recommendation, make sure to also take a more pragmatic look at it. After all, there is a reason that the vendor would suggest this particular kind of configuration. They are just as interested in your success as you are as part of an ongoing relationship, so surely it must carry some kind of positive benefit. It could be that without the recommended configuration, you are more susceptible to certain types of errors. It could also be a case of degraded performance, where everything is working fine but it could be working better or faster. Taking this into account, wouldn’t it be better to put in the time and effort to meet these recommendations now, as opposed to starting on it after you have been affected by the drawbacks of not following the recommendation?
How to Handle DR Solution Configurations Outside of the Recommendation
Now we can build our full perspective on recommendations by drawing together both ends of this discussion. The summarized version is: “It is okay to not follow vendor recommendations, as long as you are aware of why it is recommended and accept the potential drawbacks of doing so”. The crucial first step is always going to be simply talking to the vendor. Ask them questions about why they recommend it, the impact of having it versus not, if they have any methods or procedures to easily transition to a recommended environment, and anything else you can think of to help better inform yourself and your internal teams. Once you understand the impact, you are in the right position to refuse it if you have the proper justification. An example of a good justification for turning down a recommendation is for security purposes. Perhaps the recommended environment would turn off or circumvent certain security measures you have in place, so using that environment would not only make you more vulnerable, but it could also lead to violation of SLAs, partner agreements, or standards that you are bound to. In this case you can inform the vendor of why you are not following the recommended configuration. This can be very beneficial to the vendor as well, as they can take this feedback and in the future implement improvements that can allow for the recommended configuration and the security measures at the same time. As stated earlier, they are also invested in your success, so this is a win for everyone.
Disaster Recovery Solution Requirements
Sometimes, though, it’s not so easy to say “no” to what the vendor is telling you. This is where you cross the border from a vendor “recommendation” to a vendor “requirement”, and it becomes unavoidable. When it is presented to you as a requirement, it becomes something that you cannot just decline to follow. Still, as with recommendations, it is important to understand why it is a requirement, and what it is actually a requirement for. Certain practices can be required as part of a SLA you agreed on with the vendor, or a TSA for the products, applications, or services. In these cases it would indeed follow that the change needed to meet this requirement has to be made. Requirements also commonly fall in the more technical side of things. For example, specifications on disk size, I/O capacity, or available machine resources, just to name a few. These tend to be necessary for the application to work as intended, so the value in making sure these requirements are met is readily apparent.
Disaster Recovery Solution Flexibility
Just because you have to follow the requirement does not mean that you must simply resign yourself. There is still much value to be seen in understanding why that requirement is in place. As with a recommendation, talking to your vendor is vital. Perhaps a reason you do not like the requirement is rooted in a misunderstanding, and discussing the reasoning with your vendor can reveal that and clear away some apprehension. Again, your feedback on these requirements can be very important for your vendor to improve the products or services, and help them understand the value you see in being able to do something a different way. All it takes is just starting a dialog.
SIOS High Availability and Disaster Recovery
SIOS Technology Corporation provides high availability and Disaster Recovery products that protect & optimize IT infrastructures with cluster management for your most important applications. Contact us today for more information about our services and professional support.
Reproduced with permission from SIOS
A Step-by-Step Guide to Setting Up an NFS File Witness with SIOS LifeKeeper on Linux

A Step-by-Step Guide to Setting Up an NFS File Witness with SIOS LifeKeeper on Linux
Getting Started with SIOS Lifekeeper and NFS-Based File Witness
In high availability clustering, a witness plays a crucial role in ensuring the integrity and reliability of the cluster. Without a 3rd node, it can be hard to achieve quorum as there is no data to help break a tie where both nodes think they should go live (This is known as a split-brain). You can solve this problem in many ways, for example, by providing a dedicated witness server, a shared storage path seen by the whole cluster, or simply by having more nodes in the cluster itself (minimum 3!). Thankfully, SIOS LifeKeeper offers robust solutions for setting up high-availability clusters on Linux environments, and configuring a witness to improve quorum is an essential feature.
In this guide, we’ll walk you through the steps to set up an NFS-based file witness with SIOS LifeKeeper on Linux, helping you enhance the availability and resilience of your clustered applications.
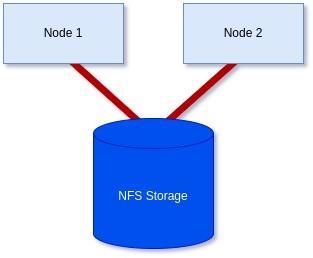
Goal:
To achieve a 2-node cluster using an NFS-based storage witness as shown in the diagram below:
Prerequisites: Before getting started, ensure you have the following:
- Linux servers are configured and connected with administrative privileges (i.e., root access).
- SIOS LifeKeeper is either installed or downloaded and ready to install on each server.
- An NFS share is accessible to all servers in the cluster.
Step 1: Install/Modify SIOS LifeKeeper:
We will need to either install LifeKeeper at this stage or re-run the setup to add Witness functionality unless you already included it earlier.
In my case, I’m using RHEL8.8, so I will mount the ISO before running the setup with the supplementary package needed for RHEL8.8.
[root@server1-LK ~]# mount /root/sps.img /mnt/loop -t iso9660 -o loop
[root@server1-LK ~]# cd /mnt/loop/
[root@server1-LK loop]# ./setup –addHADR /root/HADR-RHAS-4.18.0-477.10.1.el8_8.x86_64.rpm
Here the important part for our purposes is enabling the witness function like in the screenshot below. However, you will also need an additional license file, which you can either add here or add via the command line later at your discretion:
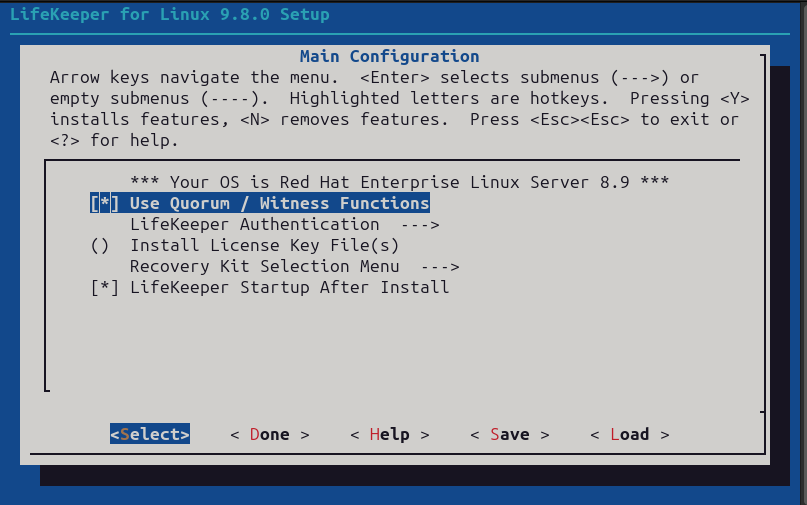
Otherwise, configure LifeKeeper for your purposes, or if it was already configured simply proceed through the setup once you’ve included the “Use Quorum / Witness Function” option.
If you decided to add the license via the command line also run the following command on each node in the cluster with the correct path to your license file:
[root@server1-LK ~]# /opt/LifeKeeper/bin/lkkeyins /<path-to-license-file>l/quorum-disk.lic
Step 2: Set up and mount shared storage:
Ensure that you have shared storage accessible to all servers in the cluster. You can check each server using either the ‘mount’ command or with ‘findmnt’ to verify that you have it locally mounted:
[root@server1-LK loop]# mount | grep nfs
sunrpc on /var/lib/nfs/rpc_pipefs type rpc_pipefs (rw,relatime)
172.16.200.254:/var/nfs/general on /nfs/general type nfs4 (rw,relatime,vers=4.2,rsize=1048576,wsize=1048576,namlen=255,hard,
proto=tcp,timeo=600,retrans=2,sec=sys,
clientaddr=172.16.205.151,local_lock=none,addr=172.16.200.254)
or
[root@server1-LK ~]# findmnt -l /nfs/general
TARGET SOURCE FSTYPE OPTIONS
/nfs/general 172.16.200.254:/var/nfs/general nfs4 rw,relatime,vers=4.2,rsize=1048576,wsize=1048576,namlen=255,hard,
proto=tcp,timeo=600,retrans=2,sec=sys,clientaddr=172.16.205.151,
local_lock=none,addr=172.16.200.254
Should you still need to mount the share yourself, please follow these steps:
First, confirm you can see the NFS share on the host server.
[root@server1-LK ~]# showmount -e 172.16.200.254
Export list for 172.16.200.254:
/home 172.16.205.244,172.16.205.151
/var/nfs/general 172.16.205.244,172.16.205.151
In my case, I want to mount the ‘/var/nfs/general’ share.
To mount this share, first, make sure your directory you plan to mount it to exists. If not, create it:
[root@server1-LK ~]# mkdir -p /nfs/general
Now you can manually mount the share using the following command to confirm you can connect, and it works:
[root@server1-LK ~]# mount 172.16.200.254:/var/nfs/general /nfs/general
Finally, once happy, add the mount point to you’re /etc/fstab file so it will mount on boot:
[root@server1-LK ~]# cat /etc/fstab
#
# /etc/fstab
# Created by anaconda on Thu Jan 25 12:07:15 2024
#
# Accessible filesystems, by reference, are maintained under ‘/dev/disk/’.
# See man pages fstab(5), findfs(8), mount(8) and/or blkid(8) for more info.
#
# After editing this file, run ‘systemctl daemon-reload’ to update systemd
# units generated from this file.
#
/dev/mapper/rhel-root / xfs defaults 0 0
UUID=6b22cebf-8f1c-405b-8fa8-8f12e1b6b56c /boot xfs defaults 0 0
/dev/mapper/rhel-swap none swap defaults 0 0
#added for NFS share
172.16.200.254:/var/nfs/general /nfs/general nfs4 defaults 0 0
Now, you can confirm it is mounted using the mount command:
[root@server1-LK ~]# mount -l | grep nfs
sunrpc on /var/lib/nfs/rpc_pipefs type rpc_pipefs (rw,relatime)
172.16.200.254:/var/nfs/general on /nfs/general type nfs4 (rw,relatime,vers=4.2,rsize=1048576,wsize=1048576,
namlen=255,hard,proto=tcp,timeo=600,retrans=2,sec=sys,
clientaddr=172.16.205.151,local_lock=none,addr=172.16.200.254)
As you can see from the highlighted text above, it has now been mounted successfully. Repeat on all servers until you are sure all servers have the share mounted before proceeding.
Step 4: Check your hostnames and configure /etc/default/LifeKeeper settings:
You can see the hostname LifeKeeper knows for each of your servers by running the following command on each node:
/opt/LifeKeeper/bin/lcduname
Example of settings you’ll need to add to the /etc/default/LifeKeeper file:
WITNESS_MODE=storage
QWK_STORAGE_TYPE=file
QWK_STORAGE_HBEATTIME=6
QWK_STORAGE_NUMHBEATS=9
QWK_STORAGE_OBJECT_server1_LK_localdomain=/nfs/general/nodeA
QWK_STORAGE_OBJECT_server2_LK_localdomain=/nfs/general/nodeB
For ‘QWK_STORAGE_OBJECT_<server-name>’, you need to declare this for each node, and it is formed using your hostname as well as the path, and the desired location of the witness file itself.
It should be noted that if the hostname contains a “-” or “.”, replace them with an underscore “_”
(e.g., lksios-1 → lksios_1 or lksios-1.localdomain → lksios_1_localdomain ).
In my example, I had the following hostnames:
server1-LK.localdomain
server2-LK.localdomain
Which meant adding the following ‘QWK_STORAGE_OBJECT_’ definitions:
QWK_STORAGE_OBJECT_server1_LK_localdomain=/nfs/general/nodeA
QWK_STORAGE_OBJECT_server2_LK_localdomain=/nfs/general/nodeB
In addition, we will need to adjust one of the existing settings in /etc/default/LifeKeeper:
QUORUM_MODE=storage
To help understand why we have set both our WITNESS_MODE and QUORUM_MODE to storage take a look at the following table:
Supported Combinations of a Quorum Mode and Witness Mode
LifeKeeper supports the following combinations.
| QUORUM_MODE | |||||
| majority | tcp_remote | storage | none/off | ||
| WITNESS_MODE | remote_verify | Supported3 or more nodes | Supported3 or more nodes | Not supported | Supported3 or more nodes |
| storage | Not Supported | Not Supported | SupportedBetween 2 and 4 nodes | Not supported | |
| none/off | Supported3 or more nodes | Supported2 or more nodes | Not supported | Supported | |
We have a two-node cluster that wants to use external storage for a quorum, so the only supported combination would be ‘storage’ for both values. However, you can see from the table how flexible this can be when you require more nodes, offering many ways to achieve communication and provide a quorum.
Step 4: Initialize the Witness file:
To initialize the witness file and enable its use, you must run the following command on each node:
[root@server1-LK ~]# /opt/LifeKeeper/bin/qwk_storage_init
It will pause when run until each node has completed so execute the command on the first node in the cluster, then the second, and so on before coming back to check the command is completed with no errors.
Example:
[root@server1-LK ~]# /opt/LifeKeeper/bin/qwk_storage_init
ok: LifeKeeper is running.
ok: The LifeKeeper license key is successfully installed.
ok: QWK parameter is valid.
QWK object of /nfs/general/nodeA is not yet avail.
/nfs/general/nodeA already exsits as not QWK_STORAGE_OBJECT: overwrite? (y/N): y
ok: The path of QWK object is valid.
ok: down: /opt/LifeKeeper/etc/service/qwk-storage: 1377s
ok: Initialization of QWK object of own node is completed.
QWK object of /nfs/general/nodeB is not yet avail.
QWK object of /nfs/general/nodeB is not yet avail.
QWK object of /nfs/general/nodeB is not yet avail.
QWK object of /nfs/general/nodeB is not yet avail.
QWK object of /nfs/general/nodeB is not yet avail.
QWK object of /nfs/general/nodeB is not yet avail.
QWK object of /nfs/general/nodeB is not yet avail.
ok: quorum system is ready.
ok: run: /opt/LifeKeeper/etc/service/qwk-storage: (pid 14705) 1s, normally down
Successful.
Step 5: Validate Configuration:
The configuration can be validated by running the following command:
/opt/LifeKeeper/bin/lktest
Should it find any errors, they will be printed to the terminal for you. In the example below, I hadn’t replaced the special characters in my hostname so it highlighted it was unable to find the storage.
[root@server1-LK ~]# /opt/LifeKeeper/bin/lktest
/opt/LifeKeeper/bin/lktest: /etc/default/LifeKeeper[308]: QWK_STORAGE_OBJECT_server1_LK.localdomain=/nfs/general/nodeA: not found
/opt/LifeKeeper/bin/lktest: /etc/default/LifeKeeper[309]: QWK_STORAGE_OBJECT_server2_LK.localdomain=/nfs/general/nodeB: not found
F S UID PID PPID C CLS PRI NI SZ STIME TIME CMD
4 S root 2348 873 0 TS 39 -20 7656 15:49 00:00:00 lcm
4 S root 2388 882 0 TS 39 -20 59959 15:49 00:00:00 ttymonlcm
4 S root 2392 872 0 TS 29 -10 10330 15:49 00:00:00 lcd
4 S root 8591 8476 0 TS 19 0 7670 15:58 00:00:00 lcdremexec -d server2-LK.localdomain -e — cat /proc/mdstat
You can also confirm that the witness file is being updated via the command line like so:
[root@server1-LK ~]# cat /nfs/general/nodeA
signature=lifekeeper_qwk_object
local_node=server1-LK.localdomain
time=Thu Feb 15 14:10:56 2024
sequence=157
node=server2-LK.localdomain
commstat=UP
checksum=13903688106811808601
A Successful File Share Witness Using NFS
Setting up a file share witness using NFS is easy! It can be powerful if you are restricted to two nodes but need better resilience to split-brain events, especially in the cloud where you can leverage something like AWS’s EFS… Another essential part can be utilizing more communications paths, but that’s a different blog. However, by following the steps outlined in this guide, you can enhance the resilience of your clustered applications and minimize the risk of downtime. Always refer to the SIOS documentation and best practices for further guidance and optimization of your high-availability setup. It’s publicly available and extremely comprehensive!
SIOS High Availability and Disaster Recovery
SIOS Technology Corporation provides high availability and Disaster Recovery products that protect & optimize IT infrastructures with cluster management for your most important applications. Contact us today for more information about our services and professional support.
Reproduced with permission from SIOS