SIOS SANless clusters

SIOS SANless clusters High-availability Machine Learning monitoring

  • Home
  • Products
    • SIOS DataKeeper for Windows
    • SIOS Protection Suite for Linux
  • News and Events
  • Clustering Simplified
  • Success Stories
  • Contact Us
  • English
  • 中文 (中国)
  • 中文 (台灣)
  • 한국어
  • Bahasa Indonesia
  • ไทย

Maximise replication performance for Linux Clustering with Fusion-io

November 27, 2018 by Jason Aw Leave a Comment

Maximise replication performance for Linux Clustering with Fusion-io

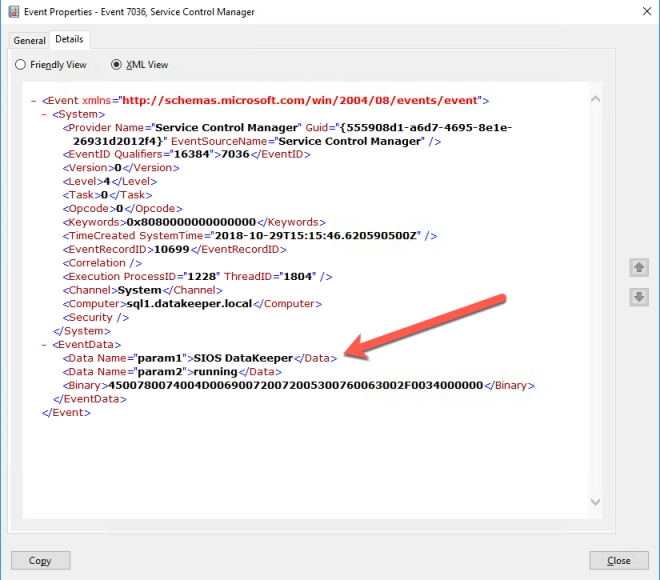
Tips To Maximise Replication Performance For Linux Clustering With Fusion-io

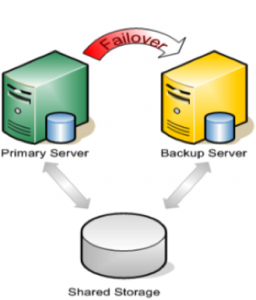
When most people think about setting up a cluster, it usually involves two or more servers, and a SAN – or some other type of shared storage. SAN’s are typically very costly and complex to setup and maintain. Also, they technically represent a potential Single Point of Failure (SPOF) in your cluster architecture. These days, more and more people are turning to companies like Fusion-io, with their lightning fast ioDrives, to accelerate critical applications.  These storage devices sit inside the server (i.e. aren’t “shared disks”). Therefore it can’t be used as cluster disks with many traditional clustering solutions. Fortunately, there are ways to Maximise replication performance for Linux Clustering with Fusion-io. Solutions that allow you to form a failover cluster when there is no shared storage involved – i.e. a “shared nothing” cluster.


Traditional Cluster

 “Shared Nothing” Cluster

When leveraging data replication as part of a cluster configuration, it’s critical that you have enough bandwidth so that data can be replicated across the network just as fast as it’s written to disk.  The following are tuning tips that will allow you to get the most out of your “shared nothing” cluster configuration, when high-speed storage is involved:

Network

  • Use a 10Gbps NIC: Flash-based storage devices from Fusion-io (or other similar products from OCZ, LSI, etc) are capable of writing data at speeds in the HUNDREDS (750 ) of MB/sec or more.  A 1Gbps NIC can only push a theoretical maximum of ~125 MB/sec, so anyone taking advantage of an ioDrive’s potential can easily write data much faster than could be pushed through a 1 Gbps network connection.  To ensure that you have sufficient bandwidth between servers to facilitate real-time data replication, a 10 Gbps NIC should always be used to carry replication traffic
  • Enable Jumbo Frames: Assuming that your Network Cards and Switches support it, enabling jumbo frames can greatly increase your network’s throughput while at the same time reducing CPU cycles.  To enable jumbo frames, perform the following configuration (example from a RedHat/CentOS/OEL linux server)
    • ifconfig <interface_name> mtu 9000
    • Edit /etc/sysconfig/network-scripts/ifcfg-<interface_name> file and add “MTU=9000” so that the change persists across reboots
    • To verify end-to-end jumbo frame operation, run this command: ping -s 8900 -M do <IP-of-other-server>
  • Change the NIC’s transmit queue length:
    • /sbin/ifconfig <interface_name> txqueuelen 10000
    • Add this to /etc/rc.local to preserve the setting across reboots

TCP/IP Tuning

  • Change the NIC’s netdev_max_backlog:
    • Set “net.core.netdev_max_backlog = 100000” in /etc/sysctl.conf
  • Other TCP/IP tuning that has shown to increase replication performance:
    • Note: these are example values and some might need to be adjusted based on your hardware configuration
    • Edit /etc/sysctl.conf and add the following parameters:
      • net.core.rmem_default = 16777216
      • net.core.wmem_default = 16777216
      • net.core.rmem_max = 16777216
      • net.core.wmem_max = 16777216
      • net.ipv4.tcp_rmem = 4096 87380 16777216
      • net.ipv4.tcp_wmem = 4096 65536 16777216
      • net.ipv4.tcp_timestamps = 0
      • net.ipv4.tcp_sack = 0
      • net.core.optmem_max = 16777216
      • net.ipv4.tcp_congestion_control=htcp

Adjustments

Typically you will also need to make adjustments to your cluster configuration, which will vary based on the clustering and replication technology you decide to implement.  In this example, I’m using the SteelEye Protection Suite for Linux (aka SPS, aka LifeKeeper), from SIOS Technologies. It allows users to form failover clusters leveraging just about any back-end storage type: Fiber Channel SAN, iSCSI, NAS, or, most relevant to this article, local disks that need to be synchronized/replicated in real time between cluster nodes.  SPS for Linux includes integrated, block level data replication functionality that makes it very easy to setup a cluster when there is no shared storage involved.

Recommendations

In order to Maximise replication performance for Linux Clustering with Fusion-io, let’s try this. SteelEye Protection Suite (SPS) for Linux configuration recommendations:

  • Allocate a small (~100 MB) disk partition, located on the Fusion-io drive to place the bitmap file.  Create a filesystem on this partition and mount it, for example, at /bitmap:
    • # mount | grep /bitmap
    • /dev/fioa1 on /bitmap type ext3 (rw)
  • Prior to creating your mirror, adjust the following parameters in /etc/default/LifeKeeper
    • Insert: LKDR_CHUNK_SIZE=4096
      • Default value is 64
    • Edit: LKDR_SPEED_LIMIT=1500000
      • (Default value is 50000)
      • LKDR_SPEED_LIMIT specifies the maximum bandwidth that a resync will ever take — this should be set high enough to allow resyncs to go at the maximum speed possible
    • Edit: LKDR_SPEED_LIMIT_MIN=200000
      • (Default value is 20000)
      • LKDR_SPEED_LIMIT_MIN specifies how fast the resync should be allowed to go when there is other I/O going on at the same time — as a rule of thumb, this should be set to half or less of the drive’s maximum write throughput in order to avoid starving out normal I/O activity when a resync occurs

From here, go ahead and create your mirrors and configure the cluster as you normally would.

Interested to Maximise Replication Performance For Linux Clustering With Fusion-io, see what else SIOS can offer.
Reproduced with permission from LinuxClustering

Filed Under: Clustering Simplified, Datakeeper Tagged With: Clustering, Fusion-io, Linux, maximise replication performance for linux clustering with fusion io, replication

Moving A Google Form Between Google Domains

November 23, 2018 by Jason Aw Leave a Comment

Moving A Google Form Between Google Domains

Moving A Google Form Between Google Domains

If you are anything like me, you might have a few different Google accounts that you work with on a regular basis. Recently, I needed help in Moving A Google Form Between Google Domains. I spent a fair amount of time creating a Google Form. Only to realize I did this while logged in with my personal account rather than my work account. I didn’t really want to redo the work I had done. I tried searching for answers online but nothing specific came up to addressed my situation.

It’s not hard to do. I figured I’d write it down just in case it happens to you. I stumbled upon the fix just by trying a few things. Let’s assume this is a new form with no data.

In Moving A Google Form Between Google Domains, all you have to do is the following:

  1. Add your second Google account as a Collaborator on the form
  2. Log in to your second Google account, open the form and “Make a copy” of the form

Moving A Google Form Between Google Domains

That’s it! Now you have a copy of the form in your second Google account. Of course if you had already collected some data on the first form, you would want to copy that Sheet. Put it in your second Google account as well and attach the form to that copy of the data. Be sure to delete the old form so you don’t accidentally use the old form.

Read tips like Moving A Google Form Between Google Domains here
Reproduced with permission from Clusteringformeremortals

Filed Under: Clustering Simplified Tagged With: Google, Google Domains, Google Form, moving a google form between google domains

Receiving Email Alerts With SIOS DataKeeper

November 19, 2018 by Jason Aw Leave a Comment

Receiving Email Alerts With SIOS Datakeeper

Receiving Email Alerts With SIOS DataKeeper

Over the past few weeks, I wrote a 3-part series on how to configure email alerts based on Perfmon Counters, System Event Log Entries and a specific Windows Service Start or Stop Event. These guides are relevant to any environment. All of my examples were geared towards monitoring SIOS DataKeeper. Also, it had some specific customer requests including monitoring the SIOS DataKeeper Service, as well as being alerted should the RPO exceed 5 seconds. I also included monitoring of the basic DataKeeper events that you would want to know about.

This video shows some of this alerting in action.

Interested to find out more about SIOS DataKeeper, read our SIOS success stories
Reproduced with permission from Clusteringformeremortals

Filed Under: Clustering Simplified Tagged With: email alerts with sios datakeeper, SIOS DataKeeper Cluster Edition

Trigger Email Alert When Specific Windows Service Starts Or Stops

November 18, 2018 by Jason Aw Leave a Comment

How To Trigger An Email Alert When A Specific Windows Service Starts Or Stops On Windows Server 2016

Step-By-Step: How To Trigger An Email Alert When A Specific Windows Service Starts Or Stops On Windows Server 2016

Different from my previous post where I showed you how to send an email alert based upon specific Windows EventIDs being logged in a Windows Event Log, this time around I’ll share how to Trigger Email Alert When Specific Windows Service Starts Or Stops. It works great for most events. Although do note it is not ideal if you want to be notified when a specific Windows Service starts or stops.

When a Windows Service starts or stops, an EventID 7036 from the Source “Service Control Manager” is logged in the Windows System Log. Now we could simply set up a trigger to send an email whenever that EventID is logged as I described in my previous post. However, you might not want to receive an email when EVERY Windows Service starts or stops.

To get a little more specific, we will have to edit the XML data associated with the Windows Event Filter when we set up the trigger. This is to look a little deeper at the Event Properties and filter on the EventData that is only shown when you view the XML View on the Details tab of a Windows Event.

This work was verified on Windows Server 2016, but I suspect it should work on Windows Server 2012 R2 and Windows Server 2019 as well. If you get it working on any other platforms please comment and let us know if you had to change anything.

Step 1 – Write A Powershell Script

The first thing that you need to do is write a Powershell script that when run can send an email. You need that email to trigger Email Alert When Specific Windows Service Starts Or Stops. There are many ways to accomplish this task. I’m about to show you is just one way, but feel free to experiment and use what is right for your environment.

In my lab I do not run my own SMTP server, so I had to write a script that could leverage my Gmail account. You will see in my Powershell script the password to the email account that authenticates to the SMTP server is in plain text. If you are concerned that someone may have access to your script and discover your password then you will want to encrypt your credentials. Gmail requires and SSL connection so your password should be safe on the wire, just like any other email client.

Here is an example of a Powershell script that when used in conjunction with Task Scheduler which will send an email alert automatically when any specified Event is logged in the Windows Event Log. In my environment I saved this script to C:\Alerts\ServiceAlert.ps1

$filter="*[System[EventID=7036] and EventData[Data='SIOS DataKeeper']]"
$A = Get-WinEvent -LogName System -MaxEvents 1 -FilterXPath $filter
$Message = $A.Message
$EventID = $A.Id
$MachineName = $A.MachineName
$Source = $A.ProviderName


$EmailFrom = "sios@medfordband.com"
$EmailTo = "sios@medfordband.com"
$Subject ="Alert From $MachineName"
$Body = "EventID: $EventID`nSource: $Source`nMachineName: $MachineName `n$Message"
$SMTPServer = "smtp.gmail.com"
$SMTPClient = New-Object Net.Mail.SmtpClient($SmtpServer, 587)
$SMTPClient.EnableSsl = $true
$SMTPClient.Credentials = New-Object System.Net.NetworkCredential("sios@medfordband.com",
 "MySMTPP@55w0rd");
$SMTPClient.Send($EmailFrom, $EmailTo, $Subject, $Body)

An example of an email generated from that Powershell script looks like this.

Service Alert Email

You probably noticed that this Powershell script uses the Get-WinEvent cmdlet to grab the most recent Event Log entry based upon the LogName, EventID and EventDataspecified. It then parses that event and assigns the EventID, Source, MachineName and Message to variables that will be used to compose the email. You will see that the LogName, EventID and EventData specified is the same as what you will specify when you set up the Scheduled Task in Step 2.

While EventID, LogName are probably familiar to you, EventData may not be as familiar. To see the EventData associated with a particular Event you will need to open the Event in Event Viewer, look at the Details tab and then select XML view. From the XML view you can see all the data included with an event. Near the bottom of the XML you will see an array of data called <EventData>. Within there you will find additional Event Data stored as parameters. As show below, in the “param1” we will find the name of the Service being that either stopped or started.

Event Data

Step 2 – Set Up A Schedule Task

In Task Scheduler Create a Task as show in the following screen shots.

  1. Create Task
    Create Task
    Make sure the task is set to Run whether the user is logged on or not.
    Service - General
  2.  On the Triggers tab choose New to create a Trigger that will begin the task “On an Event”. In my example I will be creating an event that triggers any time DataKeeper (extmirr) logs an important event to the System log.
    Create Task 3
    Create a custom event and New Event Filter as shown below…Create Task - Trigger
    For my trigger you can start my setting up a trigger that monitors 7036 as I describe in my previous article. However, the Filter GUI interface does not allow us to specify the Service Name stored in Param1 of EventData as I described earlier. In order to monitor for just the specific service we are interested in we will need to edit the XML directly as shown below.Service - XML
    If you rather just skip straight to the chase feel free to copy my XML below and replace ‘SIOS DataKeeper’ with the event data stored in param1 of the Event you want to monitor.

    <QueryList>
    <Query Id="0" Path="System">
    <Select Path="System">*[System[(Level=4 or Level=0) and (EventID=7036)]] 
    and *[EventData[Data[1]='SIOS DataKeeper']]</Select>
    </Query>
    </QueryList>
  3. Once the Event Trigger is configured, you will need to configure the Action that occurs when the event is run. In our case we are going to run the Powershell script that we created in Step 1.Actions - 2Service - Task
  4. The default Condition parameters should be sufficient.
    Conditions - 1
  5. And finally, on the Settings tab make sure you allow the task to be run on demand and to “Queue a new instance” if a task is already running.

    2018-10-28_00-17-27

Step 3 (If Necessary) -Fix the Microsoft -Windows – Distributedcom Event ID: 10016 Error

In theory, if you did everything correctly you should now start receiving emails any time one of the events you are monitoring gets logged in the event log.  However, I ran into a weird permission issue on one of my servers that I had to address before everything worked. I’m not sure if you will run into this issue, but just in case here is the fix.

In my case when I manually triggered the event, or if I ran the Powershell script directly, everything worked as expected and I received an email. However, if one of the EventIDs being monitored was logged into the event log it would not result in an email being sent. The only clue I had was the Event ID: 10016 that was logged in my Systems event log each time I expected the Task Trigger to detect a logged event.

Log Name: System
Source: Microsoft-Windows-DistributedCOM
Date: 10/27/2018 5:59:47 PM
Event ID: 10016
Task Category: None
Level: Error
Keywords: Classic
User: DATAKEEPER\dave
Computer: sql1.datakeeper.local
Description:
The application-specific permission settings do not grant Local Activation permission 
for the COM Server application with CLSID 
{D63B10C5-BB46-4990-A94F-E40B9D520160}
and APPID 
{9CA88EE3-ACB7-47C8-AFC4-AB702511C276}
to the user DATAKEEPER\dave SID (S-1-5-21-25339xxxxx-208xxx580-6xxx06984-500) from 
address LocalHost (Using LRPC) 
running in the application container Unavailable SID (Unavailable). 
This security permission can be modified using the Component Services administrative tool.

Many of the Google search results for that error indicate that the error is benign and include instructions on how to suppress the error instead of fixing it. However, I was pretty sure this error was the cause of my current failure to be able to send an email alert from a Scheduled Event that was triggered from a monitored Event Log entry. I needed to fix it.

After much searching, I stumbled upon this newsgroup discussion.  The response from Marc Whittlesey pointed me in the right direction. This is what he wrote…

There are 2 registry keys you have to set permissions before you go to the DCOM Configuration in Component services: CLSID key and APPID key.

I suggest you to follow some steps to fix issue:

1. Press Windows + R keys and type regedit and press Enter.
2. Go to HKEY_Classes_Root\CLSID\*CLSID*.
3. Right click on it then select permission.
4. Click Advance and change the owner to administrator. Also click the box that will appear below the owner line.
5. Apply full control.
6. Close the tab then go to HKEY_LocalMachine\Software\Classes\AppID\*APPID*.
7. Right click on it then select permission.
8. Click Advance and change the owner to administrators.
9. Click the box that will appear below the owner line.
10. Click Apply and grant full control to Administrators.
11. Close all tabs and go to Administrative tool.
12. Open component services.
13. Click Computer, click my computer, and then click DCOM.
14. Look for the corresponding service that appears on the error viewer.
15. Right click on it then click properties.
16. Click security tab then click Add User, Add System then apply.
17. Tick the Activate local box.

So use the relevant keys here and the DCOM Config should give you access to the greyed out areas:
CLSID {D63B10C5-BB46-4990-A94F-E40B9D520160}

APPID {9CA88EE3-ACB7-47C8-AFC4-AB702511C276}

I was able to follow Steps 1-15 pretty much verbatim. However, when I got to Step 16 I really couldn’t tell exactly what he wanted me to do. At first I granted the DATAKEEPER\dave user account Full Control to the RuntimeBroker. But that didn’t fix things. Eventually I just selected “Use Default” on all three permissions and that fixed the issue.

RuntimeBroker
I’m not sure how or why this happened, but I figured I better write it all down in case it happens again because it took me a while to figure it out.

Step 4- Automating The Deployment

If you need to enable the same alerts on multiple systems you can simply export your Task to an XML file and Import it on your other systems.

Email Alert When Specific Windows Service Starts Or Stops
Export
Email Alert When Specific Windows Service Starts Or Stops
Import

Or even better yet, automate the Import as part of your build process through a Powershell script after making your XML file available on a file share as shown in the following example.

PS C:\> Register-ScheduledTask -Xml (get-content '\\myfileshare\tasks\DataKeeperAlerts.xml' 
| out-string) -TaskName "DataKeeper Service Alerts" -User datakeeper\dave 
-Password MyDomainP@55W0rd –Force

Finally, An Email Alert When Specific Windows Service Starts Or Stops

Hopefully what I have provided will give you everything you need to start receiving alert notification emails on whichever Windows Services keep you up at night.

This concludes my series on configuring email alerts. In this series I covered covered configuring alerts based on Perfmon counters, Event Log Entries and in this article Windows Service Start and Stop events. Of course you can extend these Powershell scripts described in these articles to do more than just send emails. Many alerts or unexpected service stoppages generally require some remediation. Why not just script out the recovery steps and let the triggered task take care of the issue for you?

Personally I recommend that you invest in SCOM , SolarWinds or some other Enterprise Management System, but if that is not in the cards where you work then these articles can help in a pinch.

To learn more tips about Email Alert When Specific Windows Service Starts Or Stops, contact us
Reproduced with permission from Clusteringformeremortals.com

Filed Under: Clustering Simplified Tagged With: email alert when specific windows service starts or stops, Windows Server 2016

Move SQL Server 2008 And 2008 R2 Clusters To Azure For Extended Support

November 16, 2018 by Jason Aw Leave a Comment

Move SQL Server 2008 And 2008 R2 Clusters To Azure For Extended Support

Move SQL Server 2008 And 2008 R2 Clusters To Azure For Extended Support

Earlier this year Microsoft announced extended support if you move SQL Server 2008 and 2008 R2 Clusters to Azure. For all the details, check out https://www.microsoft.com/en-us/sql-server/sql-server-2008. If you choose not to move, your extended support ends on July 9th, 2019.

Move SQL Server 2008 And 2008 R2 Clusters To Azure For Extended Support

If you are still running SQL Server 2008 R2, it’s probably because you never upgraded your application. Hence newer versions of SQL are not supported. Or perhaps, you decided not to fix what isn’t broken. Regardless of these reasons, you have just bought yourself another three years of support if you migrate to Azure.

Now migrating workloads to Azure is a pretty well documented procedure, using Azure Site Recovery. That process should be pretty seamless for you for your standalone instances of SQL Server.

But what about those clustered instances of SQL Server? You certainly don’t want to give up availability when you move to the Azure. Part of the beauty of Azure is that they have infrastructure that you can only dream of. However, it is incumbent upon the user to configure their applications to take full advantage of the infrastructure to ensure that your deployments are highly available.

With SQL Server 2008 and 2008 R2, high availability commonly means SQL Server Failover Clustering on either Windows Server 2008 R2 or Windows Server 2012 R2. If you are new to Azure, you will quickly discover that there is no native option that supports  shared storage clusters. Instead, you will need to look at a SANLess cluster solution such as SIOS DataKeeper. Microsoft list SIOS DataKeeper as the HA solution for SQL Server Failover Clustering in their documentation.

Move SQL Server 2008 And 2008 R2 Clusters To Azure For Extended Support
https://docs.microsoft.com/en-us/azure/virtual-machines/windows/sql/virtual-machines-windows-sql-high-availability-dr

Getting Started

Let’s begin the move SQL Server 2008 And 2008 R2 Clusters To Azure For Extended Support. Here are the high level steps you will need to take.

  • Replace the Physical Disk Resource in your existing on premise SQL Server cluster with a DataKeeper Volume Resource. Do the same for MSDTC resources if you use MSDTC.
  • Remove your Disk Witness and replace it with a File Share Witness.
  • Use Azure Site Recovery to replicate your cluster nodes into Azure, making sure each replicated node resides in a different Fault Domain or in different Availability Zones in Azure
  • Recovery your replicate cluster nodes in Azure
  • Replace the File Share Witness with a File Share hosted in Azure
  • Configure the Internal Load Balancer in Azure for client redirection. This includes running the Powershell script on the local nodes to update the SQL Cluster IP resource to listen for the ILB probe
  • Assuming the IP addresses and subnet of the SQL Server cluster instances changed as part of this migration, you will also need to do some cleanup of the cluster IP address and the DataKeeper job endpoints to reflect the new IP addresses

I know I left out a lot of the details. But if you find yourself in the position of having to do a lift and shift of SQL Server to Azure, or any cloud for that matter, I’d be glad to get on the phone with you to answer any questions you may have. Keep in mind, the same steps apply for any version of SQL that you plan to migrate to Azure.

If you need to move SQL Server 2008 And 2008 R2 Clusters To Azure, get in touch with us.
Reproduced with permission from Clusteringformeremortals.com

Filed Under: Clustering Simplified Tagged With: 2008 R2 Clusters, Azure Site Recovery, move sql server 2008 and 2008 r2 clusters to azure, SQL Server 2008

  • « Previous Page
  • 1
  • …
  • 80
  • 81
  • 82
  • 83
  • 84
  • …
  • 108
  • Next Page »

Recent Posts

  • How to Cut SQL Server HA/DR Costs and Gain Advanced Features
  • Commonalities between Disaster Recovery (DR) and your spare tire
  • Unlocking Near-Zero Downtime Patch Management with High Availability Clustering
  • How to Safely Combine DataKeeper for Linux with Backup and Replication Tools
  • Think Before You Script: Best Practices for Gen/App Recovery

Most Popular Posts

Maximise replication performance for Linux Clustering with Fusion-io
Failover Clustering with VMware High Availability
create A 2-Node MySQL Cluster Without Shared Storage
SAP for High Availability Solutions For Linux
Bandwidth To Support Real-Time Replication
The Availability Equation – High Availability Solutions.jpg
Choosing Platforms To Replicate Data - Host-Based Or Storage-Based?
Guide To Connect To An iSCSI Target Using Open-iSCSI Initiator Software
Best Practices to Eliminate SPoF In Cluster Architecture
Step-By-Step How To Configure A Linux Failover Cluster In Microsoft Azure IaaS Without Shared Storage azure sanless
Take Action Before SQL Server 20082008 R2 Support Expires
How To Cluster MaxDB On Windows In The Cloud

Join Our Mailing List

Copyright © 2025 · Enterprise Pro Theme on Genesis Framework · WordPress · Log in