SIOS SANless clusters

SIOS SANless clusters High-availability Machine Learning monitoring

  • Home
  • Products
    • SIOS DataKeeper for Windows
    • SIOS Protection Suite for Linux
  • News and Events
  • Clustering Simplified
  • Success Stories
  • Contact Us
  • English
  • 中文 (中国)
  • 中文 (台灣)
  • 한국어
  • Bahasa Indonesia
  • ไทย

SIOS Technology Expands Support in Linux Product Release

January 9, 2025 by Jason Aw Leave a Comment

SIOS Technology Expands Support in Linux Product Release

SIOS Technology Expands Support in Linux Product Release

We’re excited to announce expanded support for the SIOS LifeKeeper for Linux 9.9.0 release, including:

  • SAP HANA 2.0 on RHEL 9.4
  • SAP on RHEL 9.4
  • Watchdog support on RHEL 9
  • FUJITSU Software Enterprise Postgres 16 SP1

These newly supported configurations are fully compatible with our Linux product’s current general availability version and will continue to be supported in future releases. Importantly, no software update is required to take advantage of these additions.

Stay tuned for more updates as we continue to enhance our solutions to meet your high availability and disaster recovery needs.

Reproduced with permission from SIOS

Filed Under: News and Events Tagged With: disaster recovery, High Availability, Linux, SIOS LifeKeeper

What Does the New Driver in SIOS LifeKeeper for Windows Do For You?

November 15, 2022 by Jason Aw Leave a Comment

What Does the New Driver in SIOS LifeKeeper for Windows Do For You?

Making data protection in shared and SAN-less environments stronger for years to come.

What does Coca-Cola, KitKat, SalesForce, and SIOS LifeKeeper for Windows have in common?  Here are a few hints:

  • Coca-Cola relaunched a campaign using product redesigns of its iconic brands to adapt to the future, specifically to focus on social themes.
  • Kit-Kat rebranded its candy bar in the UK to commemorate and celebrate the booming social media, YouTube, and general technology wave, and capitalize on the brand strength of the Android (KitKat) OS.
  • Salesforce revamped its base product to create a sleeker, more modern, and faster interface to serve its customer’s needs.

These companies made significant improvements to their iconic products, services and solutions to better serve their customers, adapt and prepare for the future, and capitalize on their strengths.  In a similar fashion, SIOS has made dramatic improvements to our SIOS LifeKeeper for Windows product.

Prior to LifeKeeper for Windows version 8.9.0, shared storage functionality, including I/O fencing and drive identification and management was handled by the NCR_LKF driver.  Starting with the SIOS LifeKeeper for Windows release version 8.9.0, SIOS Technology Corp. redesigned the shared storage driver architecture. Beginning with the current release, the NCR_LKF driver has been removed and replaced by the SIOS ExtMirr driver, the engine behind the SANless storage replication of SIOS DataKeeper / SIOS DataKeeper Cluster Edition.

Five significant benefits of the NCR_LKF architectural change in SIOS LifeKeeper for Windows:

  1. A more modern driver

The ExtMirr driver provides a more modern filter driver to manage the shared storage functionality.  While the NCR_LKF driver focused on “keeping the lights on” and the “data safe”, the architecture of the driver lagged behind more modern drivers.  The ExtMirr driver maintains that data protection, while being more compatible, more modern, and more easily supported in newer versions of the Windows OS.

  1. More robust I/O fencing

The driver used in both SIOS DataKeeper and SIOS DataKeeper Cluster Edition includes a robust fencing architecture. While the NCR_LKF driver was capable of I/O fencing, the new driver is more robust and has been tested in SAN and SANless environments. The enhanced I/O fencing leverages volume lock and node ownership information within the protected volume.

  1. Tighter integration and compatibility.

Leveraging the I/O fencing for the ExtMirr driver used in the DataKeeper products means that the LifeKeeper for Windows solution increases in integration with the DataKeeper product line.  The ExtMirr driver also includes the latest Microsoft driver signing and works seamlessly with Operating Systems that enforce driver signing and Secure Boot.

  1. Easier administration

The ExtMirr driver gives customers and administrators a large set of command-line utilities for obtaining and administering the status of the volume.  The emcmd commands are native to both of  the SIOS DataKeeper products. They can now be used for easier administration with the SIOS LifeKeeper shared volume configurations. Customers and partners who leverage both shared storage and replicated configurations with the LifeKeeper for Windows products now have a single command line set of tools to know and use. The emcmd tools replace the previous volume.exe, volsvc, and similar NCR_LKF filter driver tools for administration (lock, unlock, etc).

  1. More frequent updates and fixes

With the addition of the ExtMirr driver into SIOS LifeKeeper for Windows, the shared storage configurations, as well as replication configurations, will now see a boost in updates, new features, and fixes. While the NCR_LKF driver provided a solid foundation and stable base for I/O fencing, switching to the ExtMirr driver means that customers will see the same strength and stability, with faster updates for new product support

Aligning the two products to a single driver may not be as flashy as the SalesForce Classic to Lightning update, but it adds significant functionality, increases the strength and longevity of both the SIOS DataKeeper and SIOS LifeKeeper solutions, and will make data protection in shared and SAN-less environments stronger for years to come.

Cassius Rhue, VP Customer Experience

Reproduced with permission from SIOS

Filed Under: Clustering Simplified Tagged With: SIOS LifeKeeper, Windows HA

How to recreate the file system and mirror resources to ensure the size information is correct

November 11, 2022 by Jason Aw Leave a Comment

How to recreate the file system and mirror resources to ensure the size information is correct

When working with high availability (HA) clustering, it’s essential to ensure that the configuration of all nodes in the cluster are parallel with one another. These ‘mirrored’ configurations help to minimize the failure points on the cluster, providing a higher standard of HA protection. For example, we have seen situations in which the mirror-size was updated on the source node but the same information was not updated on the target node. The mirror size mismatch prevented LifeKeeper from starting on the target node in a failover. Below are the recommended steps for recreating the mirror resource on the target node with the same size information as the source:

Steps:

  1. Verify – from the application’s perspective – that the data on the source node is valid and consistent
  2. Backup the file system on the source (which is the source of the mirror)
  3. Run /opt/LifeKeeper/bin/lkbackup -c to backup the LifeKeeper config on both nodes
  4. Take all resources out of service.  In our example the resources are in service on node sc05 and sc05 is the source of the mirror (and sc06 is the target system/target of the mirror).
    1. In the right pane of the LifeKeeper GUI, right-click on the DataKeeper resource that is in service.
    2. Click Out of Service from the resource popup menu.
    3. A dialog box will confirm that the selected resource is to be taken out of service. Any resource dependencies associated with the action are noted in the dialog. Click Next.
    4. An information box appears showing the results of the resource being taken out of service. Click Done.
  1. Verify that all resources are out of service and file systems are unmounted
    1. Use the command cat /proc/mdstat on the source to verify that no mirror is configured
  1. Use the mount command on the source to make sure the file system is no longer mounted
  2. Use /opt/LifeKeeper/bin/lcdstatus -q  on the source to make sure the resources are all OSU.
  1. In the LifeKeeper GUI break the dependency between the IP resource (VIP) and the file system resource (/mnt/sps).  Right click on the VIP resource and select Delete Dependency.

Then, select the File System resource (/mnt/sps) for the Child Resource Tag.

This will result in two hierarchies, one with the IP resource (VIP) and one with the file system resource (/mnt/fs) and the mirror resource (datarep-sps).

  1. Delete the hierarchy with the file system and mirror resources. Right click on /mnt/sps and select Delete Resource Hierarchy.
  1. On the source, perform ‘mount <device> <directory>’ on the file system.

Example: mount /dev/sdb1 /mnt/sps

  1. Via the GUI recreate the mirror and file systems via the following:
    1. Recovery Kit: Data Replication
  1. Switchback Type: Intelligent
  2. Server: The source node
  3. Hierarchy Type: Replicate Existing Filesystem
  4. Existing Mount Point: <select your mount point>. It is /mnt/sps for this example.
  5. Data Replication Resource Tag: <Take the default>
  6. File System Resource Tag: <Take the default>
  7. Bitmap File: <Take the default>
  8. Enable Asynchronous Replication: Yes
  1. Once created, you can Extend the mirror and file system hierarchy:
    1. Target server: Target node
    2. Switchback Type: Intelligent
    3. Template Priority: 1
    4. Target Priority: 10
  1. Once the pre-extend checks complete select next followed by these values:
    1. Target disk: <Select the target disk for the mirror>.  It is /dev/sdb1 in our example.
    2. Data Replication Resource Tag: <Take the default>
    3. Bitmap File: <Take the default>
    4. Replication Path: <Select the replication path in your environment>
    5. Mount Point: <Select the mount point in your environment>.  It is /mnt/sps in our example.
    6. Root Tag: <Take the default>

When the resource “extend” is done select “Finish” and then “Done”.

  1.  In the LifeKeeper GUI recreate the dependency between the IP resource (VIP) and the file system resource (/mnt/sps). Right click on the VIP resource and select Create Dependency.  Select /mnt/sps for the Child Resource Tag.
  1. At this point the mirror should be performing a full resync of the size of the file system. In the LifeKeeper GUI in the right pane of the LifeKeeper GUI, right-click on the VIP resource. Select “In Service” to restore the IP resource (VIP), select the source system where the mirror is in service (sc05 in our example)  and verify that the application restarts and the IP is accessible.

Reproduced with permission from SIOS

Filed Under: Clustering Simplified Tagged With: High Availability, SIOS LifeKeeper

Installing SAP MaxDB in an HA Environment

November 1, 2022 by Jason Aw Leave a Comment

Installing SAP MaxDB in an HA Environment

General SAP documentation on MaxDB is here: https://maxdb.sap.com/documentation/

MaxDB is a relational database management system (RDBMS) sold by SAP for large environments (SAP and non-SAP) that require enterprise-level database functionality. The first step to delivering high availability for any application is ensuring it is installed according to best practices. This blog provides important insight for installing MaxDB in a SIOS LIfeKeeper for Linux high availability clustering environment. It includes links to detailed installation documentation provided by SAP.

These instructions assume that you will perform the MaxDB installation steps on all nodes in your SIOS LifeKeeper cluster that will be “production” nodes.

1. Downloading the MaxDB software

  • Use your SAP account to download latest MaxDB package, in my case 51054410_2
  • Upload the package to your Linux instance, in this case to /mnt/software/ and extract the file using  SAPCAR with switches -xvf.
  • cd into the “MaxDB_7.9___SP10_Build_05_” folder and then into “DATA_UNITS” and then finally “MAXDB_LINUX_X86_64”
  • SAP document describing installation: https://maxdb.sap.com/doc/7_7/44/eb166db6f0108ee10000000a11466f/content.htm

2. Using the CLI Installer

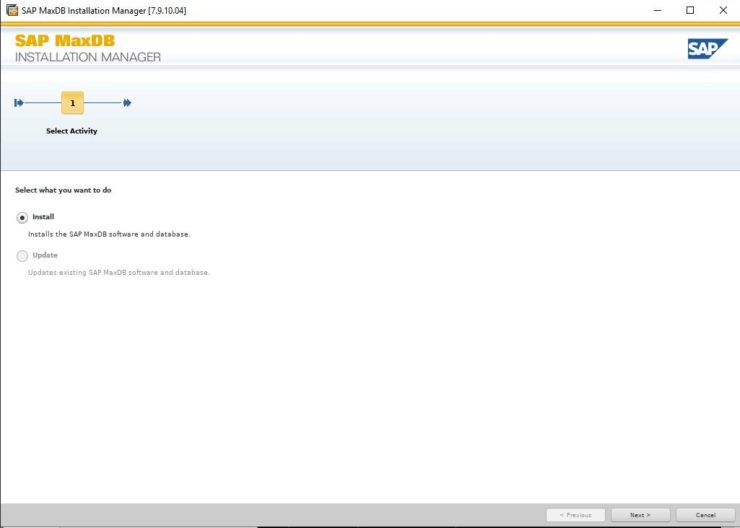
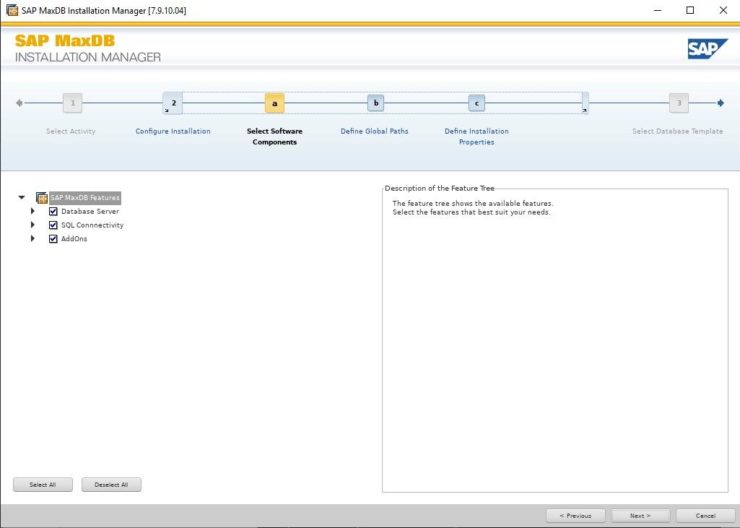
Run SDBINST,  the MaxDB installation manager which will begin the installation process.

Walk through the options, either specify the values or accept the defaults:

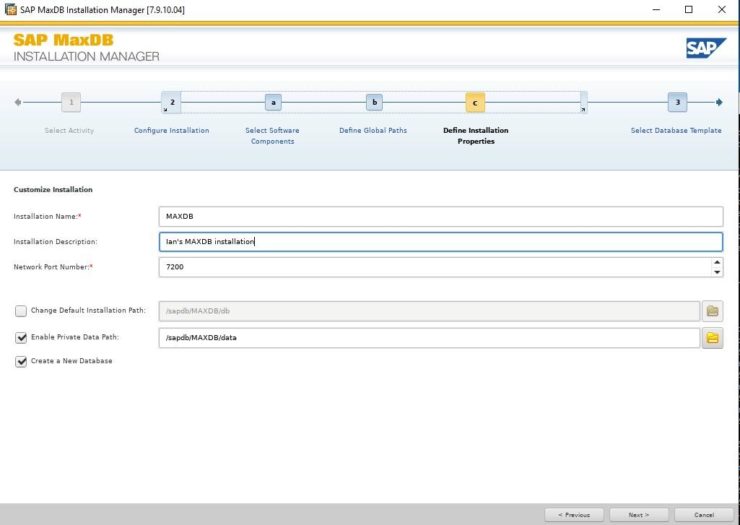
Select 0 for all components. You will then be prompted for the installation name. Installation path, installation description, privatedata and a port number.

This installations instance data location will be  privatedata and the port number is the port that this instance will use while running, the default is 7200 for the first installation.

If you need to uninstall, follow the steps in this SAP document: https://maxdb.sap.com/doc/7_8/44/d8fc93daba5705e10000000a1553f6/content.htm

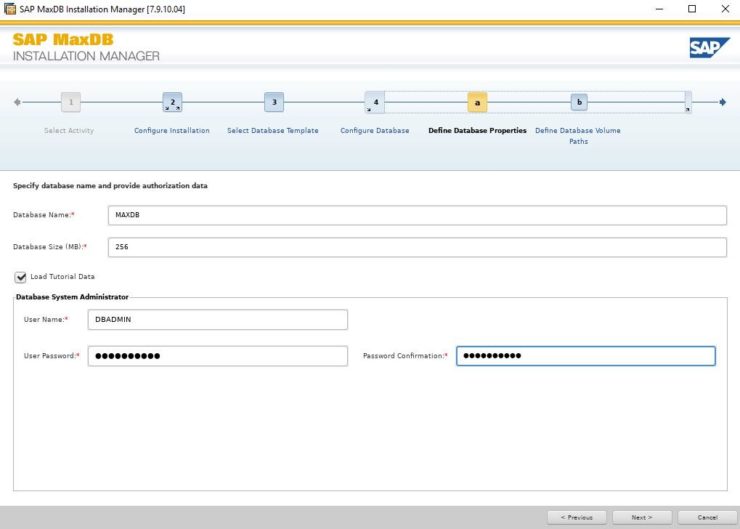
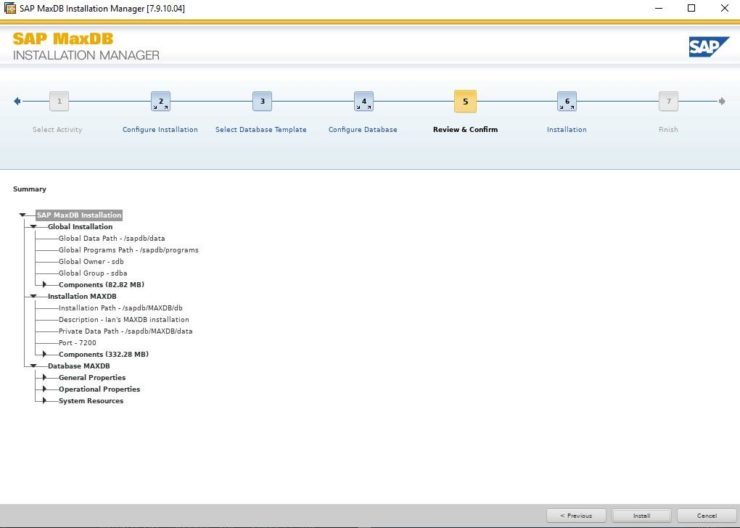
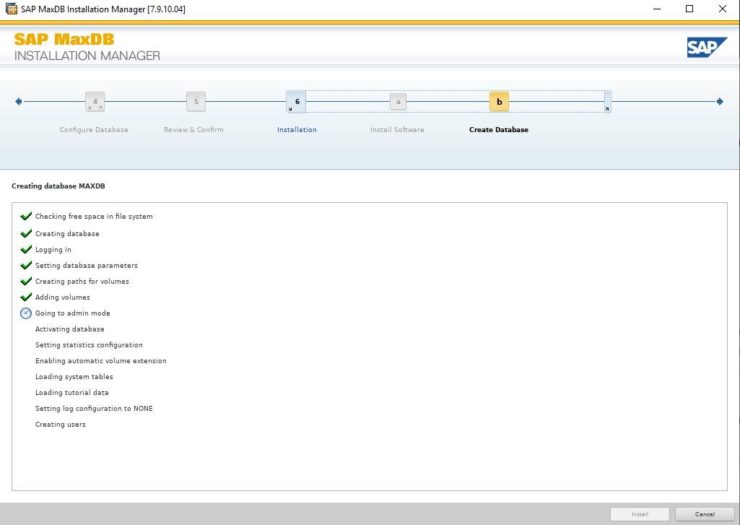
3. GUI Installer

To use the GUI installer, you will need to set up xauth and use xming (or similar X-Windows emulator), see https://superuser.com/questions/592185/how-do-i-get-x11-forwarding-to-work-on-windows-with-putty-and-xming

Note that the graphics libraries may need to be fixed. Fix some library links, Newer Linux versions have newer graphics libraries with different names. We can still use the newer libraries but MaxDB expects the older names and so we will create symbolic links to these existing libraries with the names that MaxDB expects to find:

ln /usr/lib64/libpangoxft-1.0.so.0 /usr/lib64/libpangox-1.0.so.0

ln /usr/lib64/libpng12.so.0 /usr/lib64/libpng.so.3

ln /usr/lib64/libtiff.so.5 /usr/lib64/libtiff.so.3

Now run setup:

cd /mnt/software/MaxDB_7.9___SP10_Build_05_/DATA_UNITS/MAXDB_LINUX_X86_64/

.//SDBSETUP

These templates simply pre-define parameters for the MaxDB that will be created as part of the installation. I used Desktop PC/Laptop simply because it’s aimed at small single user installations, You can change most of the parameters after installation completes. See this note for more details.

By default the global owner user created while setting up MaxDB gets /bin/false added to its entry in /etc/passwd  This addition is to restrict the account used for the MaxDB installation for security reasons e.g. you cannot login with this account. In our case we will use this user and we can change the entry in /etc/passwd to /etc/bash so that we can login and use the user that’s created for us in our example.

4. Setting up a database

Once we have the actual MaxDB software installed, we need to create a database and then start that database. In this example I will call my database SPS and the default admin user will be dbm with the password dbm.

sudo su – sdb

dbmcli -s -R  /sapdb/MAXDB/db db_create SPS dbm,dbm

dbmcli -d SPS -u dbm,dbm

user_put dbm PASSWORD=dbadmin

This should drop you to a prompt like this “dbmcli on SPS>”, this means that you are connected to the SPS db as sdb and we will now configure some parameters required to run the database.

param_startsession

param_init OLTP

param_put CAT_CACHE_SUPPLY 5000

param_put CACHE_SIZE 3000

param_put MAXDATAVOLUMES 5

param_put RUNDIRECTORYPATH /sapdb/MAXDB/run

param_checkall

param_commitsession

param_addvolume 1 DATA /sapdb/MAXDB/data/DISKD0001 F 2560

param_addvolume 1 LOG  /sapdb/MAXDB/log/DISKL001  F 2048

quit

Now it’s time to start the DB:

dbmcli -d SPS -u dbm,dbadmin db_start

All the above param and dbmcli commands should output OK when you execute them. If they do not then generally they will give you a vague idea of what’s wrong.

dbmcli -d SPS -u dbm,dbadmin

util_connect dbm,dbadmin

db_activate dba,dba

dbmcli -d SPS -u dbm,dbadmin load_systab -u dba,dba -ud domain

dbmcli -d SPS -u dbm,dbadmin

sql_connect dba,dba

sql_execute CREATE USER test PASSWORD test DBA NOT EXCLUSIVE

medium_put data datasave FILE DATA 0 8 YES

medium_put auto autosave FILE AUTO

util_connect dbm,dbadmin

backup_save data

autosave_on

Load_tutorial

auto_extend on

quit

Ok, now we need to create a DEFAULT key to allow SPS-L to connect to the resource, this is done as follows:

xuser -U sdb -d SPS -u dbm,dbadmin, make sure this is executed on all production nodes or make sure that you copy /home/sdb/.XUSER.62 to all production nodes.

Once we have these items complete we can start the global DB listener using:

/sapdb/programs/bin/sdbgloballistener start

Once the global DB listener is running you should be able to connect to the DB using something like MaxDB Studio or SQL.

Filed Under: Clustering Simplified Tagged With: Linux, MaxDB, SIOS LifeKeeper

What’s new in SIOS LifeKeeper for Linux v 9.6.2?

September 28, 2022 by Jason Aw Leave a Comment

What’s new in SIOS LifeKeeper for Linux v 9.6.2

What’s new in SIOS LifeKeeper for Linux v 9.6.2?

SIOS LifeKeeper for Linux version 9.6.2 is now available! This new version supports v 8.6 of leading Linux distributions, supports Azure Shared Disk, and provides added protection from split brain scenarios that can occur when the network connection between cluster nodes fails.

New in SIOS LifeKeeper Linux, Version 9.6.2

SIOS LifeKeeper Linux, version 9.6.2 takes advantage of the latest bug fixes, security updates, and application support critical to their infrastructures and adds support for Miracle Linux v 8.4 for the first time as well as support for the following operating system versions:

  • Red Hat Enterprise Linux (RHEL)8.6
  • Oracle Linux 8.6
  • Rocky Linux 8.6

New Support for Azure Shared Disk

LifeKeeper for Linux v 9.6.2 is now certified for use with Azure shared disk, enabling customers to build a Linux HA cluster in Azure that leverages the new Azure shared disk resource. 

Standby Node Write Protection

LifeKeeper can now use the new Standby Node Health Check feature to lock the standby node against attempted writes to a protected shared storage device, protecting against data corruption that can result from loss of network connection between cluster nodes.

LifeKeeper Load Balancer Health Check Application Recovery Kit (ARK)

SIOS LifeKeeper for Linux comes with Application Recovery Kits (ARKs) that add application-specific intelligence, enabling automation of cluster configuration and orchestration of failover in compliance with application best practices. The latest version of SIOS LifeKeeper includes a new ARK that makes it easier for the user to install, find and use Load Balancer functionality in AWS EC2.

Contact SIOS here for purchasing information.

Reproduced with permission from SIOS

Filed Under: Clustering Simplified Tagged With: SIOS LifeKeeper

  • 1
  • 2
  • Next Page »

Recent Posts

  • The Best Rolling Upgrade Strategy to Enhance Business Continuity
  • How to Patch Without the Pause: Near-Zero Downtime with HA
  • SIOS LifeKeeper Demo: How Rolling Updates and Failover Protect PostgreSQL in AWS
  • How to Assess if My Network Card Needs Replacement
  • SIOS Technology to Demonstrate High Availability Clustering Software for Mission-Critical Applications at Red Hat Summit, Milestone Technology Day and XPerience Day, and SQLBits 2025

Most Popular Posts

Maximise replication performance for Linux Clustering with Fusion-io
Failover Clustering with VMware High Availability
create A 2-Node MySQL Cluster Without Shared Storage
SAP for High Availability Solutions For Linux
Bandwidth To Support Real-Time Replication
The Availability Equation – High Availability Solutions.jpg
Choosing Platforms To Replicate Data - Host-Based Or Storage-Based?
Guide To Connect To An iSCSI Target Using Open-iSCSI Initiator Software
Best Practices to Eliminate SPoF In Cluster Architecture
Step-By-Step How To Configure A Linux Failover Cluster In Microsoft Azure IaaS Without Shared Storage azure sanless
Take Action Before SQL Server 20082008 R2 Support Expires
How To Cluster MaxDB On Windows In The Cloud

Join Our Mailing List

Copyright © 2025 · Enterprise Pro Theme on Genesis Framework · WordPress · Log in