
A Step-by-Step Guide to Setting Up an NFS File Witness with SIOS LifeKeeper on Linux
Getting Started with SIOS Lifekeeper and NFS-Based File Witness
In high availability clustering, a witness plays a crucial role in ensuring the integrity and reliability of the cluster. Without a 3rd node, it can be hard to achieve quorum as there is no data to help break a tie where both nodes think they should go live (This is known as a split-brain). You can solve this problem in many ways, for example, by providing a dedicated witness server, a shared storage path seen by the whole cluster, or simply by having more nodes in the cluster itself (minimum 3!). Thankfully, SIOS LifeKeeper offers robust solutions for setting up high-availability clusters on Linux environments, and configuring a witness to improve quorum is an essential feature.
In this guide, we’ll walk you through the steps to set up an NFS-based file witness with SIOS LifeKeeper on Linux, helping you enhance the availability and resilience of your clustered applications.
Goal:
To achieve a 2-node cluster using an NFS-based storage witness as shown in the diagram below:
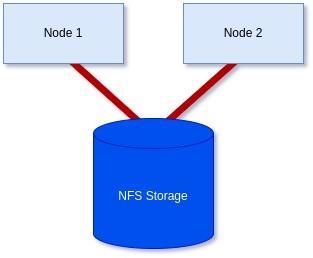
Prerequisites: Before getting started, ensure you have the following:
- Linux servers are configured and connected with administrative privileges (i.e., root access).
- SIOS LifeKeeper is either installed or downloaded and ready to install on each server.
- An NFS share is accessible to all servers in the cluster.
Step 1: Install/Modify SIOS LifeKeeper:
We will need to either install LifeKeeper at this stage or re-run the setup to add Witness functionality unless you already included it earlier.
In my case, I’m using RHEL8.8, so I will mount the ISO before running the setup with the supplementary package needed for RHEL8.8.
[root@server1-LK ~]# mount /root/sps.img /mnt/loop -t iso9660 -o loop
[root@server1-LK ~]# cd /mnt/loop/
[root@server1-LK loop]# ./setup –addHADR /root/HADR-RHAS-4.18.0-477.10.1.el8_8.x86_64.rpm
Here the important part for our purposes is enabling the witness function like in the screenshot below. However, you will also need an additional license file, which you can either add here or add via the command line later at your discretion:
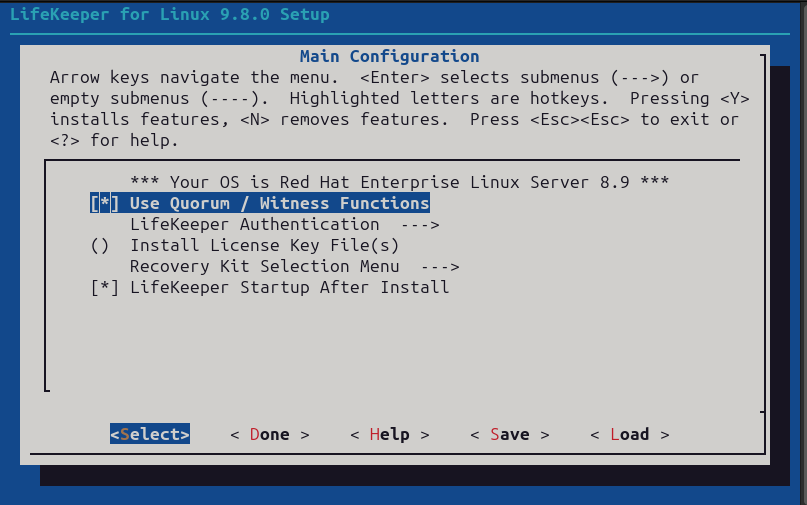
Otherwise, configure LifeKeeper for your purposes, or if it was already configured simply proceed through the setup once you’ve included the “Use Quorum / Witness Function” option.
If you decided to add the license via the command line also run the following command on each node in the cluster with the correct path to your license file:
[root@server1-LK ~]# /opt/LifeKeeper/bin/lkkeyins /<path-to-license-file>l/quorum-disk.lic
Step 2: Set up and mount shared storage:
Ensure that you have shared storage accessible to all servers in the cluster. You can check each server using either the ‘mount’ command or with ‘findmnt’ to verify that you have it locally mounted:
[root@server1-LK loop]# mount | grep nfs
sunrpc on /var/lib/nfs/rpc_pipefs type rpc_pipefs (rw,relatime)
172.16.200.254:/var/nfs/general on /nfs/general type nfs4 (rw,relatime,vers=4.2,rsize=1048576,wsize=1048576,namlen=255,hard,
proto=tcp,timeo=600,retrans=2,sec=sys,
clientaddr=172.16.205.151,local_lock=none,addr=172.16.200.254)
or
[root@server1-LK ~]# findmnt -l /nfs/general
TARGET SOURCE FSTYPE OPTIONS
/nfs/general 172.16.200.254:/var/nfs/general nfs4 rw,relatime,vers=4.2,rsize=1048576,wsize=1048576,namlen=255,hard,
proto=tcp,timeo=600,retrans=2,sec=sys,clientaddr=172.16.205.151,
local_lock=none,addr=172.16.200.254
Should you still need to mount the share yourself, please follow these steps:
First, confirm you can see the NFS share on the host server.
[root@server1-LK ~]# showmount -e 172.16.200.254
Export list for 172.16.200.254:
/home 172.16.205.244,172.16.205.151
/var/nfs/general 172.16.205.244,172.16.205.151
In my case, I want to mount the ‘/var/nfs/general’ share.
To mount this share, first, make sure your directory you plan to mount it to exists. If not, create it:
[root@server1-LK ~]# mkdir -p /nfs/general
Now you can manually mount the share using the following command to confirm you can connect, and it works:
[root@server1-LK ~]# mount 172.16.200.254:/var/nfs/general /nfs/general
Finally, once happy, add the mount point to you’re /etc/fstab file so it will mount on boot:
[root@server1-LK ~]# cat /etc/fstab
#
# /etc/fstab
# Created by anaconda on Thu Jan 25 12:07:15 2024
#
# Accessible filesystems, by reference, are maintained under ‘/dev/disk/’.
# See man pages fstab(5), findfs(8), mount(8) and/or blkid(8) for more info.
#
# After editing this file, run ‘systemctl daemon-reload’ to update systemd
# units generated from this file.
#
/dev/mapper/rhel-root / xfs defaults 0 0
UUID=6b22cebf-8f1c-405b-8fa8-8f12e1b6b56c /boot xfs defaults 0 0
/dev/mapper/rhel-swap none swap defaults 0 0
#added for NFS share
172.16.200.254:/var/nfs/general /nfs/general nfs4 defaults 0 0
Now, you can confirm it is mounted using the mount command:
[root@server1-LK ~]# mount -l | grep nfs
sunrpc on /var/lib/nfs/rpc_pipefs type rpc_pipefs (rw,relatime)
172.16.200.254:/var/nfs/general on /nfs/general type nfs4 (rw,relatime,vers=4.2,rsize=1048576,wsize=1048576,
namlen=255,hard,proto=tcp,timeo=600,retrans=2,sec=sys,
clientaddr=172.16.205.151,local_lock=none,addr=172.16.200.254)
As you can see from the highlighted text above, it has now been mounted successfully. Repeat on all servers until you are sure all servers have the share mounted before proceeding.
Step 4: Check your hostnames and configure /etc/default/LifeKeeper settings:
You can see the hostname LifeKeeper knows for each of your servers by running the following command on each node:
/opt/LifeKeeper/bin/lcduname
Example of settings you’ll need to add to the /etc/default/LifeKeeper file:
WITNESS_MODE=storage
QWK_STORAGE_TYPE=file
QWK_STORAGE_HBEATTIME=6
QWK_STORAGE_NUMHBEATS=9
QWK_STORAGE_OBJECT_server1_LK_localdomain=/nfs/general/nodeA
QWK_STORAGE_OBJECT_server2_LK_localdomain=/nfs/general/nodeB
For ‘QWK_STORAGE_OBJECT_<server-name>’, you need to declare this for each node, and it is formed using your hostname as well as the path, and the desired location of the witness file itself.
It should be noted that if the hostname contains a “-” or “.”, replace them with an underscore “_”
(e.g., lksios-1 → lksios_1 or lksios-1.localdomain → lksios_1_localdomain ).
In my example, I had the following hostnames:
server1-LK.localdomain
server2-LK.localdomain
Which meant adding the following ‘QWK_STORAGE_OBJECT_’ definitions:
QWK_STORAGE_OBJECT_server1_LK_localdomain=/nfs/general/nodeA
QWK_STORAGE_OBJECT_server2_LK_localdomain=/nfs/general/nodeB
In addition, we will need to adjust one of the existing settings in /etc/default/LifeKeeper:
QUORUM_MODE=storage
To help understand why we have set both our WITNESS_MODE and QUORUM_MODE to storage take a look at the following table:
Supported Combinations of a Quorum Mode and Witness Mode
LifeKeeper supports the following combinations.
| QUORUM_MODE | |||||
| majority | tcp_remote | storage | none/off | ||
| WITNESS_MODE | remote_verify | Supported3 or more nodes | Supported3 or more nodes | Not supported | Supported3 or more nodes |
| storage | Not Supported | Not Supported | SupportedBetween 2 and 4 nodes | Not supported | |
| none/off | Supported3 or more nodes | Supported2 or more nodes | Not supported | Supported | |
We have a two-node cluster that wants to use external storage for a quorum, so the only supported combination would be ‘storage’ for both values. However, you can see from the table how flexible this can be when you require more nodes, offering many ways to achieve communication and provide a quorum.
Step 4: Initialize the Witness file:
To initialize the witness file and enable its use, you must run the following command on each node:
[root@server1-LK ~]# /opt/LifeKeeper/bin/qwk_storage_init
It will pause when run until each node has completed so execute the command on the first node in the cluster, then the second, and so on before coming back to check the command is completed with no errors.
Example:
[root@server1-LK ~]# /opt/LifeKeeper/bin/qwk_storage_init
ok: LifeKeeper is running.
ok: The LifeKeeper license key is successfully installed.
ok: QWK parameter is valid.
QWK object of /nfs/general/nodeA is not yet avail.
/nfs/general/nodeA already exsits as not QWK_STORAGE_OBJECT: overwrite? (y/N): y
ok: The path of QWK object is valid.
ok: down: /opt/LifeKeeper/etc/service/qwk-storage: 1377s
ok: Initialization of QWK object of own node is completed.
QWK object of /nfs/general/nodeB is not yet avail.
QWK object of /nfs/general/nodeB is not yet avail.
QWK object of /nfs/general/nodeB is not yet avail.
QWK object of /nfs/general/nodeB is not yet avail.
QWK object of /nfs/general/nodeB is not yet avail.
QWK object of /nfs/general/nodeB is not yet avail.
QWK object of /nfs/general/nodeB is not yet avail.
ok: quorum system is ready.
ok: run: /opt/LifeKeeper/etc/service/qwk-storage: (pid 14705) 1s, normally down
Successful.
Step 5: Validate Configuration:
The configuration can be validated by running the following command:
/opt/LifeKeeper/bin/lktest
Should it find any errors, they will be printed to the terminal for you. In the example below, I hadn’t replaced the special characters in my hostname so it highlighted it was unable to find the storage.
[root@server1-LK ~]# /opt/LifeKeeper/bin/lktest
/opt/LifeKeeper/bin/lktest: /etc/default/LifeKeeper[308]: QWK_STORAGE_OBJECT_server1_LK.localdomain=/nfs/general/nodeA: not found
/opt/LifeKeeper/bin/lktest: /etc/default/LifeKeeper[309]: QWK_STORAGE_OBJECT_server2_LK.localdomain=/nfs/general/nodeB: not found
F S UID PID PPID C CLS PRI NI SZ STIME TIME CMD
4 S root 2348 873 0 TS 39 -20 7656 15:49 00:00:00 lcm
4 S root 2388 882 0 TS 39 -20 59959 15:49 00:00:00 ttymonlcm
4 S root 2392 872 0 TS 29 -10 10330 15:49 00:00:00 lcd
4 S root 8591 8476 0 TS 19 0 7670 15:58 00:00:00 lcdremexec -d server2-LK.localdomain -e — cat /proc/mdstat
You can also confirm that the witness file is being updated via the command line like so:
[root@server1-LK ~]# cat /nfs/general/nodeA
signature=lifekeeper_qwk_object
local_node=server1-LK.localdomain
time=Thu Feb 15 14:10:56 2024
sequence=157
node=server2-LK.localdomain
commstat=UP
checksum=13903688106811808601
A Successful File Share Witness Using NFS
Setting up a file share witness using NFS is easy! It can be powerful if you are restricted to two nodes but need better resilience to split-brain events, especially in the cloud where you can leverage something like AWS’s EFS… Another essential part can be utilizing more communications paths, but that’s a different blog. However, by following the steps outlined in this guide, you can enhance the resilience of your clustered applications and minimize the risk of downtime. Always refer to the SIOS documentation and best practices for further guidance and optimization of your high-availability setup. It’s publicly available and extremely comprehensive!
SIOS High Availability and Disaster Recovery
SIOS Technology Corporation provides high availability and Disaster Recovery products that protect & optimize IT infrastructures with cluster management for your most important applications. Contact us today for more information about our services and professional support.
Reproduced with permission from SIOS