
Deployment of a SQL Server Failover Cluster Instance on Huawei Cloud
*DISCLAIMER: While the following completely covers the high availability portion within the scope of our product, this is a setup “guide” only and should be adapted to your own configuration.
Overview
HUAWEI CLOUD is a leading cloud service provider not just in China but also has global footprint with many datacenters around the world. They bring Huawei’s 30-plus years of expertise together in ICT infrastructure products and solutions and are committed to providing reliable, secure, and cost-effective cloud services to empower applications, harness the power of data, and help organizations of all sizes grow in today’s intelligent world. HUAWEI CLOUD is also committed to bringing affordable, effective, and reliable cloud and AI services through technological innovation.
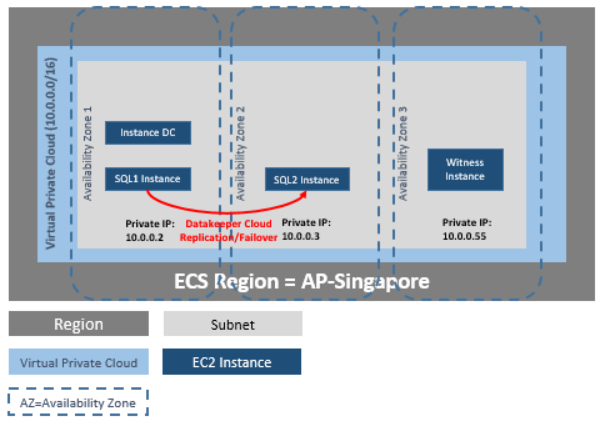
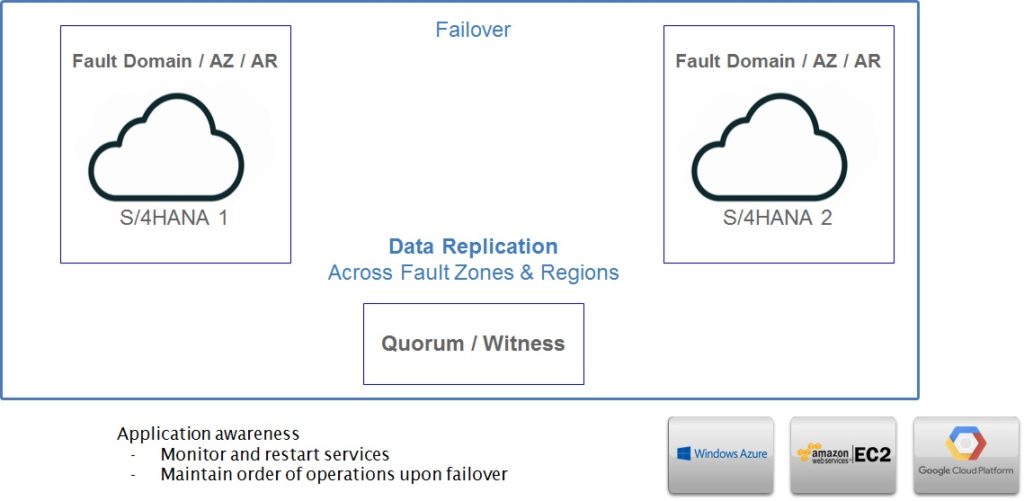
DataKeeper Cluster Edition provides replication in a virtual private cloud (VPC) within a single region across availability zones for the Huawei cloud. In this particular SQL Server clustering example, we will launch four instances (one domain controller instance, two SQL Server instances and a quorum/witness instance) into three availability zones.
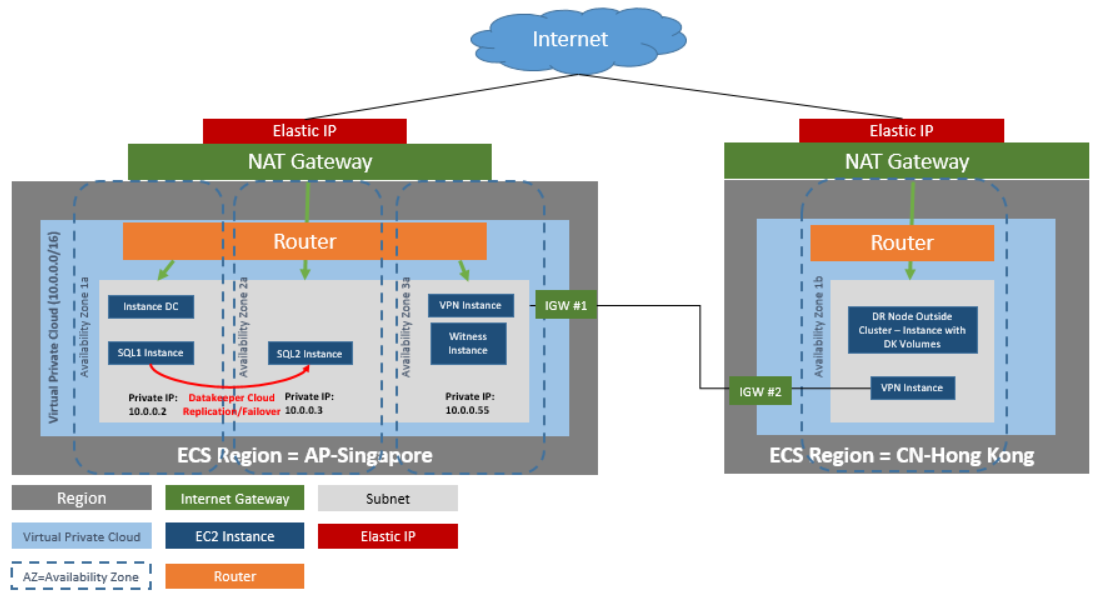
DataKeeper Cluster Edition provides support for a data replication node outside of the cluster with all nodes in Huawei cloud. In this particular SQL Server clustering example, four instances are launched (one domain controller instance, two SQL Server instances and a quorum/witness instance) into three availability zones. Then an additional DataKeeper instance is launched in a second region including a VPN instance in both regions. Please see Configuration of Data Replication From a Cluster Node to External DR Site for more information. For additional information on using multiple regions please see Connecting Two VPCs in Different Regions.
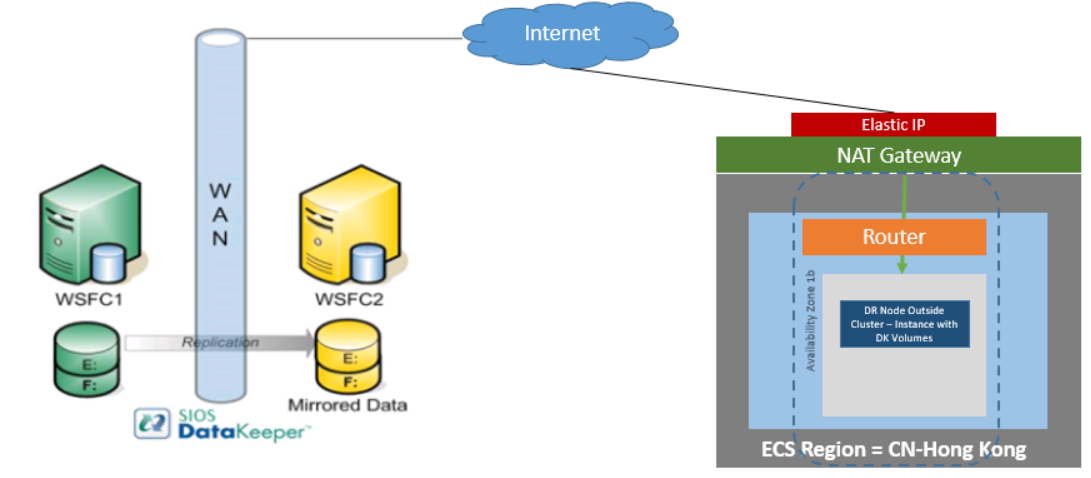
DataKeeper Cluster Edition also provides support for a data replication node outside of the cluster with only the node outside of the cluster in Huawei Cloud. In this particular SQL Server clustering example, WSFC1 and WSFC2 are in an on-site cluster replicating to a Huawei Cloud instance. Then an additional DataKeeper instance is launched in a region in Huawei Cloud. Please see Configuration of Data Replication From a Cluster Node to External DR Site for more information.
Requirements
| Description | Requirement |
| Virtual Private Cloud | In a single region with three availability zones |
| Instance Type | Minimum recommended instance type: s3.large.2 |
| Operating System | See the DKCE Support Matrix |
| Elastic IP | One elastic IP address connected to the domain controller |
| Four instances | One domain controller instance, two SQL Server instances and one quorum/witness instance |
| Each SQL Server | ENI (Elastic Network Interface) with 4 IPs
· Primary ENI IP statically defined in Windows and used by DataKeeper Cluster Edition · Three IPs maintained by ECS while used by Windows Failover Clustering , DTC and SQLFC |
| Volumes | Three volumes (EBS and NTFS only)
· One primary volume (C drive) · Two additional volumes o One for Failover Clustering o One for MSDTC |
Release Notes
Before beginning, make sure you read the DataKeeper Cluster Edition Release Notes for the latest information. It is highly recommended that you read and understand the DataKeeper Cluster Edition Installation Guide.
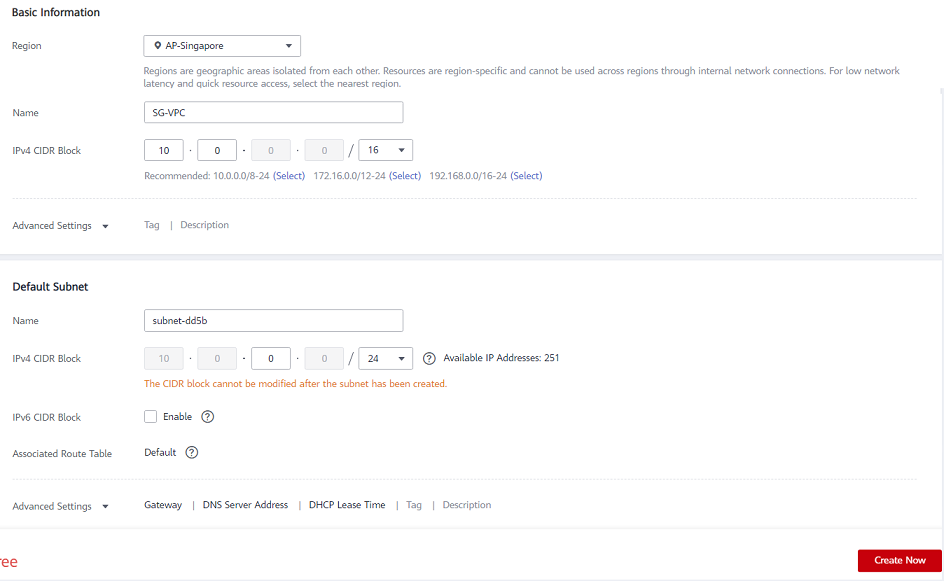
Create a Virtual Private Cloud (VPC)
A virtual private cloud is the first object you create when using DataKeeper Cluster Edition.
*A virtual Private Cloud (VPC) is an isolated private cloud consisting of a configurable pool of shared computing resources in a public cloud.
- Using the email address and password specified when signing up for Huawei Cloud, sign in to the Huawei Cloud Management Console.
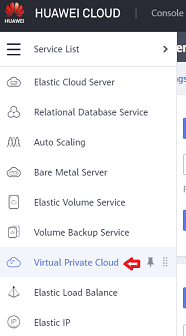
- From the Services dropdown, select Virtual Private Cloud.
- On the right side of the screen, click on Create VPC and select the region that you want to use.
- Input the name that you want to use for the VPC
- Define your virtual private cloud subnet by entering your CIDR (Classless Inter-Domain Routing) as described below
- Input the subnet name, then click Create Now.
*A Route Table will automatically be created with a “main” association to the new VPC. You can use it later or create another Route Table.
*HELPFUL LINK:
Huawei’s Creating a Virtual Private Cloud (VPC)
Launch an Instance
The following walks you through launching an instance into your subnet. You will want to launch two instances into one availability zone, one for your domain controller instance and one for your SQL instance. Then you will launch another SQL instance into another availability zone and a quorum witness instance into yet another availability zone.
*HELPFUL LINKS:
Huawei Cloud ECS Instances
- Using the email address and password specified when signing up for Huawei Cloud, sign in to the Huawei Cloud Management Console.
- From the Service List dropdown, select Elastic Cloud Server.

- Select Buy ECS button and choose the Billing Mode, Region and AZ (Availability Zone) to deploy the Instance
- Select your Instance Type. (Note:Select s3.large.2 or larger.).
- Choose an Image. Under Public Image, select the Windows Server 2019 Datacenter 64bit English image
- For Configure Network, select your VPC.
- For Subnet, select an Subnet that you want to use, select Manually-specified IP address and input the IP address that you want to use
- Select the Security Group to use or Edit and select an existing one.
- Assign an EIPif you need the ECS instance to access the internet
- Click Configure Advanced Settings and provide a name for the ECS, use Password for Login Mode and provide the secure password for Administrator login
- Click Configure Now on Advanced Options Add a Tag to name your instance and Click on Confirm
- Perform final review of the Instance and click on Submit.
*IMPORTANT: Make a note of this initial administrator password. It will be needed to log on to your instance.
Repeat the above steps for all instances.
Connect to Instances
You can connect to your domain controller instance via Remote Login from the ECS pane.
Login as administrator and enter your administrator password.
*BEST PRACTICE: Once logged on, it is best practice to change your password.
Configure the Domain Controller Instance
Now that the instances have been created, we started with setting up the Domain Service instance.
This guide is not a tutorial on how to set up an Active Domain server instance. We recommend reading articles on how to set up and configure an Active Directory server. It is very important to understand that even though the instance is running in a Huawei cloud, this is a regular installation of Active Directory.
Static IP Addresses
Configure Static IP Addresses for your Instances
- Connect to your domain controller instance.
- Click Start/ Control Panel.
- Click Network and Sharing Center.
- Select your network interface.
- Click Properties.
- Click Internet Protocol Version 4 (TCP/IPv4), then Properties.
- Obtain your current IPv4 address, default gateway and DNS server for the network interface from Amazon.
- In the Internet Protocol Version 4 (TCP/IPv4) Properties dialog box, under Use the following IP address, enter your IPv4 address.
- In the Subnet mask box, type the subnet mask associated with your virtual private cloud subnet.
- In the Default Gateway box, type the IP address of the default gateway and then click OK.
- For the Preferred DNS Server, enter the Primary IP Address of Your Domain Controller(ex. 15.0.1.72).
- Click Okay, then select Close. Exit Network and Sharing Center.
- Repeat the above steps on your other instances.
Join the Two SQL Instances and the Witness Instance to Domain
*Before attempting to join a domain make these network adjustments. On your network adapter, Add/Change the Preferred DNS server to the new Domain Controller address and its DNS server. Use ipconfig /flushdns to refresh the DNS search list after this change. Do this before attempting to join the Domain.
*Ensure that Core Networking and File and Printer Sharing options are permitted in Windows Firewall.
- On each instance, click Start, then right-click Computer and select Properties.
- On the far right, select Change Settings.
- Click on Change.
- Enter a new Computer Name.
- Select Domain.
- Enter Domain Name– (ex. docs.huawei.com).
- Click Apply.
*Use Control Panel to make sure all instances are using the correct time zone for your location.
*BEST PRACTICE: It is recommend that the System Page File is set to system managed (not automatic) and to always use the C: drive.
Control Panel > Advanced system settings > Performance > Settings > Advanced > Virtual Memory. Select System managed size, Volume C: only, then select Set to save.
Assign Secondary Private IPs to the Two SQL Instances
In addition to the Primary IP, you will need to add three additional IPs (Secondary IPs) to the elastic network interface for each SQL instance.
- From the Service List dropdown, select Elastic Cloud Server.
- Click the instance for which you want to add secondary private IP addresses.
- Select NICs > Manage Virtual IP Address.
- Click on Assign Virtual IP address and select Manual enter an IP address that is within the subnet range for the instance (ex. For 15.0.1.25, enter 15.0.1.26). Click Ok.
- Click on the More dropdown on the IP address row, and select Bind to Server, select the server to bind the IP address to, and the NIC card.
- Click OK to save your work.
- Perform the above on both SQL Instances.
*HELPFUL LINKS:
Managing Virtual IP Addresses
Binding a Virtual IP Address to an EIP or ECS
Create and Attach Volumes
DataKeeper is a block-level volume replication solution and requires that each node in the cluster have additional volume(s) (other than the system drive) that are the same size and same drive letters. Please review Volume Considerations for additional information regarding storage requirements.
Create Volumes
Create two volumes in each availability zone for each SQL server instance, a total of four volumes.
- From the Service List dropdown, select Elastic Cloud Server.
- Click the instance for which you want to manage
- Go to the Disks tab
- Click Add Disk to add a new volume of your choice and size, make sure you select the volume in the same AZ as the SQL server that you intend to attach it to
- Select the check box to agree to the SLA and Submit
- Click Back to Server Console
- Attach the disk if necessary to the SQL instance
- Do this for all four volumes.
*HELPFUL LINKS:
Elastic Volume Service
Configure the Cluster
Prior to installing DataKeeper Cluster Edition, it is important to have Windows Server configured as a cluster using either a node majority quorum (if there is an odd number of nodes) or a node and file share majority quorum (if there is an even number of nodes). Consult the Microsoft documentation on clustering in addition to this topic for step-by-step instructions. Note: Microsoft released a hotfix for Windows 2008R2 that allows disabling of a node’s vote which may help achieve a higher level of availability in certain multi-site cluster configurations.
Add Failover Clustering
Add the Failover Clustering feature to both SQL instances.
- Launch Server Manager.
- Select Features in the left pane and click Add Features in the Features This starts the Add Features Wizard.
- Select Failover Clustering.
- Select Install.
Validate a Configuration
- Open Failover Cluster Manager.
- Select Failover Cluster Manager, select Validate a Configuration.
- Click Next, then add your two SQL instances.
Note: To search, select Browse, then click on Advanced and Find Now. This will list available instances.
- Click Next.
- Select Run Only Tests I Select and click Next.
- In the Test Selection screen, deselect Storage and click Next.
- At the resulting confirmation screen, click Next.
- Review Validation Summary Report then click Finish.
Create Cluster
- In Failover Cluster Manager, click on Create a Cluster then click Next.
- Enter your two SQL instances.
- On the Validation Warning page, select No then click Next.
- On the Access Point for Administering the Cluster page, enter a unique name for your WSFC Cluster. Then enter the Failover Clustering IP address for each node involved in the cluster. This is the first of the three secondary IP addresses added previously to each instance.
- IMPORTANT!Uncheck the “Add all available storage to the cluster” checkbox. DataKeeper mirrored drives must not be managed natively by the cluster. They will be managed as DataKeeper Volumes.
- Click Next on the Confirmation
- On Summary page, review any warnings then select Finish.
Configure Quorum/Witness
- Create a folder on your quorum/witness instance (witness).
- Share the folder.
- Right-click folder and select Share With / Specific People….
- From the dropdown, select Everyone and click Add.
- Under Permission Level, select Read/Write.
- Click Share, then Done. (Make note of the path of this file share to be used below.)
- In Failover Cluster Manager, right-click cluster and choose More Actions and Configure Cluster Quorum Settings. Click Next.
- On the Select Quorum Configuration, choose Node and File Share Majority and click Next.
- On the Configure File Share Witness screen, enter the path to the file share previously created and click Next.
- On the Confirmation page, click Next.
- On the Summary page, click Finish.
Install and Configure DataKeeper
After the basic cluster is configured but prior to any cluster resources being created, install and license DataKeeper Cluster Edition on all cluster nodes. See the DataKeeper Cluster Edition Installation Guide for detailed instructions.
- Run DataKeeper setup to install DataKeeper Cluster Edition on both SQL instances.
- Enter your license key and reboot when prompted.
- Launch the DataKeeper GUI and connect to server.
*Note: The domain or server account used must be added to the Local System Administrators Group. The account must have administrator privileges on each server that DataKeeper is installed on. Refer to DataKeeper Service Log On ID and Password Selection for additional information.
- Right click on Jobs and connect to both SQL servers.
- Create a Job for each mirror you will create. One for your DTC resource, and one for your SQL resource..
- When asked if you would like to auto-register the volume as a cluster volume, select Yes.
*Note: If installing DataKeeper Cluster Edition on Windows “Core” (GUI-less Windows), make sure to read Installing and Using DataKeeper on Windows 2008R2/2012 Server Core Platforms for detailed instructions.
Configure MSDTC
- For Windows Server 2012 and 2016, in the Failover Cluster Manager GUI, select Roles, then select Configure Role.
- Select Distributed Transaction Coordinator (DTC), and click Next.
*For Windows Server 2008, in the Failover Cluster Manager GUI, select Services and Applications, then select Configure a Service or Application and click Next.
- On the Client Access Point screen, enter a name, then enter the MSDTC IP address for each node involved in the cluster. This is the second of the three secondary IP addresses added previously to each instance. Click Next.
- Select the MSDTC volume and click Next.
- On the Confirmation page, click Next.
- Once the Summary page displays, click Finish.
Install SQL on the First SQL Instance
- On the domain controller server create a folder and share it..
- For example “TEMPSHARE” with Everyone permission.
- Create a sub folder “SQL” and copy the SQL .iso installer into that sub folder.
- On the SQL server, create a network drive and attach it to the shared folder on the domain controller.
- . For example “net use S: \\\TEMPSHARE
- On the SQL server the S: drive will appear. CD to the SQL folder and find the SQL .iso installer. Right click on the .iso file and select Mount. The setup.exe installer will appear with the SQL .iso installer.
F:\>Setup /SkipRules=Cluster_VerifyForErrors /Action=InstallFailoverCluster
- On Setup Support Rules, click OK.
- On the Product Key dialog, enter your product key and click Next.
- On the License Terms dialog, accept the license agreement and click Next.
- On the Product Updates dialog, click Next.
- On the Setup Support Files dialog, click Install.
- On the Setup Support Rules dialog, you will receive a warning. Click Next, ignoring this message, since it is expected in a multi-site or non-shared storage cluster.
- Verify Cluster Node Configuration and click Next.
- Configure your Cluster Network by adding the “third” secondary IP address for your SQL instance and click Next. Click Yes to proceed with multi-subnet configuration.
- Enter passwords for service accounts and click Next.
- On the Error Reporting dialog, click Next.
- On the Add Node Rules dialog, skipped operation warnings can be ignored. Click Next.
- Verify features and click Install.
- Click Close to complete the installation process.
Install SQL on the Second SQL Instance
Installing the second SQL instance is similar to the first one.
- On the SQL server, create a network drive and attach it to the shared folder on the domain controller as explained above for the first SQL server.
- Once the .iso installer is mounted, run SQL setup once again from the command line in order to skip the Validate Open a Command window, browse to your SQL install directory and type the following command:
Setup /SkipRules=Cluster_VerifyForErrors /Action=AddNode /INSTANCENAME=”MSSQLSERVER”
(Note: This assumes you installed the default instance on the first node)
- On Setup Support Rules, click OK.
- On the Product Key dialog, enter your product key and click Next.
- On the License Terms dialog, accept the license agreement and click Next.
- On the Product Updates dialog, click Next.
- On the Setup Support Files dialog, click Install.
- On the Setup Support Rules dialog, you will receive a warning. Click Next, ignoring this message, since it is expected in a multi-site or non-shared storage cluster.
- Verify Cluster Node Configuration and click Next.
- Configure your Cluster Network by adding the “third” secondary IP address for your SQL Instance and click Next. Click Yes to proceed with multi-subnet configuration.
- Enter passwords for service accounts and click Next.
- On the Error Reporting dialog, click Next.
- On the Add Node Rules dialog, skipped operation warnings can be ignored. Click Next.
- Verify features and click Install.
- Click Close to complete the installation process.
Common Cluster Configuration
This section describes a common 2-node replicated cluster configuration.
- The initial configuration must be done from the DataKeeper UI running on one of the cluster nodes. If it is not possible to run the DataKeeper UI on a cluster node, such as when running DataKeeper on a Windows Core only server, install the DataKeeper UI on any computer running Windows XP or higher and follow the instruction in the Core Only section for creating a mirror and registering the cluster resources via the command line.
- Once the DataKeeper UI is running, connect to each of the nodes in the cluster.
- Create a Job using the DataKeeper UI. This process creates a mirror and adds the DataKeeper Volume resource to the Available Storage.
!IMPORTANT: Make sure that Virtual Network Names for NIC connections are identical on all cluster nodes.
- If additional mirrors are required, you can Add a Mirror to a Job.
- With the DataKeeper Volume(s)now in Available Storage, you are able to create cluster resources (SQL, File Server, etc.) in the same way as if there were a shared disk resource in the cluster. Refer to Microsoft documentation for additional information in addition to the above for step-by-step cluster configuration instructions.
Connectivity to the cluster (virtual) IPs
In addition to the Primary IP and secondary IP, you will also need to configure the virtual IP addresses in the Huawei Cloud so that they can be routed to the active node.
- From the Service List dropdown, select Elastic Cloud Server.
- Click on one of the SQL instance for which you want to add cluster virtual IP address (one for MSDTC, one for SQL Failover Cluster)
- Select NICs > Manage Virtual IP Address.
- Click on Assign Virtual IP address and select Manual enter an IP address that is within the subnet range for the instance (ex. For 15.0.1.25, enter 15.0.1.26). Click Ok.
- Click on the More dropdown on the IP address row, and select Bind to Server, select both the server to bind the IP address to, and the NIC card.
- Use the same steps 4. and 5 for the MSDTC and SQLFC virtual IPs
- Click OKto save your work.
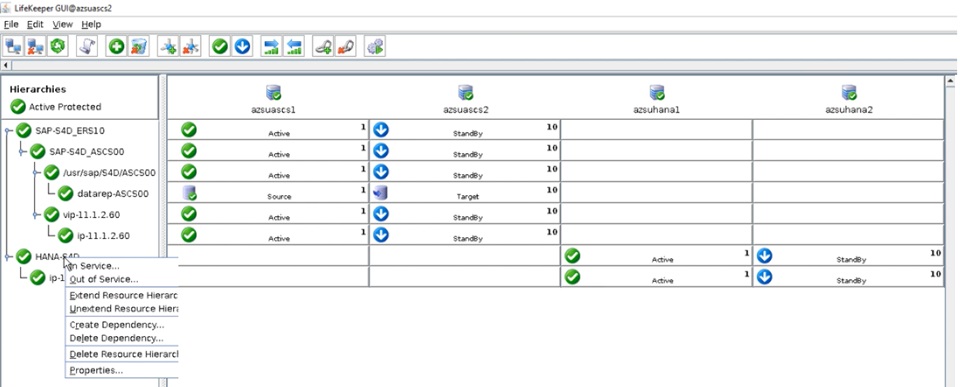
Management
Once a DataKeeper volume is registered with Windows Server Failover Clustering, all of the management of that volume will be done through the Windows Server Failover Clustering interface. All of the management functions normally available in DataKeeper will be disabled on any volume that is under cluster control. Instead, the DataKeeper Volume cluster resource will control the mirror direction, so when a DataKeeper Volume comes online on a node, that node becomes the source of the mirror. The properties of the DataKeeper Volume cluster resource also display basic mirroring information such as the source, target, type and state of the mirror.
Troubleshooting
Use the following resources to help troubleshoot issues:
- Troubleshooting issues section
- For customers with a support contract – http://us.sios.com/support/overview/
- For evaluation customers only – Pre-sales support
Additional Resources:
Step-by-Step: Configuring a 2-Node Multi-Site Cluster on Windows Server 2008 R2 – Part 1 — http://clusteringformeremortals.com/2009/09/15/step-by-step-configuring-a-2-node-multi-site-cluster-on-windows-server-2008-r2-%E2%80%93-part-1/
Step-by-Step: Configuring a 2-Node Multi-Site Cluster on Windows Server 2008 R2 – Part 3 — http://clusteringformeremortals.com/2009/10/07/step-by-step-configuring-a-2-node-multi-site-cluster-on-windows-server-2008-r2-%E2%80%93-part-3/

 Has this ever happened to you? You receive an alert about an application issue when you are out of the office, and you don’t have the information you need to address it? And you either need to access your cloud management console from an inconvenient location or pass the information on to another colleague to address? Or you are investigating an alert when another one comes in requiring your attention? Research has shown it can take the average person 23 minutes to recover from unexpected interruptions.