SIOS SANless clusters

SIOS SANless clusters High-availability Machine Learning monitoring

  • Home
  • Products
    • SIOS DataKeeper for Windows
    • SIOS Protection Suite for Linux
  • News and Events
  • Clustering Simplified
  • Success Stories
  • Contact Us
  • English
  • 中文 (中国)
  • 中文 (台灣)
  • 한국어
  • Bahasa Indonesia
  • ไทย

Sanless SQL Server Failover Cluster Instance In Google Cloud Platform

September 7, 2018 by Jason Aw Leave a Comment

How to build a sanless sql server failover cluster instance in google cloud platform

How To Build A Sanless SQL Server Failover Cluster Instance In Google Cloud Platform

If you are going to host SQL Server on the Google Cloud Platform (GCP) you will want to make sure it is highly available. One of the best and most economical ways to do that is to build a Sanless SQL Server Failover Cluster Instance In Google Cloud Platform.

Cost Effective

Since SQL Server Standard Edition supports Failover Clustering, we can avoid the cost associated with SQL Server Enterprise Edition which is required for Always On Availability Groups. In addition, SQL Server Failover Clustering is a much more robust solution as it protects the entire instance of SQL Server. It has no limitations in terms of DTC (Distributed Transaction Coordinator) support and is easier to manage. Plus, it supports earlier versions of SQL Server that you may still have, such as SQL 2012 through the latest SQL 2017. Unfortunately, SQL 2008 R2 is not supported due to the lack of support for cross-subnet failover.

What’s Different With SIOS Datakeeper?

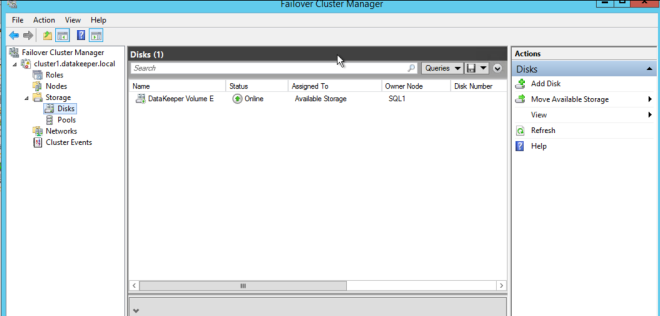
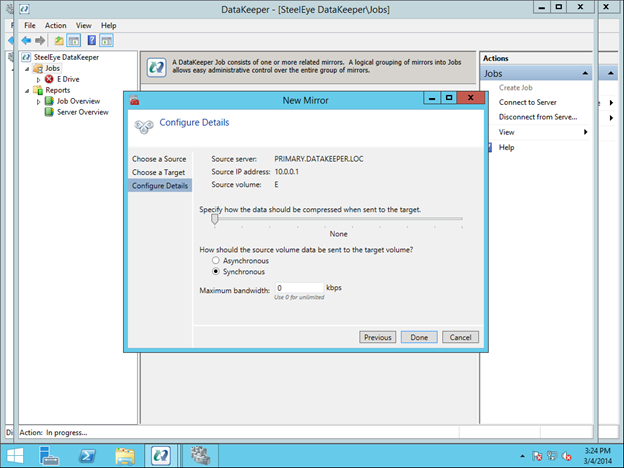
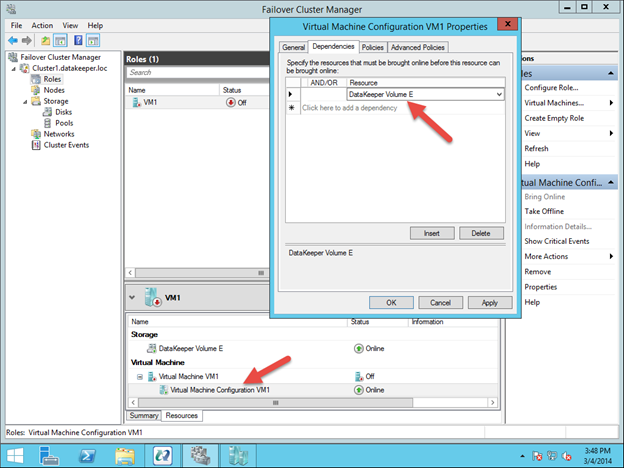
Traditionally, SQL Server FCI requires that you have a SAN or some type of shared storage device. In the cloud, there is no cluster-aware shared storage. In place of a SAN, we will build a SANless cluster using SIOS DataKeeper Cluster Edition (DKCE). DKCE uses block-level replication to ensure that the locally attached storage on each instance remains in sync with one other. It also integrates with Windows Server Failover Clustering through its own storage class resource called a DataKeeper Volume which takes the place of the physical disk resource. As far as the cluster is concerned, the SIOS DataKeeper volume looks like a physical disk, but instead of controlling SCSI reservations. It controls the mirror direction, ensuring that only the active server writes to the disk and that the passive server(s) receive all the changes either synchronously or asynchronously.

Getting Started With The Sanless SQL Server Failover Cluster Instance In Google Cloud Platform

In this guide, we will walk through the steps to build a two-node failover cluster between two instances in the same region, but in different Zones, within the GCP as shown in Figure 1.

Sanless SQL Server Failover Cluster Instance In Google Cloud Platform

To find out out more about Sanless SQL Server Failover Cluster Instance In Google Cloud Platform, download the entire white paper at https://us.sios.com/san-sanless-clusters-resources/white-paper-build-sql-server-failover-cluster-gcp/

Find out more about SIOS DataKeeper

Reproduced with permission from Clusteringformeremortals.com

Filed Under: Clustering Simplified, Datakeeper Tagged With: Failover clustering instance, sanless sql server failover cluster instance in google cloud platform, SQL Server

Deploy 2-Node File Server Failover Cluster in Azure

August 22, 2018 by Jason Aw Leave a Comment

Deploy a highly available file server in Azure IAAS with SIOS Datakeeper

Deploying A Highly Available File Server In Azure IAAS (ARM) with SIOS DataKeeper

In this post we will detail the specific steps required to Deploy 2-Node File Server Failover Cluster in Azure in a single region of Azure using Azure Resource Manager. I will assume you are familiar with basic Azure concepts as well as basic Failover Cluster concepts. In this article we will cover what is unique about deploying a File Server Failover Cluster in Azure.

With DataKeeper Cluster Edition you are able to take the locally attached storage, whether it is Premium or Standard Disks, and replicate those disks either synchronously, asynchronously or a mix or both, between two or more cluster nodes. In addition, a DataKeeper Volume resource is registered in Windows Server Failover Clustering which takes the place of a Physical Disk resource. Instead of controlling SCSI-3 reservations like a Physical Disk Resource, the DataKeeper Volume controls the mirror direction, ensuring the active node is always the source of the mirror. As far as Failover Clustering is concerned, it looks, feels and smells like a Physical Disk and is used the same way Physical Disk Resource would be used.

Pre-Requisites To Deploy 2-Node File Server Failover Cluster in Azure

  • You have used the Azure Portal before and are comfortable deploying virtual machines in Azure IaaS.
  • Have obtained a license or eval license of SIOS DataKeeper

Deploying A File Server Failover Cluster Instance Using The Azure Portal

To Deploy 2-Node File Server Failover Cluster in Azure, we are going to assume you have a basic Virtual Network based on Azure Resource Manager and you have at least one virtual machine up and running and configured as a Domain Controller. Once you have a Virtual Network and a Domain configured, you are going to provision two new virtual machines which will act as the two nodes in our cluster.

Our environment will look like this:

DC1 – Our Domain Controller and File Share Witness
SQL1 and SQL2 – The two nodes of our File Server Cluster

Provisioning The Two Cluster Nodes (SQL1 And SQL2)

Using the Azure Portal, we will provision both SQL1 and SQL2 exactly the same way. There are numerous options to choose from including instance size, storage options, etc. This guide is not meant to be an exhaustive guide to deploying Servers in Azure as there are some really good resources out there and more published every day. However, there are a few key things to keep in mind when creating your instances, especially in a clustered environment.

Availability Set – It is important that both SQL1, SQL2 AND DC1 reside in the same availability set. By putting them in the same Availability Set we are ensuring that each cluster node and the file share witness reside in a different Fault Domain and Update Domain. This helps guarantee that during both planned maintenance and unplanned maintenance the cluster will continue to be able to maintain quorum and avoid downtime.

Deploy 2-Node File Server Failover Cluster in Azure
Figure 3 – Be sure to add both cluster nodes and the file share witness to the same Availability Set

Static IP Address

Once each VM is provisioned, you will want to go into the setting and change the settings so that the IP address is Static. We do not want the IP address of our cluster nodes to change.

Deploy 2-Node File Server Failover Cluster in Azure
Figure 4 – Make sure each cluster node uses a static IP

Storage

As far as Storage is concerned, you will want to consult Performance best practices for SQL Server in Azure Virtual Machines. In any case, you will minimally need to add at least one additional disk to each of your cluster nodes. DataKeeper can use Basic Disk, Premium Storage or even Storage Pools consisting of multiple disks in a storage pool. Just be sure to add the same amount of storage to each cluster node and configure it identically. Also, be sure to use a different storage account for each virtual machine to ensure that a problem with one Storage Account does not impact both virtual machines at the same time.

Deploy 2-Node File Server Failover Cluster in Azure
Figure 5 – make sure to add additional storage to each cluster node

Create The Cluster

Assuming both cluster nodes (SQL1 and SQL2) have been provisioned as described above and added to your existing domain, we are ready to create the cluster. Before we create the cluster, there are a few Features that need to be enabled. These features are .Net Framework 3.5 and Failover Clustering. These features need to be enabled on both cluster nodes. You will also need to enable the FIle Server Role.

Deploy 2-Node File Server Failover Cluster in Azure
Figure 6 – enable both .Net Framework 3.5 and Failover Clustering features and the File Server on both cluster nodes

Once that role and those features have been enabled, you are ready to build your cluster. Most of the steps I’m about to show you can be performed both via PowerShell and the GUI. However, I’m going to recommend that for this very first step you use PowerShell to create your cluster. If you choose to use the Failover Cluster Manager GUI to create the cluster, you will find that you wind up with the cluster being issues a duplicate IP address.

Details To Note

Without going into great detail, what you will find is that Azure VMs have to use DHCP. By specifying a “Static IP” when we create the VM in the Azure portal all we did was create sort of a DHCP reservation. It is not exactly a DHCP reservation because a true DHCP reservation would remove that IP address from the DHCP pool. Instead, specifying a Static IP in the Azure portal simply means that if that IP address is still available when the VM requests it, Azure will issue that IP to it. However, if your VM is offline and another host comes online in that same subnet it very well could be issued that same IP address.

There is another strange side effect to the way Azure has implemented DHCP. When creating a cluster with the Windows Server Failover Cluster GUI when hosts use DHCP (which they have to), there is not option to specify a cluster IP address. Instead it relies on DHCP to obtain an address. The odd thing is, DHCP will issue a duplicate IP address, usually the same IP address as the host requesting a new IP address. The cluster will usually complete, but you may have some strange errors and you may need to run the Windows Server Failover Cluster GUI from a different node in order to get it to run. Once you get it to run you will want to change the cluster IP address to an address that is not currently in use on the network.

Avoid The Mess

You can avoid that whole mess by simply creating the cluster via Powershell and specifying the cluster IP address as part of the PowerShell command to create the cluster.

You can create the cluster using the New-Cluster command as follows:

New-Cluster -Name cluster1 -Node sql1,sql2 -StaticAddress 10.0.0.101 -NoStorage

After the cluster creation completes, you will also want to run the cluster validation by running the following command:

Test-Cluster

Deploy 2-Node File Server Failover Cluster in Azure
Figure 7 – The output of the cluster creation and the cluster validation commands

Create File Share Witness

Because there is no shared storage, you will need to create a file share witness on another server in the same Availability Set as the two cluster nodes. By putting it in the same availability set you can be sure that you only lose one vote from your quorum at any given time. If you are unsure how to create a File Share Witness you can review this article http://www.howtonetworking.com/server/cluster12.htm. In my demo I put the file share witness on domain controller. I have published an exhaustive explanation of cluster quorums at https://blogs.msdn.microsoft.com/microsoft_press/2014/04/28/from-the-mvps-understanding-the-windows-server-failover-cluster-quorum-in-windows-server-2012-r2/

Install DataKeeper

After the cluster is created it is time to install DataKeeper. It is important to install DataKeeper after the initial cluster is created so the custom cluster resource type can be registered with the cluster. If you installed DataKeeper before the cluster is created you will simply need to run the install again and do a repair installation.

Deploy 2-Node File Server Failover Cluster in Azure
Figure 8 – Install DataKeeper after the cluster is created

During the installation you can take all of the default options.  The service account you use must be a domain account and be in the local administrators group on each node in the cluster.

Deploy 2-Node File Server Failover Cluster in Azure
Figure 9 – the service account must be a domain account that is in the Local Admins group on each node

Once DataKeeper is installed and licensed on each node you will need to reboot the servers.

Create The DataKeeper Volume Resource

To create the DataKeeper Volume Resource you will need to start the DataKeeper UI and connect to both of the servers.
Deploy 2-Node File Server Failover Cluster in Azure

Connect to SQL1
Deploy 2-Node File Server Failover Cluster in Azure

Connect to SQL2
Deploy 2-Node File Server Failover Cluster in Azure

Once you are connected to each server, you are ready to create your DataKeeper Volume. Right click on Jobs and choose “Create Job”
Deploy 2-Node File Server Failover Cluster in Azure

Give the Job a name and description.
Deploy 2-Node File Server Failover Cluster in Azure

Choose your source server, IP and volume. The IP address is whether the replication traffic will travel.
Deploy 2-Node File Server Failover Cluster in Azure

Choose your target server.
Deploy 2-Node File Server Failover Cluster in Azure

Choose your options. For our purposes where the two VMs are in the same geographic region we will choose synchronous replication. For longer distance replication you will want to use asynchronous and enable some compression.
Deploy 2-Node File Server Failover Cluster in Azure

By clicking yes at the last pop-up you will register a new DataKeeper Volume Resource in Available Storage in Failover Clustering.

You will see the new DataKeeper Volume Resource in Available Storage.
Deploy 2-Node File Server Failover Cluster in Azure

Create The File Server Cluster Resource

To create the File Server Cluster Resource we will use Powershell once again rather than the Failover Cluster interface. The reason being is that once again because the virtual machines are configured to use DHCP, the GUI based wizard will not prompt us to enter a cluster IP address and instead will issue a duplicate IP address. To avoid this we will use a simple powershell command to create the FIle Server Cluster Resource and specify the IP Address

Add-ClusterFileServerRole -Storage "DataKeeper Volume E" 
-Name FS2 -StaticAddress 10.0.0.201

Make note of the IP address you specify here. It must be a unique IP address on your network. We will use this same IP address later when we create our Internal Load Balancer.

Create The Internal Load Balancer

Here is where failover clustering in Azure is different than traditional infrastructures. The Azure network stack does not support gratuitous ARPS. Clients cannot connect directly to the cluster IP address. Instead, clients connect to an internal load balancer and are redirected to the active cluster node. What we need to do is create an internal load balancer. This can all be done through the Azure Portal as shown below.

First, create a new Load Balancer
Deploy 2-Node File Server Failover Cluster in Azure

You can use an Public Load Balancer if your client connects over the public internet, but assuming your clients reside in the same vNet, we will create an Internal Load Balancer. The important thing to take note of here is that the Virtual Network is the same as the network where your cluster nodes reside. Also, the Private IP address that you specify will be EXACTLY the same as the address you used to create the SQL Cluster Resource.
Deploy 2-Node File Server Failover Cluster in Azure

After the Internal Load Balancer (ILB) is created, you will need to edit it. The first thing we will do is to add a backend pool. Through this process you will choose the Availability Set where your SQL Cluster VMs reside. However, when you choose the actual VMs to add to the Backend Pool, be sure you do not choose your file share witness. We do not want to redirect SQL traffic to your file share witness.
Deploy 2-Node File Server Failover Cluster in Azure

The next thing we will do is add a Probe. The probe we add will probe Port 59999. This probe determines which node is active in our cluster.
Deploy 2-Node File Server Failover Cluster in Azure

And then finally, we need a load balancing rule to redirect the SMB traffic, TCP port 445. The important thing to notice in the screenshot below is the Direct Server Return is Enabled. Make sure you make that change.

Deploy 2-Node File Server Failover Cluster in Azure

Fix The File Server IP Resource

Almost there to Deploy 2-Node File Server Failover Cluster in Azure! The final step in the configuration is to run the following PowerShell script on one of your cluster nodes. This will allow the Cluster IP Address to respond to the ILB probes and ensure that there is no IP address conflict between the Cluster IP Address and the ILB. Please take note; you will need to edit this script to fit your environment. The subnet mask is set to 255.255.255.255, this is not a mistake, leave it as is. This creates a host specific route to avoid IP address conflicts with the ILB.

# Define variables
$ClusterNetworkName = “” 
# the cluster network name 
(Use Get-ClusterNetwork on Windows Server 2012 of higher to find the name)
$IPResourceName = “” 
# the IP Address resource name 
$ILBIP = “” 
# the IP Address of the Internal Load Balancer (ILB)
Import-Module FailoverClusters
# If you are using Windows Server 2012 or higher:
Get-ClusterResource $IPResourceName | Set-ClusterParameter 
-Multiple @{Address=$ILBIP;ProbePort=59999;SubnetMask="255.255.255.255";
Network=$ClusterNetworkName;EnableDhcp=0}
# If you are using Windows Server 2008 R2 use this: 
#cluster res $IPResourceName /priv enabledhcp=0 address=$ILBIP probeport=59999  
subnetmask=255.255.255.255

Creating File Shares

You will find that using the File Share Wizard in Failover Cluster Manager does not work. Instead, you will simply create the file shares in Windows Explorer on the active node. Failover clustering automatically picks up those shares and puts them in the cluster.

Note that the”Continuous Availability” option of a file share is not supported in this configuration.

Conclusion

You have managed to Deploy 2-Node File Server Failover Cluster in Azure.  If you have ANY problems, please reach out to me on Twitter @daveberm and I will be glad to assist. If you need a DataKeeper evaluation key fill out the form at http://us.sios.com/clustersyourway/cta/14-day-trial and SIOS will send an evaluation key sent out to you.

Reproduced with permission from Clusteringformeremortals.com

Filed Under: Clustering Simplified, Datakeeper Tagged With: Azure, deploy 2 node file server failover cluster in azure, failover cluster

Disaster Recovery For SQL Server Standard Edition

August 12, 2018 by Jason Aw Leave a Comment

Disaster recovery for SQL Server Standard Edition

Replicating A 2-Node SQL Server 2012/2014 Standard Edition Cluster To A 3rd Server For Disaster Recovery

Disaster recovery for SQL Server Standard Edition is possible with SIOS DataKeeper Cluster Edition. Here’s how.

Many people have found themselves settling for SQL Server Standard Edition due to the cost of SQL Server Enterprise Edition. SQL Server Standard Edition has many of the same features, but it comes with a few limitations. One limitation is that it does not support AlwaysOn Availability Groups. Also, it only supports two nodes in a cluster. With Database Mirroring being deprecated and only supporting synchronous replication in Standard Edition, you really have limited disaster recovery options.

Disaster recovery for SQL Server Standard Edition

One of those options is SIOS DataKeeper Cluster Edition. DataKeeper will work with your existing shared storage cluster. The software allows you to extend it to a 3rd node using either synchronous or asynchronous replication. If you are using SQL Server Enterprise, simply add that 3rd node as another cluster member for a true multisite cluster. However, since we are talking about SQL Server Standard Edition, you can’t add a 3rd node directly to the cluster. The good news is DataKeeper will allow you to replicate data to a 3rd node so your data is protected.

Disaster recovery for SQL Server Standard Edition means you are going to use DataKeeper to bring that 3rd node online as the source of the mirror. Next use SQL Server Management Studio to mount the databases that are on the replicated volumes. Your clients will also need to be redirected to this 3rd node. But it is a very cost effective solution with an excellent RPO and reasonable RTO.

The SIOS documentation talks about how to do Disaster recovery for SQL Server Standard Edition. Here, I have summarized the steps recently for one of my clients.

Configuration

  • Stop the SQL Resource
  • Remove the Physical Disk Resource From The SQL Cluster Resource
  • Remove the Physical Disk from Available Storage
  • Online Physical Disk on SECONDARY server. Add the drive letter (if not there)
  • Run emcmd . setconfiguration <drive letter> 256
    and Reboot Secondary Server. This will cause the SECONDARY server to block access to the E driver. It’s an important step because you don’t want two servers have access to the E drive at the same time, if you can avoid it.
  • Online the disk on PRIMARY server
  • Add the Drive letter if needed
  • Create a DataKeeper Mirror from Primary to DR
    You may have to wait a minute for the E drive to appear available in the DataKeeper Server Overview Report on all the servers before you can create the mirror properly. If done properly, you will create a mirror from PRIMARY to DR. As part of that process DataKeeper will ask you about the SECONDARY server which shares the volume you are replicating.

In The Event Of Disaster ….

ON DR NODE

  • Run EMCMD . switchovervolume <drive letter>
  • The first time make sure the SQL Service account has read/write access to all data and log files. You WILL have to explicitly grant this access the very first time you try to mount the databases.
  • Use SQL Management Studio to mount the databases
  • Redirect all clients to the server in the DR site. Better yet have the applications that reside in the DR site pre-configured to point to the SQL Server instance in the DR site.

AFTER DISASTER IS OVER

  • Power the servers (PRIMAY, SECONDARY) in the main site back on
  • Wait for mirror to reach mirroring state
  • Determine which node was previous source (run PowerShell as an administrator)
    get-clusterresource -Name “<DataKeeper Volume Resource name>” | get-clusterparameter
  • Make sure no DataKeeper Volume Resources are online in the cluster
  • Start the DataKeeper GUI on one cluster node. Resolve any split brain conditions (most likely there are none) ensuring the DR node is selected as the source during any split-brain recovery procedures
  • On the node that was reported as the previous source run EMCMD . switchovervolume <drive letter>
  • Bring SQL Server online in Failover Cluster Manager

The above steps assume you have SIOS DataKeeper Cluster Edition installed on all three servers (PRIMARY, SECONDARY, DR). PRIMARY and SECONDARY are a two node shared storage cluster. You are replicating data to DR which is just a standalone SQL Server instance (not part of the cluster) with just local attached storage. The Disaster Recovery Server will have a volume(s) that is the same size and drive letter as the shared cluster volume(s). This works rather well and will even let you replicate to a target that is in the cloud if you don’t have your own Disaster Recovery site configured.

You can also build the same configuration using all replicated storage if you want to eliminate the SAN completely.

Here is a nice short video that illustrates some of the possible configurations for disaster recovery for SQL Server Standard Edition. http://videos.us.sios.com/medias/aula05u2fl

Reproduced with permission from Clusteringformeremortals.com

Filed Under: Clustering Simplified, Datakeeper Tagged With: disaster recovery, disaster recovery for sql server standard edition, SQL Server Standard Edition

Configure Sanless Hyper-V Failover Cluster With DataKeeper

February 19, 2018 by Jason Aw Leave a Comment

Configure Sanless Hyper-V Failover Cluster With DataKeeper

Questions about SANLess

Q. What is a SANLess cluster?
A. It is a cluster that uses local storage instead of a SAN.

Q. Why would I want to Configure Sanless Hyper-V Failover Cluster?
A. There are a few reasons:

  • Eliminate the cost of a SAN
  • Eliminate the SAN as a single point of failure
  • Take advantage of high speed storage options such a Fusion-io ioDrives and other high speed storage devices that plug in locally
  • Stretch the cluster across geographic locations for disaster recovery
  • Simplify management
  • Eliminate the need for a SAN administrator

Configure Sanless Hyper-V Failover Cluster with DataKeeper Cluster Edition is easy

If you know anything about Windows Server Failover Clustering, then you already know 99% of the solution. No need to worry if you have never built a Windows Server Failover Cluster before. Microsoft has made it easy and painless. For the beginners, I have written a step-by-step article that tells you how to build a Windows Server 2012 #SANLess cluster in my blog post here.

Two Options For Making A Highly Available Virtual Machine

If you have followed the steps in my post, you are ready to create your first highly available virtual machine. The first option assumes that you have an existing virtual machine that you want to make highly available. The second option assumes you are building a highly available virtual machine from scratch.

Configuring The DataKeeper Volume Cluster Resource

A SANLess Hyper-V cluster requires one VM per volume. Therefore, you will want to make sure you have your storage partitioned so that you have enough volumes for each VM. The storage on each cluster node should be configured identically in terms of drive letters and partition sizes. Have the partitions configured properly and your VM resides on the partition you want to replicate. Then, open the DataKeeper interface and walk through the three step wizard to create the DataKeeper Volume Resources as shown in below.

First, open the DataKeeper interface and click on Connect to Server. Do this twice to connect to both servers.

Configuring A Sanless Hyper-V Failover Cluster With DataKeeper Cluster Edition

Once you are connected, click on Create Job to create a mirror of the volume that contains the virtual machine you want to make highly available as shown below. In this example we will mirror the E drive.

Configuring A Sanless Hyper-V Failover Cluster With DataKeeper Cluster Edition

Whenever possible, keep replication traffic on a private network. In this case, we are using the 10.0.0.0/8 network for replication traffic. This can be a simple patch cable that connects the two servers across two unused NICs.

Configuring A Sanless Hyper-V Failover Cluster With DataKeeper Cluster Edition

Configuring A Sanless Hyper-V Failover Cluster With DataKeeper Cluster Edition

The final screen shows the options available for mirroring. For local area networks, Synchronous mirroring is preferred. When replicating across wide area networks, you will want to use Asynchronous replication and possibly enable compression. I would not limit the Maximum bandwidth. Because that could potentially cause your mirror to go out of sync if your rate of change (Disk Right Bytes/sec) exceeds the Maximum bandwidth specified. However, you may want to temporarily enable Maximum bandwidth during the initial mirror creation process. Otherwise, DataKeeper may flood the network with the initial replication traffic as it tries to get in sync as quickly as possible. Both Maximum bandwidth and Compression settings can be adjusted after the mirror is created. However, you cannot change between Synchronous and Asynchronous mirroring once the mirror has been created without deleting the mirror and recreating it.

Configuring A Sanless Hyper-V Failover Cluster With DataKeeper Cluster Edition

At the end of the mirror creation process you will see a popup asking if you want to auto-register this volume as a cluster volume. Select Yes, this will create a DataKeeper volume resource in Failover Clustering Available Storage.

Configuring A Sanless Hyper-V Failover Cluster With DataKeeper Cluster Edition

You are now ready to create your highly available VMs.

Option 1 – Clustering An Existing VM

Configuring A Sanless Hyper-V Failover Cluster With DataKeeper Cluster Edition

Once again, this procedure assumes you have an existing VM that you want to make highly available. If you do not have an existing VM, you will want to follow the procedure in Option 2 – Creating a Highly Available VM. Otherwise, you should have a VM when looking at Hyper-V Manager as shown below.

Configuring A Sanless Hyper-V Failover Cluster With DataKeeper Cluster Edition

All the VM files should already be located on the replicated volume, as shown below. If not, you will have to relocate the files before attempting to cluster the VM.

Configuring A Sanless Hyper-V Failover Cluster With DataKeeper Cluster Edition

To begin the clustering process, open up Failover Cluster Manager. Right click on Configure Roles and choose Virtual Machine as the role you want to create.

Configuring A Sanless Hyper-V Failover Cluster With DataKeeper Cluster Edition

Configuring A Sanless Hyper-V Failover Cluster With DataKeeper Cluster Edition

This will launch the High Availability Wizard. At this point you should select the VM that you want to cluster and step through the wizard as shown below.

Configuring A Sanless Hyper-V Failover Cluster With DataKeeper Cluster Edition

Configuring A Sanless Hyper-V Failover Cluster With DataKeeper Cluster Edition

Configuring A Sanless Hyper-V Failover Cluster With DataKeeper Cluster Edition

You will see that the VM resource will be created, but there will be some warnings. The warnings indicate that the E drive is not currently part of the VM Cluster Resource Group.

Configuring A Sanless Hyper-V Failover Cluster With DataKeeper Cluster Edition

To make the DataKeeper Volume E part of the VM Cluster Resource Group, right click on the role and choose Add Storage. Add the DataKeeper Volume that you will see listed in Available Disks.

Configuring A Sanless Hyper-V Failover Cluster With DataKeeper Cluster Edition

Configuring A Sanless Hyper-V Failover Cluster With DataKeeper Cluster Edition

Configuring A Sanless Hyper-V Failover Cluster With DataKeeper Cluster Edition

The last part is to choose the Properties of the Virtual Machine Configuration (not the Virtual Machine) resource and make it dependent upon the storage you just added to the resource group.

Configuring A Sanless Hyper-V Failover Cluster With DataKeeper Cluster Edition

Configuring A Sanless Hyper-V Failover Cluster With DataKeeper Cluster Edition

You should now be able to start the VM.

Configuring A Sanless Hyper-V Failover Cluster With DataKeeper Cluster Edition

Configuring A Sanless Hyper-V Failover Cluster With DataKeeper Cluster Edition

Option 2- Creating A Highly Available VM From Scratch

Assuming you want to create a highly available VM from scratch, you can complete this entire process from the Hyper-V Virtual Machine Manager as shown below. This step assumes that you have already created a mirror of the E drive using DataKeeper as described in Configuring the DataKeeper Volume Resource section.

To get started, open the Failover Cluster Manager and right click on Roles and choose Virtual Machine – New Virtual Machine.

Configuring A Sanless Hyper-V Failover Cluster With DataKeeper Cluster Edition

Follow through with the steps of the wizard and select the options that you want to use for the VM. When choosing where to place the VM, select the cluster node that currently is the owner of Available Storage. It will also be the source of the mirror.

Configuring A Sanless Hyper-V Failover Cluster With DataKeeper Cluster Edition

Make sure when specifying the Name and Location of the VM, you select the location of the replicated volume.

Configuring A Sanless Hyper-V Failover Cluster With DataKeeper Cluster Edition

The rest of the options are up to you. Just make sure the VHD file is located on the replicated volume.

Configuring A Sanless Hyper-V Failover Cluster With DataKeeper Cluster Edition

Configuring A Sanless Hyper-V Failover Cluster With DataKeeper Cluster Edition

You will see the highly available VM is created, but there is a warning about the storage. You will need to add the DataKeeper Volume Resource to the VM Cluster Resource Group as shown below.

Configuring A Sanless Hyper-V Failover Cluster With DataKeeper Cluster Edition

Configuring A Sanless Hyper-V Failover Cluster With DataKeeper Cluster Edition

Configuring A Sanless Hyper-V Failover Cluster With DataKeeper Cluster Edition

After the DataKeeper Volume is added to the VM Cluster Resource Group, add the DataKeeper Volume as a dependency of the Virtual Machine Configuration resource.

Configuring A Sanless Hyper-V Failover Cluster With DataKeeper Cluster Edition

Configuring A Sanless Hyper-V Failover Cluster With DataKeeper Cluster Edition

You now have a highly available virtual machine.

Configuring A Sanless Hyper-V Failover Cluster With DataKeeper Cluster Edition

Summary

In this blog post, we discussed what constitutes a #SANLess cluster. We chose SIOS DataKeeper to Configure Sanless Hyper-V Failover Cluster. Once built, the cluster behaves exactly like a SAN based cluster, This includes having the ability to do Live Migration, Quick Migration and automated failover in the event of unexpected failures.

A #SANLess cluster eliminates the expense of a SAN as well as the single point of failure of a SAN. DataKeeper Cluster Edition supports multiple nodes in a SAN. So configurations that stretch both LAN and WAN are all possible solutions for Hyper-V high availability and disaster recovery. DataKeeper supports any local storage. This opens up the possibility of using high speed local attached SSD or NAND Flash storage for high performance without giving up high availability.

If you enjoy reading tips to Configure Sanless Hyper-V Failover Cluster, read more about clustering here

Reported with permission from https://clusteringformeremortals.com/2014/03/04/configuring-a-sanless-hyper-v-failover-cluster-with-datakeeper-cluster-edition/

Filed Under: Clustering Simplified, Datakeeper Tagged With: #SANLess, cluster, configure sanless hyper v failover cluster, Microsoft Windows Server Failover Clustering, SIOS DataKeeper Cluster Edition

Windows Azure Disaster Recovery Options Just Got Better With ExpressRoute

February 19, 2018 by Jason Aw Leave a Comment

Just today I received notice that ExpressRoute, a new Windows Azure Network option, was release in Preview. Essentially ExpressRoute will now allow you to lease a private connection to the Windows Azure Cloud through a limited number of network service providers and exchange providers. Speeds ranging from 10 Mbps through 10 Gbps are available through either an Exchange Provider or Network Service Provider.

What’s Good About ExpressRoute?

Previously the only way to connect your on-premise site was to configure a site-to-site VPN to your virtual network. While this is a nice option, having a direct connection like ExpressRoute that bypasses the public network is going to allow for much less latency and a more reliable connection.

Adjust Capacity For Disaster Recovery Or For Additional Data Protection

If you are trying to use data replication solutions like DataKeeper to replicate data into the Azure cloud for disaster recovery, or out of Azure to your private network for additional data protection, you will appreciate the various different link speeds available which will allow you to adjust capacity should your bandwidth needs change over time.

Even if you are not ready to move your whole production network to the clouds at this time, I believe using something like Windows Azure in lieu of maintaining a separate disaster recovery facility makes a lot of sense, especially now that robust direct connectivity options are available.

Reproduced with permission from https://clusteringformeremortals.com/2014/02/21/windows-azure-disaster-recovery-options-just-got-better-with-expressroute/

Filed Under: Clustering Simplified, Datakeeper Tagged With: DataKeeper, disaster recovery, ExpressRoute, Windows Azure

  • « Previous Page
  • 1
  • 2
  • 3
  • 4
  • 5
  • …
  • 8
  • Next Page »

Recent Posts

  • Guide: Deploying a Multi-Zone and Multi-Region SQL Server FCI in Azure
  • High Availability for On-Premises Data Centers
  • How APM Tools and High Availability Clusters Improve Network Resilience
  • Selecting the Right Storage for SQL Server High Availability in the Cloud
  • Disaster Recovery Planning in an Unpredictable World

Most Popular Posts

Maximise replication performance for Linux Clustering with Fusion-io
Failover Clustering with VMware High Availability
create A 2-Node MySQL Cluster Without Shared Storage
SAP for High Availability Solutions For Linux
Bandwidth To Support Real-Time Replication
The Availability Equation – High Availability Solutions.jpg
Choosing Platforms To Replicate Data - Host-Based Or Storage-Based?
Guide To Connect To An iSCSI Target Using Open-iSCSI Initiator Software
Best Practices to Eliminate SPoF In Cluster Architecture
Step-By-Step How To Configure A Linux Failover Cluster In Microsoft Azure IaaS Without Shared Storage azure sanless
Take Action Before SQL Server 20082008 R2 Support Expires
How To Cluster MaxDB On Windows In The Cloud

Join Our Mailing List

Copyright © 2026 · Enterprise Pro Theme on Genesis Framework · WordPress · Log in