SIOS SANless clusters

SIOS SANless clusters High-availability Machine Learning monitoring

  • Home
  • Products
    • SIOS DataKeeper for Windows
    • SIOS Protection Suite for Linux
  • News and Events
  • Clustering Simplified
  • Success Stories
  • Contact Us
  • English
  • 中文 (中国)
  • 中文 (台灣)
  • 한국어
  • Bahasa Indonesia
  • ไทย

Configure File Server Failover Cluster in Azure Across Availability Zones

November 5, 2018 by Jason Aw Leave a Comment

Configure-File-Server-Failover-Cluster-in-Azure-Across-Availability-Zones

Step-By-Step: Configure A File Server Cluster In Azure Spanning Availability Zones

Configure-File-Server-Failover-Cluster-in-Azure-Across-Availability-Zones

Step-By-Step: Configure A File Server Cluster In Azure Spanning Availability Zones

In this post, we will detail the specific steps required to deploy a 2-node File Server Failover Cluster in Azure that spans the new Availability Zones. I will assume you are familiar with basic Azure concepts as well as basic Failover Cluster concepts. I will focus on what is unique about deploying a File Server Failover Cluster in Azure across Availability Zones. If your Azure region doesn’t support Availability Zones yet, you will have to use Fault Domains instead as described in an earlier post.

With DataKeeper Cluster Edition you are able to take the locally attached Managed Disks, whether it is Premium or Standard Disks, and replicate those disks either synchronously, asynchronously or a mix or both, between two or more cluster nodes. In addition, a DataKeeper Volume resource is registered in Windows Server Failover Clustering which takes the place of a Physical Disk resource. Instead of controlling SCSI-3 reservations like a Physical Disk Resource, the DataKeeper Volume controls the mirror direction. It ensures the active node is always the source of the mirror. As far as Failover Clustering is concerned, it looks, feels and smells like a Physical Disk and is used the same way Physical Disk Resource would be used.

Pre-Requisites

  • You have used the Azure Portal before and are comfortable deploying virtual machines in Azure IaaS.
  • Have obtained a license or eval license of SIOS DataKeeper

Deploying A File Server Failover Cluster In Azure

To build a 2-node File Server Failover Cluster Instance in Azure, we are going to assume you have a basic Virtual Network based on Azure Resource Manager. You have at least one virtual machine up and running and configured as a Domain Controller. Once you have a Virtual Network and a Domain configured, you are going to provision two new virtual machines which will act as the two nodes in our cluster.

Our environment will look like this:

DC1 – Our Domain Controller and File Share Witness
SQL1 and SQL2 – The two nodes of our File Server Cluster. Don’t let the names confuse you. We are building a File Server Cluster in this guide. In my next post I will demonstrate a SQL Server cluster configuration.

Provisioning The Two Cluster Nodes

Using the Azure Portal, we will provision both SQL1 and SQL2 exactly the same way.  There are numerous options to choose from including instance size, storage options, etc. This guide is not meant to be an exhaustive guide to deploying Servers in Azure. There are some really good resources out there and more published every day. However, there are a few key things to keep in mind when creating your instances, especially in a clustered environment.

Availability Zones – It is important that both SQL1, SQL2 reside in different Availability Zones. For the sake of this guide we will assume you are using Windows 2016 and will use a Cloud Witness for the Cluster Quorum. If you use Windows 2012 R2 or Windows Server 2008 R2 instead of Windows 2016, you will need to configure a File Share Witness in the 3rd Availability Zone. Cloud Witness was not introduced until Windows Server 2016.

By putting the cluster nodes in different Availability Zones, we are ensuring that each cluster node resides in a different Azure datacenter in the same region. Leveraging Availability Zones rather than the older Fault Domains is beneficial. It isolates you from the types of outages occured just a few weeks ago that brought down the entire South Central region for multiple days.
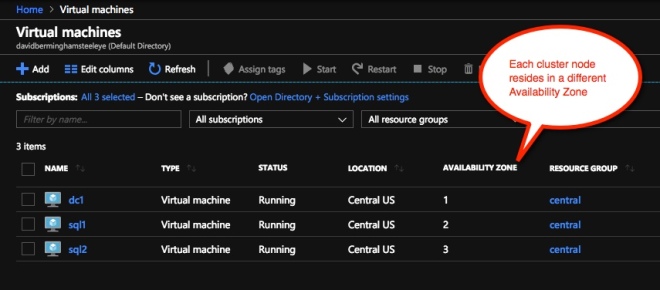
Availability Zones
Be sure to add each cluster node to a different Availability Zone. If you leverage a File Share Witness it should reside in the 3rd Availability Zone.

Static IP Address

Once each VM is provisioned, you will want to go into the setting and change the settings so that the IP address is Static. We do not want the IP address of our cluster nodes to change.

Static IP
Make sure each cluster node uses a static IP

Storage

As far as Storage is concerned, you will want to consult Performance best practices for SQL Server in Azure Virtual Machines. In any case, you will minimally need to add at least one additional Managed Disk to each of your cluster nodes. DataKeeper can use Basic Disk, Premium Storage or even multiple disks striped together in a local Storage Space. If you do want to use a local Storage Space, be aware to create the Storage Space before any cluster configuration. This is due to a known issue with Failover Clustering and local Storage Spaces. All disks should be formatted NTFS.

Create The Cluster

Assuming both cluster nodes (SQL1 and SQL2) have been provisioned as described above and added to your existing domain, we are ready to create the cluster. Before we create the cluster, there are a few Features that need to be enabled. These features are .Net Framework 3.5 and Failover Clustering. These features need to be enabled on both cluster nodes. You will also need to enable the FIle Server Role.

6
Enable both .Net Framework 3.5 and Failover Clustering features and the File Server on both cluster nodes.

Once that role and those features have been enabled, you are ready to build your cluster. Most of the steps I’m about to show you can be performed both via PowerShell and the GUI. However, I’m going to recommend that for this very first step you use PowerShell to create your cluster. If you choose to use the Failover Cluster Manager GUI to create the cluster you will find that you wind up with the cluster being issued a duplicate IP address.

Without going into great detail, what you will find is that Azure VMs have to use DHCP. By specifying a “Static IP” when we create the VM in the Azure portal all we did was create sort of a DHCP reservation. It is not exactly a DHCP reservation because a true DHCP reservation would remove that IP address from the DHCP pool. Instead, this specifying a Static IP in the Azure portal simply means that if that IP address is still available when the VM requests it, Azure will issue that IP to it. However, if your VM is offline and another host comes online in that same subnet it very well could be issued that same IP address.

Another Side Effect To How Azure Implemented DHCP

When creating a cluster with the Windows Server Failover Cluster GUI, there is not option to specify a cluster IP address. Instead it relies on DHCP to obtain an address. The strange thing is, DHCP will issue a duplicate IP address. Usually the same IP address as the host requesting a new IP address. The cluster install will complete, but you may have some strange errors. You may need to run the Windows Server Failover Cluster GUI from a different node in order to get it to run. Once you get it to run you will need to change the core cluster IP address to an address that is not currently in use on the network.

You can avoid that whole mess by simply creating the cluster via Powershell and specifying the cluster IP address as part of the PowerShell command to create the cluster.

You can create the cluster using the New-Cluster command as follows:

New-Cluster -Name cluster1 -Node sql1,sql2 -StaticAddress 10.0.0.100 -NoStorage

After the cluster creation completes, you will also want to run the cluster validation by running the following command. You should expect to see some warnings about storage and network, but that is expected in Azure and you can ignore those warnings. If any errors are reported you will need to address those before you move on.

Test-Cluster

Create A Quorum Cluster

if you are running Windows 2016 or 2019 you will need to create a Cloud Witness for the cluster quorum. If you are running Windows Server 2012 R2 or 2008 R2 you will need to create a File Share Witness. The detailed instruction on witness creation can be found here.

Install DataKeeper

After the cluster is created, it is time to install DataKeeper. It is important to install DataKeeper after the initial cluster is created so the custom cluster resource type can be registered with the cluster. If you installed DataKeeper before the cluster is created, you will simply need to run the install again and do a repair installation.

8
Install DataKeeper after the cluster is created

During the installation you can take all of the default options.  The service account you use must be a domain account and be in the local administrators group on each node in the cluster.

9
The service account must be a domain account that is in the Local Admins group on each node

Once DataKeeper is installed and licensed on each node you will need to reboot the servers.

Create the DataKeeper Volume Resource

10

To create the DataKeeper Volume Resource you will need to start the DataKeeper UI and connect to both of the servers.

11
Connect to SQL1
12
Connect to SQL2

Once you are connected to each server, you are ready to create your DataKeeper Volume. Right click on Jobs and choose “Create Job”
13

Give the Job a name and description.
14

Choose your source server, IP and volume. The IP address is whether the replication traffic will travel.
15

Choose your target server.
16

Choose your options. For our purposes where the two VMs are in the same geographic region we will choose synchronous replication. For longer distance replication you will want to use asynchronous and enable some compression.
17

By clicking yes at the last pop-up you will register a new DataKeeper Volume Resource in Available Storage in Failover Clustering.
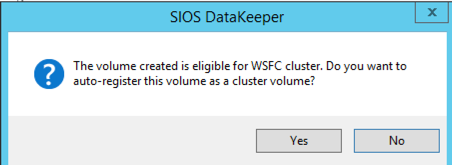
18

You will see the new DataKeeper Volume Resource in Available Storage.
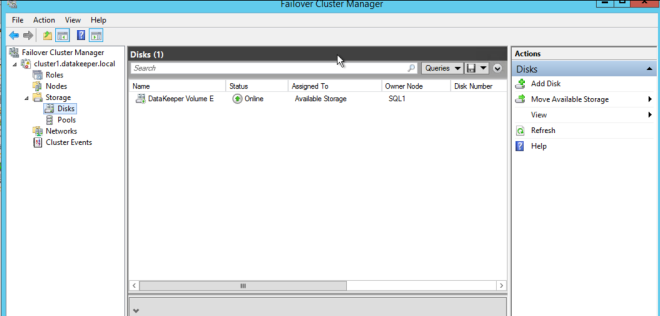
19

Create The File Server Cluster Resource

To create the File Server Cluster Resource, we will use Powershell once again rather than the Failover Cluster interface. The reason being is that once again because the virtual machines are configured to use DHCP, the GUI based wizard will not prompt us to enter a cluster IP address and instead will issue a duplicate IP address. To avoid this we will use a simple powershell command to create the FIle Server Cluster Resource and specify the IP Address

Add-ClusterFileServerRole -Storage "DataKeeper Volume E" -Name FS2 -StaticAddress 10.0.0.101

Make note of the IP address you specify here. It must be a unique IP address on your network. We will use this same IP address later when we create our Internal Load Balancer.

Create The Internal Load Balancer

Here is where failover clustering in Azure is different than traditional infrastructures. The Azure network stack does not support gratuitous ARPS, so clients cannot connect directly to the cluster IP address. Instead, clients connect to an internal load balancer and are redirected to the active cluster node. What we need to do is create an internal load balancer. This can all be done through the Azure Portal as shown below.

You can use an Public Load Balancer if your client connects over the public internet. But assuming your clients reside in the same vNet, we will create an Internal Load Balancer. The important thing to take note of here is that the Virtual Network is the same as the network where your cluster nodes reside. Also, the Private IP address that you specify will be exactly the same as the address you used to create the File Server Cluster Resource. Also, because we are using Availability Zones, we will be creating a Zone Redundant Standard Load Balancer as shown in the picture below.
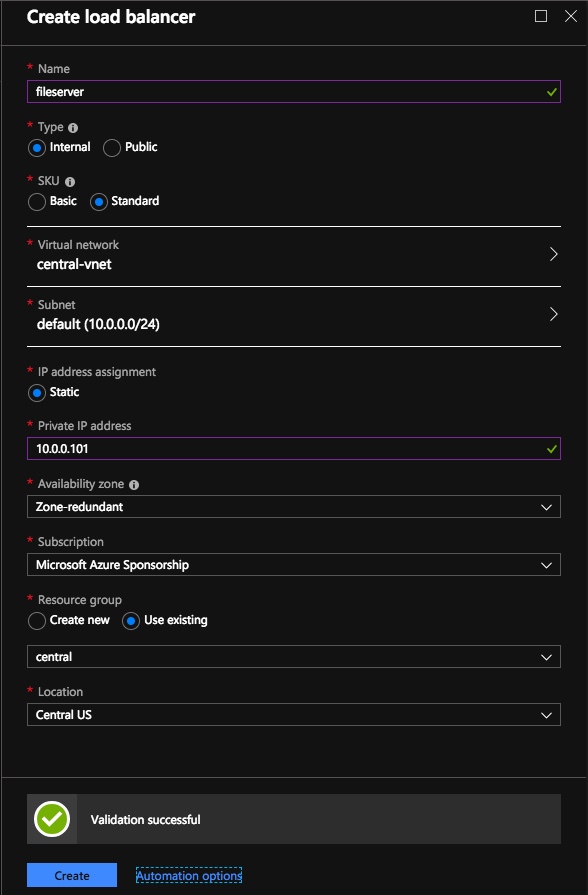
Load Balancer

After the Internal Load Balancer (ILB) is created, you will need to edit it. The first thing we will do is to add a backend pool. Through this process you will choose the two cluster nodes.
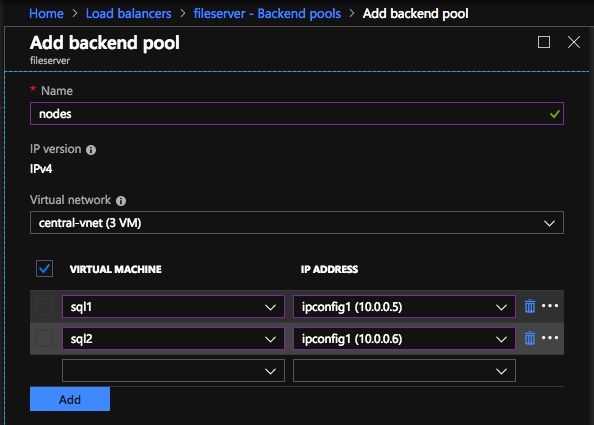
Backend Pools

The next thing we will do is add a Probe. The probe we add will probe Port 59999. This probe determines which node is active in our cluster.
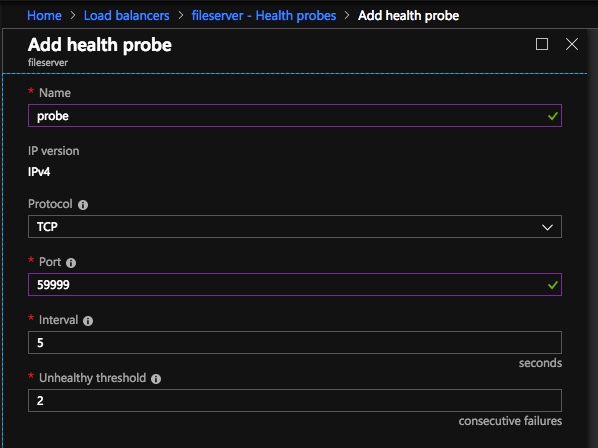
probe

And then finally, we need a load balancing rule to redirect the SMB traffic, TCP port 445. The important thing to notice in the screenshot below is the Direct Server Return is Enabled. Make sure you make that change.

rules

Fix The File Server IP Resource

The final step in the configuration is to run the following PowerShell script on one of your cluster nodes. This will allow the Cluster IP Address to respond to the ILB probes. Also to ensure that there is no IP address conflict between the Cluster IP Address and the ILB. Please take note; you will need to edit this script to fit your environment. The subnet mask is set to 255.255.255.255. This is not a mistake, leave it as is. This creates a host specific route to avoid IP address conflicts with the ILB.

# Define variables
$ClusterNetworkName = “” 
# the cluster network name (Use Get-ClusterNetwork on Windows Server 2012 of higher to find the name)
$IPResourceName = “” 
# the IP Address resource name 
$ILBIP = “” 
# the IP Address of the Internal Load Balancer (ILB)
Import-Module FailoverClusters
# If you are using Windows Server 2012 or higher:
Get-ClusterResource $IPResourceName | Set-ClusterParameter -Multiple @{Address=$ILBIP;ProbePort=59999;SubnetMask="255.255.255.255";Network=$ClusterNetworkName;EnableDhcp=0}
# If you are using Windows Server 2008 R2 use this: 
#cluster res $IPResourceName /priv enabledhcp=0 address=$ILBIP probeport=59999  subnetmask=255.255.255.255

Creating File Shares

You will find that using the File Share Wizard in Failover Cluster Manager does not work. Instead, you will simply create the file shares in Windows Explorer on the active node. Failover clustering automatically picks up those shares and puts them in the cluster.

Note that the”Continuous Availability” option of a file share is not supported in this configuration.

Conclusion

You should now have a functioning File Server Failover Cluster in Azure that spans Availability Zones. If you need a DataKeeper evaluation key fill out the form at http://us.sios.com/clustersyourway/cta/14-day-trial and SIOS will send an evaluation key sent out to you.
To read more about clustering, click here
Reproduced with permission from Clusteringformeremortals.com

Filed Under: Clustering Simplified Tagged With: Azure, cluster, failover, File Server, file server failover cluster in azure

Quick Start Guide: SQL Server Clusters On Windows Server 2008 R2 In Azure

November 4, 2018 by Jason Aw Leave a Comment

SQL-Server-Clusters-On-Windows--Server-2008-R2-In-Azure

Quick Start Guide: SQL Server Clusters On Windows Server 2008 R2 In Azure

Windows Server 2008 R2 lives on in the cloud. So here’s a quick start guide for all those who need help with SQL Server Clusters On Windows Server 2008 R2. Yes, Azure does support Windows Server 2008 R2 and older versions of SQL Server including 2008 R2 and 2012. Of course Always On Availability Groups wasn’t introduced until SQL 2012 and even then you probably want to avoid Availability Groups due to some of the performance issues associated with that version.

Need to support older versions of SQL Server or Windows? Build SANless clusters based on SIOS DataKeeper as mentioned in the Azure documentation.

Quick Start Guide: SQL Server Clusters On Windows Server 2008 R2 In Azure
https://docs.microsoft.com/en-us/azure/virtual-machines/windows/sql/virtual-machines-windows-sql-high-availability-dr

SQL Server Clusters On Windows Server 2008 R2 – How To Get It Done?

In a nutshell here are the steps for SQL Server Clusters On Windows Server 2008 R2

  • Provision two cluster servers and a file share witness in the same Availability Set. This places all three quorum votes in different Fault and Update Domains.
  • There is a hotfix for SQL 2008 R2 clusters in Azure to enable the listener used by both AGs and FCIs. https://support.microsoft.com/en-us/help/2854082/update-enables-sql-server-availability-group-listeners-on-windows-serv
  • Install that and all other OS updates.
  • Provision the storage on each server.
  • Format NTFS and give drive letters.
  • Each cluster node needs identical storage.
    Enable Failover Clustering and .Net 3.5 Framework on each server
  • Add the servers to the domain
  • Create the basic cluster, but USE POWERSHELL and specify the cluster IP address. If you use the GUI to create the cluster, it will get confused and provision a duplicate IP address. Connecting via the GUI will enable you to connect to the cluster from one of the nodes. If you connect, you can correct the problem by specifying a static IP address to be used by the cluster resource. Here is an example of the Powershell usage to create the cluster
    New-Cluster -Name cluster1 -Node sql1,sql2 -StaticAddress 10.0.0.101 -NoStorage-
  • Add a File Share Witness to the cluster
  • Install DataKeeper on both cluster nodes
  • Create the DataKeeper Volume Resources and make sure they are Available Storage
  • Install SQL into the cluster as you normally would in a shared storage cluster.
  • Configure the Azure ILB and run the powershell script to update the SQL Cluster IP resource to listen on the Probe Port.

All of this is fully documented on the SIOS documentation page, Deploying DataKeeper Cluster Edition in Azure

If you have any questions about high availability for SQL Server or disaster recovery in Azure, AWS or Google Cloud, do visit our pages on clustering and other related topics.
Reproduced with permission from Clusteringformeremortals.com

Filed Under: Clustering Simplified Tagged With: sql server clusters on windows server 2008 r2, SQL Servers, Windows Server 2008 R2

Strip Together Multiple Disk In A Simple Storage Space

November 2, 2018 by Jason Aw Leave a Comment

Strip Together Multiple Disk In A Simple Storage Space

Strip Together Multiple Disk In A Simple Storage Space

Strip Together Multiple Disk In A Simple Storage Space

Strip Together Multiple Disk In A Simple Storage Space

You are building a SANless SQL Server cluster with SIOS DataKeeper. Or maybe you’re configuring Always On Availability Groups for SQL Server. How about trying to strip together multiple disk in a Simple Storage Space (RAID 0) for performance? This is very commonly done in the cloud where each instance typically is backed by hardware resiliency, so RAID 0 is not really all that risky.

For instance, I had a recent customer in AWS that wanted to max out his IOPS to 80,000 – the maximum IOPS currently available to a single instance. Now keep in mind, only the largest EBS optimized instance sizes supports 80,000 IOPS. So make sure you know what maximum IOPS your particular instance size supports.

https://docs.aws.amazon.com/AWSEC2/latest/UserGuide/EBSOptimized.html

In this case we had ac5.18xlarge instance which does support 80,000 IOPS. However, any individual EBS Provisioned IOPS volume only supports up to 32,000 IOPS. The only way to achieve 80,000 IOPS when writing to any single volume is to strip three of these volumes together in a Simple Storage Space.

Herein lies the rub. If you try to do Strip Together Multiple Disk In A Simple Storage Space in an existing cluster, things are going to go haywire pretty fast. Fellow MVP Joey D’Antoni recently blogged about the issue. It appears to still be an issue in the Windows Server 2019 preview.

Just as Joey suggests, I always advise my customers to build out the nodes and any Storage Spaces before they start the clustering process. This makes the process to Strip Together Multiple Disk In A Simple Storage Space go much smoother. It also allows the customer to have some time to benchmark the server’s performance before they add any replication. And also to ensure everything is working as expected.

Keen to know more quick tips like how to Strip Together Multiple Disk In A Simple Storage Space, check out our other posts about clustering
Reproduced with permission from Clusteringformeremortals.com

Filed Under: Clustering Simplified Tagged With: cluster, Strip Together Multiple Disk In A Simple Storage Space

How To Survive A Azure Cloud Outage

October 31, 2018 by Jason Aw Leave a Comment

How to survive a azure outage

Lightning Never Strikes Twice: Surviving A Azure Cloud Outage

Yesterday morning I opened my Twitter feed to find that many people were impacted by an Azure Cloud outage. Almost every resource page about the outage was unavailable. Fortunately, @AzureSupport continued to provide updates via Twitter.

The original update from @AzureSupport came in at 7:12 AM EDT

 How To Survive A Azure Cloud Outage

Looking back on the Twitter feed it seems as if the problem initially began an hour or two before that.

 How To Survive A Azure Cloud Outage

It quickly became apparent that the outages had a wider spread impact than just the South Central US region as originally reported. It seems as if services that relied on Azure Active Directory could have been impacted as well and customers trying to provision new subscriptions were having issues.

 How To Survive A Azure Cloud Outage

And 24 hours later the problem has not been completely resolved and it according to the last update this morning…

 How To Survive A Azure Cloud Outage

 How To Survive A Azure Cloud Outage

So what could you have done to minimize the impact of this azure cloud outage? No one can blame Microsoft for a natural disaster such as a lightning strike. But at the end of the day if your only disaster recovery plan is to call, tweet and email Microsoft until the issue is resolved, you just received a rude awakening. It is up to you to ensure that all bases are covered when it comes to your disaster recovery plan.

Time To Explore Some Alternatives?

While the dust is still settling on exactly what was impacted and what customers could have done to minimize the downtime, here are some of my initial thoughts.

Availability Sets (Fault Domains/Update Domains)

In this scenario, even if you built Failover Clusters, or leveraged Azure Load Balancers and Availability Sets, you still would have been out of luck since the entire region went offline. While it is still recommended to leverage Availability Sets, especially for planned downtime, in this case you still would have been offline.

Availability Zones

It’s not available in the South Central US region yet. Yet it seems that the concept of Availability Zones being rolled out in Azure could have minimized the impact of the outage. Assuming the lightning strike only impacted one datacenter, the other datacenter in the other Availability Zone should have remained operational. However, the outages of the other non-regional services such as Azure Active Directory (AAD) seems to have impacted multiple regions. I don’t think Availability Zones would have isolated you completely.

Global Load Balancers, Cross Region Failover Clusters, etc.

Whether you are building SANLess clusters that cross regions, or using global load balancers to spread the load across multiple regions, you may have minimized the impact of the outage in South Central US. But you may have still been susceptible to the AAD outage.

Hybrid-Cloud, Cross Cloud

Guaranteed resiliency in a cloud wide failure scenario is to have a DR plan that includes having realtime replication of data to a target outside of your primary cloud provider and a plan in place to bring applications online quickly in this other location. These two locations should be entirely independent. It should not rely on services from your primary location to be available, such as AAD. The DR location could be another cloud provider. In this case AWS or Google Cloud Platform seem like logical alternatives, or it could be your own datacenter. But that kind of defeats the purpose of running in the cloud in the first place.

Software as a Service

While Software as service such as Azure Active Directory (ADD), Azure SQL Database (Database-as-Service) or one of the many SaaS offerings from any of the cloud providers can seem enticing, you really need to plan for the worst case scenario. You may have very little control because you are trusting a business critical application to a single vendor. Remember it’s in terms of DR options that includes recovery outside of the current cloud service provider. I don’t have any words of wisdom here other than investigate your DR options before implementing any SaaS service. If recovery outside of the cloud is not an option, then think long and hard before you sign-up for that service. Inform business stake owners that if the cloud service is offline, there may be nothing you can do about it other than call and complain.

Future Trends

I think in the very near future, you will start to hear more and more about cross cloud availability. Also about how people leverage solutions like SIOS DataKeeper to build robust HA and DR strategies that cross cloud providers. Truly cross cloud or hybrid cloud models are the only way to truly insulate yourself from most conceivable cloud outages.

If you were impacted from this latest outage I’d love to hear from you. Tell me what went down, how long you were down, and what you did to recover. What are you planning to do so that in the future your experience is better?

Read more articles like How To Survive A Azure Cloud Outage? 
Reproduced with permission from Clusteringformeremortals.com

Filed Under: Clustering Simplified Tagged With: Azure, azure cloud outage, SIOS

How To Avoid Split Brain On Availability Groups With SQL Server On Linux

October 30, 2018 by Jason Aw Leave a Comment

How-To-Avoid-Split-Brain-On-Availability-Groups-With-SQL-Server-On-Linux

SQL Server 2017 On Linus Availability Group Split Brain Problem

How-To-Avoid-Split-Brain-On-Availability-Groups-With-SQL-Server-On-Linux

SQL Server 2017 On Linus Availability Group Split Brain Problem

Avoid Split Brain On Availability Groups With SQL Server On Linux with this support article posted by Microsoft.

Running SQL Server on Linux can have some advantages, including cost savings on the OS if running in Azure. Make some calculations. The cost savings are substantials as the number of cores go up. Furthermore you are licensing at least two servers for every cluster pair.

However, why bother saving money if the technology is not rock solid? One of the biggest issues I see with running SQL Server on Linux is the lack of a cohesive HA/DR story. On Windows, Microsoft owns the whole HA stack and SQL Server relies heavily on Windows Server Failover Clustering to support both Availability Groups and Failover Cluster Instances. This has been running well for many years and has a long track record of success stories.

When moving to Linux, Microsoft no longer owns the HA stack at the OS level. Depending upon your distro of Linux, you are left trying to piece together open source solutions like Pacemaker. Not to mention trying to get things to cooperate with SQL Server Availability Groups.

To avoid Split Brain On Availability Groups With SQL Server On Linux, I would much rather look to a 3rd party high availability solution like the SIOS Protection Suite for Linux (SPS-L). It gives you a tried and true HA solution for your business critical applications running on Linux.

Split Brain On Availability Groups With SQL Server On Linux
SQL Server on Linux Cluster in Azure

Split Brain On Availability Groups With SQL Server On Linux With SIOS

SPS-L has been protecting business critical applications running on Linux since 1999. It is a full HA/DR solution that monitors. It recovers the entire application stack as well as the physical servers and network to ensure your business critical applications are highly available. All this while maintaining a 3rd copy for disaster recover in a remote datacenter or different geographic region of the cloud.

The other benefit of SPS-L is that it doesn’t require the Enterprise Edition of SQL Server, so there can be a significant cost savings advantage on SQL Server licenses as well. Consider SQL Server Standard Edition costs $1859 per core vs $7128 per core for SQL Server Enterprise Edition. The cost savings advantage can be significant, depending upon how many cores you need to license.

Below is a video demonstration of SPS-L protecting SQL Server running on Linux in the Azure Cloud. The demonstration shows a SQL Server Standard Edition Cluster being manually failed over between nodes in different Azure Fault Domains as well as SPS-L responding to an unexpected failure.

Want to learn other tips like avoiding Split Brain On Availability Groups With SQL Server On Linux, read about our blog
Reproduced with ClusteringForMereMortals.com

Filed Under: Clustering Simplified Tagged With: Linux, Microsoft, split brain on availability groups with sql server on linux, SQL Server

  • « Previous Page
  • 1
  • …
  • 81
  • 82
  • 83
  • 84
  • 85
  • …
  • 107
  • Next Page »

Recent Posts

  • Webinar: Healthy IT in Healthcare: Protecting SQL Server with SIOS and Google Cloud
  • High Availability Health-Check Services, Optimization, and Training
  • Eliminate Shadow IT High Availability Problems
  • Achieving High Availability Cost-Effectively
  • Why Company History Matters in HA

Most Popular Posts

Maximise replication performance for Linux Clustering with Fusion-io
Failover Clustering with VMware High Availability
create A 2-Node MySQL Cluster Without Shared Storage
SAP for High Availability Solutions For Linux
Bandwidth To Support Real-Time Replication
The Availability Equation – High Availability Solutions.jpg
Choosing Platforms To Replicate Data - Host-Based Or Storage-Based?
Guide To Connect To An iSCSI Target Using Open-iSCSI Initiator Software
Best Practices to Eliminate SPoF In Cluster Architecture
Step-By-Step How To Configure A Linux Failover Cluster In Microsoft Azure IaaS Without Shared Storage azure sanless
Take Action Before SQL Server 20082008 R2 Support Expires
How To Cluster MaxDB On Windows In The Cloud

Join Our Mailing List

Copyright © 2025 · Enterprise Pro Theme on Genesis Framework · WordPress · Log in