SIOS SANless clusters

SIOS SANless clusters High-availability Machine Learning monitoring

  • Home
  • Products
    • SIOS DataKeeper for Windows
    • SIOS Protection Suite for Linux
  • News and Events
  • Clustering Simplified
  • Success Stories
  • Contact Us
  • English
  • 中文 (中国)
  • 中文 (台灣)
  • 한국어
  • Bahasa Indonesia
  • ไทย

Configure File Server Failover Cluster in Azure Across Availability Zones

November 5, 2018 by Jason Aw Leave a Comment

Configure-File-Server-Failover-Cluster-in-Azure-Across-Availability-Zones

Step-By-Step: Configure A File Server Cluster In Azure Spanning Availability Zones

Configure-File-Server-Failover-Cluster-in-Azure-Across-Availability-Zones

Step-By-Step: Configure A File Server Cluster In Azure Spanning Availability Zones

In this post, we will detail the specific steps required to deploy a 2-node File Server Failover Cluster in Azure that spans the new Availability Zones. I will assume you are familiar with basic Azure concepts as well as basic Failover Cluster concepts. I will focus on what is unique about deploying a File Server Failover Cluster in Azure across Availability Zones. If your Azure region doesn’t support Availability Zones yet, you will have to use Fault Domains instead as described in an earlier post.

With DataKeeper Cluster Edition you are able to take the locally attached Managed Disks, whether it is Premium or Standard Disks, and replicate those disks either synchronously, asynchronously or a mix or both, between two or more cluster nodes. In addition, a DataKeeper Volume resource is registered in Windows Server Failover Clustering which takes the place of a Physical Disk resource. Instead of controlling SCSI-3 reservations like a Physical Disk Resource, the DataKeeper Volume controls the mirror direction. It ensures the active node is always the source of the mirror. As far as Failover Clustering is concerned, it looks, feels and smells like a Physical Disk and is used the same way Physical Disk Resource would be used.

Pre-Requisites

  • You have used the Azure Portal before and are comfortable deploying virtual machines in Azure IaaS.
  • Have obtained a license or eval license of SIOS DataKeeper

Deploying A File Server Failover Cluster In Azure

To build a 2-node File Server Failover Cluster Instance in Azure, we are going to assume you have a basic Virtual Network based on Azure Resource Manager. You have at least one virtual machine up and running and configured as a Domain Controller. Once you have a Virtual Network and a Domain configured, you are going to provision two new virtual machines which will act as the two nodes in our cluster.

Our environment will look like this:

DC1 – Our Domain Controller and File Share Witness
SQL1 and SQL2 – The two nodes of our File Server Cluster. Don’t let the names confuse you. We are building a File Server Cluster in this guide. In my next post I will demonstrate a SQL Server cluster configuration.

Provisioning The Two Cluster Nodes

Using the Azure Portal, we will provision both SQL1 and SQL2 exactly the same way.  There are numerous options to choose from including instance size, storage options, etc. This guide is not meant to be an exhaustive guide to deploying Servers in Azure. There are some really good resources out there and more published every day. However, there are a few key things to keep in mind when creating your instances, especially in a clustered environment.

Availability Zones – It is important that both SQL1, SQL2 reside in different Availability Zones. For the sake of this guide we will assume you are using Windows 2016 and will use a Cloud Witness for the Cluster Quorum. If you use Windows 2012 R2 or Windows Server 2008 R2 instead of Windows 2016, you will need to configure a File Share Witness in the 3rd Availability Zone. Cloud Witness was not introduced until Windows Server 2016.

By putting the cluster nodes in different Availability Zones, we are ensuring that each cluster node resides in a different Azure datacenter in the same region. Leveraging Availability Zones rather than the older Fault Domains is beneficial. It isolates you from the types of outages occured just a few weeks ago that brought down the entire South Central region for multiple days.
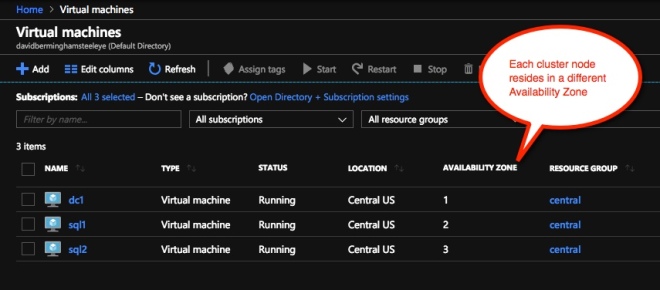
Availability Zones
Be sure to add each cluster node to a different Availability Zone. If you leverage a File Share Witness it should reside in the 3rd Availability Zone.

Static IP Address

Once each VM is provisioned, you will want to go into the setting and change the settings so that the IP address is Static. We do not want the IP address of our cluster nodes to change.

Static IP
Make sure each cluster node uses a static IP

Storage

As far as Storage is concerned, you will want to consult Performance best practices for SQL Server in Azure Virtual Machines. In any case, you will minimally need to add at least one additional Managed Disk to each of your cluster nodes. DataKeeper can use Basic Disk, Premium Storage or even multiple disks striped together in a local Storage Space. If you do want to use a local Storage Space, be aware to create the Storage Space before any cluster configuration. This is due to a known issue with Failover Clustering and local Storage Spaces. All disks should be formatted NTFS.

Create The Cluster

Assuming both cluster nodes (SQL1 and SQL2) have been provisioned as described above and added to your existing domain, we are ready to create the cluster. Before we create the cluster, there are a few Features that need to be enabled. These features are .Net Framework 3.5 and Failover Clustering. These features need to be enabled on both cluster nodes. You will also need to enable the FIle Server Role.

6
Enable both .Net Framework 3.5 and Failover Clustering features and the File Server on both cluster nodes.

Once that role and those features have been enabled, you are ready to build your cluster. Most of the steps I’m about to show you can be performed both via PowerShell and the GUI. However, I’m going to recommend that for this very first step you use PowerShell to create your cluster. If you choose to use the Failover Cluster Manager GUI to create the cluster you will find that you wind up with the cluster being issued a duplicate IP address.

Without going into great detail, what you will find is that Azure VMs have to use DHCP. By specifying a “Static IP” when we create the VM in the Azure portal all we did was create sort of a DHCP reservation. It is not exactly a DHCP reservation because a true DHCP reservation would remove that IP address from the DHCP pool. Instead, this specifying a Static IP in the Azure portal simply means that if that IP address is still available when the VM requests it, Azure will issue that IP to it. However, if your VM is offline and another host comes online in that same subnet it very well could be issued that same IP address.

Another Side Effect To How Azure Implemented DHCP

When creating a cluster with the Windows Server Failover Cluster GUI, there is not option to specify a cluster IP address. Instead it relies on DHCP to obtain an address. The strange thing is, DHCP will issue a duplicate IP address. Usually the same IP address as the host requesting a new IP address. The cluster install will complete, but you may have some strange errors. You may need to run the Windows Server Failover Cluster GUI from a different node in order to get it to run. Once you get it to run you will need to change the core cluster IP address to an address that is not currently in use on the network.

You can avoid that whole mess by simply creating the cluster via Powershell and specifying the cluster IP address as part of the PowerShell command to create the cluster.

You can create the cluster using the New-Cluster command as follows:

New-Cluster -Name cluster1 -Node sql1,sql2 -StaticAddress 10.0.0.100 -NoStorage

After the cluster creation completes, you will also want to run the cluster validation by running the following command. You should expect to see some warnings about storage and network, but that is expected in Azure and you can ignore those warnings. If any errors are reported you will need to address those before you move on.

Test-Cluster

Create A Quorum Cluster

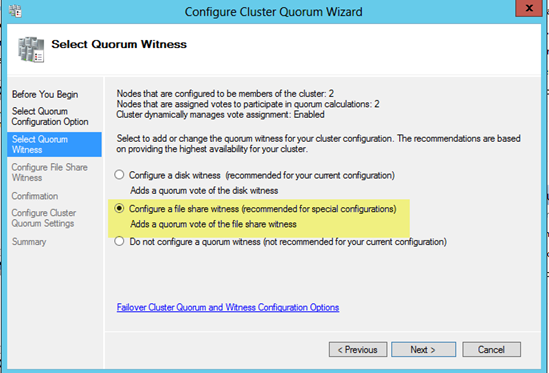
if you are running Windows 2016 or 2019 you will need to create a Cloud Witness for the cluster quorum. If you are running Windows Server 2012 R2 or 2008 R2 you will need to create a File Share Witness. The detailed instruction on witness creation can be found here.

Install DataKeeper

After the cluster is created, it is time to install DataKeeper. It is important to install DataKeeper after the initial cluster is created so the custom cluster resource type can be registered with the cluster. If you installed DataKeeper before the cluster is created, you will simply need to run the install again and do a repair installation.

8
Install DataKeeper after the cluster is created

During the installation you can take all of the default options.  The service account you use must be a domain account and be in the local administrators group on each node in the cluster.

9
The service account must be a domain account that is in the Local Admins group on each node

Once DataKeeper is installed and licensed on each node you will need to reboot the servers.

Create the DataKeeper Volume Resource

10

To create the DataKeeper Volume Resource you will need to start the DataKeeper UI and connect to both of the servers.

11
Connect to SQL1
12
Connect to SQL2

Once you are connected to each server, you are ready to create your DataKeeper Volume. Right click on Jobs and choose “Create Job”
13

Give the Job a name and description.
14

Choose your source server, IP and volume. The IP address is whether the replication traffic will travel.
15

Choose your target server.
16

Choose your options. For our purposes where the two VMs are in the same geographic region we will choose synchronous replication. For longer distance replication you will want to use asynchronous and enable some compression.
17

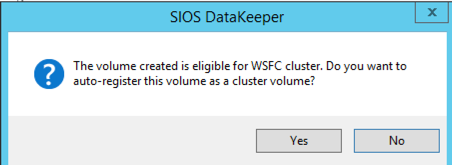
By clicking yes at the last pop-up you will register a new DataKeeper Volume Resource in Available Storage in Failover Clustering.
18

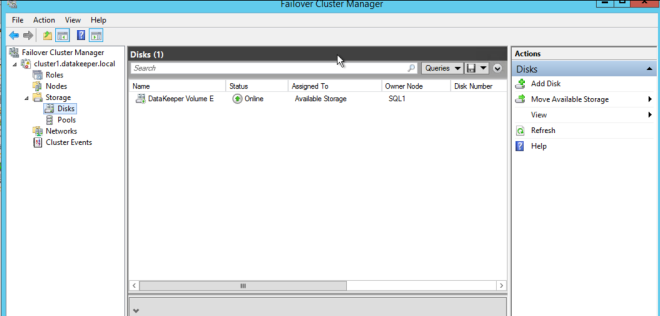
You will see the new DataKeeper Volume Resource in Available Storage.
19

Create The File Server Cluster Resource

To create the File Server Cluster Resource, we will use Powershell once again rather than the Failover Cluster interface. The reason being is that once again because the virtual machines are configured to use DHCP, the GUI based wizard will not prompt us to enter a cluster IP address and instead will issue a duplicate IP address. To avoid this we will use a simple powershell command to create the FIle Server Cluster Resource and specify the IP Address

Add-ClusterFileServerRole -Storage "DataKeeper Volume E" -Name FS2 -StaticAddress 10.0.0.101

Make note of the IP address you specify here. It must be a unique IP address on your network. We will use this same IP address later when we create our Internal Load Balancer.

Create The Internal Load Balancer

Here is where failover clustering in Azure is different than traditional infrastructures. The Azure network stack does not support gratuitous ARPS, so clients cannot connect directly to the cluster IP address. Instead, clients connect to an internal load balancer and are redirected to the active cluster node. What we need to do is create an internal load balancer. This can all be done through the Azure Portal as shown below.

You can use an Public Load Balancer if your client connects over the public internet. But assuming your clients reside in the same vNet, we will create an Internal Load Balancer. The important thing to take note of here is that the Virtual Network is the same as the network where your cluster nodes reside. Also, the Private IP address that you specify will be exactly the same as the address you used to create the File Server Cluster Resource. Also, because we are using Availability Zones, we will be creating a Zone Redundant Standard Load Balancer as shown in the picture below.
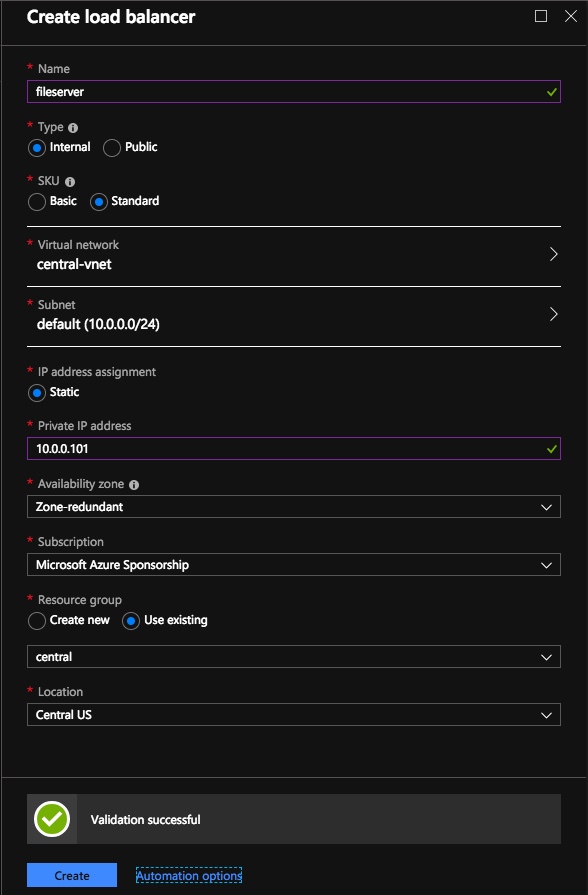
Load Balancer

After the Internal Load Balancer (ILB) is created, you will need to edit it. The first thing we will do is to add a backend pool. Through this process you will choose the two cluster nodes.
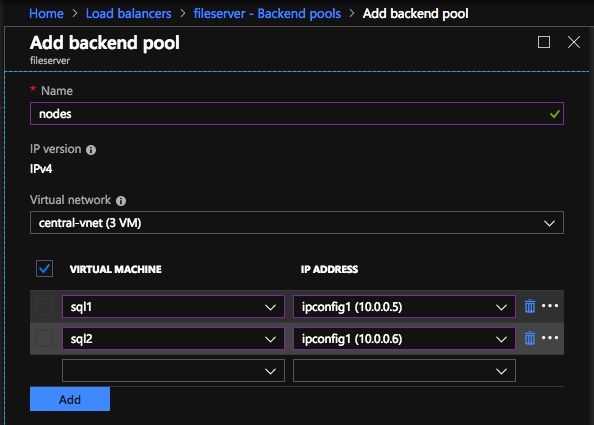
Backend Pools

The next thing we will do is add a Probe. The probe we add will probe Port 59999. This probe determines which node is active in our cluster.
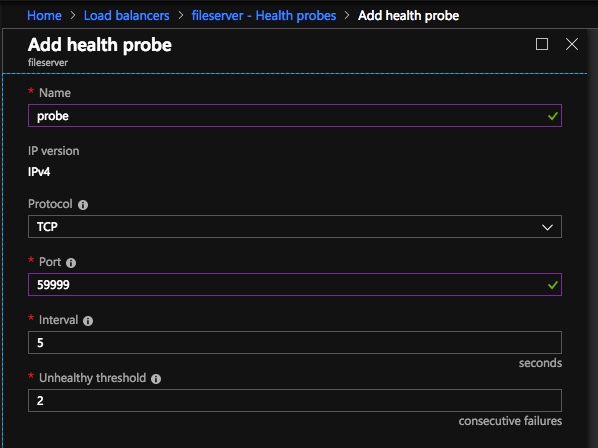
probe

And then finally, we need a load balancing rule to redirect the SMB traffic, TCP port 445. The important thing to notice in the screenshot below is the Direct Server Return is Enabled. Make sure you make that change.

rules

Fix The File Server IP Resource

The final step in the configuration is to run the following PowerShell script on one of your cluster nodes. This will allow the Cluster IP Address to respond to the ILB probes. Also to ensure that there is no IP address conflict between the Cluster IP Address and the ILB. Please take note; you will need to edit this script to fit your environment. The subnet mask is set to 255.255.255.255. This is not a mistake, leave it as is. This creates a host specific route to avoid IP address conflicts with the ILB.

# Define variables
$ClusterNetworkName = “” 
# the cluster network name (Use Get-ClusterNetwork on Windows Server 2012 of higher to find the name)
$IPResourceName = “” 
# the IP Address resource name 
$ILBIP = “” 
# the IP Address of the Internal Load Balancer (ILB)
Import-Module FailoverClusters
# If you are using Windows Server 2012 or higher:
Get-ClusterResource $IPResourceName | Set-ClusterParameter -Multiple @{Address=$ILBIP;ProbePort=59999;SubnetMask="255.255.255.255";Network=$ClusterNetworkName;EnableDhcp=0}
# If you are using Windows Server 2008 R2 use this: 
#cluster res $IPResourceName /priv enabledhcp=0 address=$ILBIP probeport=59999  subnetmask=255.255.255.255

Creating File Shares

You will find that using the File Share Wizard in Failover Cluster Manager does not work. Instead, you will simply create the file shares in Windows Explorer on the active node. Failover clustering automatically picks up those shares and puts them in the cluster.

Note that the”Continuous Availability” option of a file share is not supported in this configuration.

Conclusion

You should now have a functioning File Server Failover Cluster in Azure that spans Availability Zones. If you need a DataKeeper evaluation key fill out the form at http://us.sios.com/clustersyourway/cta/14-day-trial and SIOS will send an evaluation key sent out to you.
To read more about clustering, click here
Reproduced with permission from Clusteringformeremortals.com

Filed Under: Clustering Simplified Tagged With: Azure, cluster, failover, File Server, file server failover cluster in azure

SIOS For U.S. Navy’s High Availability Data Replication Needs

May 26, 2018 by Jason Aw Leave a Comment

SIOS For U.S. Navy's High Availability Data Replication Needs

SIOS Provides GTS with High Availability Data Replication and Business Continuity for U.S. Navy Combat Systems

Global Technical Systems (GTS) had to find a technical solution to meet the U.S. Navy’s high availability data replication needs; one that could keep data synchronized among cabinets and would meet the requirements for the Navy’s mission critical needs. They issued a request for proposal (RFP), which consisted of a need to find an enclosure and Common Processing System (CPS) for the Navy to feed various programs of record, such as the ship self-defense system.

The Solution

SIOS Protection Suite was the optimal solution to provide multi-site cluster configurations and enable cascading of multiple node failovers. They was selected by GTS to monitor and protect the Navy’s IBM BladeCenter BCHT and storage infrastructure against planned and unplanned network downtime. With the ability to combine the robustness of a classic, shared storage cluster with efficient, blocklevel data replication to a disaster recovery site, SIOS Protection Suite also enabled automatic replication redirection to deliver comprehensive disaster recovery protection for the Navy’s combat systems.

In certain configurations, the Navy has two data centers with two servers that provide local availability. Inside the data centers are two node clusters that are connected to shared storage. Both sets of machines exchange data replication on a continuous basis. GTS liked how SIOS Protection Suite combined shared storage support, cascading failover, real-time continuous data protection, and application level monitoring.

Ensuring High Availability Data Replication All The Time

Since these systems run with a rack of servers that will travel out at sea, GTS needs to ensure there is continuous availability in the event that there is combat. With the SIOS failover advantage, the Navy is protected from hardware issues that may surface. SIOS’s solutions allow business data to appear as is, showing no changes in the secondary server. Its application awareness feature has the ability to comprehend the interdependencies that occur between all system components, which greatly differs from competitors whose features are limited to monitoring the hardware, operating system, and database.

Ease Of Installation

There were no integration issues in terms of implementing this solution into the system baseline. GTS took the baseline and loaded the solution into the system. Next, it ran quality control and operational qualification tests then shipped the units to the Navy. The deployment process from start to finish was roughly a yearlong activity for all software and hardware subsystems that, for SIOS products, was both hassle free and easy.

The SIOS Protection Suite allows the end user to choose or use the capability. This means if the user chooses to not deploy the SIOS Protection Suite, they will not receive the added benefit of having SIOS protection. Services are billed on a monthly basis. For this extra fee, customers can receive the added benefit of having a disaster recovery solution that maintains uninterrupted access to data. SIOS takes over the failover of the solution and ensures a resilient environment by monitoring each server.

Benefits

SIOS Protection Suite enables the Navy to meet its mission critical requirements by helping GTS maintain the availability of data. The Navy must be able to meet their mission at hand with high availability. If the enclosure is not able to fail over, they are not able to meet their mission. This solution concisely affords the Navy to meet their mission requirements.

GTS completed an extensive trade study prior to selecting Lifekeeper. SIOS Protection Suite’s price point and its ease of deployment was a key factor in GTS’s decision to select this solution. In addition, the solution’s unique composition provides GTS with the flexibility and savings that are associated with open source platforms.

The robustness of the SIOS Protection Suite provides enterprise class high availability data replication and failover. Protecting critical data is absolutely an imperative necessity for the Navy. The fact that SIOS was chosen for this project speaks volumes, as it ensures systems are 100 percent secure and reliable.

To find out more about SIOS products, go here
To read about how SIOS helped US Navy achieve high availability data replication, go here

Filed Under: Success Stories Tagged With: data replication, failover, High Availability, high availability data replication

Meet Your Failover And Disaster Recovery Needs With SIOS

May 20, 2018 by Jason Aw Leave a Comment

Meet Your Failover And Disaster Recovery Needs With SIOS

SIOS Software Ensures 24/7 Availability, Failover And Disaster Recovery Of Theatre’s Online Ticketing System

The theatre with the highest regular annual attendance in the United Kingdom uses SIOS Protection Suite software. The software safeguard the online ticketing system keeping it available 24/7, even in the event of software bugs, hardware failure or unanticipated outages. SIOS Protection Suite meets Birmingham Hippodrome’s failover, replication and disaster recovery needs. The company moved off a hosted server and onto its own in-house networking infrastructure. By doing so, the theatre has freed itself to develop a new marketing strategy based around its website and database of customers.

The Challenge

Birmingham Hippodrome wrote a detailed specification. It called for a new network infrastructure that would deliver full failover and disaster recovery, with no single point of failure. The new infrastructure would need to be flexible and resilient. It would also need to enable them to tailor the system to improve marketing around its website and database of customers. That meant the infrastructure would essentially need to run all back office tasks. This includes a new e-mail system, the theatre’s own ticket booking, de-booking and credit card service.

The Solution

To deliver full failover and disaster recovery protection, IT infrastructure consultancy eSpida built two server rooms approximately one mile apart. Each replicating to the other. If one server failed, the other server would continue operations. They also implemented two leased lines and established two service providers at two points in the city with two separate main supplies. Birmingham wanted to simplify server “housekeeping.” The Hippodrome’s network infrastructure has been virtualised with 20 virtualised servers on IBM x3650 hardware and twin dual-core CPUs with 32 GB RAM and local disk. They use SIOS software to ensure continuous availability of applications and the online ticketing system.

SIOS Protection Suite creates a “mirrored” server system on the remote site that is identical to the primary server. If the primary server fails, SIOS software can shut it down and transfer all operations to the backup server while providing continuous access to applications and data. This capability ensures that both Birmingham Hippodrome staff and customers shopping for tickets online are unaffected by system failures or maintenance. SIOS software monitors system and application health, maintains client connectivity. It provides uninterrupted data access, giving Birmingham Hippodrome the reliable, fault-resilient system they need.

Benefit Of Failover And Disaster Recovery Solution

Another benefit of SIOS software is that installation and set-up is a quick and hassle-free process. High availability and protection of the theatre’s overall operations may have seemed like a daunting task. But SIOS Protection Suite was installed, configured, tested and in production within a few days.

For the first six months of operation, one of the servers was freezing up about once a month. In each case, SIOS software failed over to the back-up server in under a minute. The few initial instances of server failure went largely unnoticed, thanks to SIOS.

SIOS software enables Hippodrome to provide a total solution that includes hardware, installation, as well as supplementary services related to disaster recovery.

To find out more about SIOS products, go here
To read about how SIOS can meet your failover and disaster recovery needs, go here

Filed Under: Success Stories Tagged With: disaster recovery, failover, failover and disaster recovery

Clustering Windows Server 2012 Step-By-Step

February 8, 2018 by Jason Aw Leave a Comment

Basic Steps Of Any Cluster

This article is the first in a series of articles on Clustering Windows Server 2012. This first article covers the basics first steps of any cluster, regardless of whether you are clustering Hyper-V, SQL Server Failover Clusters, File Servers, iSCSI Target Server or others. Future articles will cover more detailed instructions for each cluster resource type, but the following information is applicable to ALL clusters.

I’m assuming you know a little bit about clusters and why you would want to build one, so I won’t go into those details in this particular post. I also assume you are familiar with Windows Server 2012 and basic things like DNS, AD, etc. It is also worth noting that in Windows Server 2012 failover clustering comes with every edition, unlike Windows Server 2008 R2 and earlier where failover clustering was only included in Enterprise Edition and above.

Focus On Basic 2-Node Cluster

This particular series will focus on a basic 2-node cluster, where we have two servers (named PRIMARY and SECONDARY) running Windows Server 2012 in a Windows Server 2012 Domain (domain controller named DC). It also assumes that PRIMARY and SECONDARY can communicate with each other over two network connections I have labeled PUBLIC and PRIVATE. In production scenarios these network connections should run through entirely different network gear (switches, routers, etc) to eliminate any single point of failure.

Let’s Start! Clustering Windows Server 2012, here we go!

This series will be written in a very basic, step-by-step style that walks you through the process in an ordered list with basic instructions and plenty of screen shots to help illustrate the procedure where needed. So let’s begin at the beginning…

  1. Add the Failover Clustering Feature on all of the servers you want to add to the cluster
    1. Open the Server Manager Dashboard (this 1st step will need to be completed on both PRIMARY and SECONDARY)
    2. Click on Add roles and features
    3. Clustering Windows Server 2012 Step-By-StepChoose Role-based or feature-based installation
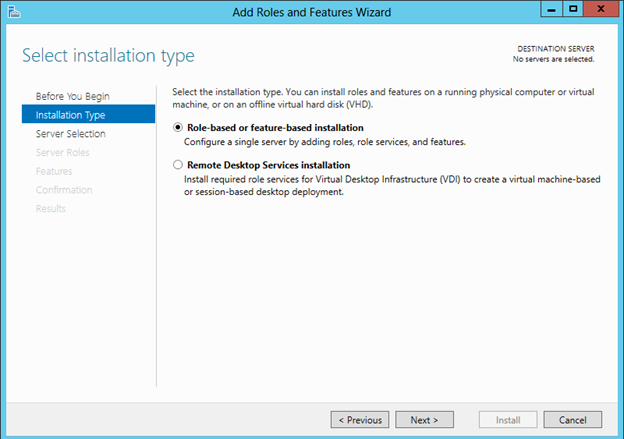
    4. Clustering Windows Server 2012 Step-By-StepChoose the server on which you wish to enable the failover cluster feature
      Clustering Windows Server 2012 Step-By-Step
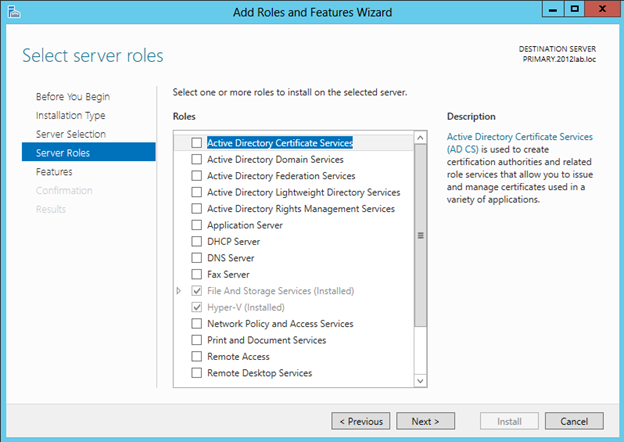
    5. Skip over the Server Roles page
      Clustering Windows Server 2012 Step-By-Step
    6. On the Features page select Failover Clustering and click Next and then confirm the installation
      Clustering Windows Server 2012 Step-By-Step
  2. Before we start configuring the cluster, we need to consider what kind of storage the cluster will use. Traditionally clusters will use some sort of SAN, but with Windows 2012 not all clusters will use a SAN. For instance, if you are building a cluster to support SQL Server AlwaysOn Availability Groups your storage will be replicated by SQL Server, eliminating the need for a SAN. Also, with SMB 3.0 being support as cluster storage for Hyper-V and SQL Server you may not have a traditional SAN for storage. And let’s not forget clustered Storage Spaces with shared SAS drives is also a possibility in Windows Server 2012. In addition to the options mentioned above, you also can use local disks and 3rd party host based replication solutions like DataKeeper Cluster Edition which is an excellent alternative which I blog about pretty frequently.For the purposes of this post to share about Clustering Windows Server 2012 , I am going to assume you have no shared storage. However, if you do have shared storage at this point you should configure you storage such that you have LUN(s) carved out and shared with each of the cluster nodes with one LUN being used as a disk witness and the remaining LUNs can be used for the application which you want to cluster. In lieu of a disk witness for our quorum, I am going to use a node and file share witness quorum type which I will explain later.
  3. Now that Failover Clustering is enabled on each server, you can open the Failover Cluster Manager on your PRIMARY server. The first thing we will want to do is to run “Validate Configuration” so we can identify any potential issues before we begin. Click on Validate ClusterClustering Windows Server 2012 Step-By-Step
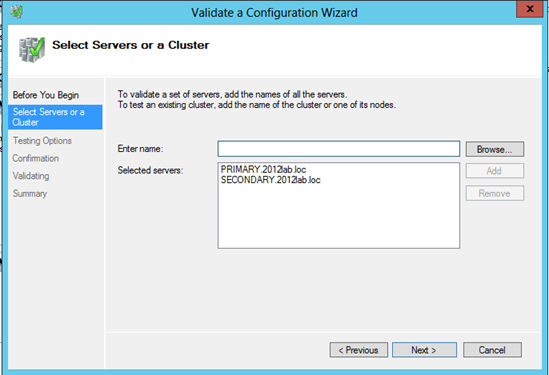
  4. Step through the Validate a Configuration Wizard as shown in the following steps.
    1. Select the servers you want to cluster
      Clustering Windows Server 2012 Step-By-Step
    2. Run all tests (depending on what roles you have installed on the servers you may get more or less tests. For instance, if Hyper-V is enabled there are new Hyper-V specific tests for clusters)
      Clustering Windows Server 2012 Step-By-Step
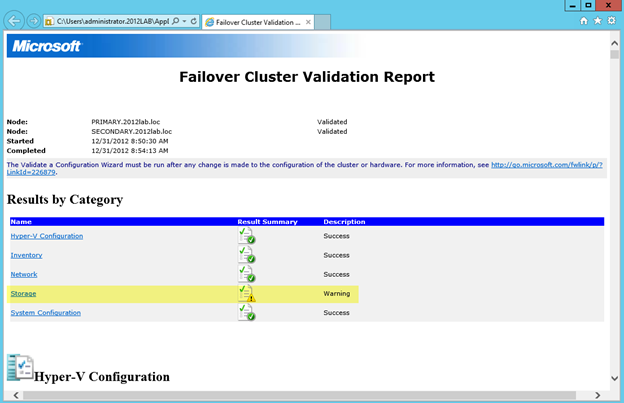
    3. Assuming your cluster “passed” validation you should have a report that looks similar to mine. You will notice that my report contains “warnings” but no errors. It is important for you to view the report and understand what warnings might be present, but you as long as you understand the warnings and they make sense for your particular environment you can move on. If you validation “failed”, you MUST fix the failures before moving on. Click View Report to view the report
      Clustering Windows Server 2012 Step-By-Step
    4. You will see all of my warnings are related to storage, so I am not concerned since I have not configured any shared storage, so I would expect some of these thests to produce warnings.
      Clustering Windows Server 2012 Step-By-Step


  1. Once Validation completes without any errors, you will automatically be thrown into the Create Cluster Wizard. Walk through this wizard as shown below to create your basic cluster.
    1. In this first screen you will choose a name for your cluster and pick an IP address that will be associated with this name in DNS. This name is just the name used to manage your cluster – this is NOT the name that your clients will use to connect to the clustered resource(s) you will eventually create. Once you create this access point a new computer object will be created in AD with this name and a DNS A record will be created with this name and IP address.
      Clustering Windows Server 2012 Step-By-Step
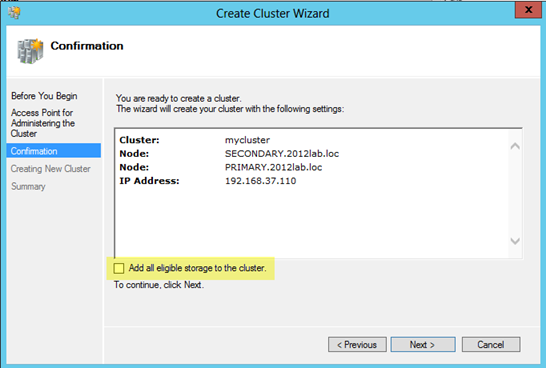
    2. On the confirmation screen you will see the name and IP address you selected. You will also see an option which is new with Windows Server 2012 failover clustering…”Add all eligible storage to the cluster”. Personally I’m not sure why this is selected by default, as this option can really confuse things. By default, this selection will add all shared storage (if you have it configured) to the cluster, but I have also seen it add just local, non-shared disks, to the cluster as well. I suppose they want to make it easy to support symmetric storage, but generally any host based or array based replication solutions are going to have some pretty specific instructions on how to add symmetric storage to the cluster and generally this option to add all disks to the cluster is more of a hindrance than a help when it comes to asymmetric storage. For our case, since I have no shared storage configured and I don’t want the cluster adding any local disks to the cluster for me automatically I have unchecked the Add all eligible storage to the cluster option.Clustering Windows Server 2012 Step-By-Step
    3. After you click next you will see that the cluster has finished the creation process, but there may be some warnings. In our case the warnings are probably related to the quorum configuration which we will take care of in the next step. Click View Report to check out any warnings.
      Clustering Windows Server 2012 Step-By-Step
      You see that the warning is telling use to change the quorum type.
      Clustering Windows Server 2012 Step-By-Step
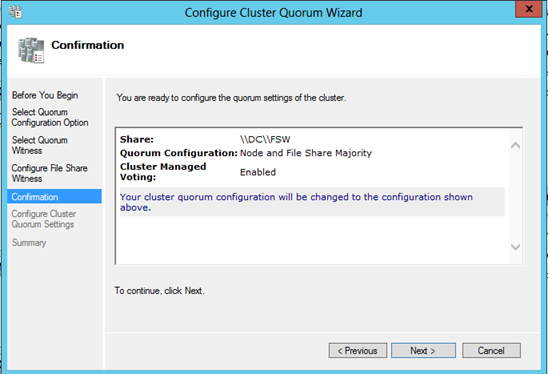
  2. Because we have no shared storage, we will not be using a Node and Disk Majority quorum as suggested. Instead, we will use and Node and File Share Majority quorum. The following steps will help us configure the Node and File Majority Quorum
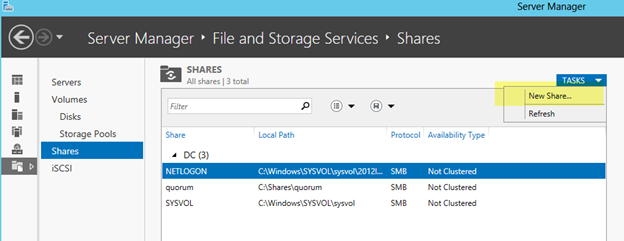
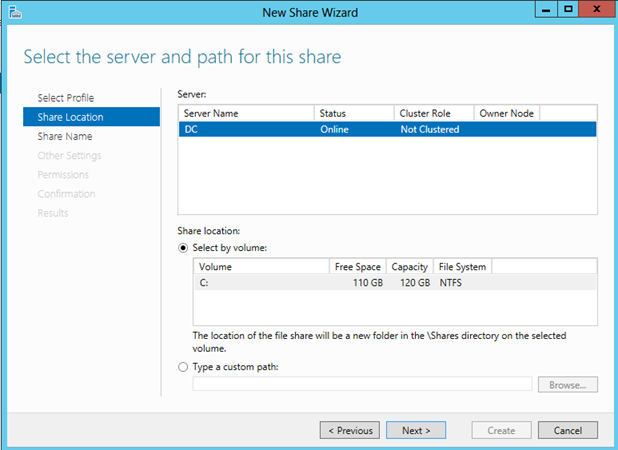
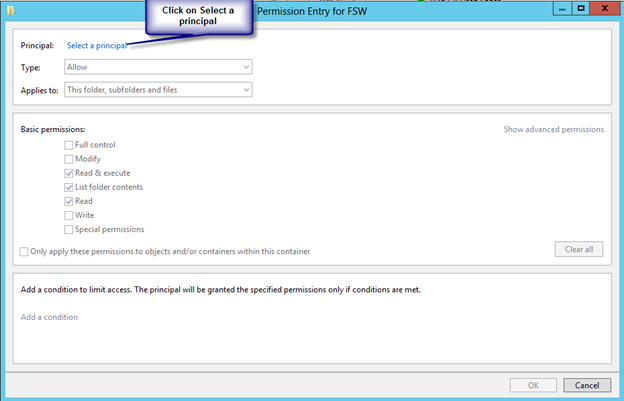
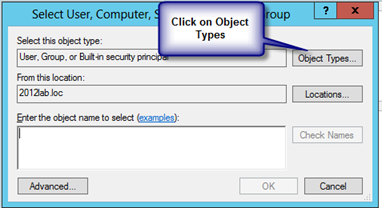
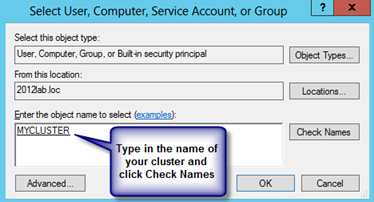
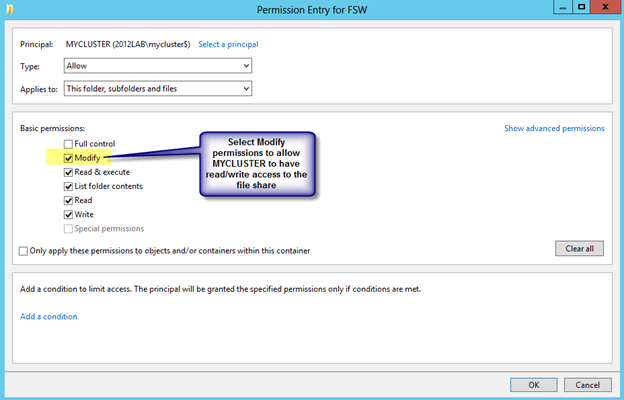
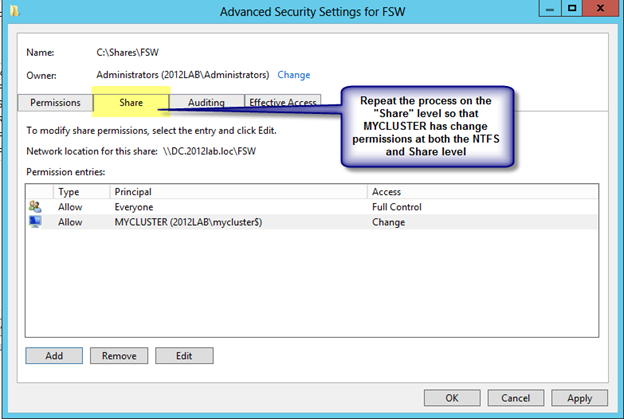
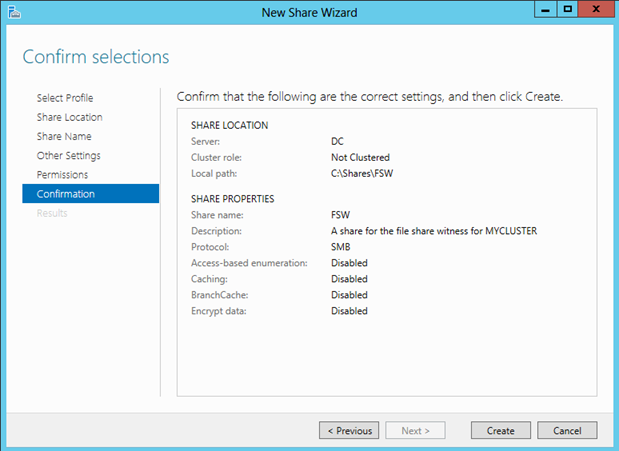
    1. A File Share Witness needs to be configured on a server that is not part of the cluster. A file share witness is a basic file share that the cluster computer name (MYCLUSTER in our case) has read/write access. The first step involves creating this file share. In our example, we are going to create a file share on our DC and give MYCLUSTER read/write access to it.
    2. The file share does not need to reside on a Windows 2012 server, but it does need to be on a Windows Server in the same domain as the cluster. The important thing to remember is that the cluster computer name that we created needs read/write access at both the share level and NTFS level. The following are some screen shots that walk you through this process on the DC server which is running Windows Server 2012 in my lab.
      Clustering Windows Server 2012 Step-By-Step

      Clustering Windows Server 2012 Step-By-Step

      Clustering Windows Server 2012 Step-By-Step

      Clustering Windows Server 2012 Step-By-Step

      Clustering Windows Server 2012 Step-By-Step
      Clustering Windows Server 2012 Step-By-Step

      Clustering Windows Server 2012 Step-By-Step
      Clustering Windows Server 2012 Step-By-Step

      Clustering Windows Server 2012 Step-By-Step

      Clustering Windows Server 2012 Step-By-Step

      Clustering Windows Server 2012 Step-By-Step

      Clustering Windows Server 2012 Step-By-Step
      Clustering Windows Server 2012 Step-By-Step

      Clustering Windows Server 2012 Step-By-Step

      Clustering Windows Server 2012 Step-By-Step

      Clustering Windows Server 2012 Step-By-Step

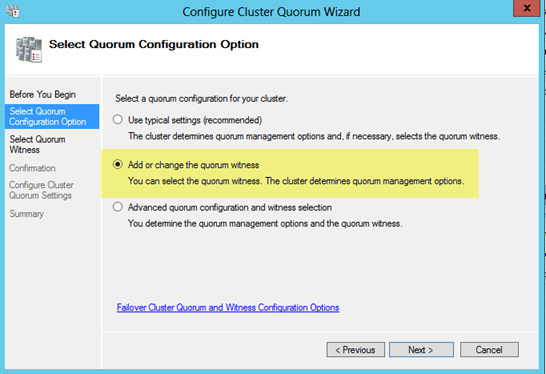
    3. Now that we have the file share created on DC, we will go back to PRIMARY and use the Failover Cluster Manager to change the quorum type as shown in the following steps.
      Clustering Windows Server 2012 Step-By-Step
      Clustering Windows Server 2012 Step-By-Step
      Clustering Windows Server 2012 Step-By-Step
      Clustering Windows Server 2012 Step-By-Step
      Clustering Windows Server 2012 Step-By-Step
      Clustering Windows Server 2012 Step-By-Step
      If by chance this wizard fails, it is most likely related to the permissions on the file share. Make sure you give the cluster computer name read/write permissions at BOTH the file share and security (NTFS) level and try again.
  3. You now have a basic 2-node cluster and are ready to move on to the next step of series Clustering Windows Server 2012 which is creating your cluster resources. I will be publishing a series of articles on how to cluster different resources, starting with SQL 2012 in my next post.

Reproduced with permission from https://clusteringformeremortals.com/2012/12/31/windows-server-2012-clustering-step-by-step/

Filed Under: Clustering Simplified, Datakeeper Tagged With: Clustering, clustering windows server, failover, Windows Server 2012

New Features of Windows Server Failover Clustering

February 3, 2018 by Jason Aw Leave a Comment

New Features of Windows Server Failover Clustering

Elden Christensen recently blogged about some of the new features of Windows Server Failover Clustering in Windows Server 8. You can read the entire post here

All of these features found in Windows Server Failover Clustering in Windows Server 8 are welcome additions. My personal favorite is the “Dynamic Clusters” or what I think is probably better described as “Dynamic Quorum”. It basically allows the quorum to reconfigure itself dynamically which I think is a fantastic feature! If configured properly, you could actually withstand the failure of all but one remain node (last man standing) and still have a functional cluster. Previously this was only possible if you used the “Disk Only” quorum model, which is not recommended as the disk quorum represented a single point of failure.

With the new dynamic quorum model as nodes are removed from the cluster, the remaining nodes reconfigure themselves in the most resilient manner. For example, previously you had a 5 node cluster using the “Node Majority” quorum model. If you lose three nodes, the remaining two nodes would shut down as they no longer had a majority vote (2 out of 5 is not a majority). With the new model, as nodes leave the cluster, the quorum reconfigures itself so that the remaining two nodes would remain online.

The description above is really an over simplification of what actually happens under the covers. I plan to write more about it in the future, but it is definitely a welcome feature to check out!
For More Information

There are a few other blog articles relevant to Windows Server Failover Clustering you should refer to

How to Enable Failover Clustering and Network Load Balancing PowerShell Help on Windows Server “8”:

http://blogs.msdn.com/b/clustering/archive/2012/03/21/10286213.aspx

How to Enable CSV Cache:

http://blogs.msdn.com/b/clustering/archive/2012/03/22/10286676.aspx

How to Create a Cluster in a Restrictive Active Directory Environment:

http://blogs.msdn.com/b/clustering/archive/2012/03/30/10289577.aspx

Reproduced with permission from Clusteringformeremortals


Filed Under: Clustering Simplified Tagged With: Clustering, failover, failover cluster, failover clustering, Windows Server 8, Windows Server Failover Clustering

Recent Posts

  • The Best Rolling Upgrade Strategy to Enhance Business Continuity
  • How to Patch Without the Pause: Near-Zero Downtime with HA
  • SIOS LifeKeeper Demo: How Rolling Updates and Failover Protect PostgreSQL in AWS
  • How to Assess if My Network Card Needs Replacement
  • SIOS Technology to Demonstrate High Availability Clustering Software for Mission-Critical Applications at Red Hat Summit, Milestone Technology Day and XPerience Day, and SQLBits 2025

Most Popular Posts

Maximise replication performance for Linux Clustering with Fusion-io
Failover Clustering with VMware High Availability
create A 2-Node MySQL Cluster Without Shared Storage
SAP for High Availability Solutions For Linux
Bandwidth To Support Real-Time Replication
The Availability Equation – High Availability Solutions.jpg
Choosing Platforms To Replicate Data - Host-Based Or Storage-Based?
Guide To Connect To An iSCSI Target Using Open-iSCSI Initiator Software
Best Practices to Eliminate SPoF In Cluster Architecture
Step-By-Step How To Configure A Linux Failover Cluster In Microsoft Azure IaaS Without Shared Storage azure sanless
Take Action Before SQL Server 20082008 R2 Support Expires
How To Cluster MaxDB On Windows In The Cloud

Join Our Mailing List

Copyright © 2025 · Enterprise Pro Theme on Genesis Framework · WordPress · Log in