SIOS SANless clusters

SIOS SANless clusters High-availability Machine Learning monitoring

  • Home
  • Products
    • SIOS DataKeeper for Windows
    • SIOS Protection Suite for Linux
  • News and Events
  • Clustering Simplified
  • Success Stories
  • Contact Us
  • English
  • 中文 (中国)
  • 中文 (台灣)
  • 한국어
  • Bahasa Indonesia
  • ไทย

Multi-Instance SQL Server Failover Cluster With New Azure ILB Feature

April 14, 2019 by Jason Aw Leave a Comment

New Azure ILB Feature Allows You To Build A Multi-Instance SQL Server Failover Cluster

At Microsoft Ignite this past September, Microsoft made some announcements around Azure. One of these announcements was the general availability of multiple VIPs on internal load balancers. Why is this so important to a SQL Server DBA? Well, up until now if you want to deploy highly available SQL Server in Azure you were limited to a single SQL Server FCI per cluster or a single Availability Group listener.

This limitation forced you to deploy a new cluster for each instance of SQL Server you wanted to protect in a Failover Cluster. It also forced you to group all of your databases into a single Availability Group if you wanted automatic failover and client redirection in your AlwaysOn AG configuration.

How To Get Out Of These Restrictions?

Those restrictions have now been lifted with these new ILB features. In this post I am going to walk you through the process of deploying a SQL Server FCI in Azure that contains two SQL Server instances. In a future post I will walk you through the same process for SQL Server AlwaysOn AG.

Let’s Start With A Multi-Instance SQL Server Failover Cluster

Build a basic, single instance SQL Server FCI in Azure as I describe in my post Deploying Microsoft SQL Server 2014 Failover Clusters in Azure Resource Manager .

That post describes the process of creating the Multi-Instance SQL Server Failover Cluster. Using DataKeeper to create the replicated volume resources used in the cluster, try creating the Internal Load Balancer (ILB) and then fixing the SQL Server Cluster IP Resource to work with the ILB. If you want to skip that process and jumpstart your configuration you can always use the Azure Deployment Template that creates a 2-Node SQL Server FCI using SIOS DataKeeper

Assuming you now have a basic two node SQL Server FCI, the steps to add a 2nd named instance are as follows:

  1. Create another DataKeeper Volume Resource on another volume that is not currently being used. You may need to add additional disks to your Azure instance if you have no available volumes. As part of this volume creation process the new DataKeeper Volume resource will be registered in Available Storage in the cluster. Refer to the article referenced earlier for the details.
  2. Install a named instance of SQL Server on the first node, specifying the DataKeeper Volume that we just created as the storage location.
  3. “Add a node” to the cluster on the second node.
  4. Lock down the port number of this new named instance to a port that is not in use. In my example I use port 1440.

Adjust ILB To Second Instance

Next we have to adjust the ILB to redirect traffic to this second instance. Here are the steps you need to follow:

Add a frontend IP address that is identical to the SQL cluster IP address you used for the second instance of SQL Server as shown below.
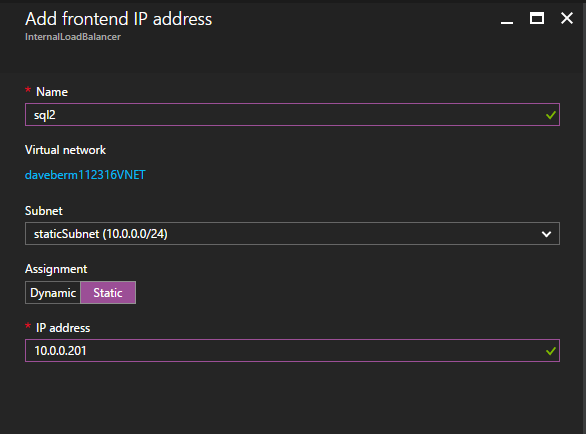
Multi-Instance SQL Server Failover Cluster With New Azure ILB Feature

Next, we will need to add another probe since the instances could be running on different servers. As shown below, I added a probe that probes port 59998 (instead of the usual 59999). We will need to make sure the new rules reference this probe. We will also need to remember that port number since we will need to update IP address associated with this instance during the last step of this process.

Multi-Instance SQL Server Failover Cluster With New Azure ILB Feature

Now we need to add two new rules to the ILB to direct traffic destined for this 2ndinstance of SQL. Of course we need to add a rule to redirect TCP port 1440 (the port I used for the named instance of SQL), but because we are now using named instances we will also need to have a port to support the SQL Server Browser Service, UDP Port 1434.

In the picture below depicting the rule for the SQL Server Browser Service, take note that the Front End IP Address is referencing the new FrontendIP address (10.0.0.201), UDP port 1434 for both the Port and Backend Port. In the pool you will need to specify the two servers in the cluster, and finally make sure you choose the new Health Probe we just created.
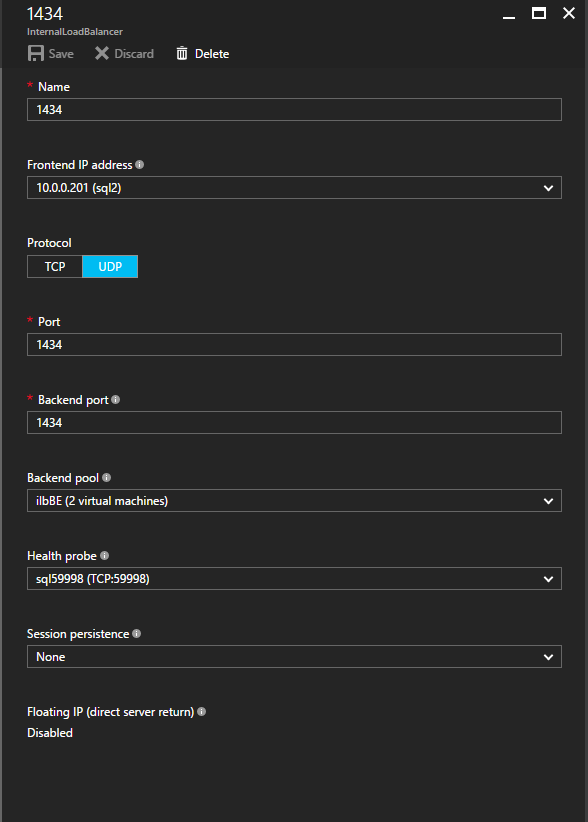
Multi-Instance SQL Server Failover Cluster With New Azure ILB Feature

We will now add a rule for TCP/1440. As show in the picture below, add a new rule for port TCP 1440, or whatever port locked down for the named instance of SQL Server. Again, be sure to choose the new FrontEnd IP Address and the new Health Probe (59998). Also, make sure the Floating IP (direct server return) is enabled.
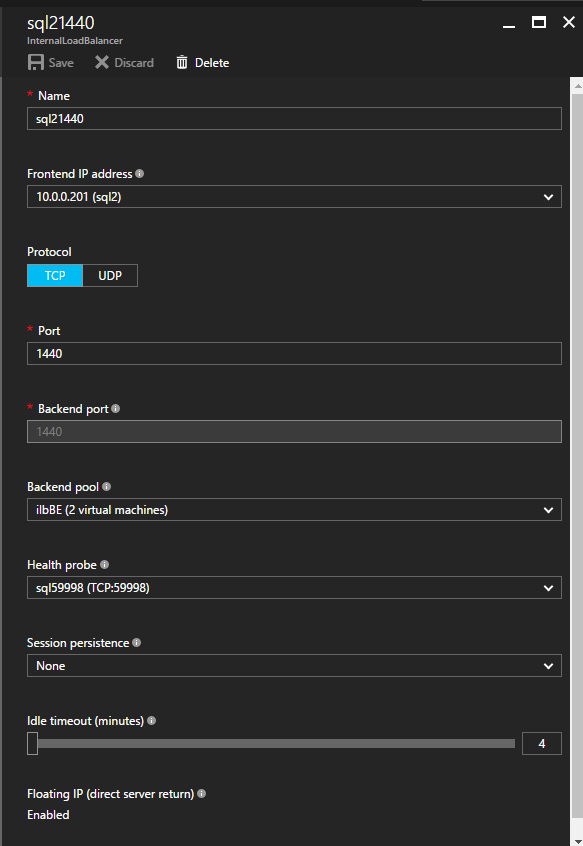
Multi-Instance SQL Server Failover Cluster With New Azure ILB Feature

The Last Step

Now that the load balancer is configured, the final step is to run the PowerShell script to update the new Cluster IP address associated with this 2nd instance of SQL Server. This PowerShell script only needs to be run on one of the cluster nodes.

# Define variables

$ClusterNetworkName = “”

# the cluster network name 
(Use Get-ClusterNetwork on Windows Server 2012 of higher to find the name)

$IPResourceName = “”

# the IP Address resource name of the second instance of SQL Server

$ILBIP = “”

# the IP Address of the second instance of SQL, 
which should be the same as the new Frontend IP address as well

Import-Module FailoverClusters

# If you are using Windows Server 2012 or higher:

Get-ClusterResource $IPResourceName | 
Set-ClusterParameter -Multiple @{Address=$ILBIP;ProbePort=59998;
SubnetMask="255.255.255.255";Network=$ClusterNetworkName;EnableDhcp=0}

# If you are using Windows Server 2008 R2 use this:

#cluster res $IPResourceName /priv enabledhcp=0 address=$ILBIP probeport=59998  
subnetmask=255.255.255.255

You now have a fully functional multi-instance SQL Server FCI in Azure. Let me know if you have any questions to build a Multi-Instance SQL Server Failover Cluster With New Azure ILB Feature

Reproduced from Clusteringformeremortals.com
Filed Under: Clustering Simplified, Datakeeper Tagged With: Azure, failover cluster, ILB, multi instance sql server failover cluster, Multi-Instance SQL Server, SQL Server

No-Cost! Address SQL Server 2008 End of Support by Re-hosting in Azure Now

April 14, 2019 by Jason Aw Leave a Comment

SIOS Technology Offers No-Cost Assessment to Address SQL Server 2008 End of Support by Re-hosting in Azure

SIOS’ experience and expertise building highly-available SQL Server clusters in the cloud can help fast-track customer migrations and maintain SQL Server 2008 security updates


SIOS Technology Corp. is the industry pioneer in providing IT Resilience through intelligent application availability. Today, they announced a new no-cost assessment for customers considering migrating Microsoft SQL Server 2008 to Azure to address the July 9, 2019, End-of-Support.

A major challenge when considering this option from Microsoft is how to maintain SQL Server availability. High availability clustering solutions used on premises are not possible in Azure due to their reliance on shared-storage. This new SIOS offer provides businesses a no-cost assessment of their SQL Server 2008 environments and delivers an Azure re-hosting and configuration plan that ensures protection against unplanned downtime and data loss to meet customer-specific SLAs.

“Moving SQL Server 2008 environments to Azure achieves the goal of obtaining continued product updates from Microsoft without the need to upgrade. However, the question of maintaining availability of those SQL Server environments in the cloud becomes a challenge,” said Michael Bilancieri, VP, Product, SIOS Technology. “Shared-storage clustering solutions that deliver availability for on-premises environments are not a native option in Azure. Designing and implementing high availability clusters in the cloud requires specialized skills to ensure that reliable availability is achieved and that the SLAs of critical systems using SQL Server are met. We’ve helped customers deploy thousands of SQL Server instances in the cloud with our software and expertise. We’re looking to help customers take advantage of Microsoft’s SQL Server 2008 EOS program in Azure.”

Supporting Resources:

For more information on the SIOS No-Cost Assessment for SQL Server 2008 end of support on Azure, visit here: https://us.sios.com/solutions/sql-server-2008-end-of-support

Microsoft SQL Server 2008 end of support reference page:
https://www.microsoft.com/en-us/cloud-platform/windows-sql-server-2008

Tweet this: .@SIOSTech offers No-Cost Assessment for #SQLServer 2008 End of Support on #Azure http://bit.ly/2VvvQ9x #highavailability #nocost

About SIOS Technology Corp.

SIOS Technology Corp. is the leading expert in IT Resiliency with software and services focused on High Availability and Disaster Recovery. SIOS delivers tightly-integrated availability solutions for business-critical applications running on-premises, in the cloud, and in hybrid cloud environments. Also, it has the flexibility to meet the widely-varying requirements of different platforms, applications, and Linux and Windows Operating Systems.

SIOS DataKeeper Cluster Edition software is Microsoft Azure-certified and available in the Azure marketplace. It is the only Azure-certified software that enables customers to create a SANless high availability SQL Server 2008 cluster in Azure using Microsoft Windows Server Failover Clustering (WSFC). It eliminates the need for shared storage while maintaining availability SLAs in the cloud.

Founded in 1999, SIOS Technology Corp. (https://us.sios.com) is headquartered in San Mateo, California, and has offices throughout the United States, United Kingdom and Japan.

Media Contact:
Beth Winkowski
Winkowski Public Relations, LLC for SIOS
978-649-7189
bethwinkowski@US.SIOS.com


Interested to create SANless high availability SQL Server 2008 cluster in Azure using Microsoft Windows Server Failover Clustering (WSFC), SIOS could be a viable solution. Find out more about clus

Filed Under: News and Events Tagged With: Clustering, High Availability, SQL Server, SQL Server clusters

A Guide To Configure A SQL Server Failover Cluster Instance in Azure

March 31, 2019 by Jason Aw Leave a Comment

Step-By-Step: How To Configure A SQL Server 2008 R2 Failover Cluster Instance in Azure

If you need a guide Configure A SQL Server Failover Cluster Instance in Azure, you probably are still using SQL Server 2008/2008 R2. And, want to take advantage of the extended security updates that Microsoft is offering if you move your SQL Server 2008/2008 R2 into Azure. I previously wrote about this topic in this blog post.

You may be wondering how to make sure your SQL Server Failover Cluster instance remains highly available once you make the move to Azure. Today, most people have business critical SQL Server 2008/2008 R2 configured as a clustered instance (SQL Server FCI) in their data center. When looking at Azure you have probably come to the realization that due to the lack of shared storage it might seem that you can’t bring your SQL Server FCI to the Azure cloud. However, that is not the case thanks to SIOS DataKeeper.

SIOS DataKeeper enables you to build a SQL Server Failover Cluster instance in Azure, AWS, Google Cloud, or anywhere else where shared storage is not available or where you wish to configure multi-site clusters where shared storage doesn’t make sense. DataKeeper has been enabling SANless clusters for Windows and Linux since 1999. Microsoft documents the use of SIOS DataKeeper for SQL Server Failover Cluster instance in their documentation: High availability and disaster recovery for SQL Server in Azure Virtual Machines.

I’ve written about SQL Server FCI’s running in Azure before, But I never published a Step-by-Step Guide specific to SQL Server 2008/2008 R2. The good news is that it works just as great with SQL 2008/2008 R2 as it does with SQL 2012/2014/2016/2017 and the soon to be released 2019. Also, regardless of the version of Windows Server (2008/2012/2016/2019) or SQL Server (2008/2012/2014/2016/2017) the configuration process is similar enough that this guide should be sufficient enough to get you through any configurations.

If your flavor of SQL or Windows is not covered in any of my guides, don’t be afraid to jump in and build a SQL Server FCI and reference this guide, I think you will figure out any differences and if you ever get stuck just reach out to me on Twitter @daveberm and I’ll be glad to give you a hand.

This guide uses SQL Server 2008 R2 with Windows Server 2012 R2. As of the time of this writing I did not see an Azure Marketplace image of SQL 2008 R2 on Windows Server 2012 R2, so I had to download and install SQL 2008 R2 manually. Personally I prefer this combination, but if you need to use Windows Server 2008 R2 or Windows 212 that is fine. If you use Windows Server 2008 R2 don’t forget to install the kb3125574Convenience Rollup Update for Windows Server 2008 R2 SP1. Or if you are stuck with Server 2012 (not R2) you need the Hotfix in kb2854082.

Don’t be fooled by this article that says you must install kb2854082 on your SQL Server 2008 R2 instances. If you start searching for that update for Windows Server 2008 R2 you will find that only the version for Server 2012 is available. That particular hotfix for Server 2008 R2 is instead included in the rollup Convenience Rollup Update for Windows Server 2008 R2 SP1.

PROVISION AZURE INSTANCES

I’m not going to go into great detail here with a bunch of screenshots, especially since the Azure Portal UI tends to change pretty frequently, so any screenshots I take will get stale pretty quickly. Instead, I will just cover the important topics that you should be aware of.

FAULT DOMAINS OR AVAILABILITY ZONES?

In order to ensure your SQL Server instances are highly available, you have to make sure your cluster nodes reside in different Fault Domains (FD) or in different Availability Zones (AZ). Not only do your instances need to reside in different FDs or AZs, but your File Share Witness (see below) also needs to reside in a FD or AZ that is different than that one your cluster nodes reside in.

Here is my take on it. AZs are the newest Azure feature, but they are only supported in a handful of regions so far. AZs give you a higher SLA (99.99%) then FDs (99.95%), and protect you against the kind of cloud outages I describe in my post Azure Outage Post-Mortem. If you can deploy in a region that supports AZs then I recommend you use AZs.

In this guide I used AZs which you will see when you get to the section on configuring the load balancer. However, if you use FDs everything will be exactly the same, except the load balancer configuration will reference Availability Sets rather than Availability Zones.

WHAT IS A FILE SHARE WITNESS YOU ASK?

Without going into great detail, Windows Server Failover Clustering (WSFC) requires you configure a “Witness” to ensure failover behaves properly. Windows Server Failover Clustering supports three kinds of witnesses: Disk, File Share, Cloud. Since we are in Azure a Disk Witness is not possible. Cloud Witness is only available with Windows Server 2016 and later, so that leaves us with a File Share Witness. If you want to learn more about cluster quorums check out my post on the Microsoft Press Blog, From the MVPs: Understanding the Windows Server Failover Cluster Quorum in Windows Server 2012 R2

ADD STORAGE TO YOUR SQL SERVER INSTANCES

As you provision your SQL Server instances you will want to add additional disks to each instance. Minimally you will need one disk for the SQL Data and Log file, one disk for Tempdb. Whether or not you should have a separate disk for log and data files is somewhat debated when running in the cloud. On the back end the storage all comes from the same place and your instance size limits your total IOPS. In my opinion there really isn’t any value in separating your log and data files since you cannot ensure that they are running on two physical sets of disks. I’ll leave that for you to decide, but I put log and data all on the same volume.

Normally a SQL Server 2008 R2 FCI would require you to put tempdb on a clustered disk. However, SIOS DataKeeper has this really nifty feature called a DataKeeper Non-Mirrored Volume Resource. This guide does not cover moving tempdb to this non-mirrored volume resource, but for optimal performance you should do this. There really is no good reason to replicate tempdb since it is recreated upon failover anyway.

As far as the storage is concerned you can use any storage type, but certainly use Managed Disks whenever possible. Make sure each node in the cluster has the identical storage configuration. Once you launch the instances you will want to attach these disks and format them NTFS. Make sure each instance uses the same drive letters.

NETWORKING

It’s not a hard requirement, but if at all possible use an instance size that supports accelerated networking. Also, make sure you edit the network interface in the Azure portal so that your instances use a static IP address. For clustering to work properly you want to make sure you update the settings for the DNS server so that it points to your Windows AD/DNS server and not just some public DNS server.

SECURITY

By default, the communications between nodes in the same virtual network are wide open, but if you have locked down your Azure Security Group you will need to know what ports must be open between the cluster nodes and adjust your security group. In my experience, almost all the issues you will encounter when building a cluster in Azure are either caused by blocked ports.

DataKeeper has some some ports that are required to be open between the clustered instance. Those ports are as follows:
UDP: 137, 138
TCP: 139, 445, 9999, plus ports in the 10000 to 10025 range

Failover cluster has its own set of port requirements that I won’t even attempt to document here. This article seems to have that covered. http://dsfnet.blogspot.com/2013/04/windows-server-clustering-sql-server.html

In addition, the Load Balancer described later will use a probe port that must allow inbound traffic on each node. The port that is commonly used and described in this guide is 59999.

And finally if you want your clients to be able to reach your SQL Server instance you want to make sure your SQL Server port is open, which by default is 1433.

Remember, these ports can be blocked by the Windows Firewall or Azure Security Groups, so to be sure to check both to ensure they are accessible.

JOIN THE DOMAIN

A requirement for SQL Server 2008 R2 FCI is that the instances must reside in the same Windows Server Domain. So if you have not done so, make sure you have joined the instances to your Windows domain

LOCAL SERVICE ACCOUNT

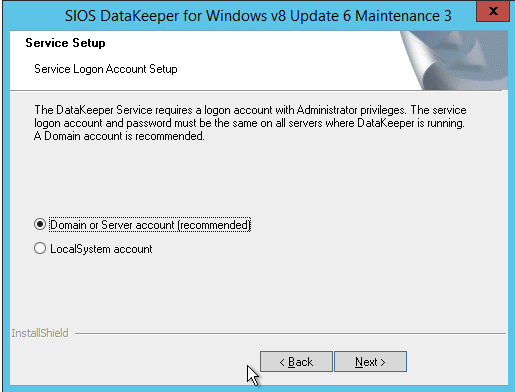
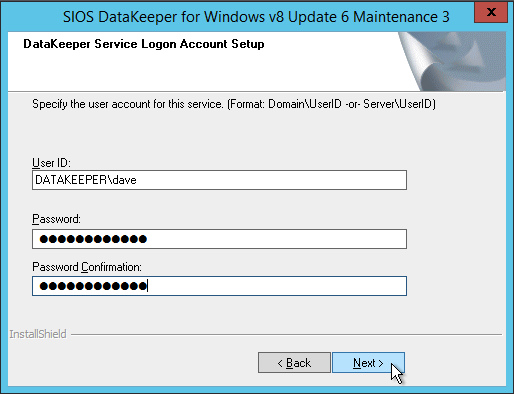
When you install DataKeeper, it will ask you to provide a service account. You must create a domain user account and then add that user account to the Local Administrators Group on each node. When asked during the DataKeeper installation, specify that account as the DataKeeper service account. Note – Don’t install DataKeeper just yet!

DOMAIN GLOBAL SECURITY GROUPS

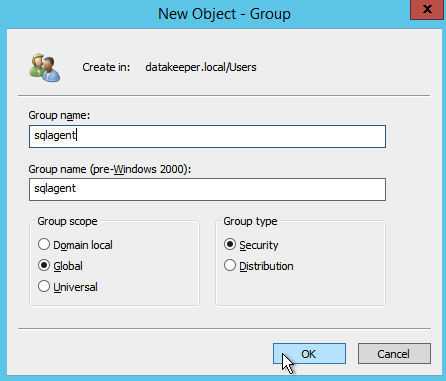
You will be asked to specify two Global Domain Security Groups as you install SQL 2008 R2. You might want to look ahead at the SQL install instructions and create those groups now. Also, create a domain user account and place them in each of these security accounts. You will specify this account as part of the SQL Server Cluster installation.

OTHER PRE-REQUISITES

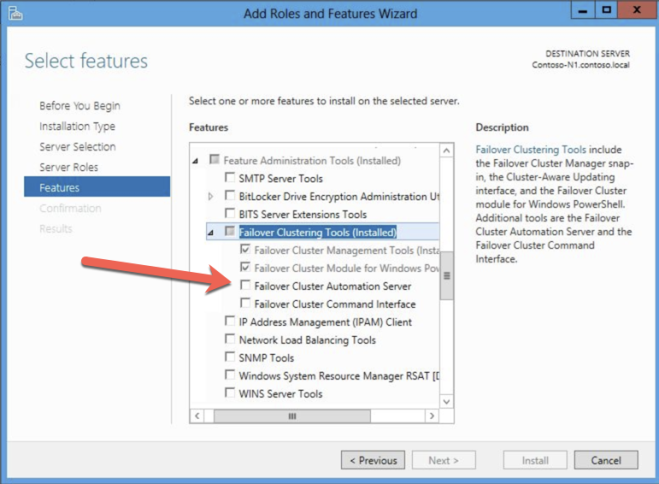
You must enable both Failover Clustering and .Net 3.5 on each instance of the two cluster instances. When you enable Failover Clustering, also be sure to enable the optional “Failover Cluster Automation Server”. This is required for a SQL Server 2008 R2 cluster in Windows Server 2012 R2.

CREATE THE CLUSTER AND DATAKEEPER VOLUME RESOURCES

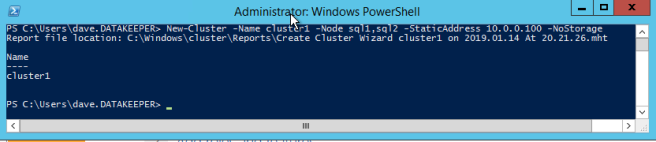
We are now ready to start building the cluster. The first step is to create the base cluster. Because of the way Azure handles DHCP, we MUST create the cluster using Powershell and not the Cluster UI. We use Powershell because it will let us specify a static IP address as part of the creation process. If we used the UI, it would see that the VMs use DHCP and it will automatically assign a duplicate IP address. Therefore to avoid that situation, let’s use the Powershell as shown below.

New-Cluster -Name cluster1 -Node sql1,sql2 -StaticAddress 10.0.0.100 -NoStorage

After the cluster creates, run Test-Cluster. This is required before SQL Server will install.

Test-Cluster

You will get warnings about Storage and Networking. Thankfully, you can ignore those as they are expected in a SANless cluster in Azure. However, address any other warnings or errors before moving on.

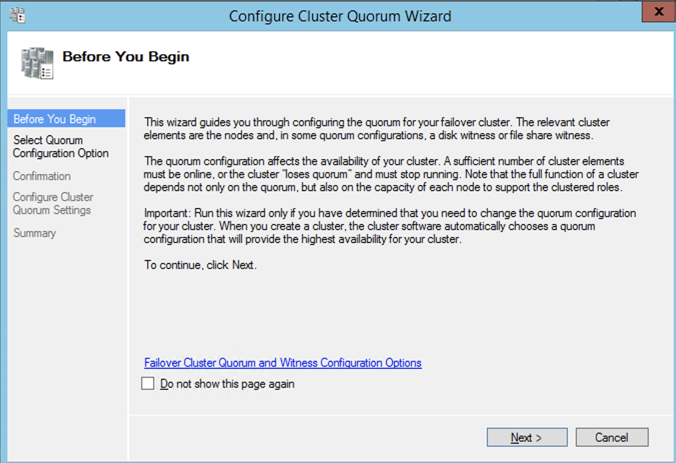
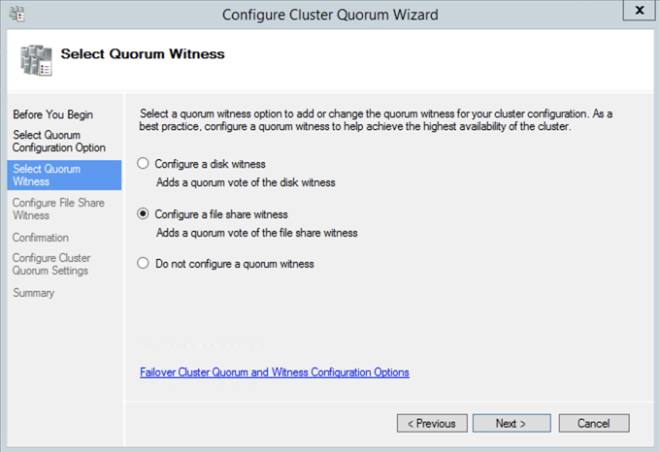
After the cluster is created, you will need to add the File Share Witness. On the third server we specified as the file share witness, create a file share and give Read/Write permissions to the cluster computer object we just created above. In this case $Cluster1 will be the name of the computer object that needs Read/Write permissions at both the share and NTFS security level.

Once the share is created, you can use the Configure Cluster Quorum Wizard as shown below to configure the File Share Witness.

INSTALL DATAKEEPER

It is important to wait until the basic cluster is created before we install DataKeeper, since the DataKeeper installation registers the DataKeeper Volume Resource type in failover clustering. If you jumped the gun and installed DataKeeper already that is okay. Simply run the setup again and choose Repair Installation.

The screenshots below walk you through a basic installation. Start by running the DataKeeper Setup.

The account you specify below must be a domain account. It must be part of the Local Administrators group on each of the cluster nodes.

When presented with the SIOS License Key manager you can browse out to your temporary key. Or if you have a permanent key, you can copy the System Host ID and use that to request your permanent license. If you ever need to refresh a key, the SIOS License Key Manager is a program that will be installed that you can run separately to add a new key.

CREATE DATAKEEPER VOLUME RESOURCE

Once DataKeeper is installed on each node you are ready to create your first DataKeeper Volume Resource. The first step is to open the DataKeeper UI and connect to each of the cluster nodes.

If everything is done correctly the Server Overview Report should look something like this.

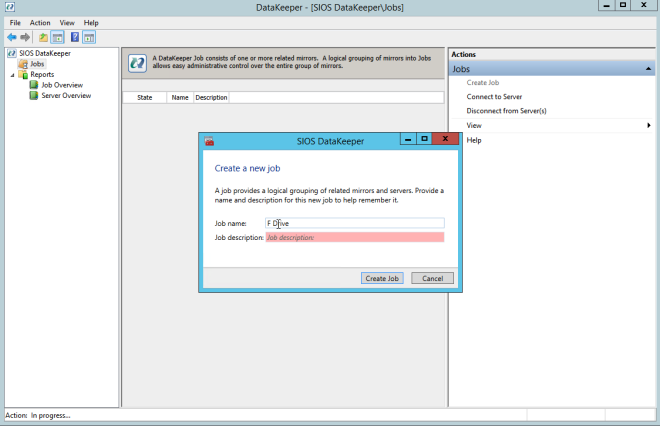
You can now create your first Job as shown below.

After you choose a Source and Target you are presented with the following options. For a local target in the same region, the only thing you need to select is Synchronous.

Choose Yes and auto-register this volume as a cluster resource.

Once you complete this process open up the Failover Cluster Manager and look in Disk. You should see the DataKeeper Volume resource in Available Storage. At this point WSFC treats this as if it were a normal cluster disk resource.

SLIPSTREAM SP3 ONTO SQL 2008 R2 INSTALL MEDIA

SQL Server 2008 R2 is only supported on Windows Server 2012 R2 with SQL Server SP2 or later. Unfortunately, Microsoft never released a SQL Server 2008 R2 installation media that that includes SP2 or SP3. Instead, you must slipstream the service pack onto the installation media BEFORE you do the installation. If you try to do the installation with the standard SQL Server 2008 R2 media, you will run into all kinds of problems. I don’t remember the exact errors you will see. But I do recall they didn’t really point to the exact problem. You will waste a lot of time trying to figure out what went wrong.

As of the date of this writing, Microsoft does not have a Windows Server 2012 R2 with SQL Server 2008 R2 offering in the Azure Marketplace. Do bring your own SQL license if you want to run SQL 2008 R2 on Windows Server 2012 R2 in Azure. If they add that image later, or if you choose to use the SQL 2008 R2 on Windows Server 2008 R2 image, you must first uninstall the existing standalone instance of SQL Server before moving forward.

I followed the guidance in Option 1 of this article to slipstream SP3 on onto my SQL 2008 R2 installation media. You will of course have to adjust a few things as this article references SP2 instead of SP3. Make sure you slipstream SP3 on the installation media we will use for both nodes of the cluster. Once that is done, continue to the next step.

INSTALL SQL SERVER ON THE FIRST NODE

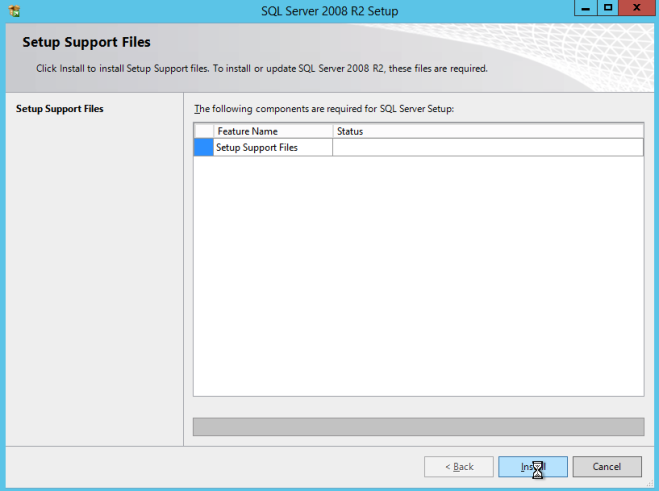
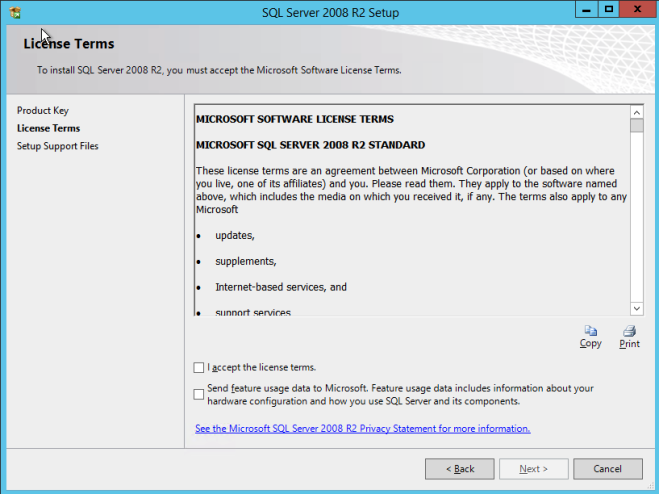
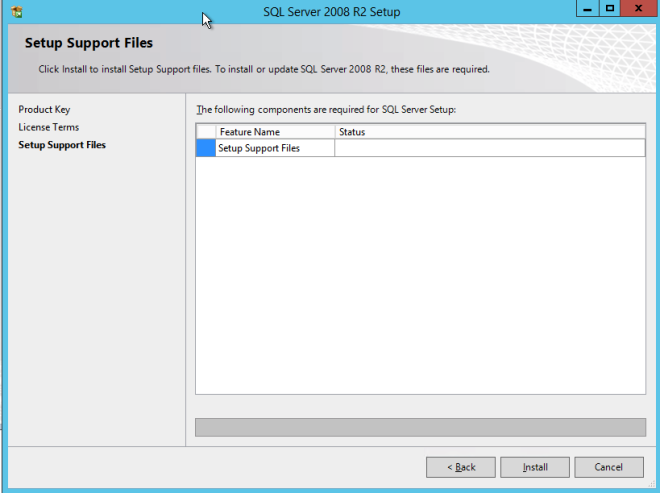
Using the SQL Server 2008 R2 media with SP3 slipstreamed, run setup and install the first node of the cluster as shown below.

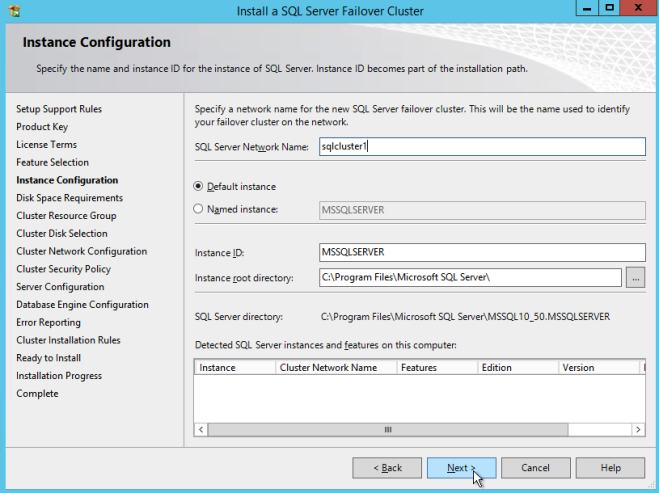
If you use anything other than the Default instance of SQL Server, you will have some additional steps not covered in this guide. The biggest difference is you must lock down the port that SQL Server uses since by default a named instance of SQL Server does NOT use 1433. Once you lock down the port you also need to specify that port instead of 1433 whenever we reference port 1433 in this guide, including the firewall setting and the Load Balancer settings.

Here make sure to specify a new IP address that is not in use. This is the same IP address we will use later when we configure the Internal Load Balancer later.

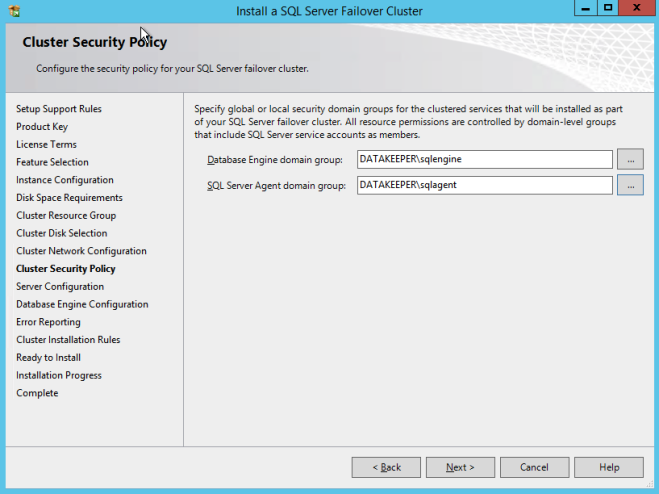
As I mentioned earlier, SQL Server 2008 R2 utilizes AD Security Groups. If you have not already created them, go ahead and create them now as show below before you continue to the next step in the SQL install

Specify the Security Groups you created earlier.

Make sure the service accounts you specify are a member of the associated Security Group.

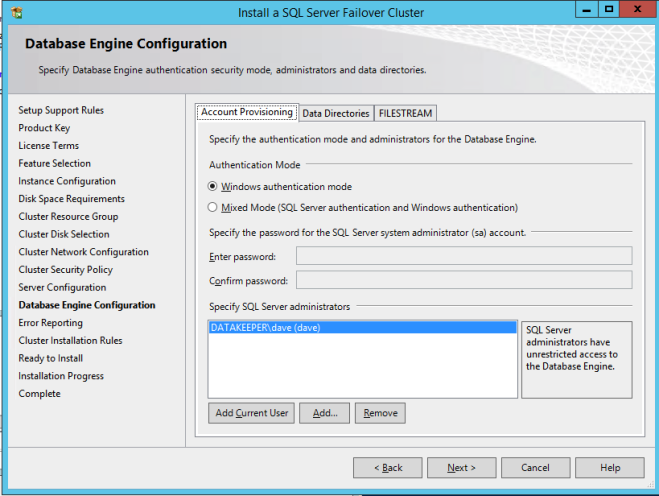
Specify your SQL Server administrators here.

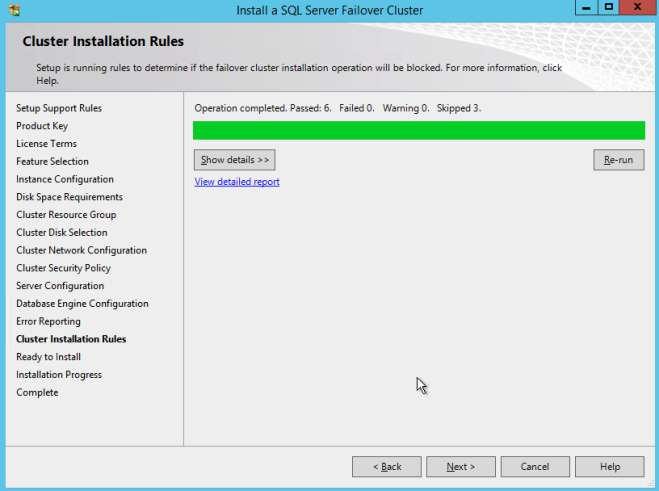
If everything goes well you are now ready to install SQL Server on the second node of the cluster.

INSTALL SQL SERVER ON THE SECOND NODE

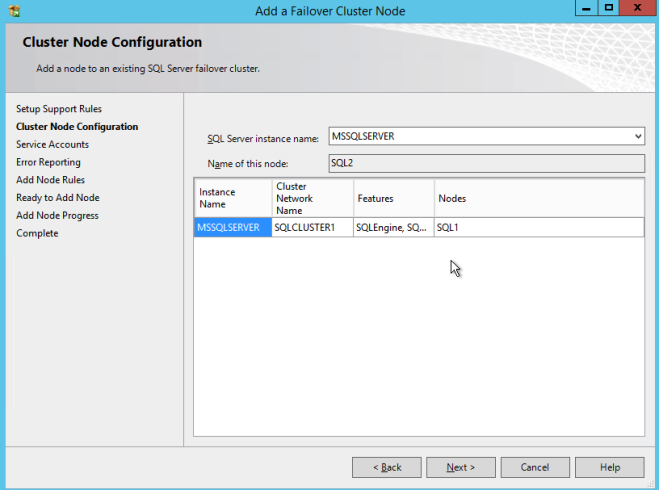
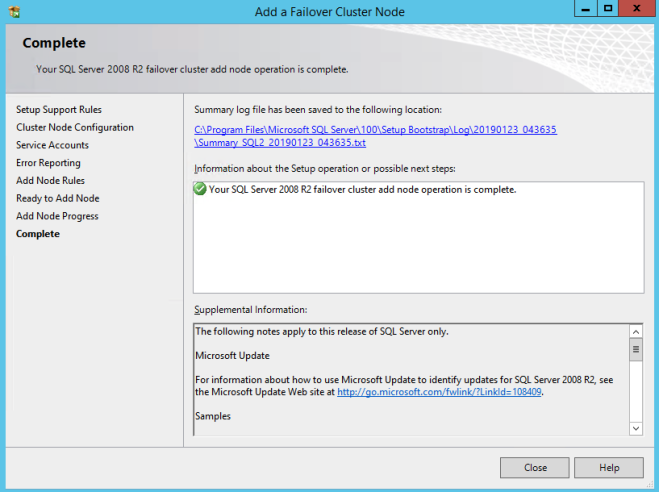
One the second node, run the SQL Server 2008 R2 with SP3 install and select Add Node to a SQL Server Failover Clustering Instance.

Proceed with the installation as shown in the following screenshots.

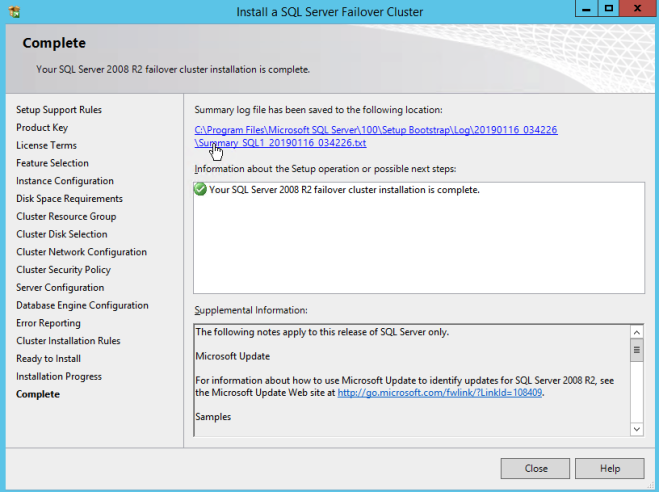
Assuming everything went well, you should now have a two node SQL Server 2008 R2 cluster configured that looks something like the following.

However, you probably will notice that you can only connect to the SQL Server instance from the active cluster node. The problem is that Azure does not support gratuitous ARP .Your clients probably cannot connect directly to the Cluster IP Address. Instead, the clients must connect to an Azure Load Balancer, which will redirect the connection to the active node. To make this work there are two steps: Create the Load Balancer and Fix the SQL Server Cluster IP to respond to the Load Balancer Probe and use a 255.255.255.255 Subnet mask. Those steps are described below.

CREATE THE AZURE LOAD BALANCER

I’m going to assume your clients can communicate directly to the internal IP address of the SQL cluster. Let’s go ahead to create an Internal Load Balancer (ILB) in this guide. If you need to expose your SQL Instance on the public internet, use a Public Load Balancer instead.

In the Azure portal, create a new Load Balancer following the screenshots as shown below. The Azure portal UI changes rapidly. Bbut these screenshots should give you enough information to do what you need to do. I will call out important settings as we go along.

Here we create the ILB. The important thing to note on this screen is you must select “Static IP address assignment”. Specify the same IP address that we used during the SQL Cluster installation too.

Since I used Availability Zones, I see Zone Redundant as an option. If you used Availability Sets your experience will be slightly different.

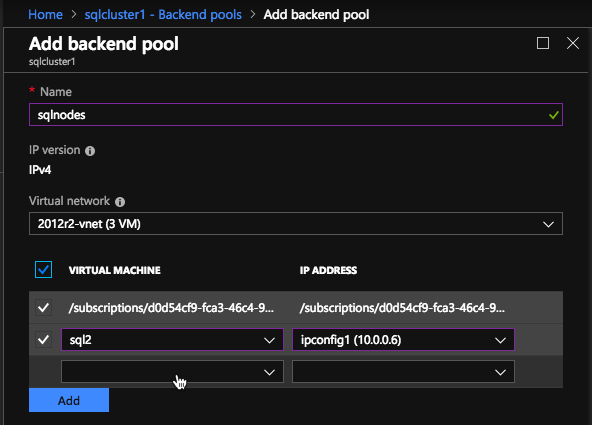
In the Backend pool be sure to select the two SQL Server instances. You DO NOT want to add your File Share Witness in the pool.

Here we configure the Health Probe. Most Azure documentation uses port 59999, so we will stick with that port for our configuration.

Then we will add a load balancing rule. In our case we want to redirect all SQL Server traffic to TCP port 1433 of the active node. It is also important that you select Floating IP (Direct Server Return) as Enabled.

RUN POWERSHELL SCRIPT TO UPDATE SQL CLIENT ACCESS POINT

Now we must run a Powershell script on one of the cluster nodes to allow the Load Balancer Probe to detect which node is active. The script also sets the Subnet Mask of the SQL Cluster IP Address to 255.255.255.255.255 so that it avoids IP address conflicts with the Load Balancer we just created.

# Define variables
$ClusterNetworkName = “” 
# the cluster network name (Use Get-ClusterNetwork on Windows Server 2012 of 
higher to find the name)
$IPResourceName = “” 
# the IP Address resource name 
$ILBIP = “” 
# the IP Address of the Internal Load Balancer (ILB) and SQL Cluster
Import-Module FailoverClusters
# If you are using Windows Server 2012 or higher:
Get-ClusterResource $IPResourceName | Set-ClusterParameter 
-Multiple @{Address=$ILBIP;ProbePort=59999;SubnetMask="255.255.255.255";
Network=$ClusterNetworkName;EnableDhcp=0}
# If you are using Windows Server 2008 R2 use this: 
#cluster res $IPResourceName /priv enabledhcp=0 address=$ILBIP probeport=59999  
subnetmask=255.255.255.255

This is what the output will look like if run correctly.

windows server failover cluster

You probably notice that the end of that script has a commented line of code to use if you are running on Windows Server 2008 R2. Running Windows Server 2008 R2? Ensure you run the code specific for Windows Server 2008 R2 at a Command prompt, it is not Powershell.

NEXT STEPS

You’re not the first if  you get to this point and you still cannot connect to the cluster remotely. There are a lot of things that can go wrong in terms of security, load balancer, SQL ports, etc. I wrote this guide to help troubleshoot connection issues.

In fact, I ran into some strange issues in terms of my SQL Server TCP/IP Properties in SQL Server Configuration Manager. When I looked at the properties I did not see the SQL Server Cluster IP address as one of the addresses it was listening on. As such I had to add it manually. I’m not sure if that was an anomaly. Although it certainly was an issue I had to resolve before I could connect to the cluster from a remote client.

As I mentioned earlier, one other improvement you can make to this installation is to use a DataKeeper Non-Mirrored Volume Resource for TempDB. If you set that up please be aware of the following two configuration issues people commonly run into.

The first issue is if you move tempdb to a folder on the 1st node, you must be sure to create the exact same folder structure on the second node. If you don’t do that, when you try to failover SQL Server will fail to come online since it can’t create TempDB.

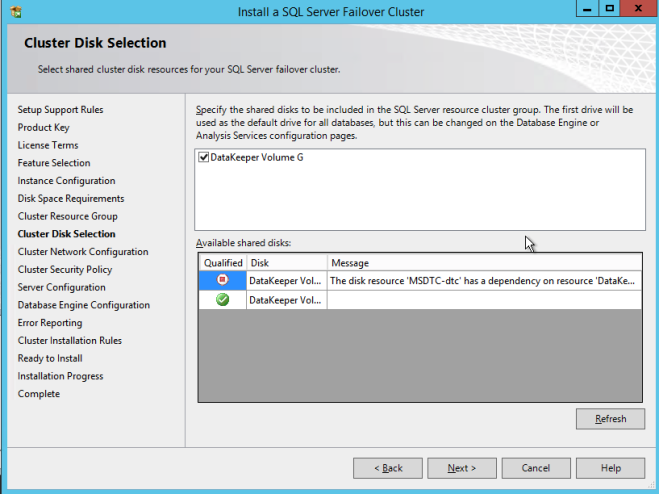
The second issue occurs anytime you add another DataKeeper Volume Resource to a SQL Cluster after the cluster is created. You must go into the properties of the SQL Server cluster resource and make it dependent on the new DataKeeper Volume resource you added. This is true for the TempDB volume and any other volumes you may decide to add after the cluster is created.

If you have any questions about this configuration or any other cluster configurations please feel free to reach out to me on Twitter @DaveBerm

Reproduced with permission from Clusteringformeremortals.com
Filed Under: Clustering Simplified, Datakeeper Tagged With: failover cluster, SQL Server, SQL Server Failover Cluster, Windows Server Failover Clustering

Ensure High Availability for SQL Server on Amazon Web Services

January 30, 2019 by Jason Aw Leave a Comment

Ensure High Availability for SQL Server on Amazon Web Services

Database and system administrators have long had a wide range of options for ensuring that mission-critical database applications remain highly availability. Public cloud infrastructures, like those provided by Amazon Web Services, offer their own, additional high availability options backed by service level agreements. But configurations that work well in a private cloud might not be possible in the public cloud. Poor choices in the AWS services used and/or how these are configured can cause failover provisions to fail when actually needed. This article outlines the various options available for ensuring High Availability for SQL Server in the AWS cloud.

Options

For database applications, AWS gives administrators two basic choices. Each of which has different high availability (HA) and disaster recovery (DR) provisions: Amazon Relational Database Service (RDS) and Amazon Elastic Compute Cloud (EC2).

RDS

RDS is a fully managed service suitable for mission-critical applications. It offers a choice of six different database engines, but its support for SQL Server is not as robust as it is for other choices like Amazon Aurora, My SQL and MariaDB. Here are some of the common concerns administrators have about using RDS for mission-critical SQL Server applications:

  • Only a single mirrored standby instance is supported,
  • Agent Jobs are not mirrored and, therefore, must be created separately in the standby instance,
  • Failures caused by the database application software are not detected,
  • Performance-optimized in-memory database instances are not supported,
  • Depending on the Availability Zone assignments (over which the customer has no control) performance can be adversely affected,
  • SQL Server’s more expensive Enterprise Edition is needed for the data mirroring feature available only with Always On Availability Groups.

Elastic Compute Cloud

The other basic choice is the Elastic Compute Cloud with its substantially greater capabilities. This makes it the preferred choice when HA and DR are of paramount importance. A major advantage of EC2 is the complete control it gives admins over the configuration, and that presents admins with some additional choices.

Picking The Operating System

Perhaps the most consequential choice is which operating system to use: Windows or Linux. Windows Server Failover Clustering is a powerful, proven and popular capability that comes standard with Windows. But WSFC requires shared storage, and that is not available in EC2. Because Multi-AZ, and even Multi-Region, configurations are required for robust HA/DR protection, separate commercial or custom software is needed to replicate data across the cluster of server instances. Microsoft’s Storage Spaces Direct (S2D) is not an option here, as it does not support configurations that span Availability Zones.

The need for additional HA/DR provisions is even greater for Linux, which lacks a fundamental clustering capability like WSFC. Linux gives admins two equally bad choices for high availability: Either pay more for the more expensive Enterprise Edition of SQL Server to implement Always On Availability Groups; or struggle to make complex do-it-yourself HA Linux configurations using open source software work well.

Comparisons

Both of these choices undermine the cost-saving rationale for using open source software on commodity hardware in public cloud services. SQL Server for Linux is only available for the more recent (and more expensive) versions, beginning in 2017. And the DIY HA alternative can be prohibitively expensive for most organizations. Indeed, making Distributed Replicated Block Device, Corosync, Pacemaker and, optionally, other open source software work as desired at the application-level under all possible failure scenarios can be extraordinarily difficult. Which is why only very large organizations have the wherewithal (skill set and staffing) needed to even consider taking on the task.

Owing to the difficulty involved implementing mission-critical HA/DR provisions for Linux, AWS recommends using a combination of Elastic Load Balancing and Auto Scaling to improve availability. But these services have their own limitations that are similar to those in the managed Relational Database Service.

All of this explains why admins are increasingly choosing to use failover clustering solutions designed specifically for ensuring HA and DR protections in a cloud environment.

Failover Clustering Purpose-Built for the Cloud

The growing popularity of private, public and hybrid clouds has led to the advent of failover clustering solutions purpose-built for a cloud environment. These HA/DR solutions are implemented entirely in software that creates, as implied by the name, a cluster of servers and storage with automatic failover to assure high availability at the application level.

Most of these solutions provide a complete HA/DR solution that includes a combination of real-time block-level data replication, continuous application monitoring and configurable failover/failback recovery policies. Some of the more sophisticated solutions also offer advanced capabilities like support for Always on Failover Cluster Instances in the less expensive Standard Edition of SQL Server for both Windows and Linux. They also offer WAN optimization to maximize multi-region performance. There’s also manual switchover of primary and secondary server assignments to facilitate planned maintenance. Including the ability to perform regular backups without disruption to the application.

Most failover clustering software is application-agnostic, enabling organizations to have a single, universal HA/DR solution. This same capability also affords protection for the entire SQL Server application. And that includes the database, logons, agent jobs, etc., all in an integrated fashion. Although these solutions are generally also storage-agnostic, enabling them to work with shared storage area networks, shared-nothing SANless failover clustering is usually preferred for its ability to eliminate potential single points of failure.

Support for Always On Failover Cluster Instances (FCIs) in the less expensive Standard Edition of SQL Server, with no compromises to availability or performance, is a major advantage. In a Windows environment, most failover clustering software supports FCIs by leveraging the built-in WSFC feature. It makes the implementation quite straightforward for both database and system administrators. Linux is becoming increasingly popular for SQL Server and many other enterprise applications. Some failover clustering solutions now make implementing HA/DR provisions just as easy as it is for Windows by offering application-specific integration.

Typical Three-Node SANless Failover Cluster

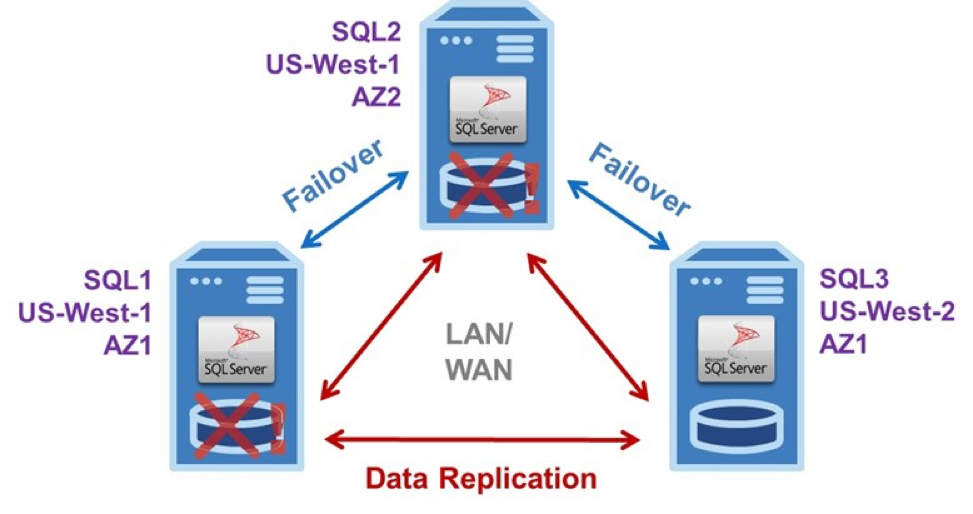
The example EC2 configuration in the diagram shows a typical three-node SANless failover cluster configured as Virtual Private Cloud (VPC) with all three SQL Server instances in different Availability Zones. To eliminate the potential for an outage in a local disaster affecting an entire region, one of the AZs is located in a different AWS region.

High Availability for SQL Server

This three-node SANless failover cluster, with one active and two standby server instances, can handle two concurrent failures with minimal downtime and no data loss.

A three-node SANless failover cluster affords carrier-class HA and DR protections. The basic operation is the same in the LAN and/or WAN for Windows or Linux. Server #1 is initially the primary or active instance that replicates data continuously to both servers #2 and #3. It experiences a problem. Then it triggers an automatic failover to server #2, which now becomes the primary replicating data to server #3.

Failure Detected

If the failure was caused by an infrastructure outage, the AWS staff would begin immediately diagnosing and repairing whatever caused the problem. Once fixed, it could be restored as the primary, or server #2 could continue in that capacity replicating data to servers #1 and #3. Should server #2 fail before server #1 is returned to operation, as shown, server #3 would become the primary after a manual failover. Of course, if the failure was caused by the application software or certain other aspects of the configuration, it would be up to the customer to find and fix the problem.

SANless failover clusters can be configured with only a single standby instance, of course. But such a minimal configuration does require a third node to serve as a witness. The witness is needed to achieve a quorum for determining the assignment of the primary. This important task is normally performed by a domain controller in a separate AZ. Keeping all three nodes (primary, secondary and witness) in different AZs eliminates the possibility of losing more than one vote if any zone goes offline.

It is also possible to have two- and three-node SANless failover clusters in hybrid cloud configurations for HA and/or DR purposes. One such three-node configuration is a two-node HA cluster located in an enterprise data center with asynchronous data replication to AWS or another cloud service for DR protection—or vice versa.

In clusters within a single region, where data replication is synchronous, failovers are normally configured to occur automatically. For clusters with nodes that span multiple regions, where data replication is asynchronous, failovers are normally controlled manually to avoid the potential for data loss. Three-node clusters, regardless of the regions used, can also facilitate planned hardware and software maintenance for all three servers while providing continuous DR protection for the application and its data.

Maximise High Availability for SQL Server

By offering 55 availability Zones spread across 18 geographical Regions, the AWS Global Infrastructure affords enormous opportunity to maximize High Availability for SQL Server by configuring SANless failover clusters with multiple, geographically-dispersed redundancies. This global footprint also enables all SQL Server applications and data to be located near end-users to deliver satisfactory performance.

With a purpose-built solution, carrier-class high availability need not mean paying a carrier-like high cost. Because purpose-built failover clustering software makes effective and efficient use of EC2’s compute, storage and network resources, while being easy to implement and operate, these solutions minimize any capital and all operational expenditures, resulting in high availability being more robust and more affordable than ever before.

Reproduced from TheNewStack

Filed Under: News and Events Tagged With: High Availability, high availability for sql server, SQL Server

Take Action Before SQL Server 2008/2008 R2 Support Expires

January 13, 2019 by Jason Aw Leave a Comment

Take Action Before SQL Server 2008/2008 R2 Support Expires

Tick Tock…6 Months Until SQL Server 2008/2008 R2 Support Expires Unless You Take Action

Still running SQL Server 2008/2008 R2? You probably have heard by now that as of July 9, 2019, you will no longer be supported. Microsoft has offered two options to provide extended security updates for an additional three years for customers that are still running on this platform and not able to upgrade to the newer version of SQL before the deadline.

First Option

To prevent SQL Server 2008/2008 R2 Support Expires before you are ready, the first option you have requires the annual purchase of “Extended Security Updates”. Extended Security Updates will cost 75% of the full license cost annually. It also requires that the customer is on active software assurance, which is typically 25% of the license cost annually. So effectively, to receive Extended Security Updates you are paying for new SQL Server licenses annually for three years, or until you migrate off SQL Server 2008/2008 R2.

Second Option

However, there is another second option before your SQL Server 2008/2008 R2 Support Expires. Microsoft has announced that if you move your SQL Server 2008 R2 instances to Azure, you will receive the Extended Security Updates at no additional charge. There is of course the hourly infrastructure charges you will incur in Azure. And additionally either the cost of pay as you go SQL Server instances or the Software Assurance charges if you want to bring your existing SQL licenses to Azure. But that cost includes the added benefit of running in a state of the art cloud environment. This opens up opportunities for enhanced performance and HA/DR scenarios that you may not have had available on premise.

An Array Of Options

Azure offers many different options in terms of CPU, Memory and Storage configurations. If you are looking for a server or storage upgrade, or your existing on-premise infrastructure was reaching a refresh cycle, now is the perfect time to dip your feet into the Azure cloud and upgrade your performance and availability at the same time as extending the life of your SQL Server 2008/2008 R2 deployment.

99.99% SLA

In terms of high availability and disaster recovery configurations, Azure offers up to a 99.99% SLA.  To qualify for the SLA, you must leveraging their infrastructure appropriately. Even then, the SLA only covers “dial tone” to the instance. It is up to you to ensure SQL Server is highly available, which is traditionally done by building a SQL Server Failover Cluster Instance (FCI). Azure has the infrastructure in place which enables you to configure a SQL Server FCI. But due to the lack of cluster aware shared storage in the cloud, you will need to use SIOS DataKeeper to build the FCI.

Benefits Of SIOS DataKeeper

SIOS DataKeeper takes the place of the shared storage normally required by a SQL Server FCI. Instead it allows you to leverage the any NTFS formatted volumes that are attached to each instance. SIOS keeps the volumes replicated between the instances and presents the storage to the cluster as a resource called a DataKeeper Volume. As far as the cluster is concerned the DataKeeper Volume looks like a share disk, but instead of controlling SCSI reservations (disk locking), it controls the mirror direction ensuring writes occur on the active server and are synchronously or asynchronously replicated to the other cluster nodes. The end user experience is exactly the same as a traditional shared storage cluster. Although under the covers, the cluster is leveraging the locally attached storage instead of shared storage.

Different Racks

In Azure your cluster nodes can run in different racks (Fault Domains), data centers (Availability Zones), or even in different geographic regions. SIOS DataKeeper supports all three options: Fault Domains, Availability Zones or cross Region replication to cover both HA and DR requirements. Similar configurations are also possible in the AWS and Google Cloud.

azure ha
Typical 2-node SQL Server FCI configuration in Azure with SIOS DataKeeper

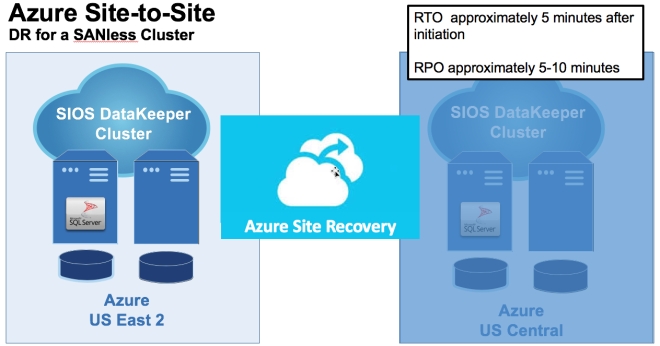
With Azure Site Recovery (ASR) you can replicate standalone or clustered instances of SQL Server between Region Pairs, without the headache and expense of managing your own disaster recovery site. Of course SQL Server seldom lives alone. Hence, at the same time you move your SQL Server instance to Azure you probably want to move your application servers there as well to also take advantage of the performance and availability upgrades available in Azure. Combining SIOS DataKeeper for HA and ASR for DR provides a cost effective HA and DR strategy that would have been impossible, or extremely expensive to implement on premise with SAN replication and your own DR site.

asr - 2
Common configuration leveraging SIOS DataKeeper for HA and Azure Site Recovery for DR

Get Started

While it only takes a few minutes to spin up a SQL Server instance in Azure, I wouldn’t wait until the last minute to do your migration. Please take the next few months to become familiar with Azure, start doing some testing, and then plan to migrate your workloads well before the July 9, 2019 expiration date. Running SQL Server after that date leaves you susceptible to any new security threats and also puts you out of compliance. Your boss, and more importantly your customers, will be glad to know that their data is still secure, available, and in compliance once you migrate your workload to Azure.

Enjoy tips like figuring what to do after SQL Server 2008/2008 R2 Support Expires, here are more great posts to read

Reproduced with permission from Clusteringformeremortals.com

Filed Under: Clustering Simplified Tagged With: SQL Server, sql server 2008 2008 r2 support expires

  • « Previous Page
  • 1
  • …
  • 9
  • 10
  • 11
  • 12
  • 13
  • …
  • 19
  • Next Page »

Recent Posts

  • SIOS LifeKeeper vs. Red Hat High Availability Add-On:
  • The State of Application Resilience: 2026 SIOS High Availability Survey
  • Where Should HA “Live”? Matching Placement to Your Availability Targets
  • Why 99.99% Uptime Doesn’t Mean 100% Uptime
  • Webinar: Resilience by Design – Keeping Mission-Critical Workloads Running on AWS

Most Popular Posts

Maximise replication performance for Linux Clustering with Fusion-io
Failover Clustering with VMware High Availability
create A 2-Node MySQL Cluster Without Shared Storage
SAP for High Availability Solutions For Linux
Bandwidth To Support Real-Time Replication
The Availability Equation – High Availability Solutions.jpg
Choosing Platforms To Replicate Data - Host-Based Or Storage-Based?
Guide To Connect To An iSCSI Target Using Open-iSCSI Initiator Software
Best Practices to Eliminate SPoF In Cluster Architecture
Step-By-Step How To Configure A Linux Failover Cluster In Microsoft Azure IaaS Without Shared Storage azure sanless
Take Action Before SQL Server 20082008 R2 Support Expires
How To Cluster MaxDB On Windows In The Cloud

Join Our Mailing List

Copyright © 2026 · Enterprise Pro Theme on Genesis Framework · WordPress · Log in