Step-By-Step: SQL Server v.Next Linux High Availability – Public Preview #azure #sql #sanless
Earlier this year, Microsoft announced that they would be releasing a version of SQL Server for Linux. Today, I was excited to learn that Microsoft finally announced the public preview of what they are currently calling SQL Server v.Next, and that it is available for both Linux and Windows operating systems. More information, along with download links and documentation can be found here:
https://www.microsoft.com/en-us/sql-server/sql-server-vnext-including-Linux
SQL Server for Linux
In this article, I will not only show you how to deploy a Linux VM in Azure running SQL Server, but also how to configure a 2-node failover cluster to make it highly available! And WITHOUT using shared storage (aka “sanless” or “shared nothing” cluster).
The end result will be a 2-node SQL Server for Linux cluster (plus witness server) in Microsoft Azure IaaS (Infrastructure as a Service). The guide includes both screenshots, shell commands and code snippets as appropriate. I assume that you are somewhat familiar with Microsoft Azure and already have an Azure account with an associated subscription. If not, you can sign up for a free account today. I’m also going to assume that you have basic linux system administration skills as well as understand basic failover clustering concepts like Virtual IPs, etc.
Disclaimer: Azure is a rapidly moving target. And here I’m working with a public preview version of SQL Server for Linux. As such, features/screens/buttons are bound to change before SQL v.Next is officially released so your experience may vary slightly from what you’ll see below. While this guide will show you how to make a SQL Server for Linux database highly available, you could certainly adapt this information and process to protect other applications or databases, like I have written about before here (MySQL example).
These are the high level steps to create a highly available MySQL database within Microsoft Azure IaaS:
- Create a Resource Group
- Create a Virtual Network
- Create a Storage Account
- Create Virtual Machines in an Availability Set
- Set VM Static IP Addresses
- Add a Data Disk to cluster nodes
- Create Inbound Security Rule to allow VNC access
- Linux OS Configuration
- Install and Configure SQL Server
- Install and Configure Cluster
- Create an Internal Load Balancer
- Test Cluster Connectivity
Overview
This article will describe how to create a cluster within a single Azure region. The cluster nodes (sql-linux1, sql-linux2 and the witness server) will reside in an Availability Set (3 different Fault Domains and Update Domains), thanks to the new Azure Resource Manager (ARM). We will be creating all resources using the new Azure Resource Manager.
The configuration will look like this:
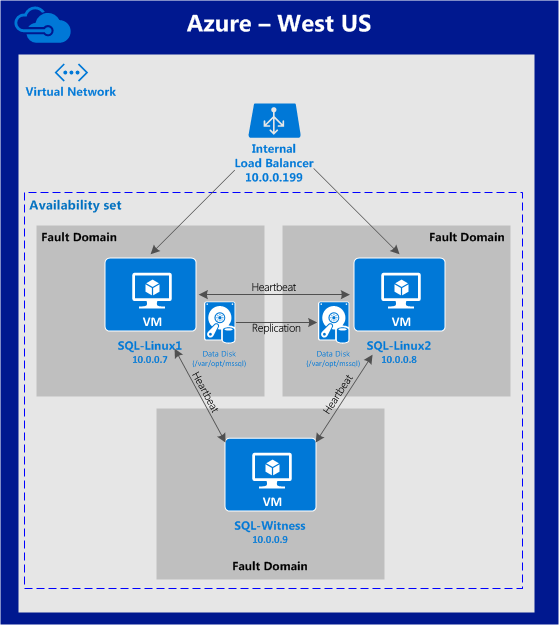
The following IP addresses will be used:
- sql-linux1: 10.0.0.7
- sql-linux2: 10.0.0.8
- sql-witness: 10.0.0.9
- virtual/”floating” IP: 10.0.0.199
- SQL Server port: 1433
Create a Resource Group
First, create a Resource Group. Your resource group will end up containing all of the various objects related to our cluster deployment: virtual machines, storage account, etc. Here we will call our newly created Resource Group “sql-cluster”.
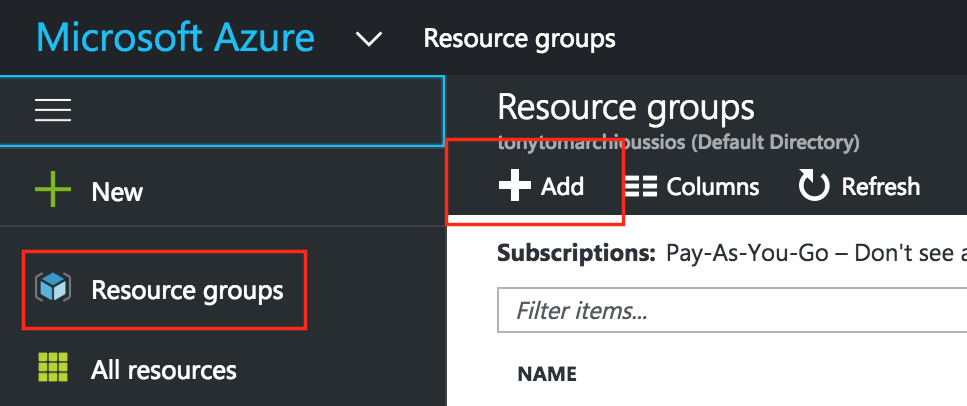
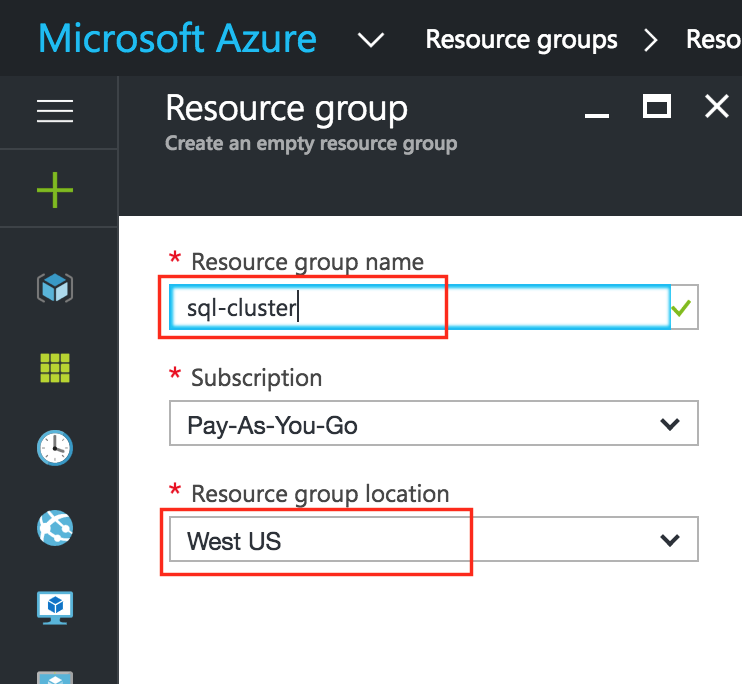
Be mindful when selecting your region. All of your resources will need to reside within the same region. Here, we’ll be deploying everything into the “West US” region:
Create a Virtual Network (VNet)
Next, if you don’t already have one, create a Virtual Network. A Virtual Network is an isolated network within the Azure cloud that is dedicated to you. You have full control over things like IP address blocks and subnets, routing, security policies (i.e. firewalls), DNS settings, and more. You will be launching your Azure Iaas virtual machines (VMs) into your Virtual Network.
My Azure account already has an existing VNet (10.0.0.0/16) called “cluster-network” that I’m going to use in this guide. Creating a VNet is pretty straightforward, and I’ve covered creating one here if you need a refresher.
Create a Storage Account
Before you provision any Virtual Machines, you’ll need a Storage Account to store them.
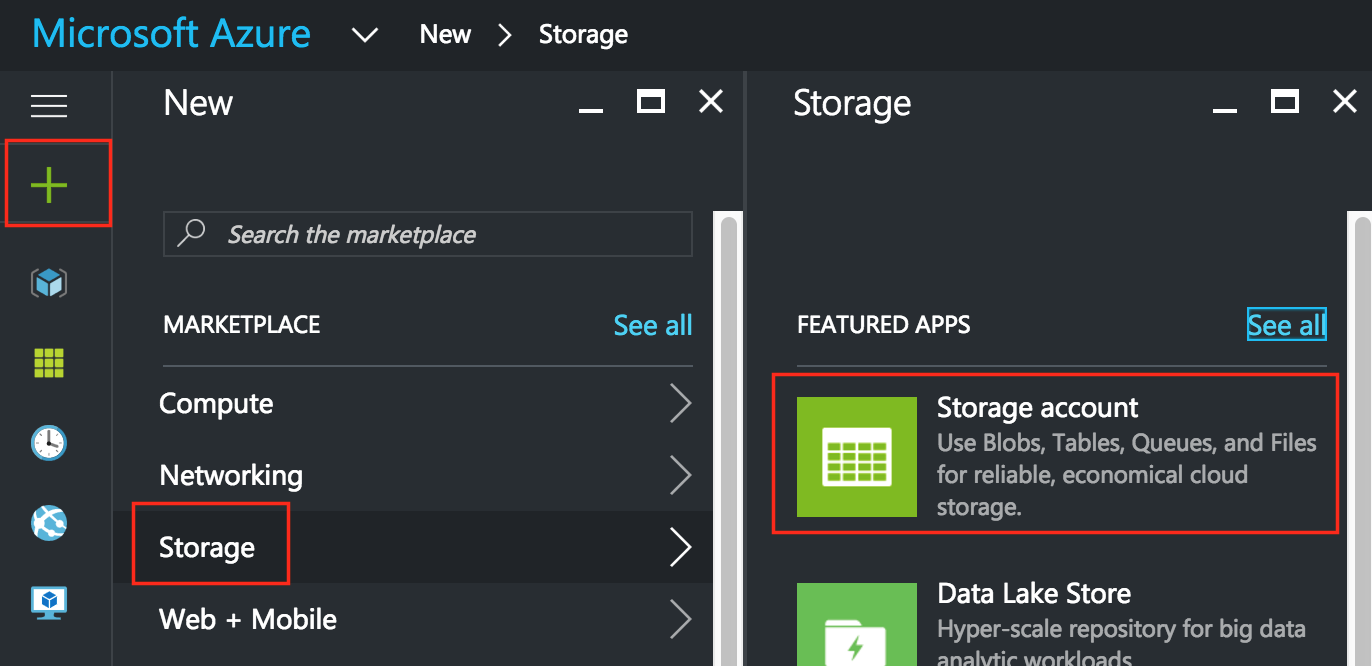
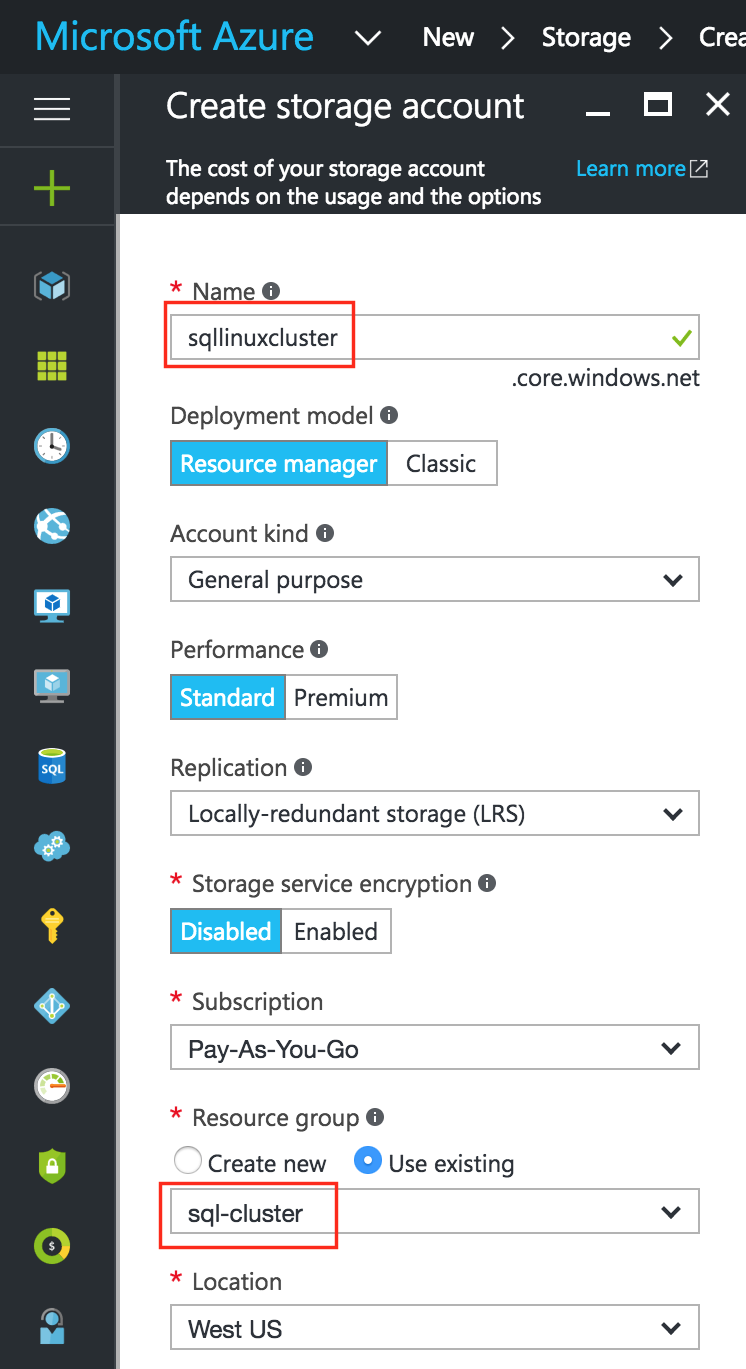
Next, give your new storage account a name. The storage account name must be unique across *ALL* of Azure. (Every object that you store in Azure Storage has a unique URL address. The storage account name forms the subdomain of that address.) In this example I call my storage account “sqllinuxcluster” but you’ll need to select something different as you setup your own.
Select a storage Type based on your requirements and budget. For the purposes of this guide, I selected “Standard-LRS” (i.e. Locally Redundant) to minimize cost.
Make sure your new Storage Account is added to the Resource Group you created in Step 1 (“sql-cluster”) in the same Location (“West US” in this example):
Create Virtual Machines in an Availability Set
We will be provisioning 3 Virtual Machines in this guide. The first two VMs (I’ll call them “sql-linux1” and “sql-linux2”) will function as cluster nodes with the ability to bring the SQL Server database and it’s associated resources online. The 3rd VM will act as the cluster’s witness server for added protection against split-brain.
To ensure maximum availability, all 3 VMs will be added to the same Availability Set, ensuring that they will end up in different Fault Domains and Update Domains.
The Azure Marketplace has a VM template called “SQL Server vNext on Red Hat Enterprise Linux 7.2” that has a public preview evaluation version SQL Server v.Next for Linux pre-installed, which will save you a few steps. If you’d rather start with an empty VM and install SQL yourself, the installation instructions can be found here.
Create “sql-linux1” VM
Create your first VM (“sql-linux1”) and select the marketplace image mentioned above.
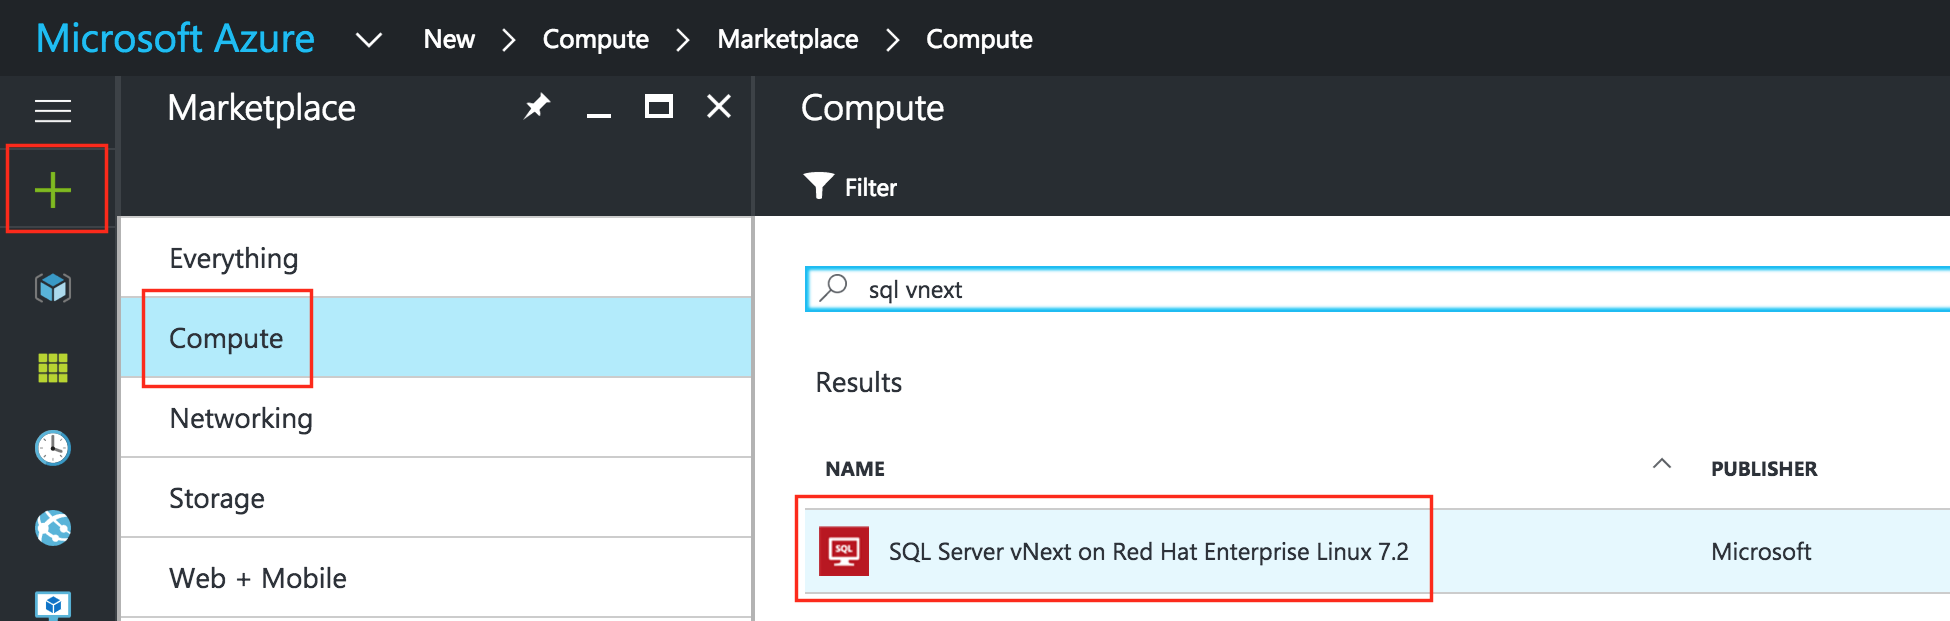
Give the VM a hostname (“sql-linux1”) and username/password that will later be used to SSH into the system. Make sure you add this VM to your Resource Group (“sql-cluster”) and that it resides in the same region as all of your other resources:
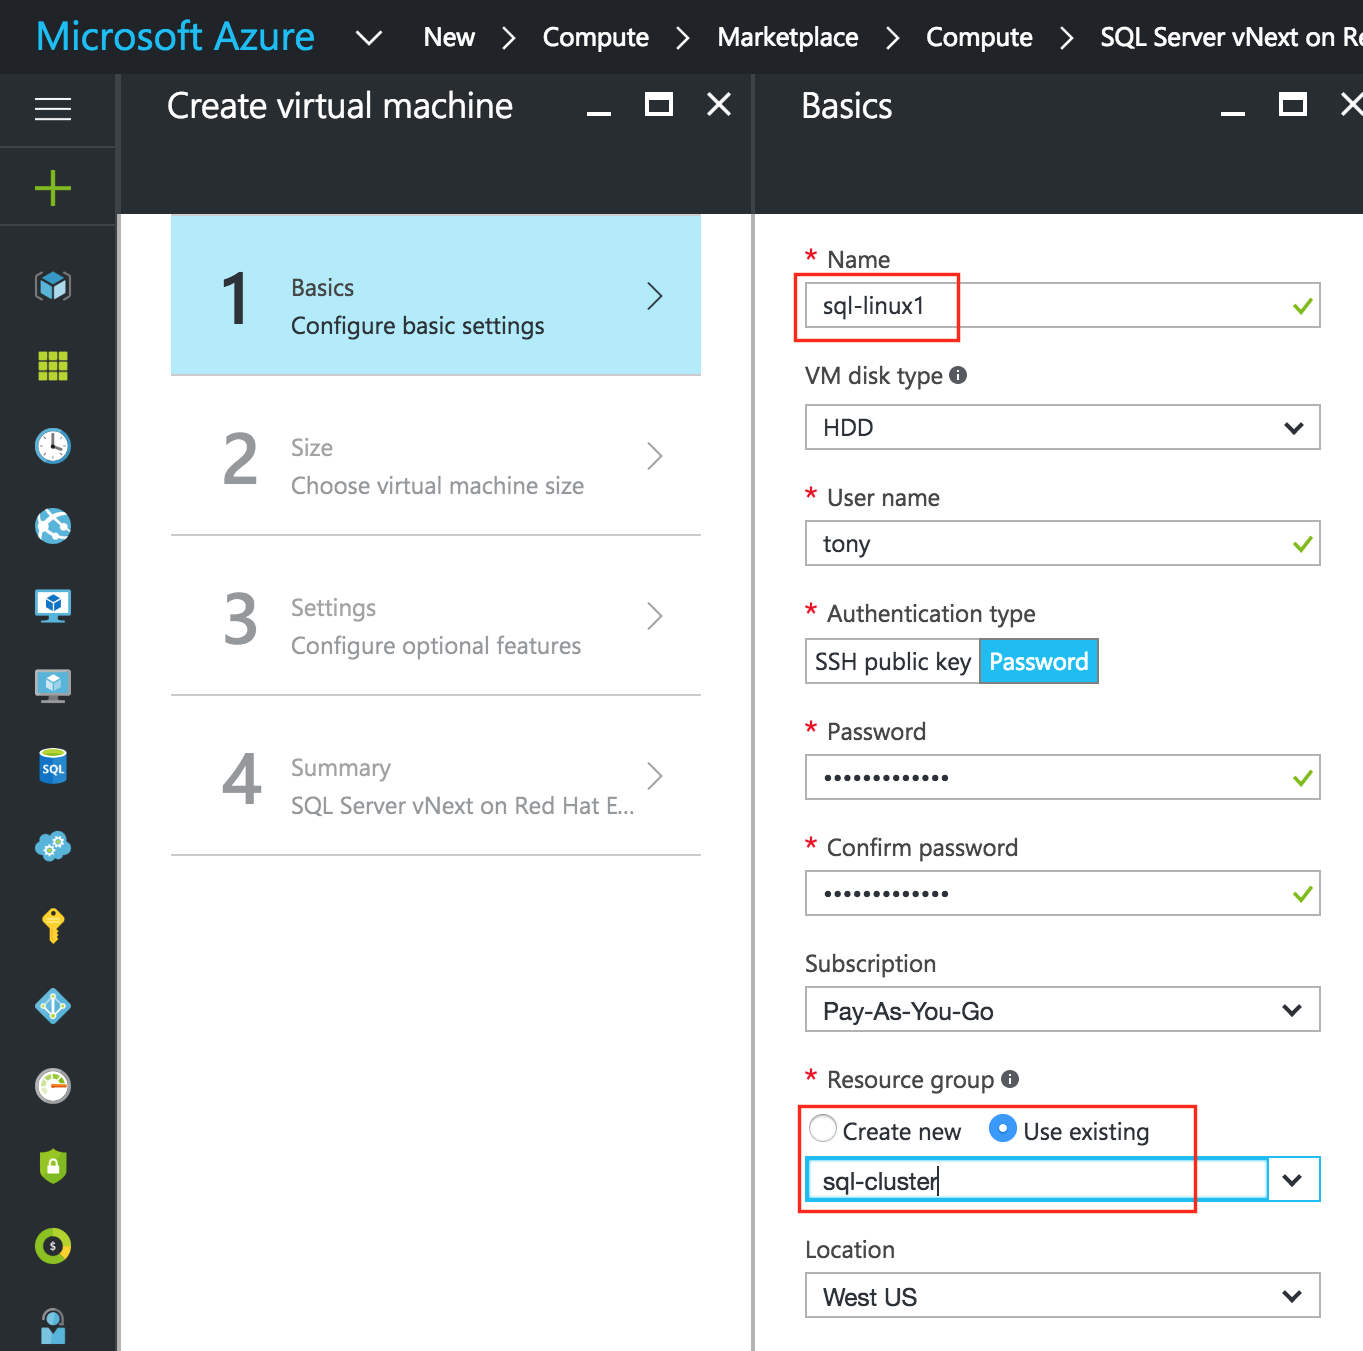
Next, choose your instance size. For more information on the various instance sizes available, click here.
For the purposes of this guide, I selected the smallest/cheapest size I could, in this case “DS1_V2 Standard”, to minimize cost since this won’t be running a production workload. Select the instance size that makes most sense based on what you are looking to test:
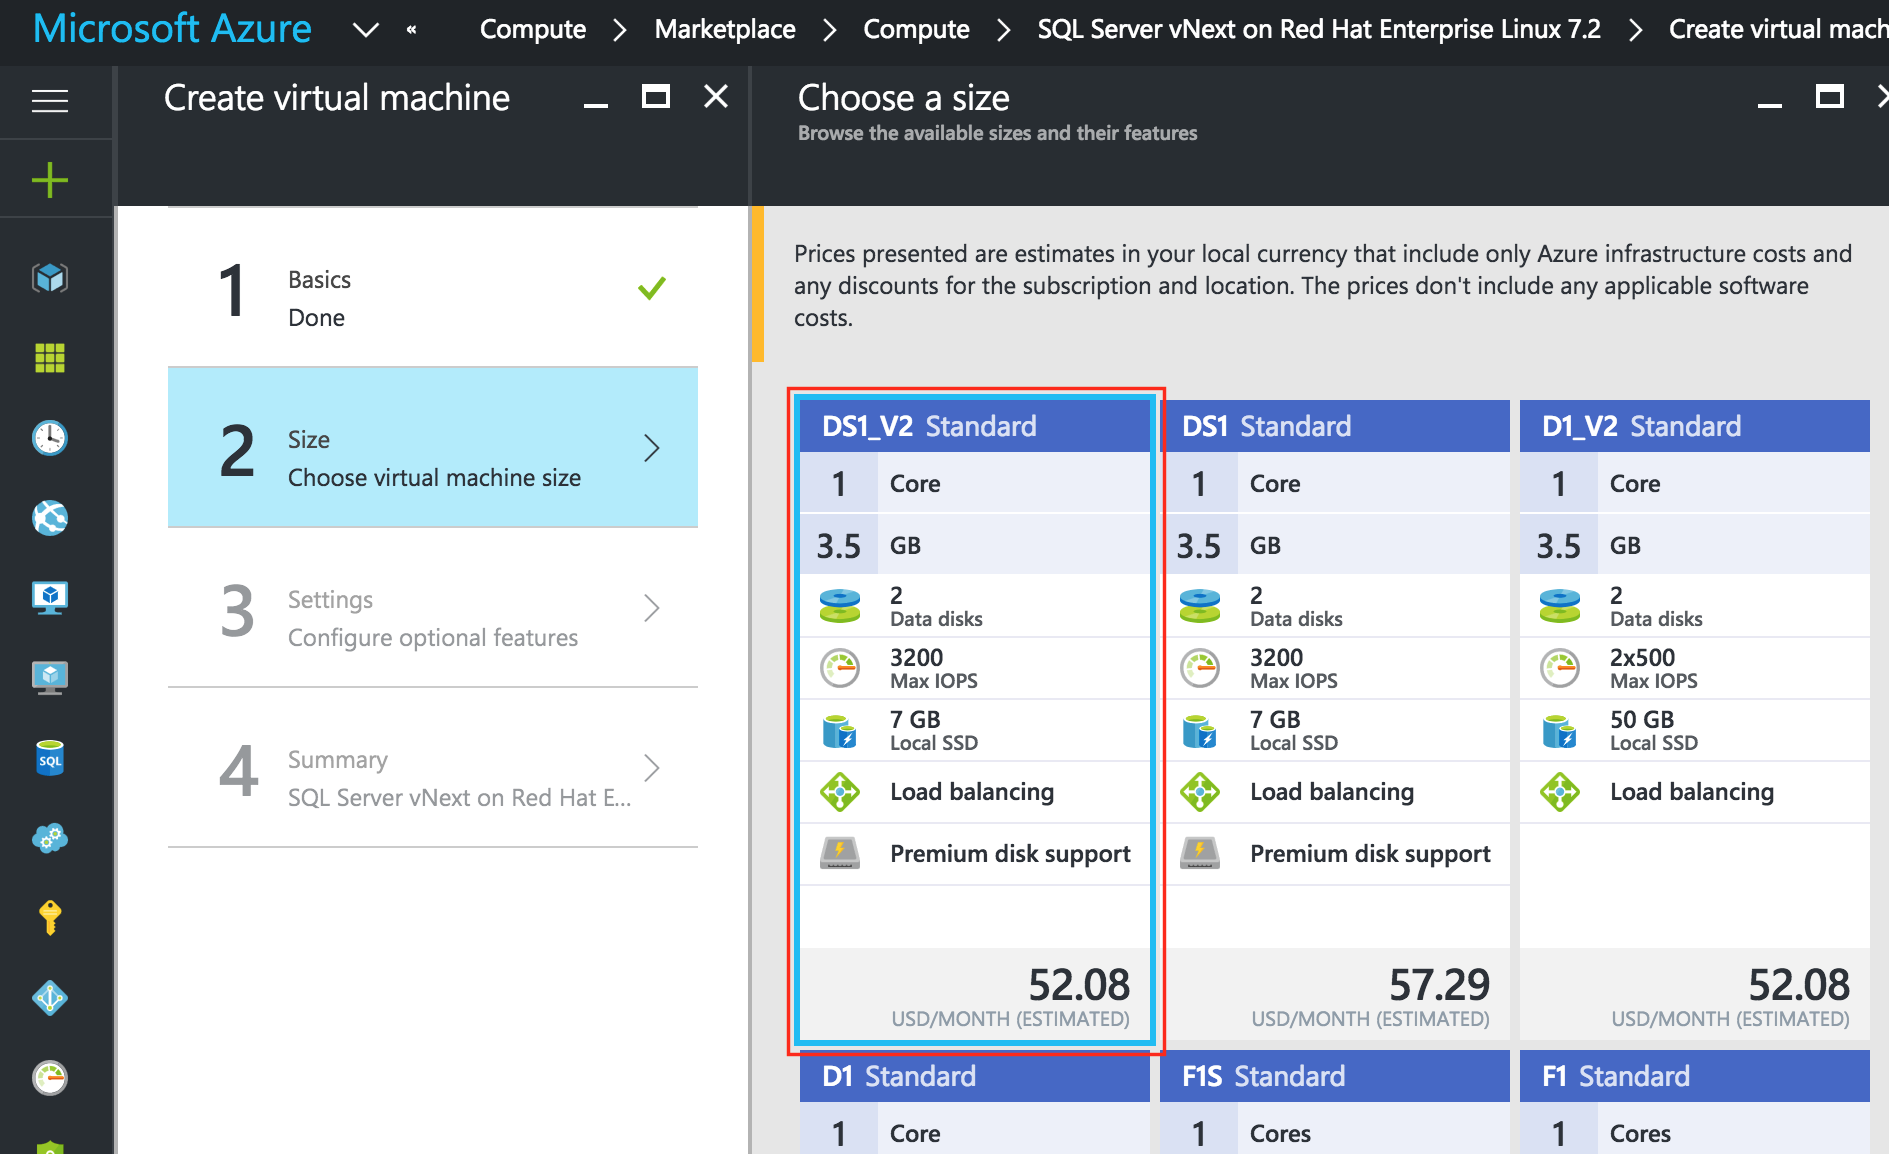
IMPORTANT: By default, your VM won’t be added to an Availability Set. On the Settings screen during make sure you create a new Availability Set, we’ll call “sql-availability-set”. Azure Resource Manager (ARM) allows your to create Availability Sets with 3 Fault Domains. The default values here are fine:
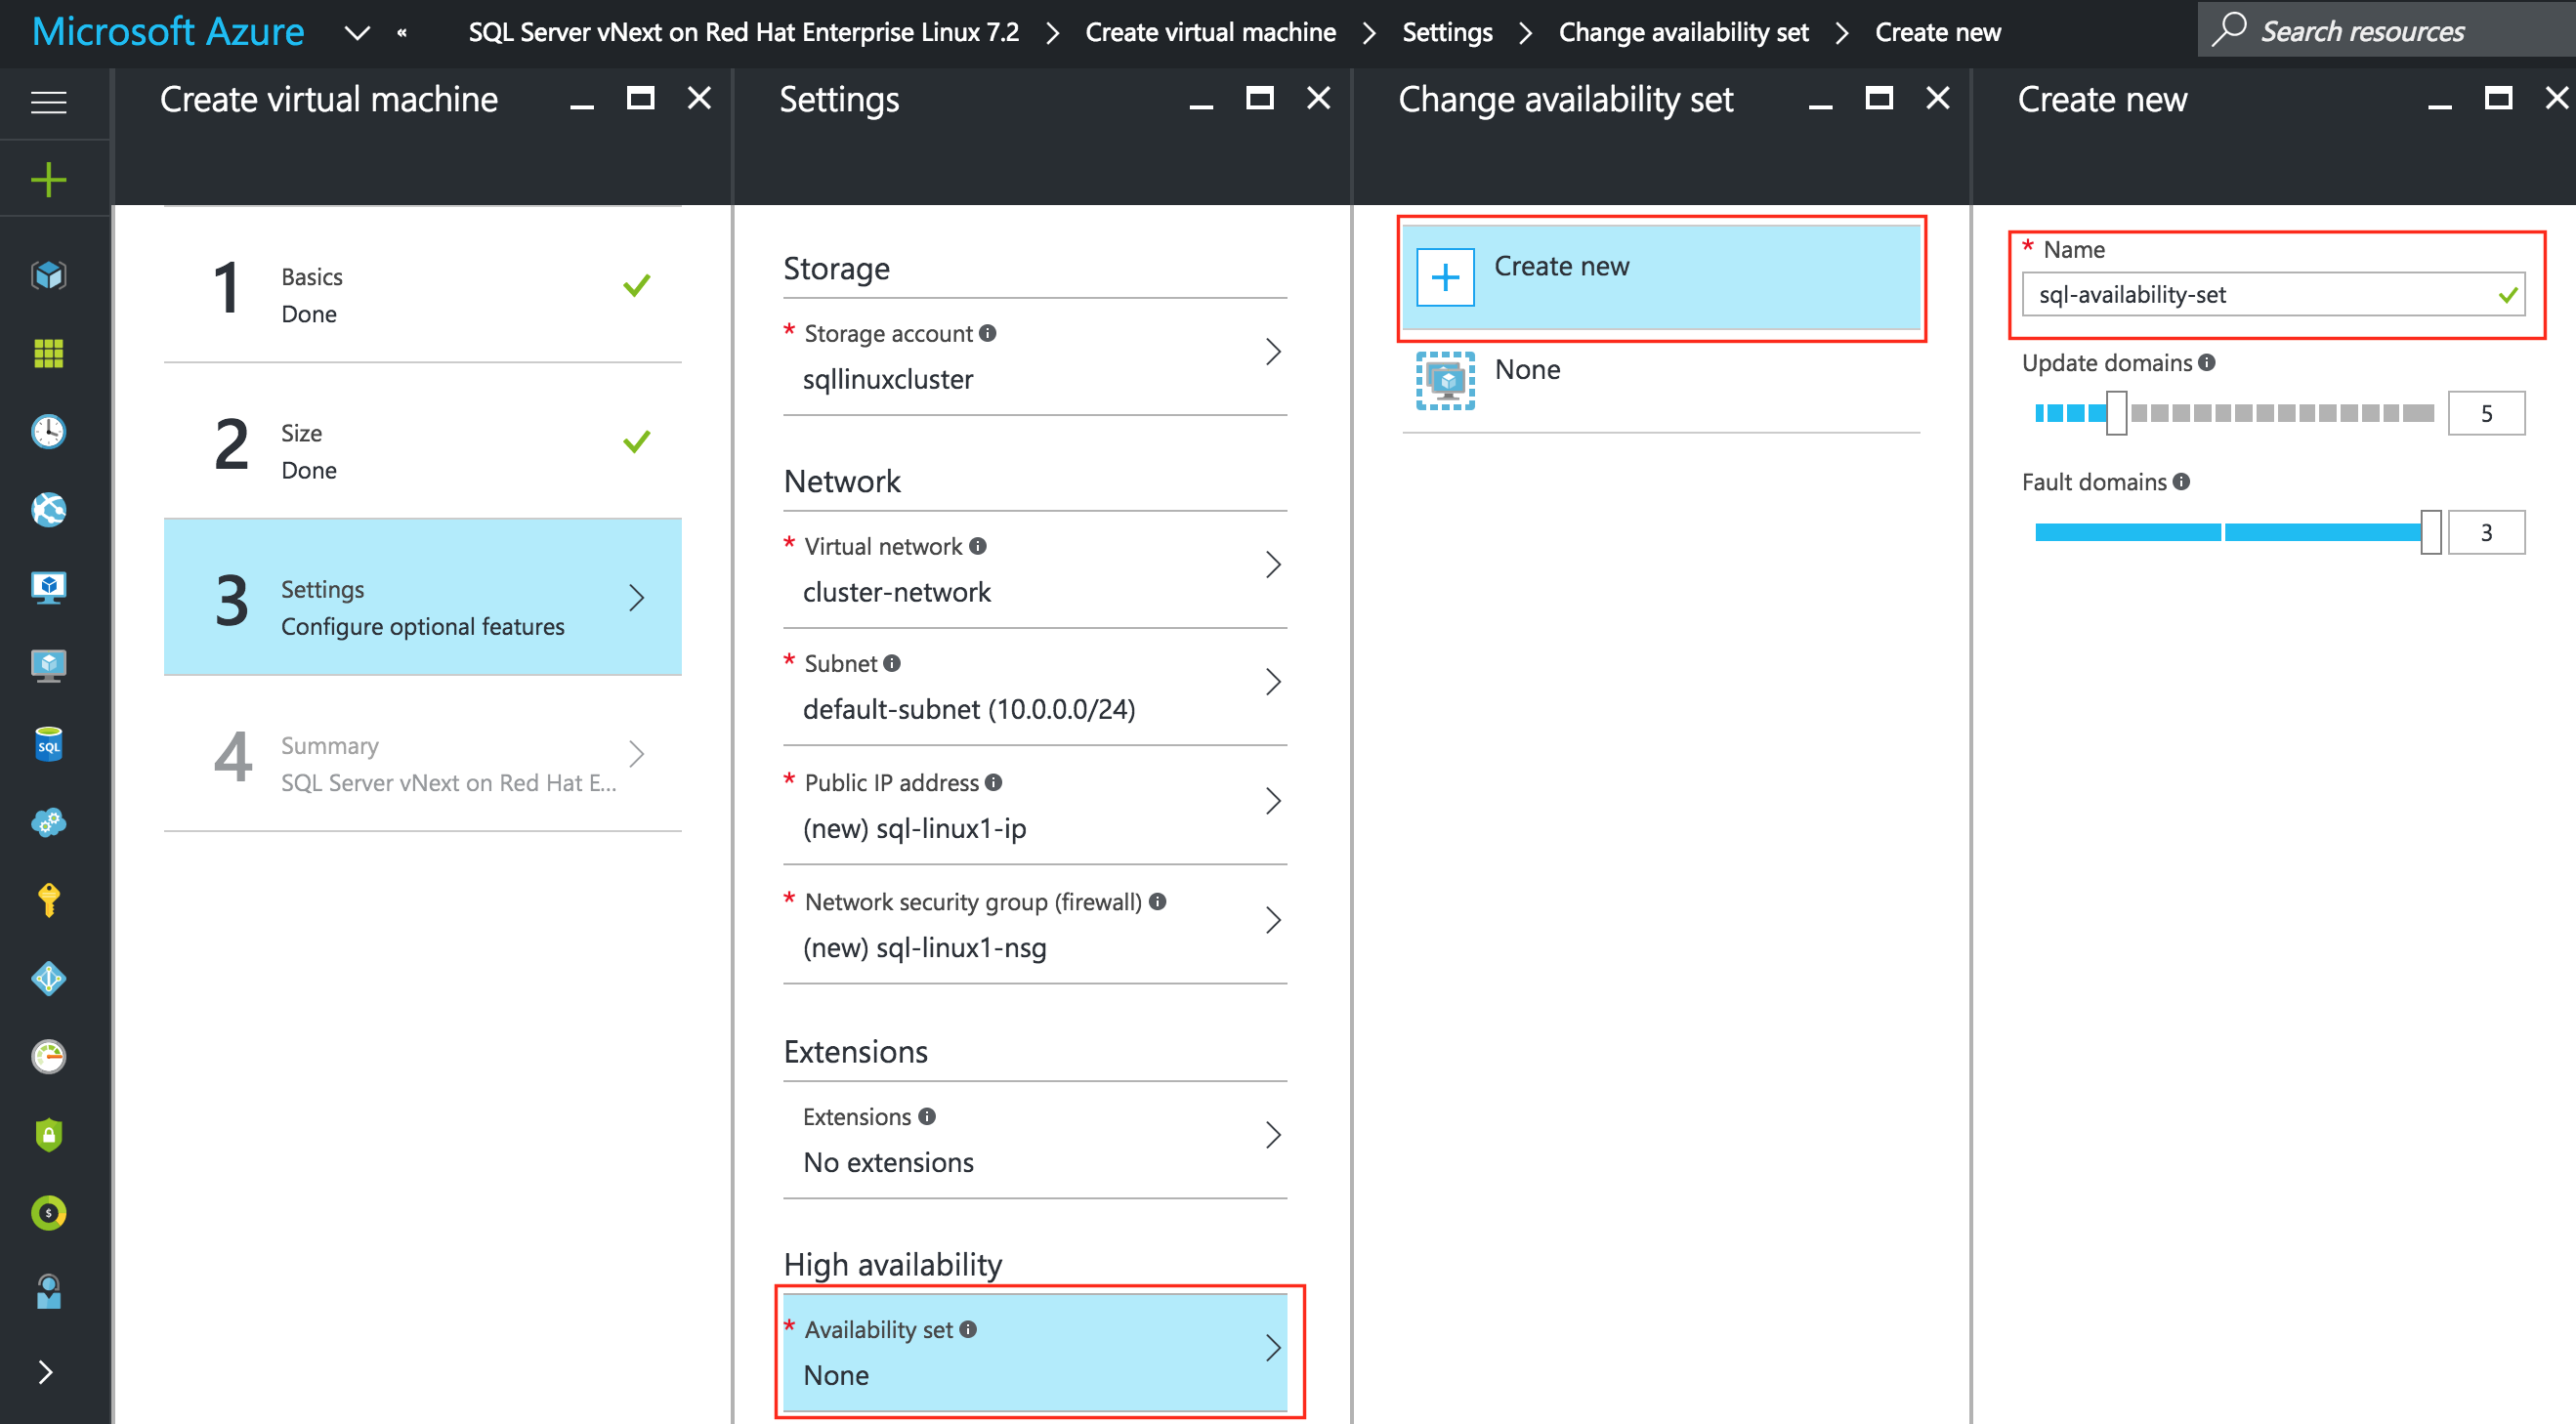
On the next screen, review your VM properties and click OK to create your first VM.
Create “sql-linux2” and “sql-witness” VMs
Repeat the steps above twice to create two more VMs.
The only difference here is that you’ll be ADDING these VMs to the Availability Set (“sql-availability-set”) we just created.
It may take a little while for your 3 VMs to provision. Once complete, you’ll see your VMs (sql-linux1, sql-linux2 and sql-witness) listed on the Virtual Machines screen within your Azure Portal.
Set VM Static IP Addresses
The VMs will be set with the following IP addresses:
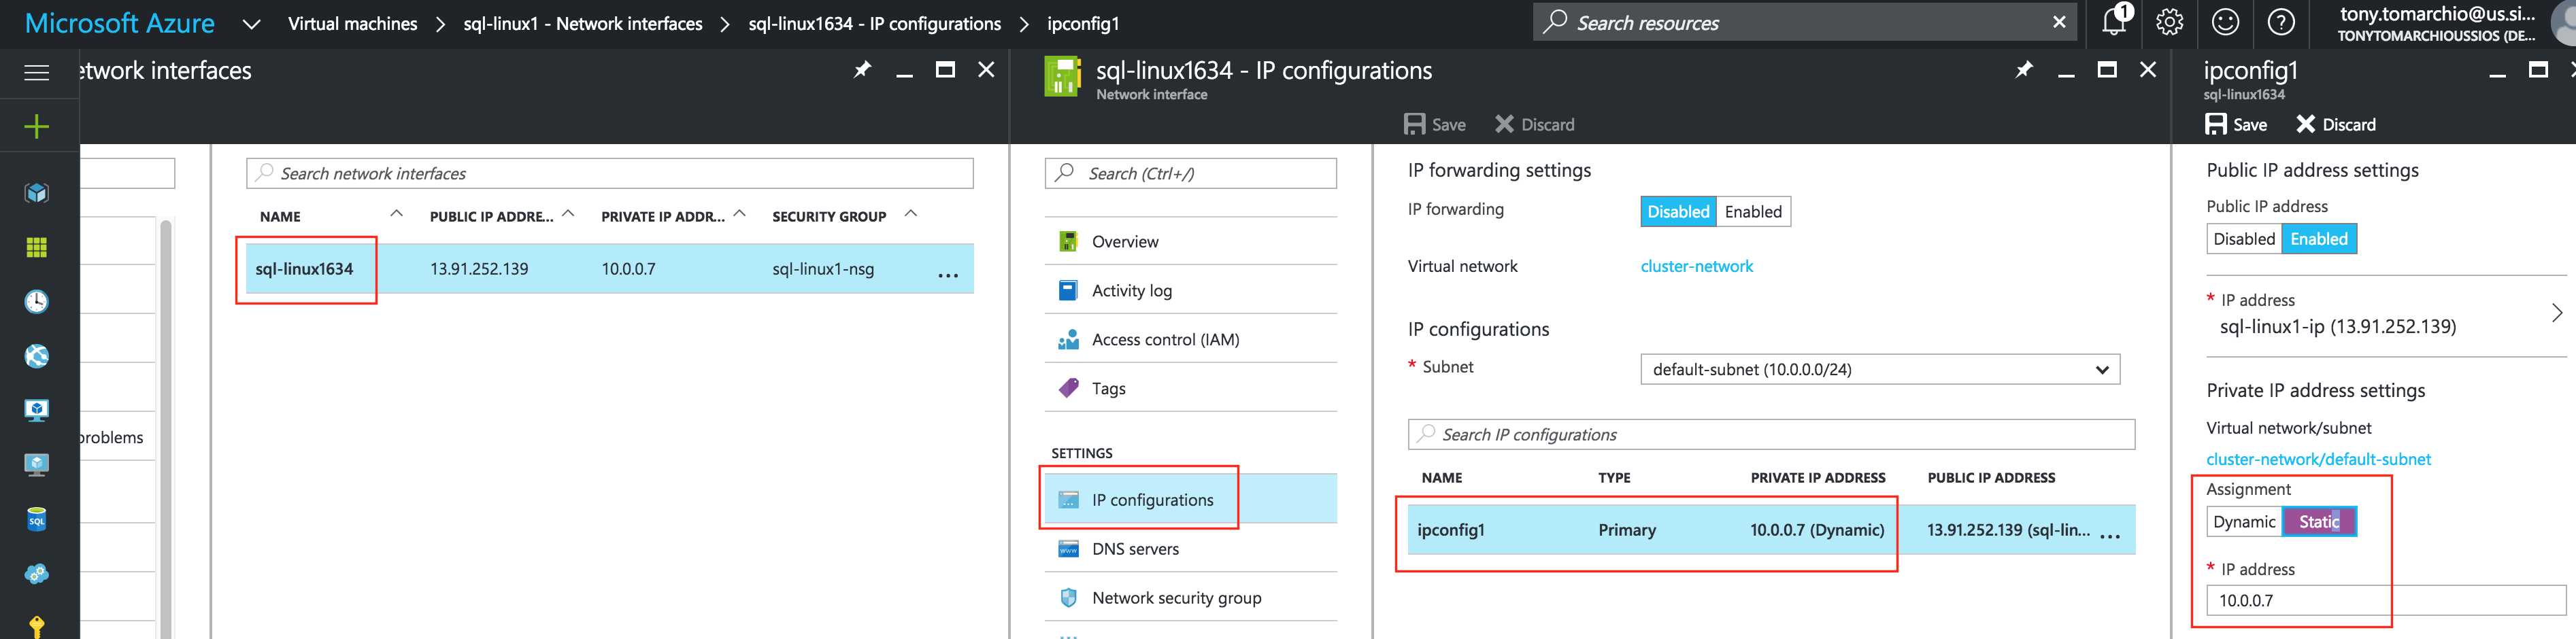
- sql-linux1: 10.0.0.7
- sql-linux2: 10.0.0.8
- sql-witness: 10.0.0.9
Repeat this step for each VM. Select your VM and edit the Network Interfaces
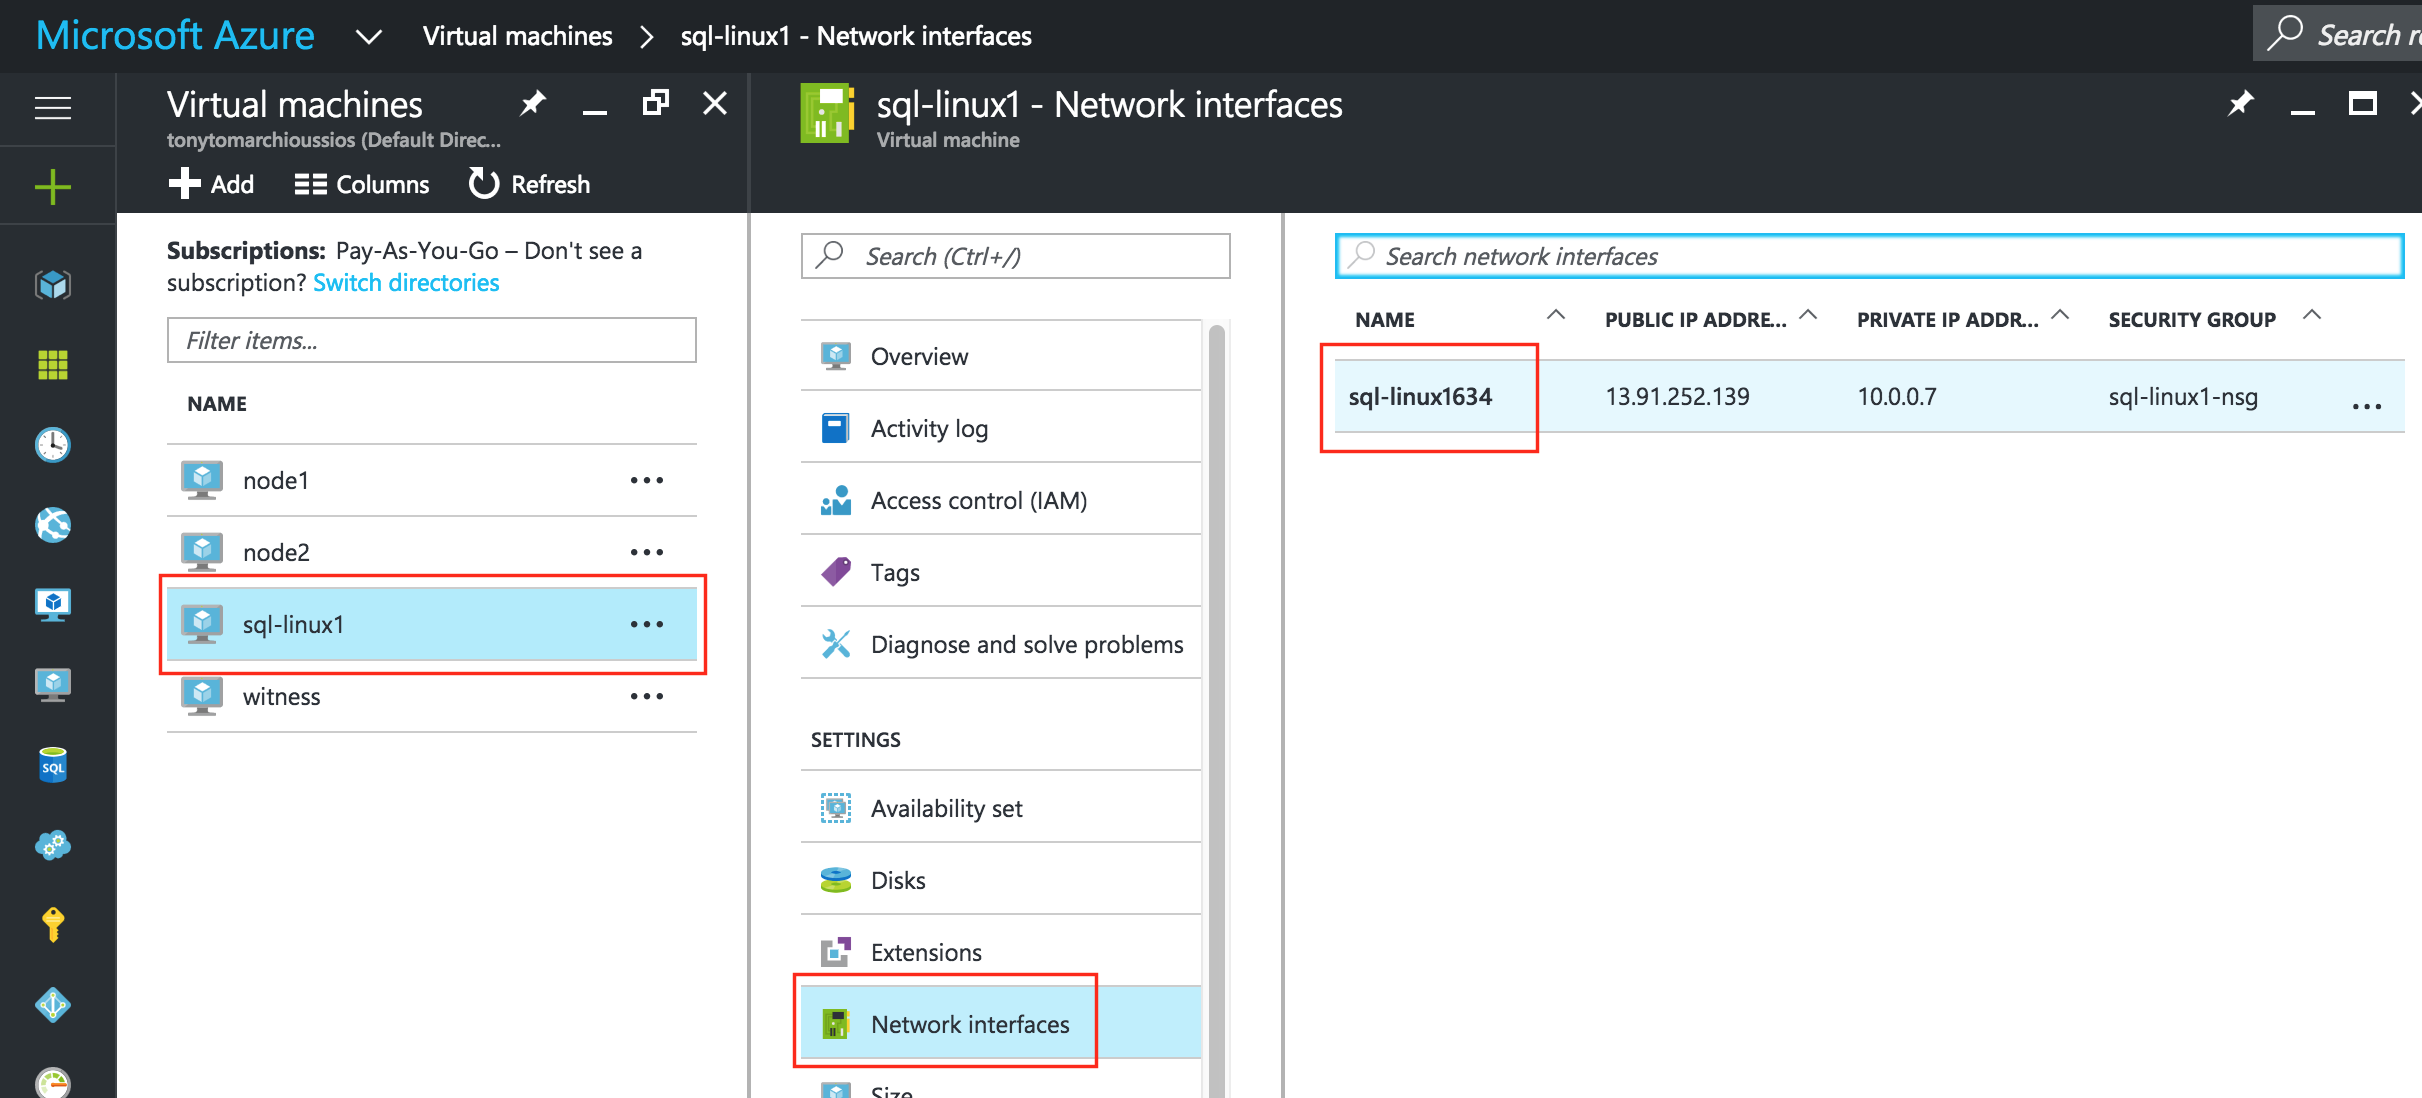
Select the network interface associated with the VM, and edit IP configurations. Select “Static” and specify the desired IP address:
Add a Data Disk to cluster nodes
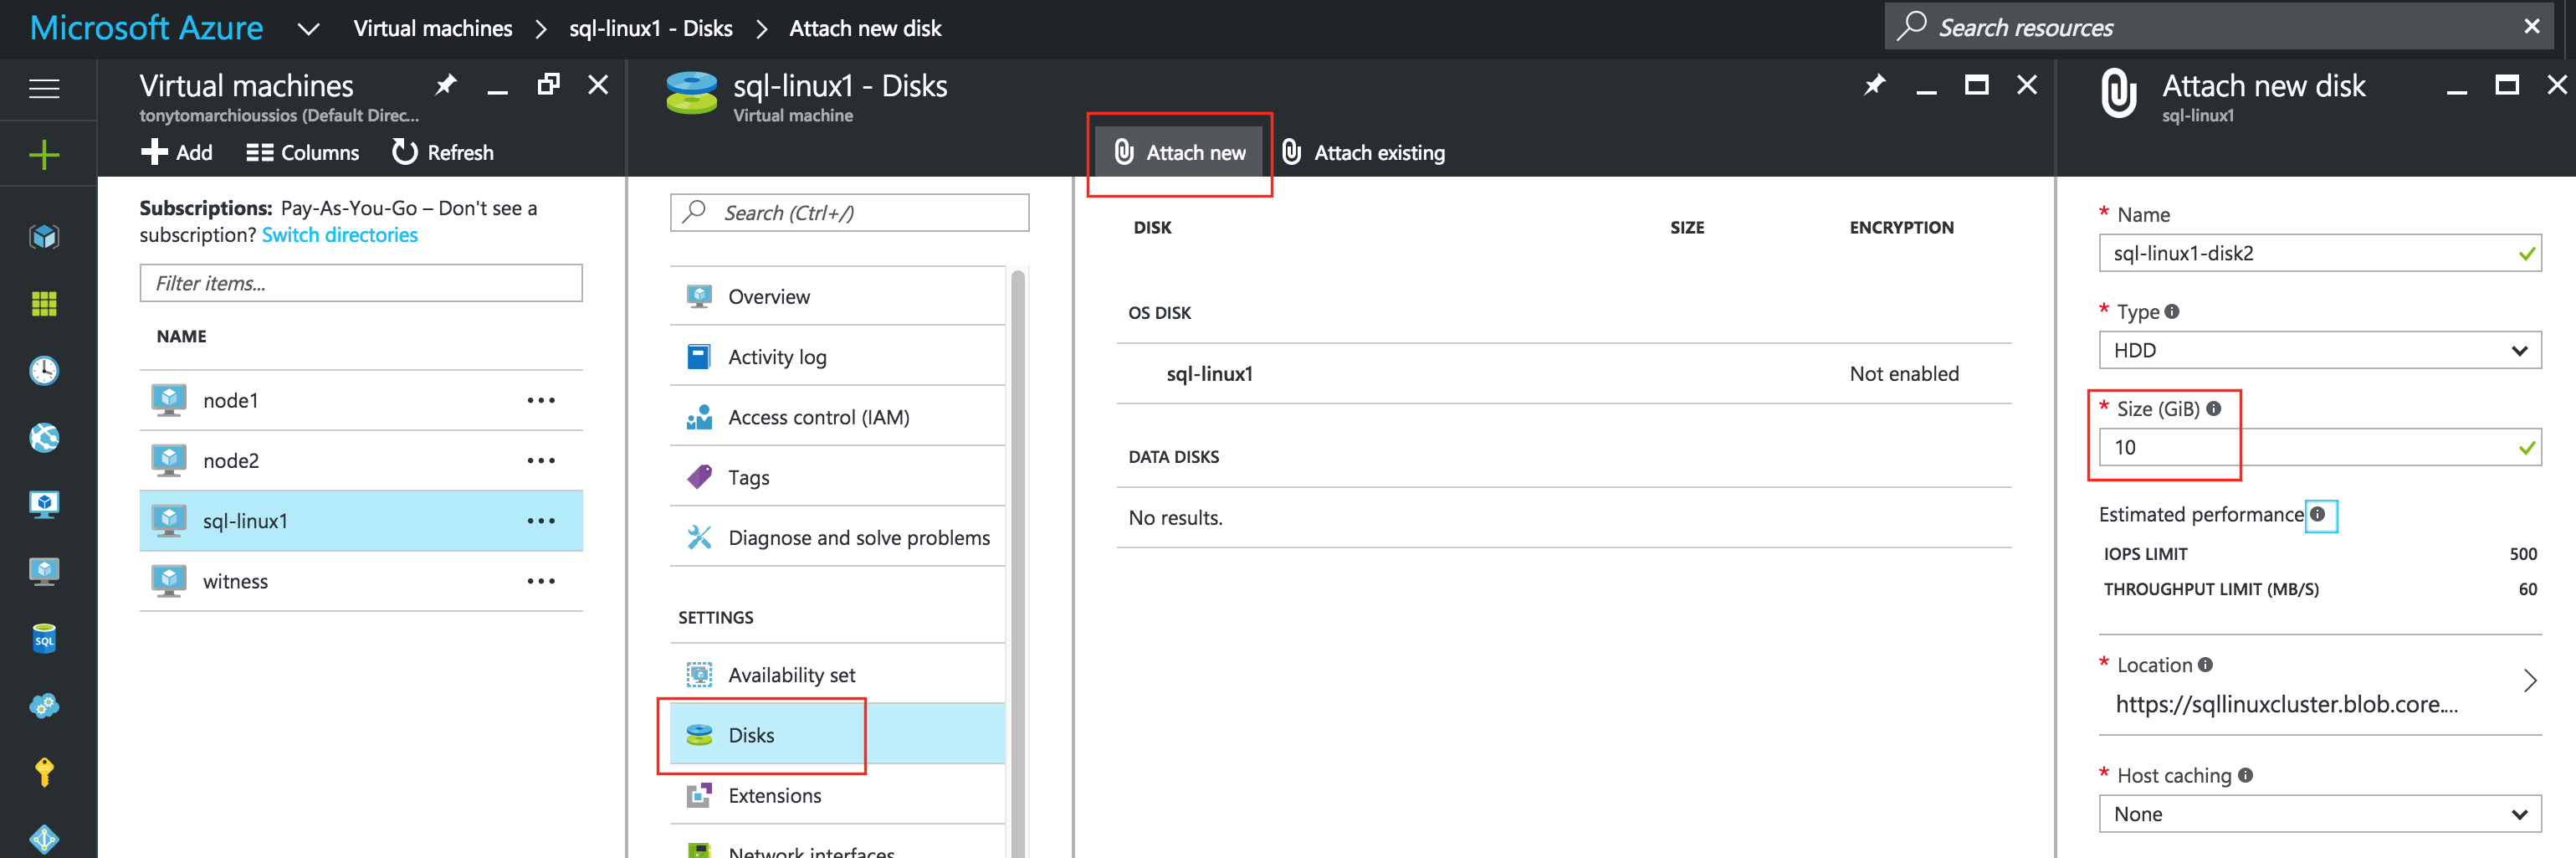
Next, we will need to add a extra disk to of our cluster nodes (“sql-linux1” and “sql-linux2”). This disk will store our SQL databases and the later be replicated between nodes.
Note: You do NOT need to add an extra disk to the “sql-witness” node. Only “sql-linux1” and “sql-linux2”.
Edit your VM, select Disks and then attach a new disk. Select a disk type (Standard or Premium SSD) and size based on your workload. Here I create a 10GB Standard disk on both of my cluster nodes. As far as Host caching goes, “None” or “Read only” caching is fine. I do not recommend using “Read/Write” as there is potential for data loss:
Create Inbound Security Rule to allow VNC access
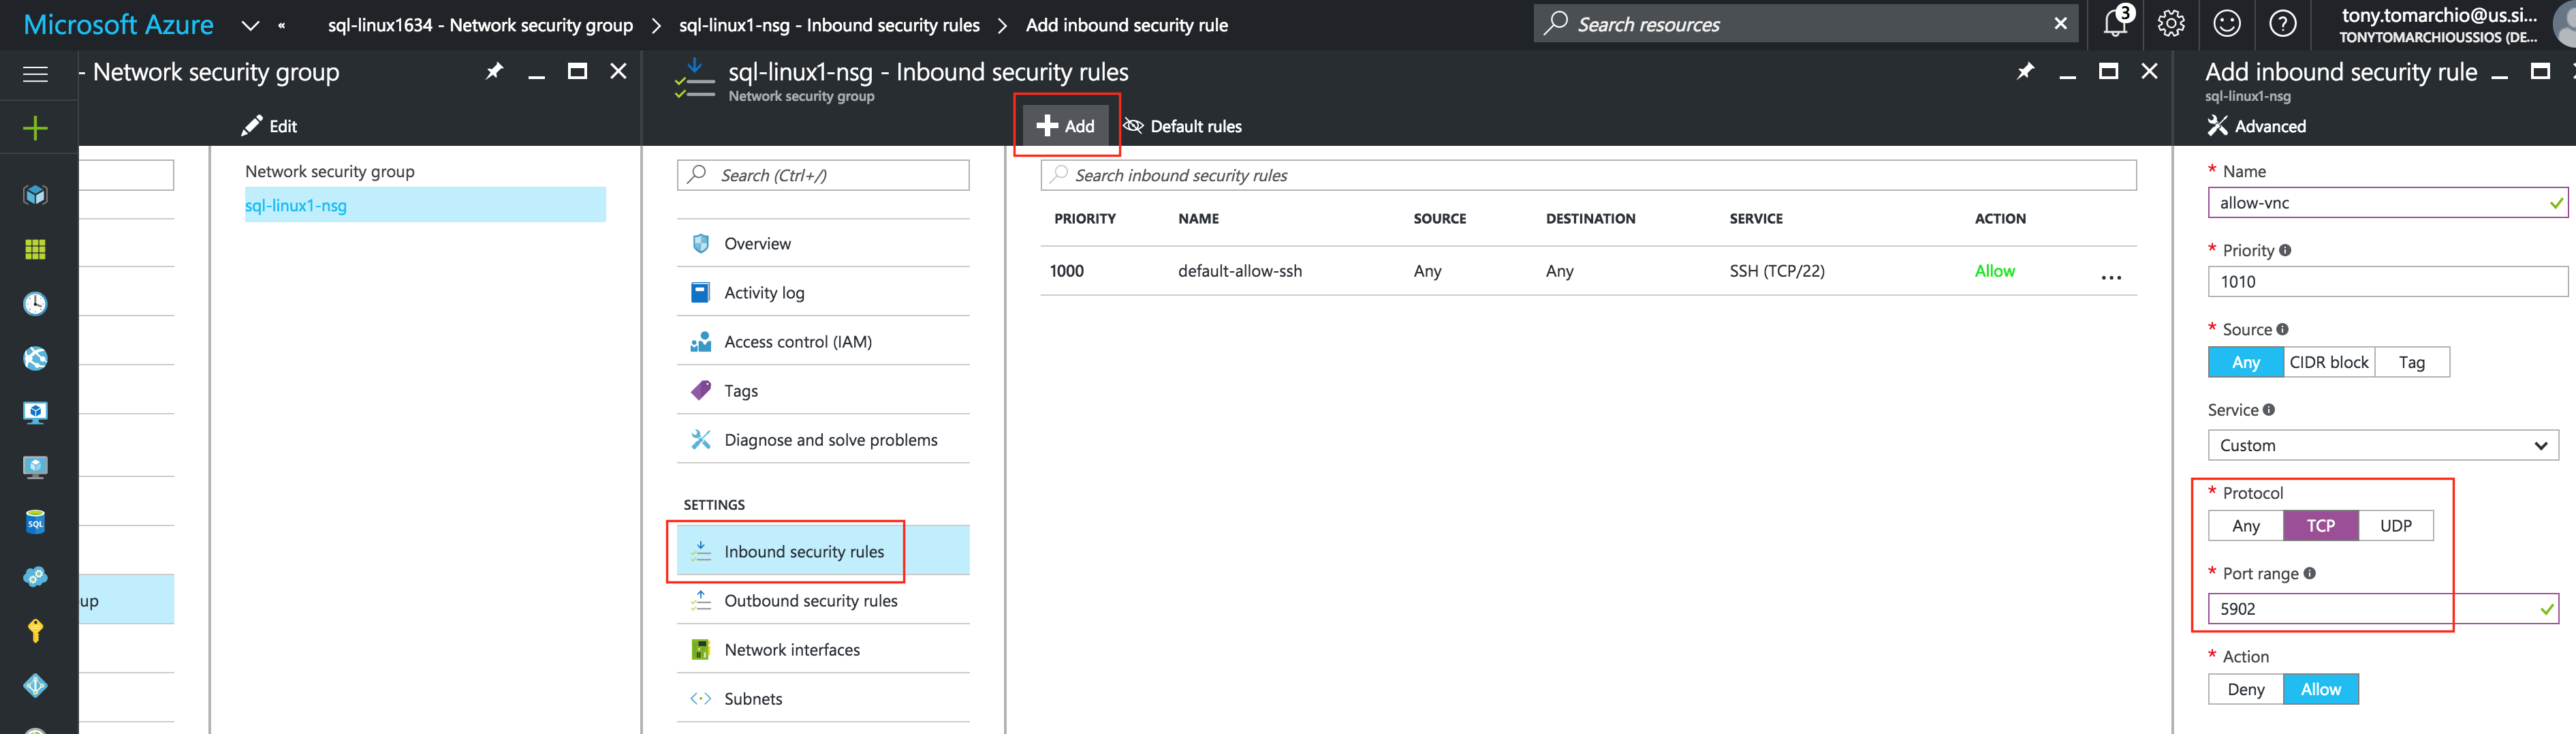
If your VM is part of a Network Security Group (NSG), which by default it likely is unless you disabled it during VM creation, the only port open in the “Azure firewall” is SSH (port 22). Later in the guide, I’ll be using VNC to access the desktop of “sql-linux1” and configure the cluster using a GUI. Create an Inbound Security Rule to open up VNC access. In this guide port 5902 is used. Adjust this according based on your VNC configuration.
Virtual Machines -> (select sql-linux1) -> Network interfaces -> (select NIC) -> Network security group -> (select the NSG) -> Inbound security rules -> Add
Linux OS Configuration
Here is where we will leave the Azure Portal for a little while and get our hands dirty on the command line, which as a Linux administrator you should be used to by now. You aren’t given the root password to your Linux VMs in Azure, so once you login as the user specified during VM creation, use the “sudo” command to gain root privileges:
$sudo su -
Edit /etc/hosts
Unless you have already have a DNS server setup, you’ll want to create host file entries on all 3 servers so that they can properly resolve each other by name
Add the following lines to the end of your /etc/hosts file:
10.0.0.7    sql-linux1
10.0.0.8    sql-linux2
10.0.0.9    sql-witness
10.0.0.199   sql-vip
Disable SELinux
Edit /etc/sysconfig/linux and set “SELINUX=disabled”:
# vi /etc/sysconfig/selinux

# This file controls the state of SELinux on the system.
# SELINUX= can take one of these three values:
#     enforcing - SELinux security policy is enforced.
#     permissive - SELinux prints warnings instead of enforcing.
#     disabled - No SELinux policy is loaded.
SELINUX=disabled
# SELINUXTYPE= can take one of these two values:
#     targeted - Targeted processes are protected,
#     mls - Multi Level Security protection.
SELINUXTYPE=targeted
Configure iptables so that cluster the Virtual IP will work
In order to get connectivity to the cluster Virtual IP to work, and also monitoring of the IP resource, a few iptables rules need to be setup. Note: 10.0.0.199 is the Virtual IP we’ll be using in our cluster, and 1433 is the default port used my SQL Server.
Note: RHEL7 changed the default firewall to FirewallD, instead of iptables. Haven’t spent much time with firewalld yet, so for now this guide will disable firewalld and use iptables instead. You’ll also need to install the “iptables-services” package so that the service and chkconfig commands below work.
# systemctl stop firewalld
# systemctl disable firewalld
On sql-linux1 (10.0.0.7), run the following commands:
# yum install iptables-services
# iptables --flush
# iptables -t nat -A PREROUTING -p tcp --dport 1433 -j DNAT --to-destination 10.0.0.199:1433
# iptables -t nat -A PREROUTING -p tcp --dport 1434 -j DNAT --to-destination 10.0.0.199:1434
# iptables -t nat -A POSTROUTING -p icmp -s 10.0.0.199 -j SNAT --to-source 10.0.0.7
# service iptables save
# chkconfig iptables on
On sql-linux2 (10.0.0.8), run the following commands:
# yum install iptables-services
# iptables --flush
# iptables -t nat -A PREROUTING -p tcp --dport 1433 -j DNAT --to-destination 10.0.0.199:1433
# iptables -t nat -A PREROUTING -p tcp --dport 1434 -j DNAT --to-destination 10.0.0.199:1434
# iptables -t nat -A POSTROUTING -p icmp -s 10.0.0.199 -j SNAT --to-source 10.0.0.8
# service iptables save
# chkconfig iptables on
Install and Configure VNC (and related packages)
In order to access the GUI of our linux servers, and to later install and configure our cluster, install VNC server, as well as a handful of other required packages (cluster software needs the redhat-lsb and patch rpms).
# yum install tigervnc-server xterm wget unzip patch redhat-lsb
# vncpasswd
The following URL is a great guide to getting VNC Server running on RHEL 7 / CentOS 7:
Note: This example configuration runs VNC on display 2 (:2, aka port 5902) and as root (not secure). Adjust accordingly!
# cp /lib/systemd/system/vncserver@.service /etc/systemd/system/vncserver@:2.service
# vi /etc/systemd/system/vncserver@:2.service


[Service]
Type=forking
# Clean any existing files in /tmp/.X11-unix environment
ExecStartPre=/bin/sh -c '/usr/bin/vncserver -kill %i > /dev/null 2>&1 || :'
ExecStart=/sbin/runuser -l root -c "/usr/bin/vncserver %i -geometry 1024x768"
PIDFile=/root/.vnc/%H%i.pid
ExecStop=/bin/sh -c '/usr/bin/vncserver -kill %i > /dev/null 2>&1 || :'


# systemctl daemon-reload
# systemctl enable vncserver@:2.service
# vncserver :2 -geometry 1024x768
Reboot Cluster Nodes
Reboot your cluster nodes so that SELinux is disabled, and the 2nd disk you previously added is detected.
Partition and Format the “data” disk
In Step 6 of this guide (“Add a Data Disk to cluster nodes”) we did just that….added an extra disk to each cluster node to store the application data we will be protecting. In this case it happens to be MySQL databases.
In Azure IaaS, Linux Virtual Machines use the following arrangement for disks:
- /dev/sda – OS disk
- /dev/sdb – temporary disk
- /dev/sdc – 1st data disk
- /dev/sdd – 2nd data disk
- …
- /dev/sdj – 8th data disk
The disk we added in Step 6 of this guide should appear as /dev/sdc. You can run the “fdisk -l” command to verify. You’ll see that /dev/sda (OS) and /dev/sdb (temporary) already have disk partitions and are being used.
# fdisk -l

Disk /dev/sda: 31.5 GB, 31457280000 bytes, 61440000 sectors
Units = sectors of 1 * 512 = 512 bytes
Sector size (logical/physical): 512 bytes / 4096 bytes
I/O size (minimum/optimal): 4096 bytes / 4096 bytes
Disk label type: dos
Disk identifier: 0x000c46d3

Device Boot Start End Blocks Id System
/dev/sda1 * 2048 1026047 512000 83 Linux
/dev/sda2 1026048 61439999 30206976 83 Linux

Disk /dev/sdb: 7516 MB, 7516192768 bytes, 14680064 sectors
Units = sectors of 1 * 512 = 512 bytes
Sector size (logical/physical): 512 bytes / 4096 bytes
I/O size (minimum/optimal): 4096 bytes / 4096 bytes
Disk label type: dos
Disk identifier: 0x7cd70e11

Device Boot Start End Blocks Id System
/dev/sdb1 128 14678015 7338944 83 Linux

Disk /dev/sdc: 10.7 GB, 10737418240 bytes, 20971520 sectors
Units = sectors of 1 * 512 = 512 bytes
Sector size (logical/physical): 512 bytes / 4096 bytes
I/O size (minimum/optimal): 4096 bytes / 4096 bytes
Here I will create a partition (/dev/sdc1), format it, and mount it at the default location for SQL, which is /var/opt/mssql. Perform the following steps on BOTH “sql-linux1” and “sql-linux2”:
# fdisk /dev/sdc
Command (m for help): n
Command action
e   extended
p   primary partition (1-4)
p
Partition number (1-4): 1
First cylinder (1-1305, default 1): <enter>
Using default value 1
Last cylinder,  cylinders or  size{K,M,G} (1-1305, default 1305): <enter>
Using default value 1305

Command (m for help): w
The partition table has been altered!
Calling ioctl() to re-read partition table.
Syncing disks.
[root@sql-linux1 ~]#
# mkfs.ext4 /dev/sdc1
# mkdir /var/opt/mssql
# chmod 770 /var/opt/mssql
Mount the filesystem:
# mount /dev/sdc1 /var/opt/mssql
Install and Configure SQL Server
If you started with a fresh linux system, the full installation instructions can be found here.
If you created your VMs using the “SQL Server vNext on Red Hat Enterprise Linux 7.2” Azure template, as I have done in this guide, then SQL Server is already installed. All you need to do now is run the setup script:
# /opt/mssql/bin/sqlservr-setup
Microsoft(R) SQL Server(R) Setup

You can abort setup at anytime by pressing Ctrl-C. Start this program
with the --help option for information about running it in unattended
mode.

The license terms for this product can be downloaded from
http://go.microsoft.com/fwlink/?LinkId=746388 and found
in /usr/share/doc/mssql-server/LICENSE.TXT.

Do you accept the license terms? If so, please type "YES": YES

Please enter a password for the system administrator (SA) account: <enter desired password>
Please confirm the password for the system administrator (SA) account: <enter desired password>

Setting system administrator (SA) account password...

Do you wish to start the SQL Server service now? [y/n]: y
Do you wish to enable SQL Server to start on boot? [y/n]: n

You can use sqlservr-setup --enable-service to enable SQL Server to start
at boot.

Setup completed successfully.
Verify that the service is running:
# systemctl status mssql-server
Stop SQL Server on both nodes. The cluster software will later be responsible for starting it up:
# systemctl stop mssql-server
# systemctl stop mssql-server-telemetry
Install and Configure the Cluster
At this point, we are ready to install and configure our cluster. SIOS Protection Suite for Linux (aka SPS-Linux) will be used in this guide as the clustering technology. It provides both high availability failover clustering features (LifeKeeper) as well as real-time, block level data replication (DataKeeper) in a single, integrated solution. SPS-Linux enables you to deploy a “SANLess” cluster, aka a “shared nothing” cluster meaning that cluster nodes don’t have any shared storage, as is the case with Azure VMs.
Install SIOS Protection Suite for Linux
Perform the following steps on ALL 3 VMs (sql-linux1, sql-linux2, sql-witness):
Download the SPS-Linux installation image file (sps.img) and and obtain either a trial license or purchase permanent licenses. Contact SIOS for more information.
You will loopback mount it and run the “setup” script inside, as root (or first “sudo su -” to obtain a root shell if you haven’t already)
For example:
# mkdir /tmp/install
# mount -o loop sps.img /tmp/install
# cd /tmp/install
# ./setup
During the installation script, you’ll be prompted to answer a number of questions. You will hit Enter on almost every screen to accept the default values. Note the following exceptions:
- On the screen titled “High Availability NFS” you may select “n” as we will not be creating a highly available NFS server
- Towards the end of the setup script, you can choose to install a trial license key now, or later. We will install the license key later, so you can safely select “n” at this point
- In the final screen of the “setup” select the ARKs (Application Recovery Kits, i.e. “cluster agents”) you wish to install from the list displayed on the screen.
- The ARKs are ONLY required on “sql-linux1” and “sql-linux2”. You do not need to install on “sql-witness”
- Navigate the list with the up/down arrows, and press SPACEBAR to select the following:
- lkDR – DataKeeper for Linux
- This will result in the following additional RPMs installed on “sql-linux1” and “sql-linux2”:
- steeleye-lkDR-9.0.2-6513.noarch.rpm
Install Witness/Quorum package
The Quorum/Witness Server Support Package for LifeKeeper (steeleye-lkQWK) combined with the existing failover process of the LifeKeeper core allows system failover to occur with a greater degree of confidence in situations where total network failure could be common. This effectively means that failovers can be done while greatly reducing the risk of “split-brain” situations.
Install the Witness/Quorum rpm on all 3 nodes (sql-linux1, sql-linux2, sql-witness):
# cd /tmp/install/quorum
# rpm -Uvh steeleye-lkQWK-9.0.2-6513.noarch.rpm
On ALL 3 nodes (sql-linux1, sql-linux2, sql-witness), edit /etc/default/LifeKeeper, set
NOBCASTPING=1
On ONLY the Witness server (“sql-witness”), edit /etc/default/LifeKeeper, set
WITNESS_MODE=off/none
Install a License key
On all 3 nodes, use the “lkkeyins” command to install the license file that you obtained from SIOS:
# /opt/LifeKeeper/bin/lkkeyins <path_to_file>/<filename>.lic
Start LifeKeeper
On all 3 nodes, use the “lkstart” command to start the cluster software:
# /opt/LifeKeeper/bin/lkstart
Set User Permissions for LifeKeeper GUI
On all 3 nodes, edit /etc/group and add the “tony” user (or whatever username you specified during VM creation) to the “lkadmin” group to grant access to the LifeKeeper GUI. By default only “root” is a member of the group, and we don’t have the root password in :
# vi /etc/group

lkadmin:x:1001:root,tony
Open the LifeKeeper GUI
Make a VNC connection to the Public IP address of sql-linux1. Based on the VNC and Inbound Security Rule configuration from above, you would connect to <Public_IP>:2 using the VNC password you specified earlier. Once logged in, open a terminal window and run the LifeKeeper GUI using the following command:
# /opt/LifeKeeper/bin/lkGUIapp &
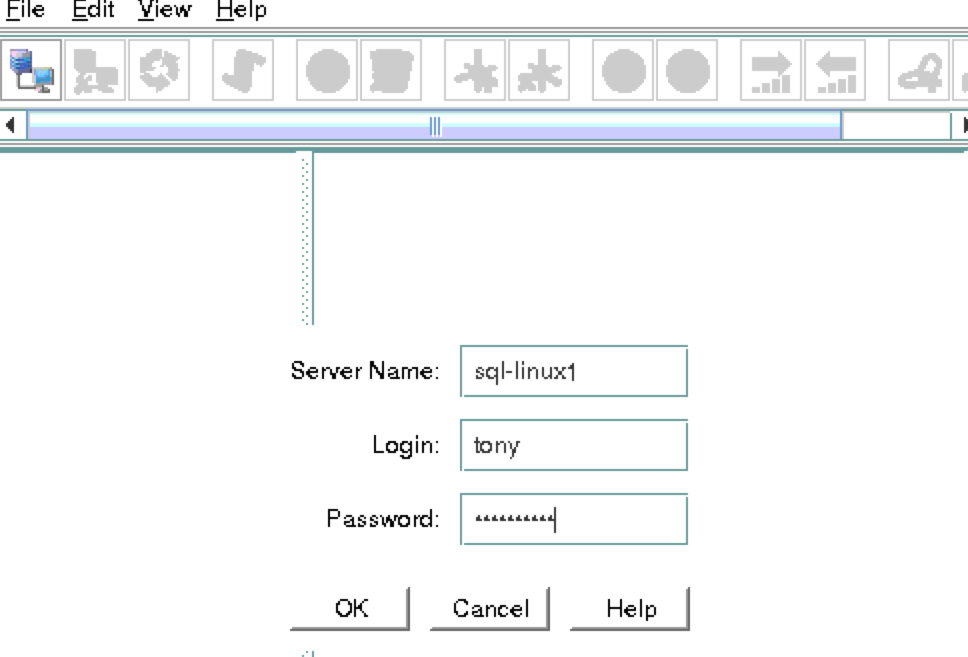
You will be prompted to connect to your first cluster node (“sql-linux1”). Enter the linux userid and password specified during VM creation:
Next, connect to both “sql-linux2” and “sql-witness” by clicking the “Connect to Server” button highlighted in the following screenshot:
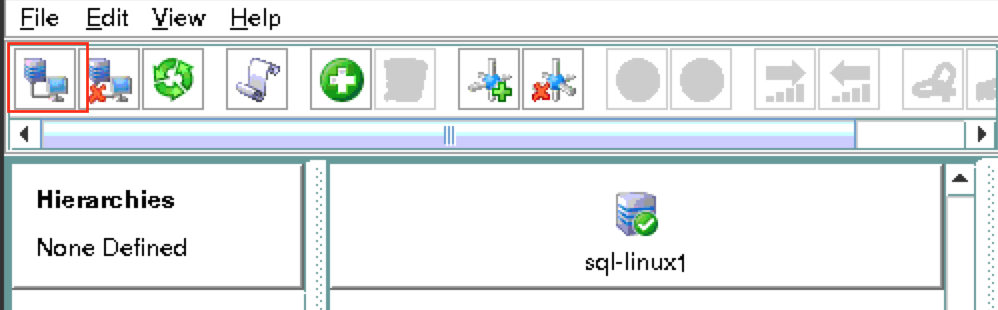
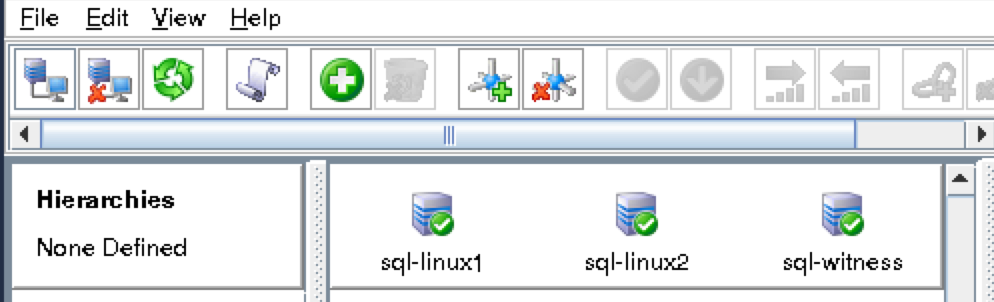
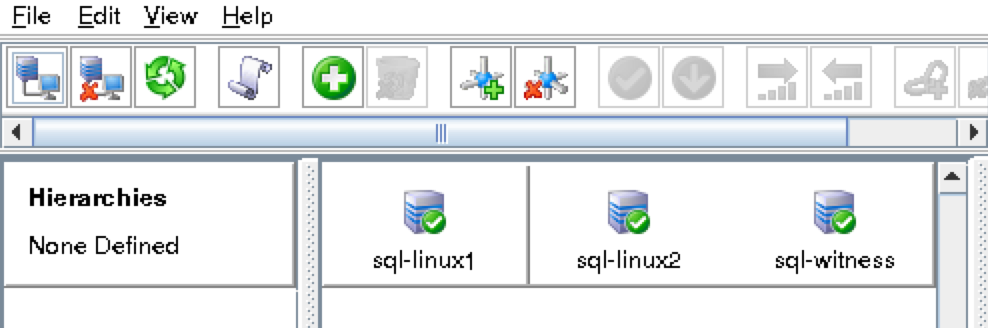
You should now see all 3 servers in the GUI, with a green checkmark icon indicating they are online and healthy:
Create Communication Paths
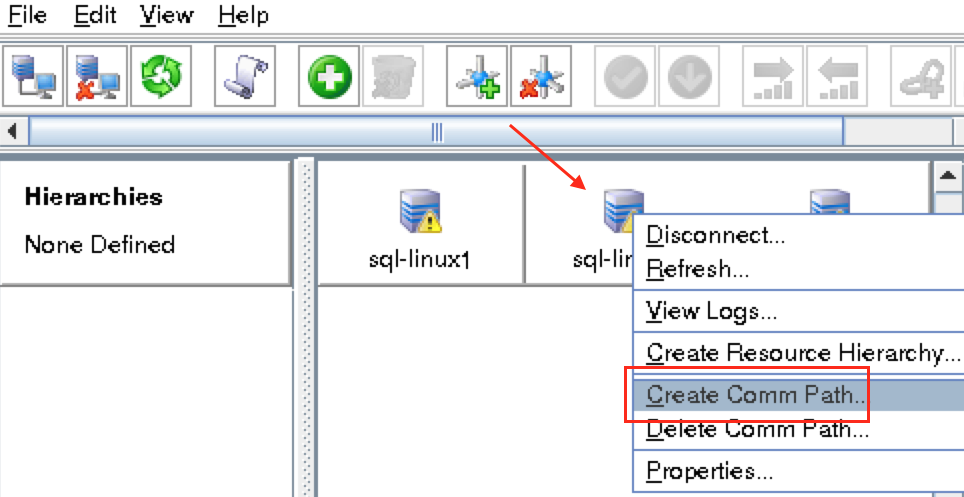
Right-click on “sql-linux1” and select Create Comm Path
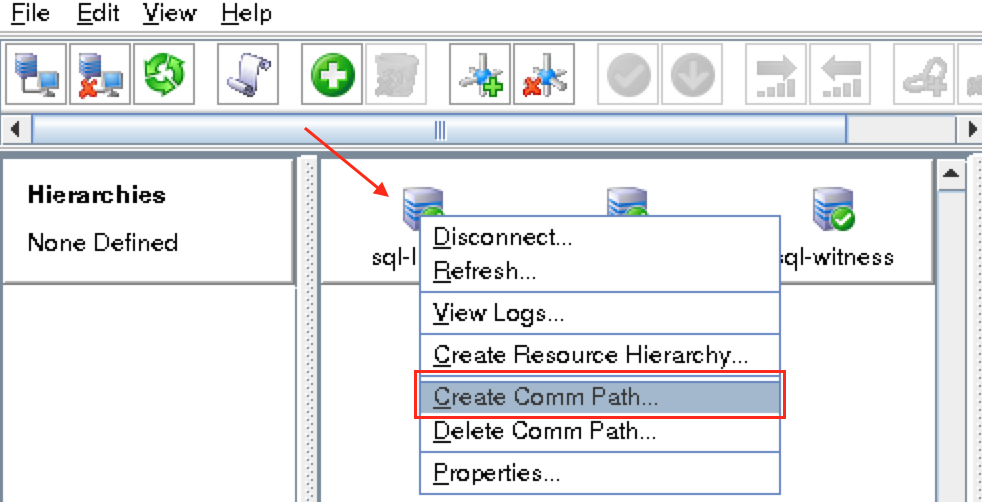
Select BOTH “sql-linux2” and “sql-witness” and then follow the wizard. This will create comm paths between:
- sql-linux1 & sql-linux2
- sql-linux1 & sql-witness
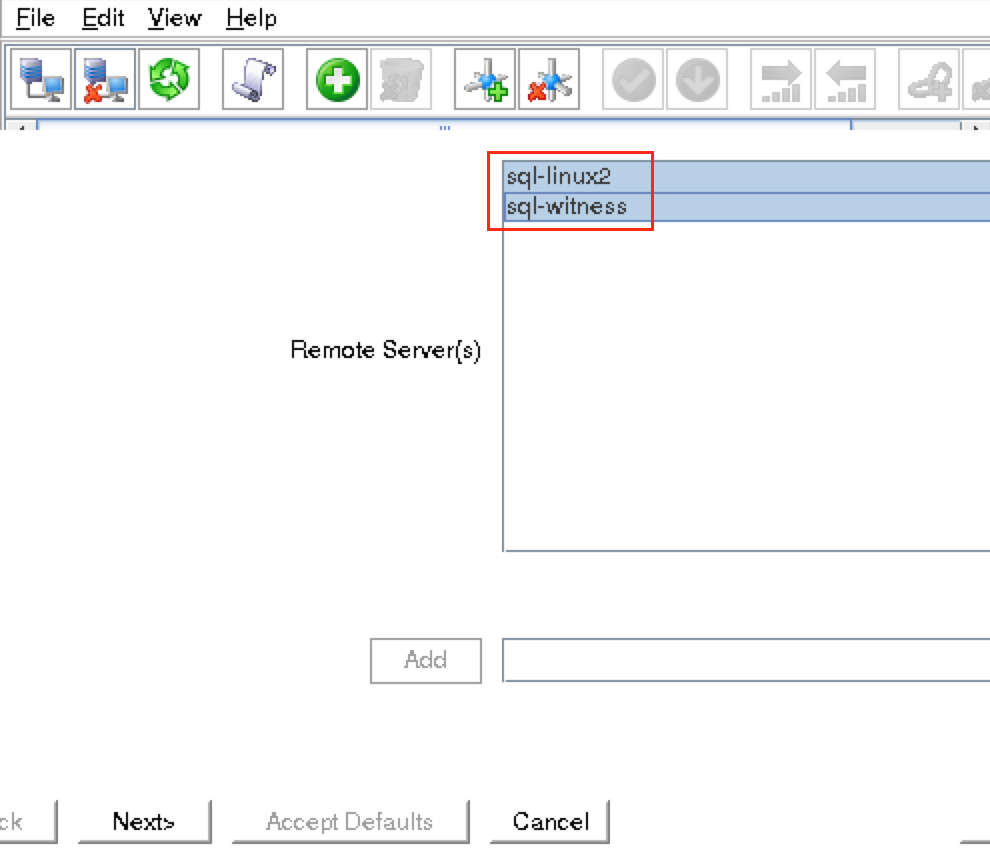
A comm path still needs to be created between sql-linux2 & sql-witness. Right click on “sql-linux2” and select Create Comm Path. Follow the wizard and select “sql-witness” as the remote server:
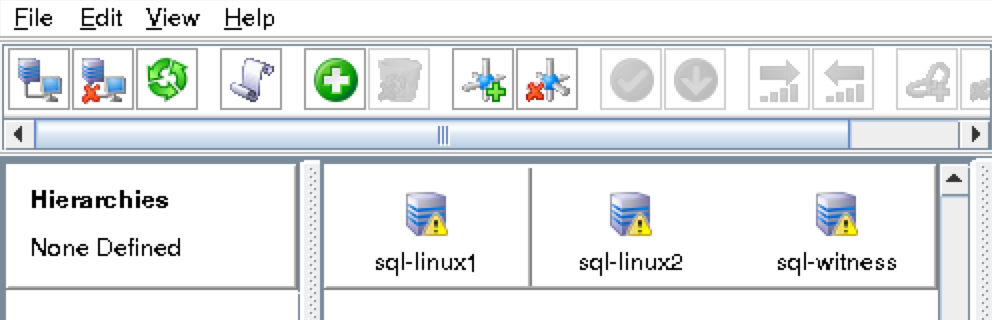
At this point the following comm paths have been created:
- sql-linux1 <—> sql-linux2
- sql-linux1 <—> sql-witness
- sql-linux2 <—> sql-witness
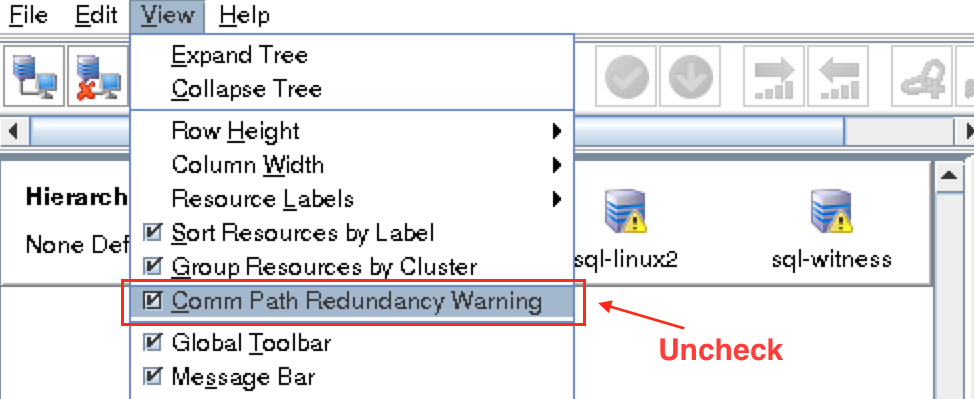
The icons in front of the servers have changed from a green “checkmark” to a yellow “hazard sign”. This is because we only have a single communication path between nodes.
If the VMs had multiple NICs (information on creating Azure VMs with multiple NICs can be found here, but won’t be covered in this article), you would create redundant comm paths between each server.
To remove the warning icons, go to the View menu and de-select “Comm Path Redundancy Warning”:
Result:
Verify Communication Paths
Use the “lcdstatus” command to view the state of cluster resources. Run the following commands to verify that you have correctly created comm paths on each node to the other two servers involved:
# /opt/LifeKeeper/bin/lcdstatus -q -d sql-linux1
MACHINE NETWORK ADDRESSES/DEVICE STATE PRIO
sql-linux2 TCP 10.0.0.7/10.0.0.8 ALIVE 1
sql-witness TCP 10.0.0.7/10.0.0.9 ALIVE 1
# /opt/LifeKeeper/bin/lcdstatus -q -d sql-linux2
MACHINE NETWORK ADDRESSES/DEVICE STATE PRIO
sql-linux1 TCP 10.0.0.8/10.0.0.7 ALIVE 1
sql-witness TCP 10.0.0.8/10.0.0.9 ALIVE 1
# /opt/LifeKeeper/bin/lcdstatus -q -d sql-witness
MACHINE NETWORK ADDRESSES/DEVICE STATE PRIO
sql-linux1 TCP 10.0.0.9/10.0.0.7 ALIVE 1
sql-linux2 TCP 10.0.0.9/10.0.0.8 ALIVE 1
Create a Data Replication cluster resource (i.e. Mirror)
Before you proceed with this step, make sure that /var/opt/mssql is MOUNTED on sql-linux1, but NOT MOUNTED on sql-linux2. Run “umount /var/opt/mssql” on sql-linux2 if needed.
Next, create a Data Replication resource to replicate the /var/opt/mssql partition from sql-linux1 (source) to sql-linux2 (target). Click the “green plus” icon to create a new resource:
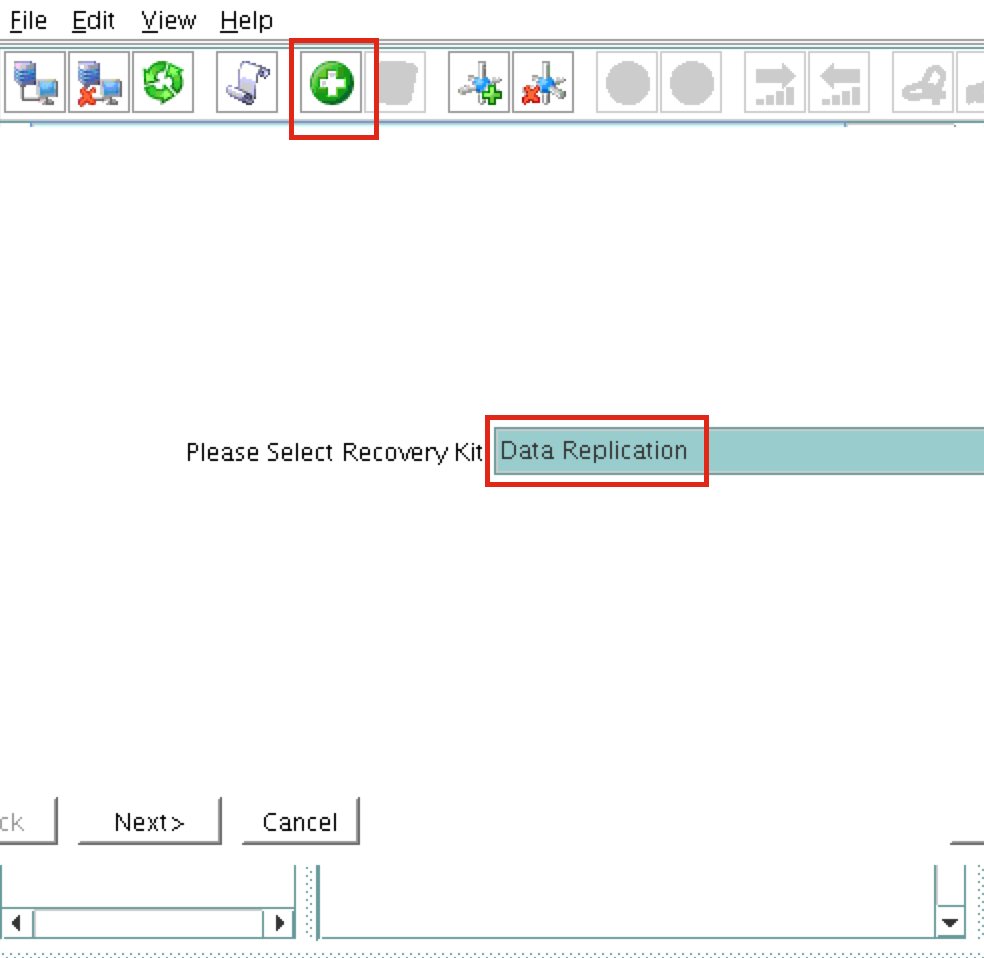
Follow the wizard with these selections:
Please Select Recovery Kit:  Data Replication
Switchback Type: intelligent
Server: sql-linux1
Hierarchy Type: Replicate Exiting Filesystem
Existing Mount Point: /var/opt/mssql
Data Replication Resource Tag: datarep-mssql
File System Resource Tab: /var/opt/mssql
Bitmap File: (default value)
Enable Asynchronous Replication:  No
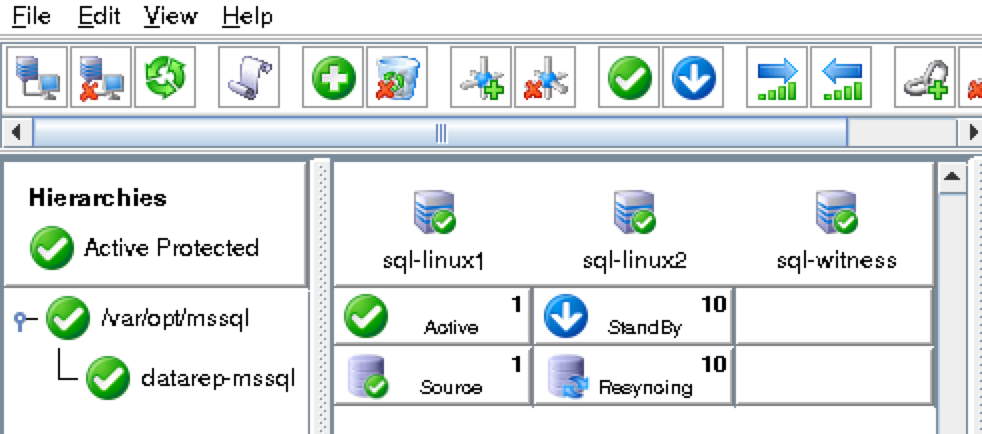
After the resource has been created, the “Extend” (i.e. define backup server) wizard will appear. Use the following selections:
Target Server: sql-linux2
Switchback Type: Intelligent
Template Priority: 1
Target Priority: 10
Mount Point: /var/opt/mssql
Root Tag: /var/opt/mssql
Target Disk: /dev/sdc1
Data Replication Resource Tag: datarep-mssql
Bitmap File: (default value)
Replication Path: 10.0.0.7/10.0.0.8
The cluster will look like this:
Create Virtual IP
Next, create a Virtual IP cluster resource. Click the “green plus” icon to create a new resource:
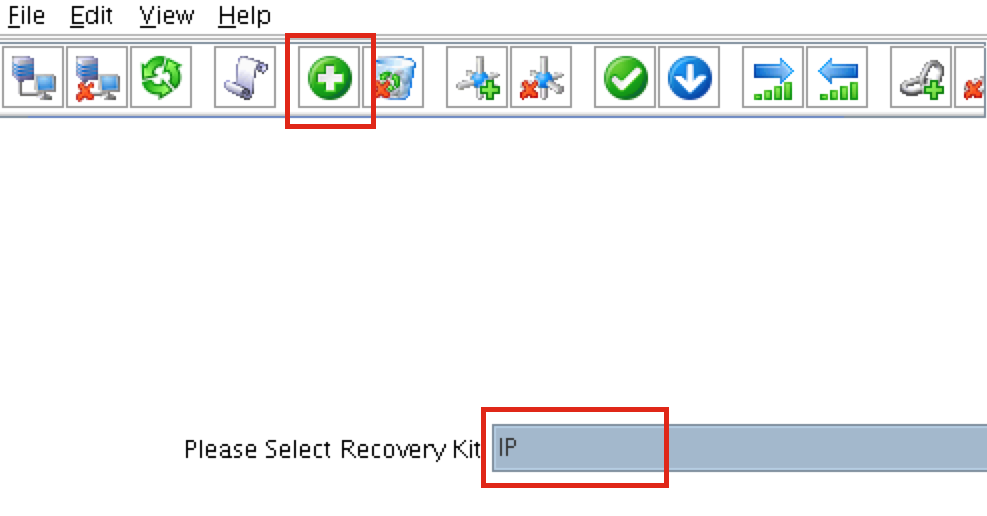
Follow the wizard with to create the IP resource with these selections:
Select Recovery Kit: IP
Switchback Type: Intelligent
Server: sql-linux1
IP Resource: 10.0.0.199
Netmask: 255.255.255.0
Network Interface: eth0
IP Resource Tag: ip-10.0.0.199
Extend the IP resource with these selections:
Target Server: sql-linux2
Switchback Type: Intelligent
Template Priority: 1
Target Priority: 10
IP Resource: 10.0.0.199
Netmask: 255.255.255.0
Network Interface: eth0
IP Resource Tag: ip-10.0.0.199
Configure a Ping List for the IP resource
By default, SPS-Linux monitors the health of IP resources by performing a broadcast ping. In many virtual and cloud environments, broadcast pings don’t work. In a previous step, we set “NOBCASTPING=1” in /etc/default/LifeKeeper to turn off broadcast ping checks. Instead, we will define a ping list. This is a list of IP addresses to be pinged during IP health checks for this IP resource. In this guide, we will add the witness server (10.0.0.9) to our ping list.
Right click on the IP resource (ip-10.0.0.199) and select Properties:
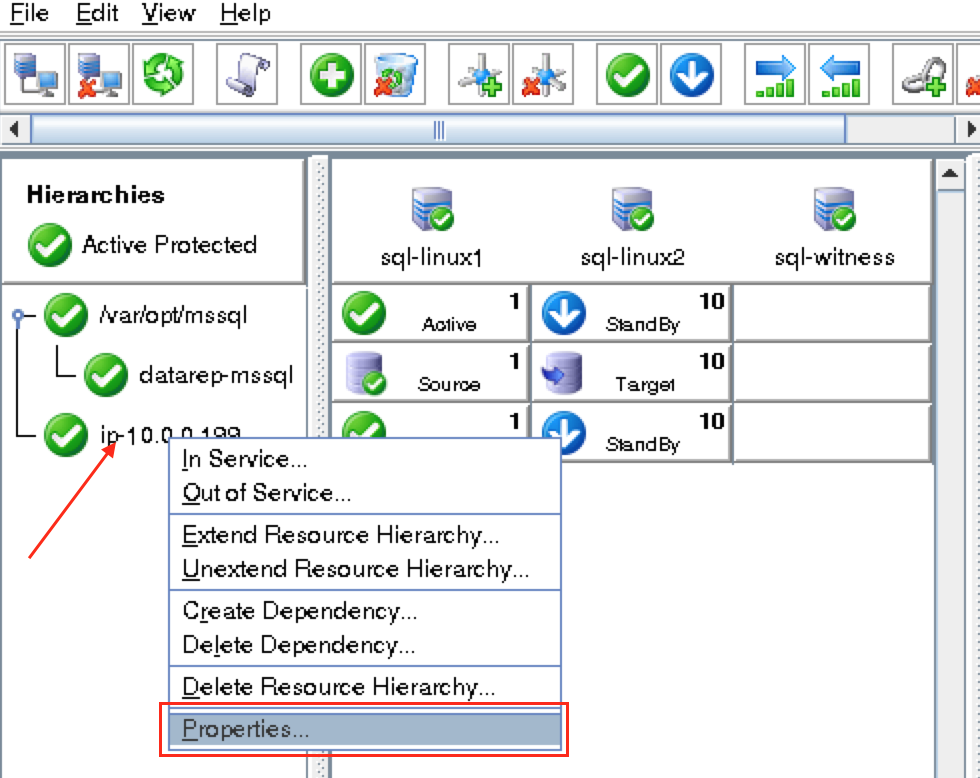
You will see that initially, no ping list is configured for our 10.0.0.0 subnet. Click “Modify Ping List”:
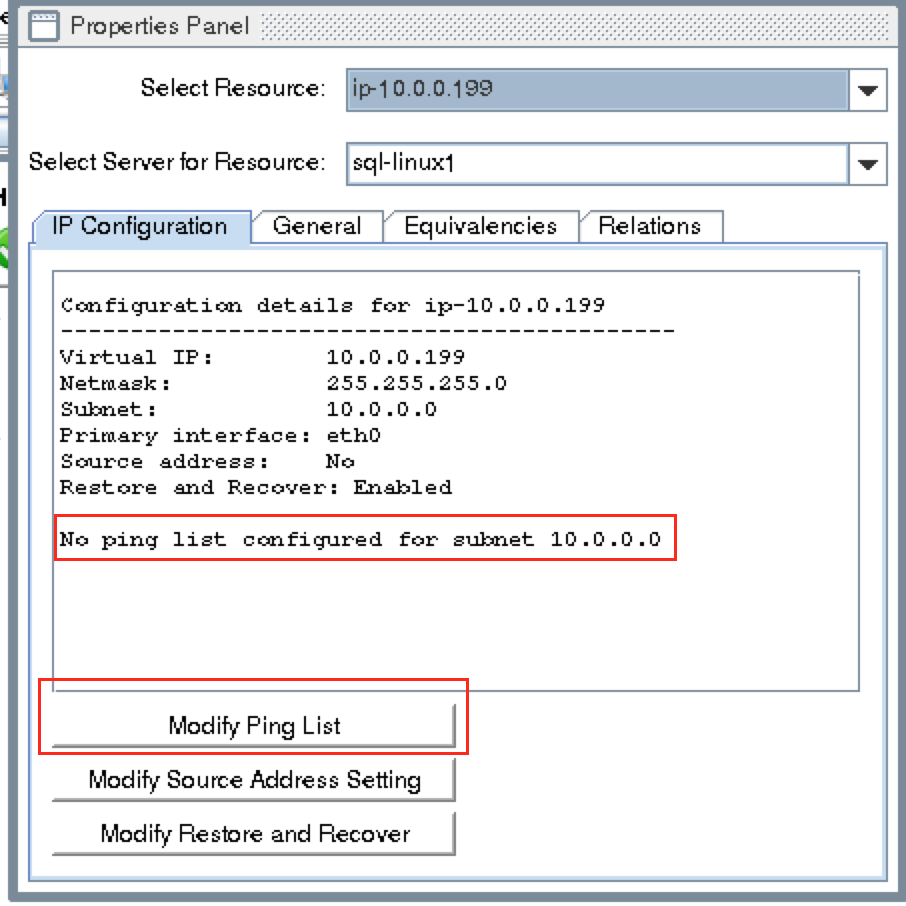
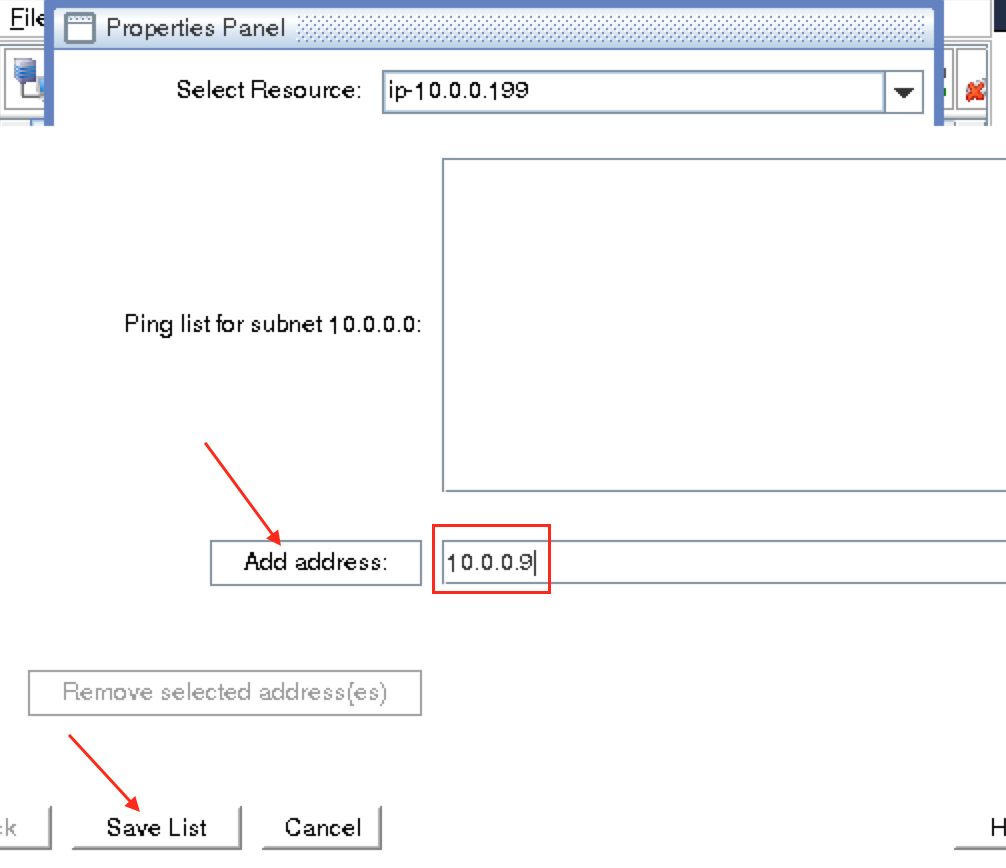
Enter “10.0.0.9” (the IP address of our witness server), click “Add address” and finally click “Save List”:
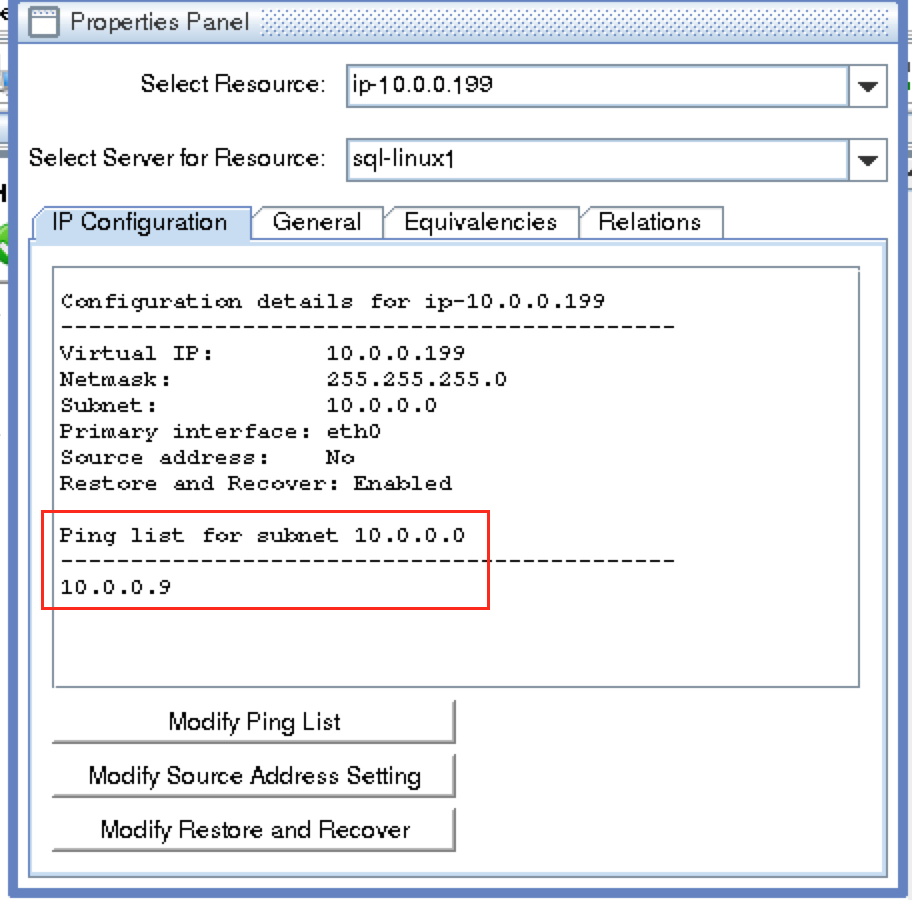
You will be returned to the IP properties panel, and can verify that 10.0.0.9 has been added to the ping list. Click OK to close the window:
Write scripts to stop/start/monitor/restart SQL Server
Next, create some simple shell scripts that will be loaded into the cluster to create a “Generic Application” resource, allowing the cluster to start/stop/monitor/restart SQL Server. These are very basic examples that make calls to “systemctl” to control the SQL Server services. We will create 4 scripts:
- Restore Script – aka “start”: sql-start.sh
- Remove Script – aka “stop”: sql-stop.sh
- QuickCheck Script – aka “status”: sql-status.sh
- Recover Script – aka “restart”: sql-restart.sh
# sudo su -

# cd /root

# vi sql-start.sh

#!/bin/bash
systemctl start mssql-server
systemctl start mssql-server-telemetry

# vi sql-stop.sh

#!/bin/bash
systemctl stop mssql-server
systemctl stop mssql-server-telemetry

# vi sql-status.sh

#!/bin/bash
systemctl status mssql-server
exit $?

# vi sql-restart.sh

#!/bin/bash
systemctl restart mssql-server
systemctl restart mssql-server-telemetry

Before loading these scripts into the cluster, make sure they are executable:

# chmod 755 sql-*.sh
Create the SQL Server resource hierarchy (Generic Application)
Next, create a Generic Application cluster resource. We will load in the scripts created in the previous step. To create, click the “green plus” icon to create a new resource:
Follow the wizard with to create the Generic Application resource with these selections:
Select Recovery Kit: Generic Application
Switchback Type: Intelligent
Server: sql-linux1
Restore Script: /root/sql-start.sh
Remove Script: /root/sql-stop.sh
QuickCheck Script: /root/sql-status.sh
Local Recovery Script: /root/sql-restart.sh
Application Info: <empty>
Bring Resource In Service: Yes
Resource Tag: app-SQLServer
Extend the Generic Application resource with the following selections:
Target Server: sql-linux2
Switchback Type: intelligent
Template Priority: 1
Target Priority: 10
Resource Tag: app-SQLServer
Application Info: <empty>
As a result, your cluster will look as follows:
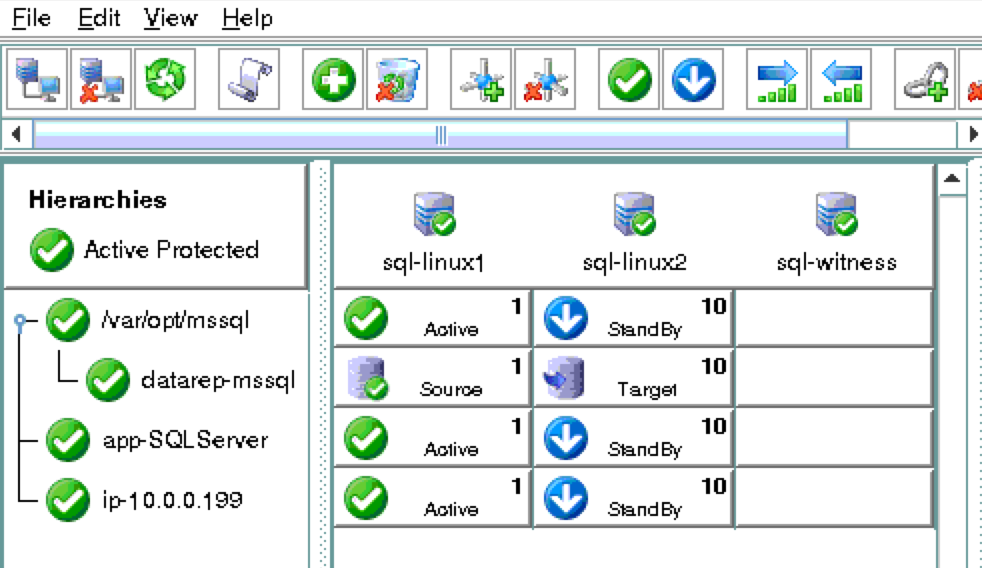
Create Dependencies between cluster resources
Create a dependency between the IP resource, SQL Server resource, and replicated filesystem resource so that they failover together as a group. Right click on the “app-SQLServer” resource and select “Create Dependency”.
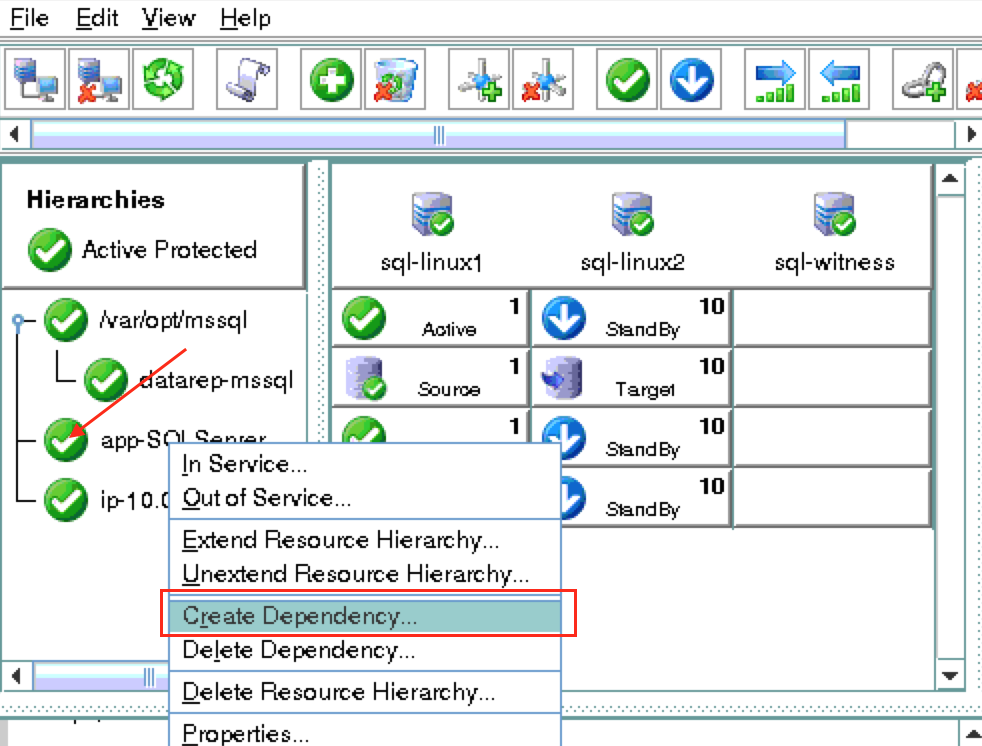
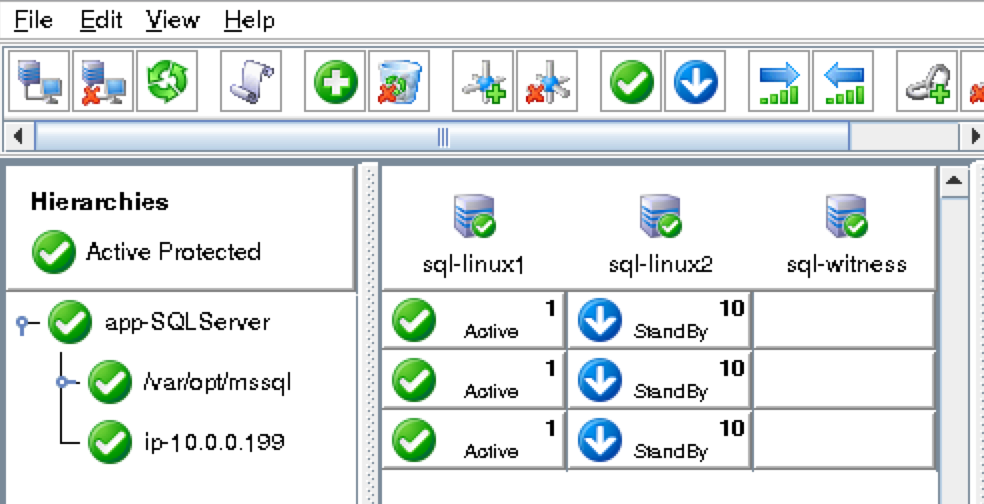
You will do this two times. First selecting “ip-10.0.0.199” as the child resource, and and second time selecting “/var/opt/mssql” as the child resource. After dependency creation your resource hierarchy should look like this:
Create an Internal Load Balancer
If this was a typical on-premises cluster using either physical or virtual servers, you’d be done at this point. Clients and Applications would connect into the Virtual IP of the cluster (10.0.0.199) to reach the active node. In Azure, this doesn’t work without some additional configuration.
You will notice that you can’t connect to the Virtual IP from any server other than the node that is currently active. Most cloud providers, including Azure, do not allow or support gratuitous ARPs which is the reason you can’t connect to the Virtual IP directly.
To workaround this, Azure provides a feature were you can setup an Internal Load Balancer (ILB). Essentially, when you connect to the IP address of the ILB (which we will actually set to be the same as the cluster’s Virtual IP – 10.0.0.199) you are routed to the currently active cluster node.
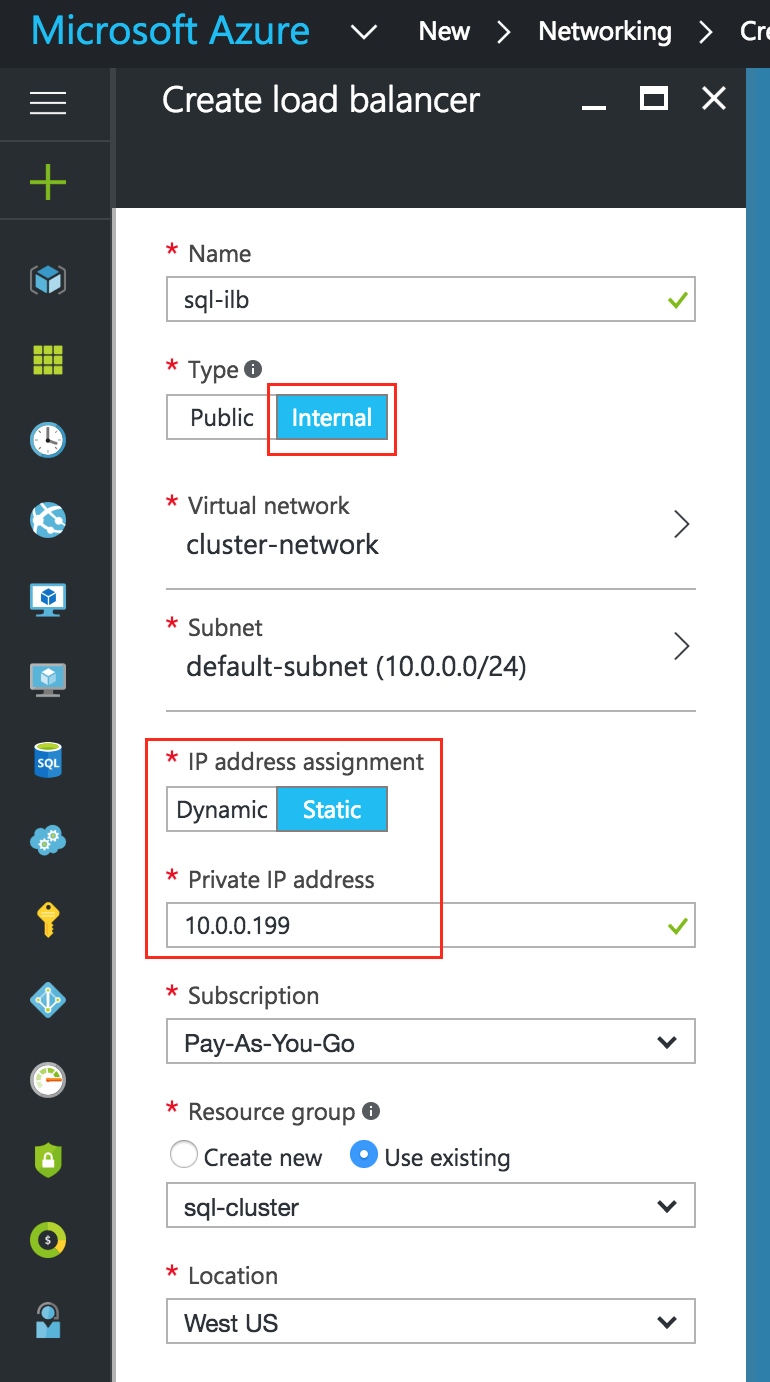
Create a Load Balancer:
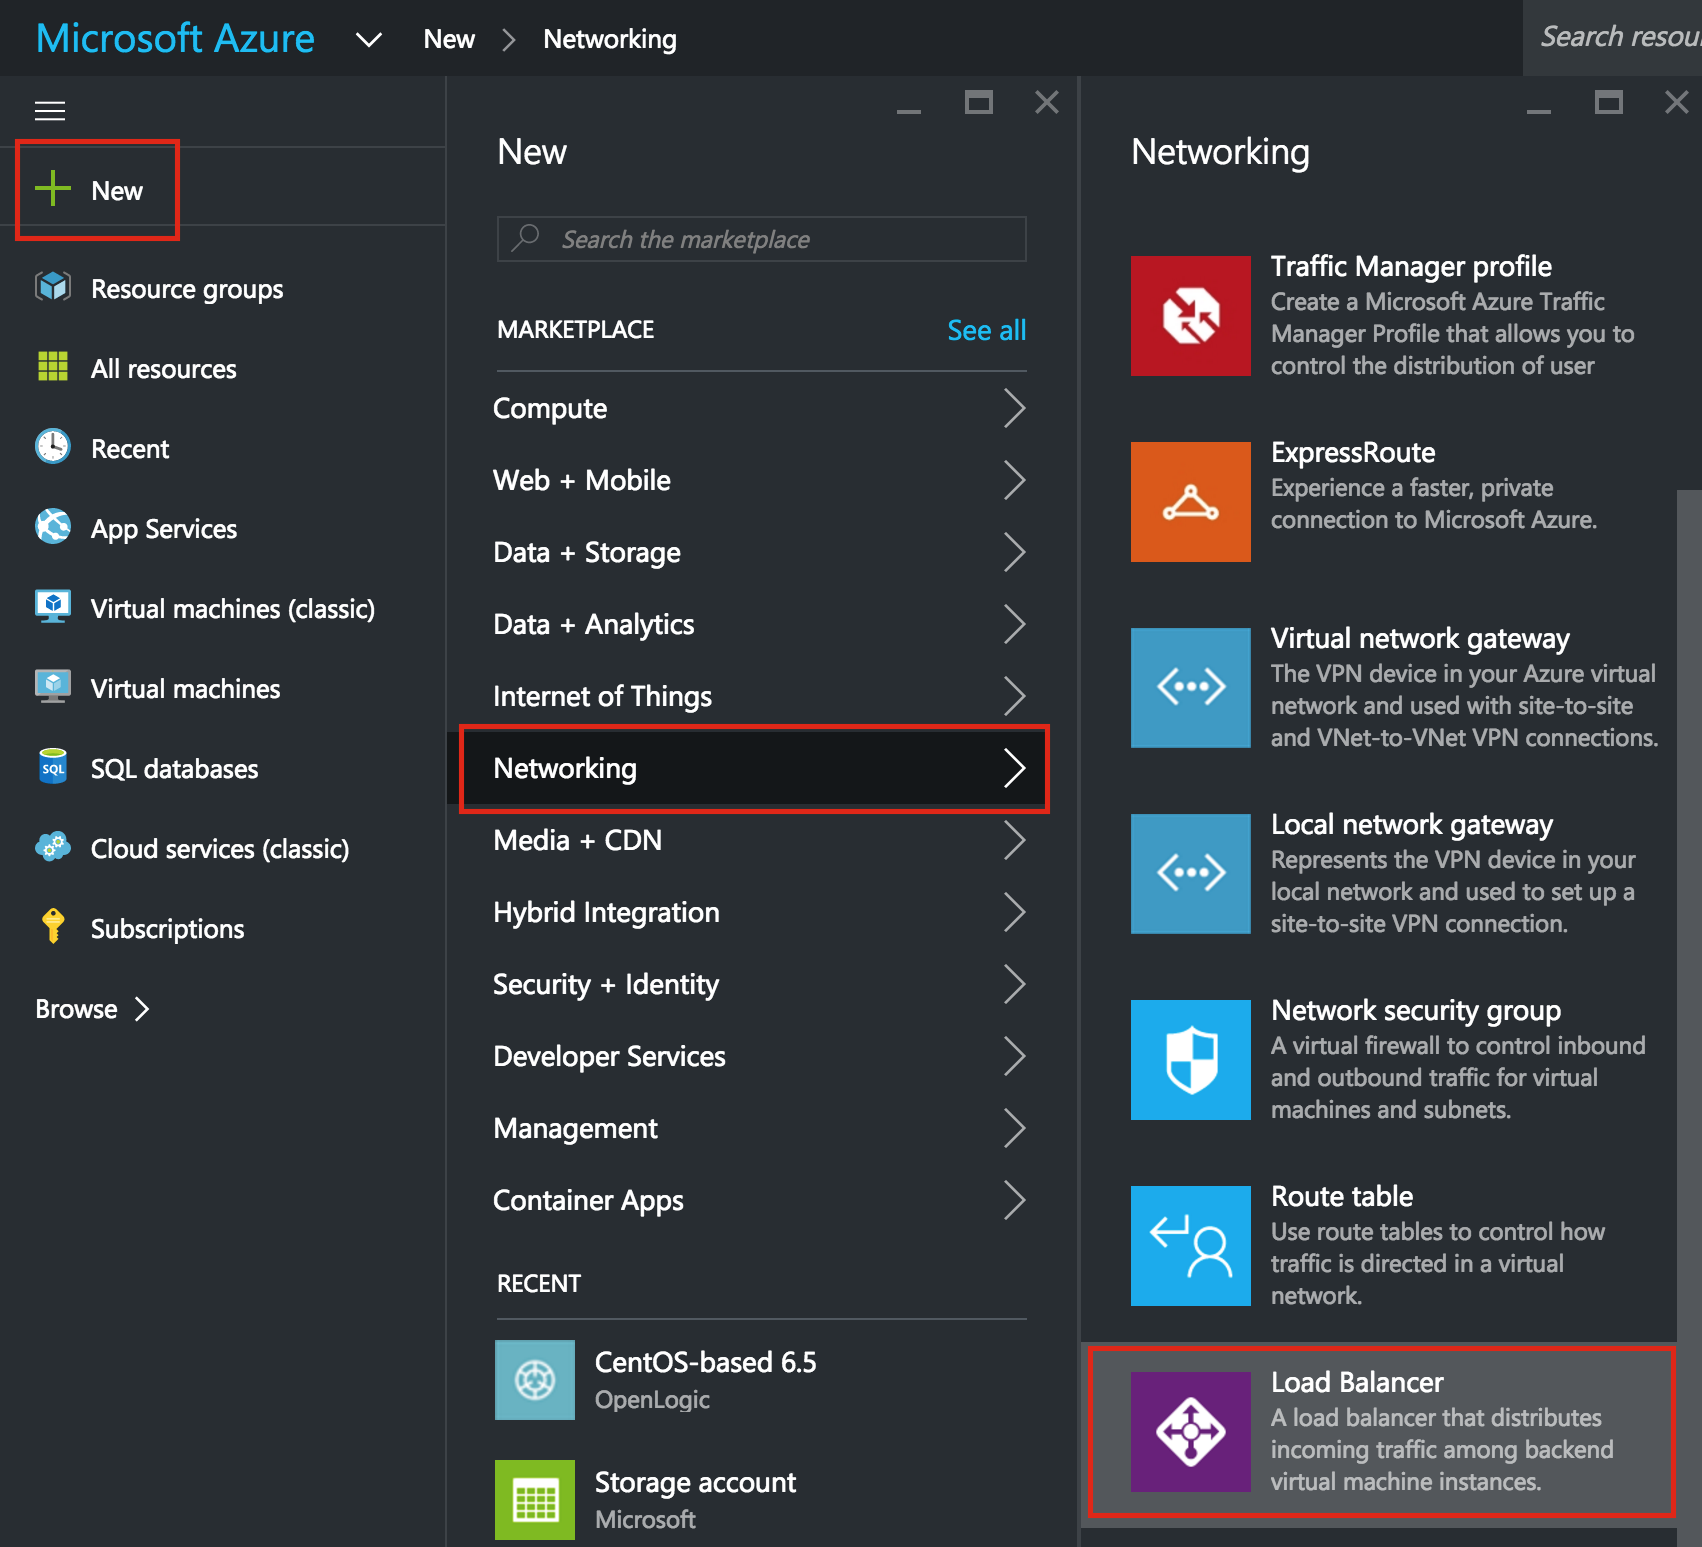
Give it a name, select “Internal” as the scheme, make sure your virtual network and subnet are properly selected, and assign a static IP that is the same as the cluster’s Virtual IP address. In this example it’s 10.0.0.199:
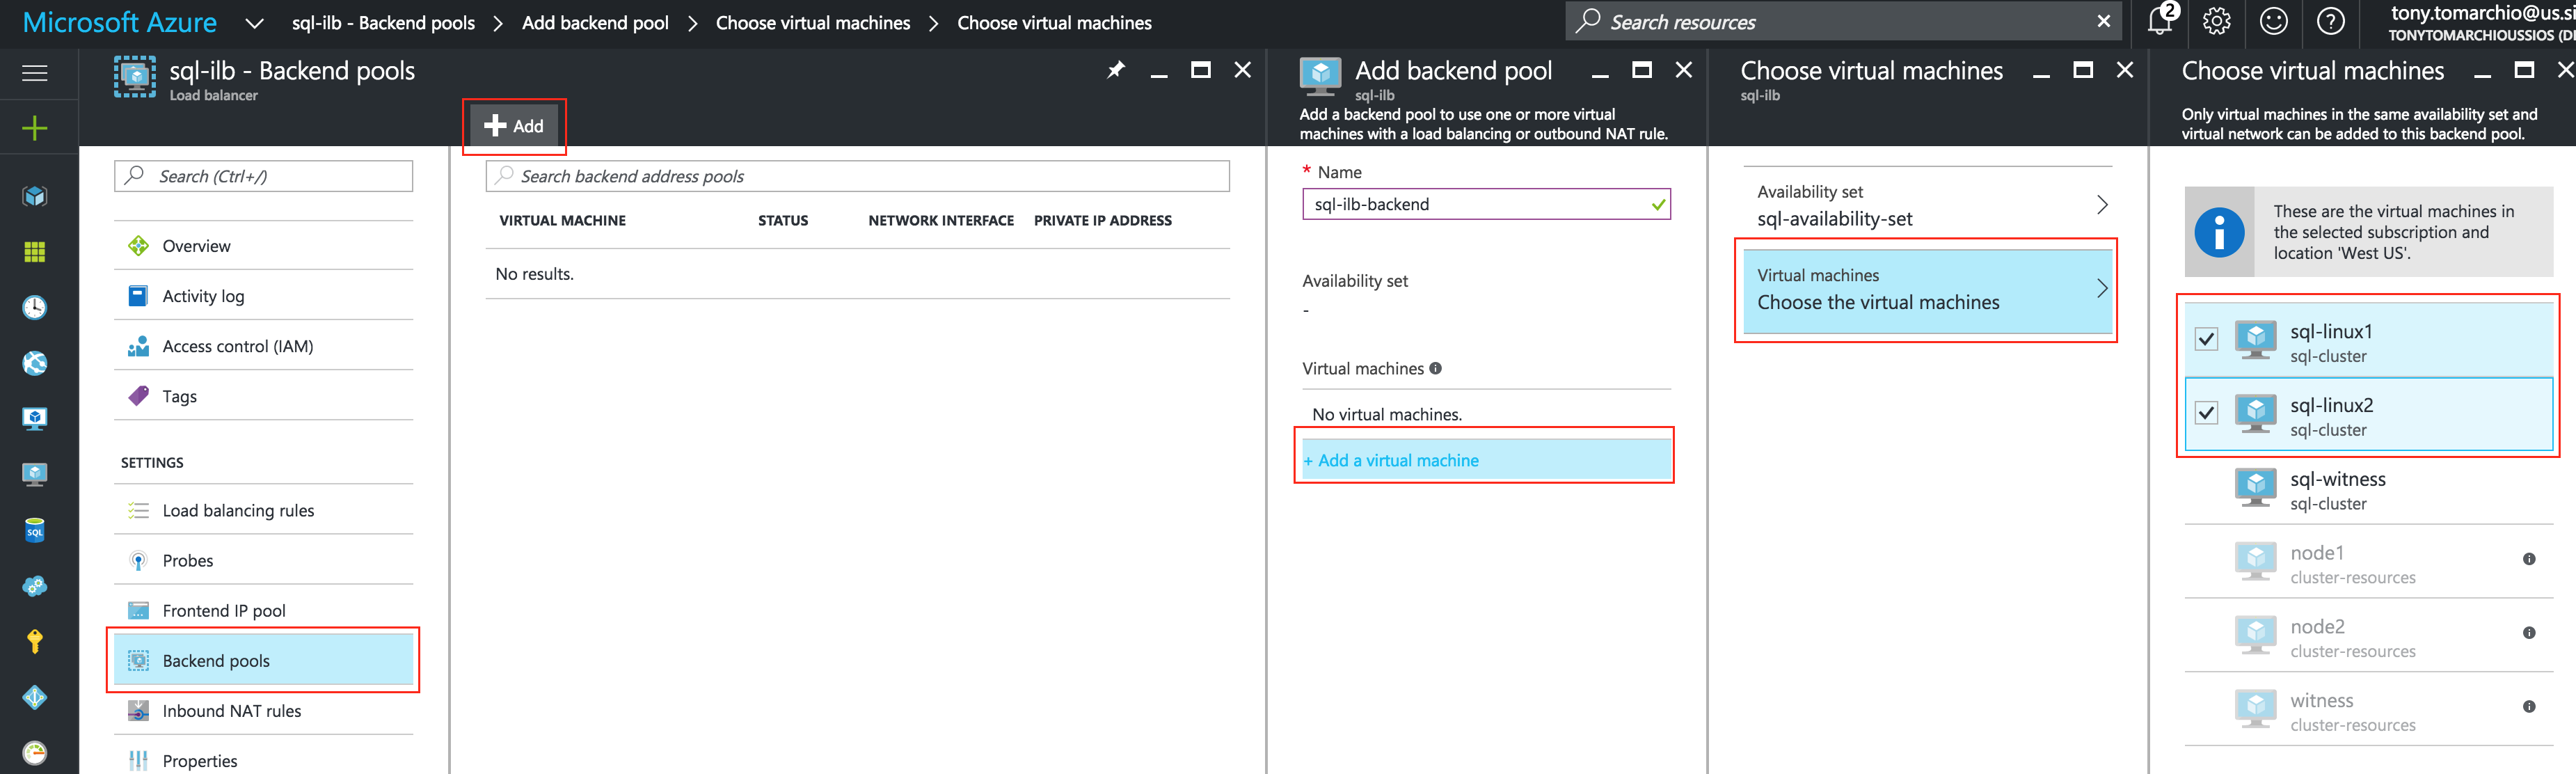
Next, add a backend pool behind the load balancer. This how you place the two cluster VMs behind this load balancer
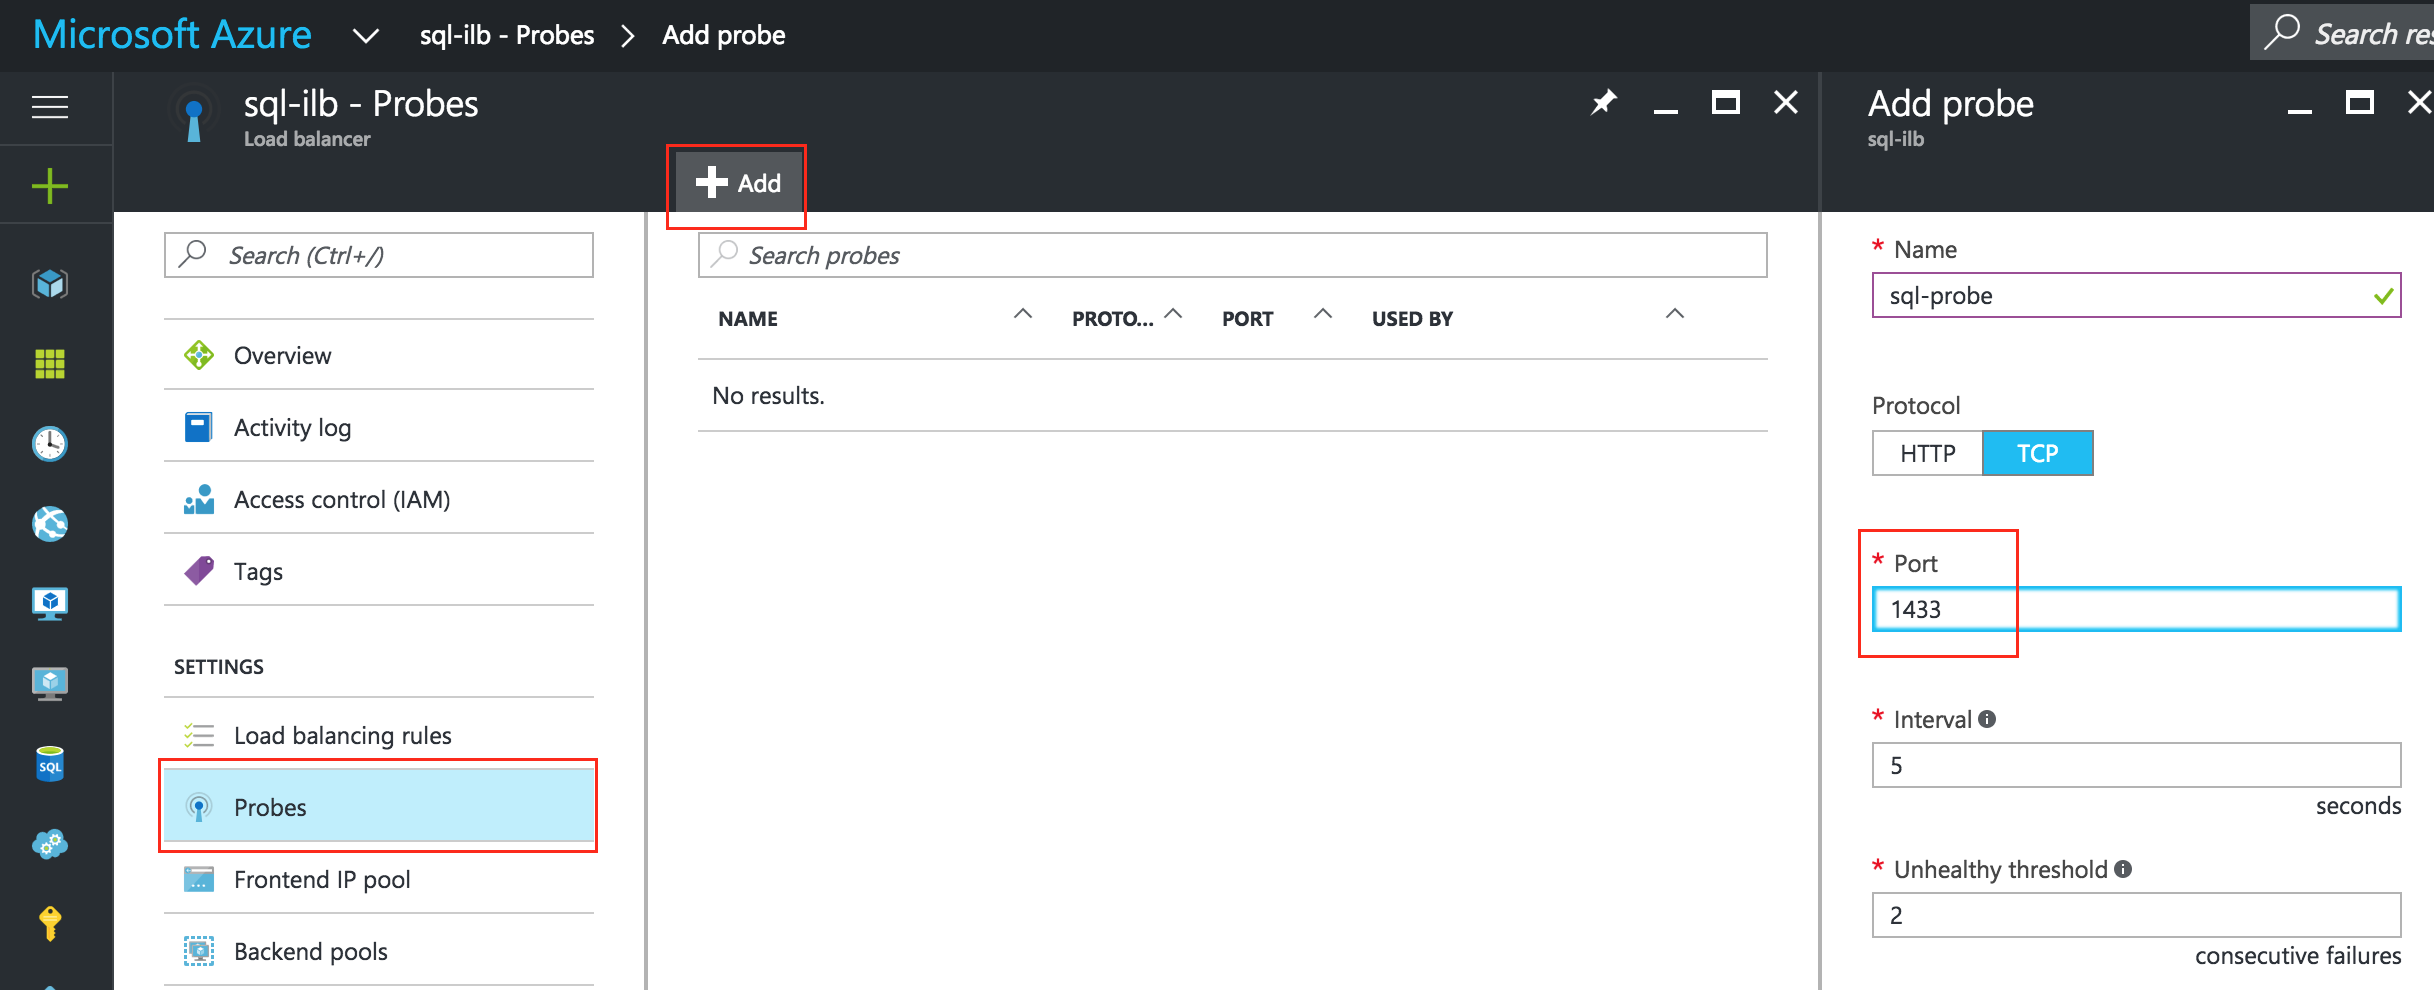
Next, configure a probe for your ILB. The probe checks the health of a service behind the ILB to determine which node to route traffic to. Here we will specify port 1433, which is the default for SQL Server:
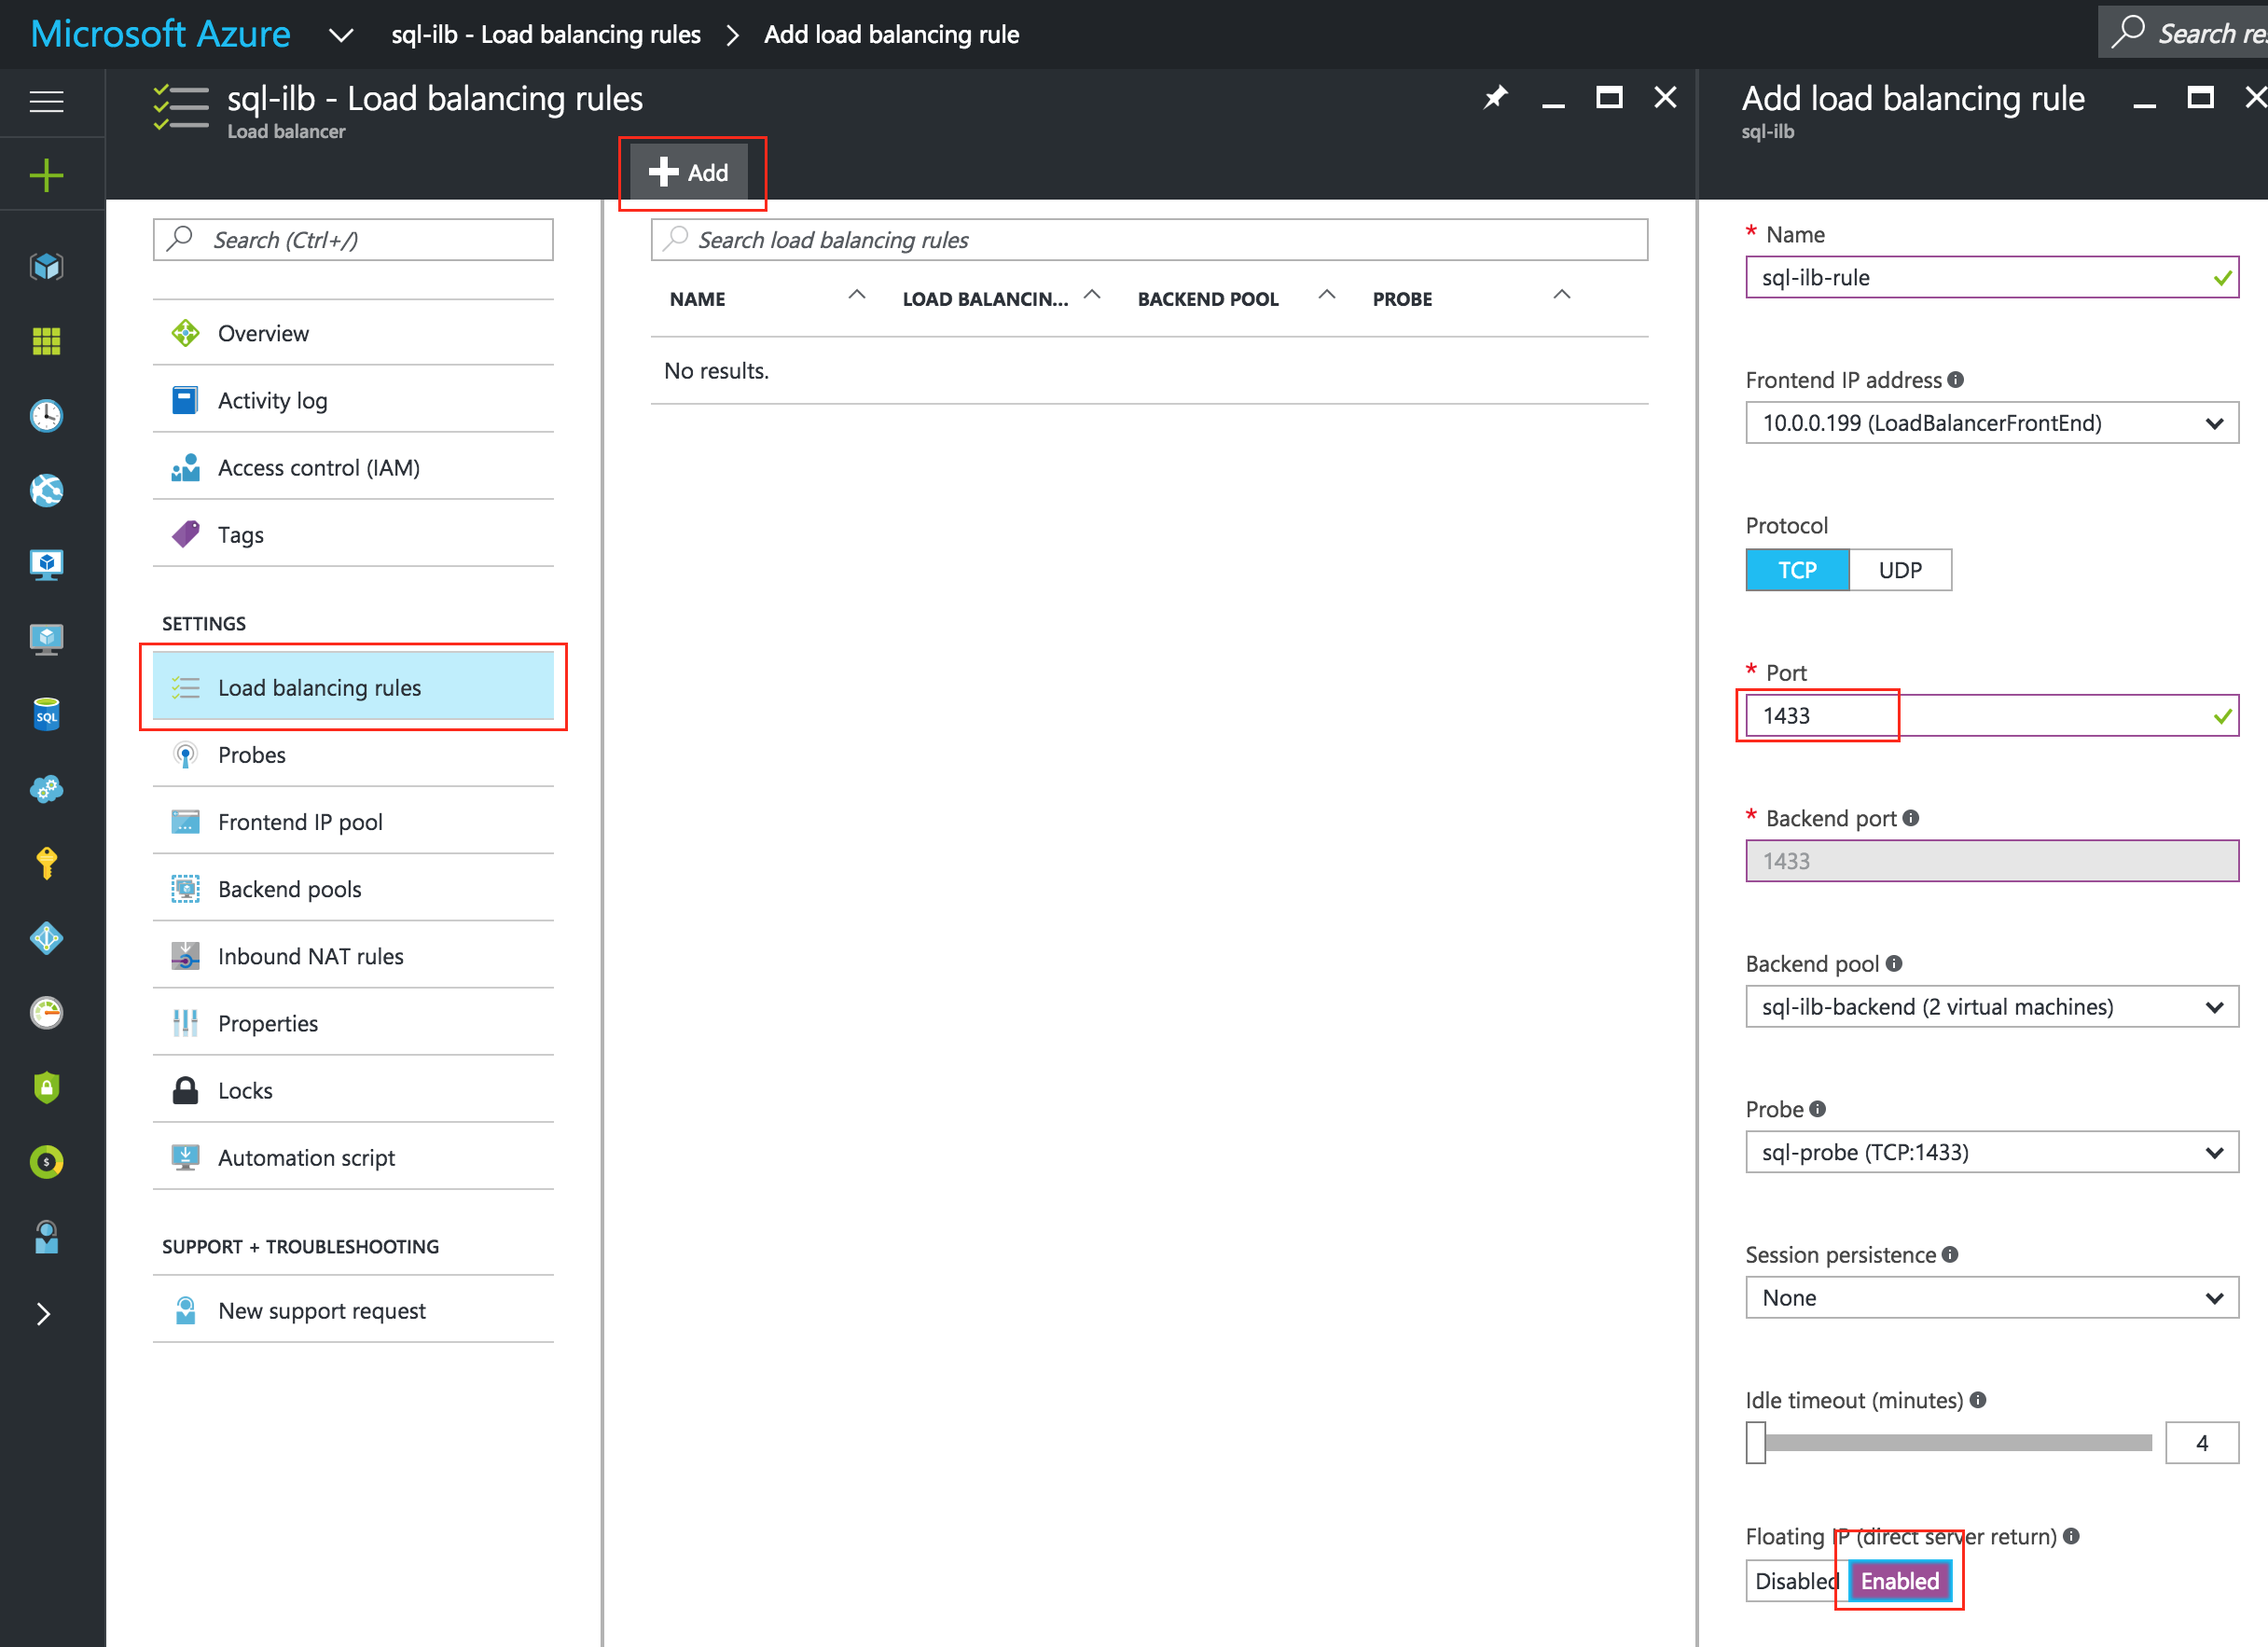
Finally, complete the ILB configuration by creating a Load Balancing Rule. TCP, Port 1433, and make sure you select “Enabled” for “Floating IP (direct server return)”:
Test Cluster Connectivity
At this point, all of our Azure and Cluster configurations are complete!
Cluster resources are currently active on sql-linux1:
SSH into the witness server (sql-witness), “sudo su -” to gain root access. Install sqlcmd if needed:
https://docs.microsoft.com/en-us/sql/linux/sql-server-linux-connect-and-query-sqlcmd
Test SQL connectivity to the cluster:
[root@sql-witness ~]# sqlcmd -S 10.0.0.199 -U SA -p
Execute the following SQL query to display the hostname of the active cluster node:
1> select @@servername;
2> go

-------------
sql-linux1

(1 rows affected)
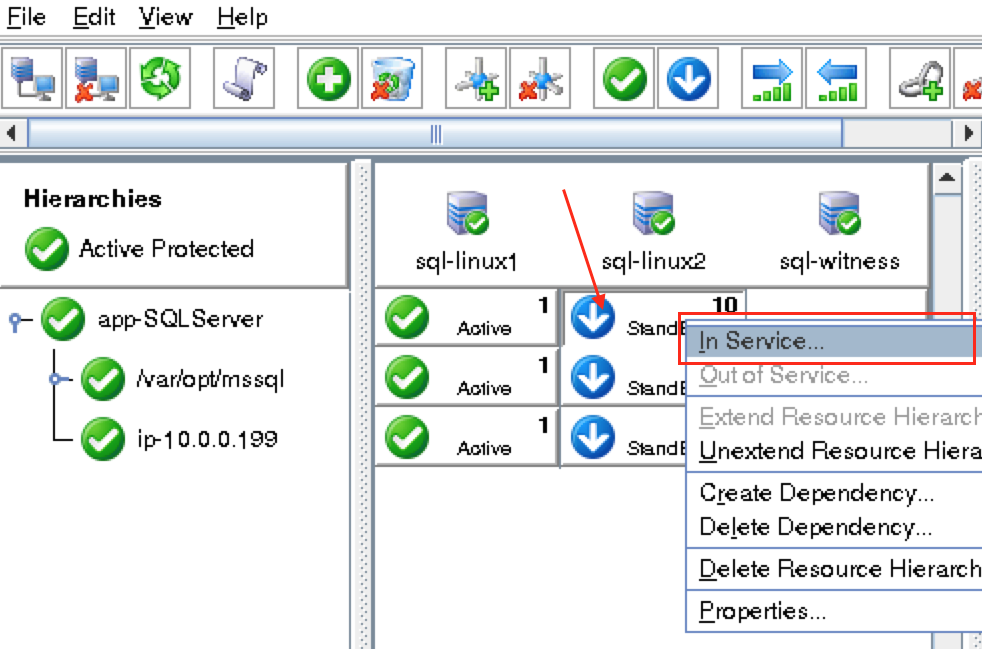
Using LifeKeeper GUI, failover from sql-linux1 -> sql-linux2″. Right click on the “app-SQLServer” resource underneath sql-linux2, and select “In Service…”:
After failover:
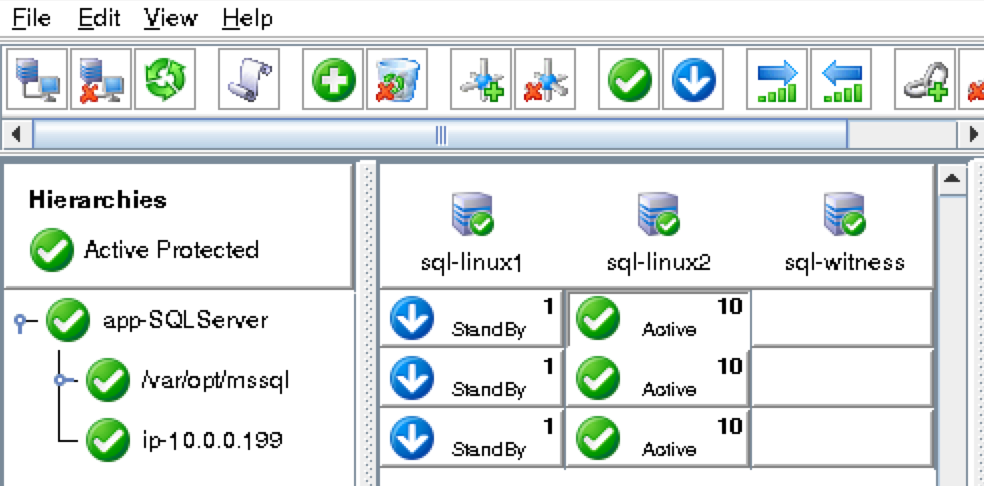
After failover has completed, re-run the SQL query, verifying that now “sql-linux2” is active:
[root@sql-witness ~]# sqlcmd -S 10.0.0.199 -U SA -p
Execute the following SQL query to display the hostname of the active cluster node:
1> select @@servername;
2> go

-------------
sql-linux2

(1 rows affected)

SQL Server for Linux – Public Preview Now Available
Reproduced with permission from Linuxclustering