In Part 1 of this series, I showed you how to prepare your multi-site cluster, including setting up the Node and File Share Majority Quorum. In Part 2, we saw a video example of how to integrate SteelEye DataKeeper, one of the available cluster replication solutions, with failover clustering to configure a multi-site Hyper-V failover cluster. In Part 3, we will examine how Microsoft SQL Server 2008 can be configured in a multi-site cluster with Windows Server 2008 Failover Clustering and SteelEye DataKeeper Cluster Edition.
First, why would you want to deploy a multi-site SQL server cluster? SQL Server comes with a variety of high availability options, including log shipping, replication (transactional, merge, snapshot), database mirroring and failover clusters. There is a great article that talks about the High Availability options in SQL Server 2008, so I won’t re-invent the wheel here. If you want to learn more about all of the options, have a look at this article by Ross Mistry, High Availability Options in SQL Server 2008.
If you read the article, Ross’ summary makes the following statement…
“Clearly, failover clustering is the best choice to reduce system downtime and provide higher application availability for the whole instance of SQL Server within a site; however, a failover cluster does not protect against disk failure and requires a SAN.”
What if you could have all of the benefits that Ross outlines and also protect against disk failure and eliminate the need for a SAN? Well, the good news is that is exactly what you can do by implementing a Microsoft SQL Server 2008 multi-site cluster on Windows Server 2008. SQL Server 2008 multi-site cluster may be a little bit of a misnomer. It does not necessarily need to be deployed across geographically dispersed locations. The servers could be located in the same rack, same room, same building or across continents; it really doesn’t matter. The important thing is that you are eliminating your storage as a single point of failure and if you choose to locate your cluster nodes in different physical locations then you also have built in site resiliency.
One of the most common questions and points of confusion about SQL Server 2008 and Windows Server 2008 failover clustering is support for failing across subnets. Yes, Windows Server 2008 Failover Clustering does support failing between subnets for most applications, however, SQL Server 2008 is not one of those applications. As far as I know, SQL Server 2008 R2 will also not support failing between subnets when it is released. My understanding is that the SQL team is working on support for cross-subnet failover, but it will be supported sometime after SQL Server 2008 R2 is released. So, for the time being, you will have to span your subnet if you wish to separate your nodes geographically.
Now that you have determined to deploy a multi-node SQL server cluster, here are the steps you will need to follow.
CONFIGURE YOUR BASIC CLUSTER
Follow the steps in Part 1 of this series to configure a basic 2-node cluster with a Node and File Share Majority Quorum.
CONFIGURE YOUR REPLICATION
Deploying a multi-site cluster will require that you work very closely with your replication vendor during this part of the configuration. Each vendor will have very specific instructions on how to set up the replication and create the storage resources to be used in your cluster. For the purposes of this demonstration, I will use SteelEye DataKeeper Cluster Edition to replicate the E drive from the server named PRIMARY to the server named SECONDARY. The E drive on PRIMARY and SECONDARY are just local attached volumes and not part of any SAN. As long as the E drive shows up as a local attached disk, DataKeeper can replicate it from one server to another. You can mix and match SAS, iSCSI, SAN, VHD, or any other storage type as DataKeeper is storage agnostic.
After you have configured your basic cluster as described in Part 1 of my series, run the DataKeeper setup.exe to install SteelEye DataKeeper Cluster Edition on both nodes of the cluster. You will be prompted to enter your license key at the end of the install. Enter your license and reboot your servers when prompted. You are now ready to create your mirror. Launch the DataKeeper GUI and follow the instructions below to create your mirror.
Click on “Connect to Server”.

Enter the name of the first server. Click Connect.


Enter the name of the second server, click Connect


Now click Create Job. That will launch the Create Job wizard.

Give your job a name and description. These can be anything you like.

Choose the following:
- Source Server – where the data will be replicated from
- Network adapter – the network where the replication traffic will travel
- Volume – the volume you want to replicate
Click Next to continue.

Choose the following:
- Target Server – where the data will be replicated to
- Network adapter – the network where the replication traffic will travel
- Volume – the volume you want to replicate
Click Next to continue.

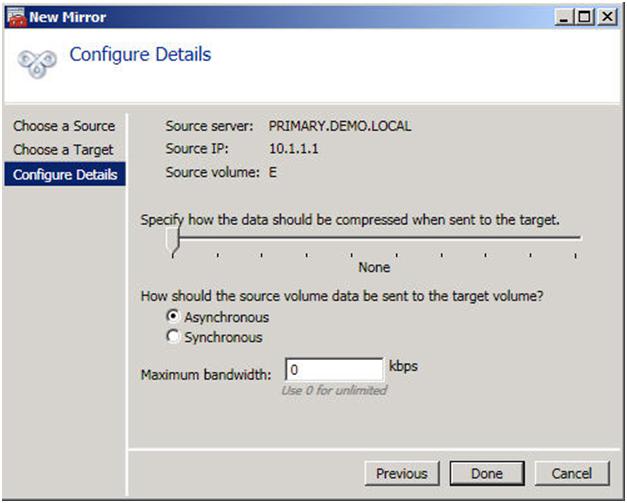
Choose the following:
- Compression Level – If you have a 100 Mbps or faster network for replication, leave it set to none. If you have a WAN that is less that 100 Mbps, you may benefit from enabling compression. Settings somewhere in the middle tend to give you the best performance of compression vs. CPU overhead associated with enabling compression.
- Asynchronous vs. Synchronous – Asynchronous replication is generally acceptable in most environments and is definitely required in high-latency WAN environments. I wrote a whole blog post on this topic, so if you have any questions, check out my article on Asynchronous vs. Synchronous replication.
- Maximum bandwidth – you can think of this as a “poor man’s” QOS. If you want to ensure that replication never exceeds a certain threshold of your WAN capacity, you can put a limiter on the amount of bandwidth it can consume. Unless you have a good reason to set it, it is better off leaving it set to 0.
Click Done to create your mirror.
Now if you take a look at your DataKeeper GUI, it will look similar to the following.

Once you have created your mirror, you need to make your mirror available in the Microsoft Cluster “Available Storage”. There are a few ways to do this, but the most straight forward way is to use the Windows PowerShell CLI. Below is an example that shows how to take the existing mirror we just created on the E drive and add it to the cluster “Available Storage”, move it to the PRIMARY node and bring it in-service
Import-Module FailoverClusters
Add-ClusterResource -Name “DataKeeper Volume E” -ResourceType “DataKeeper Volume” -Group “Available Storage”
Get-ClusterResource “DataKeeper Volume E” | Set-ClusterParameter VolumeLetter E
Move-ClusterGroup “Available Storage” -Node primary
Start-ClusterResource “DataKeeper Volume E”
For more information on PowerShell and the available commands for use with Failover Clustering, check out this great blog post from Symon Perriman of the Microsoft Failover Clustering Team.
http://blogs.msdn.com/clustering/archive/2008/12/20/9243367.aspx
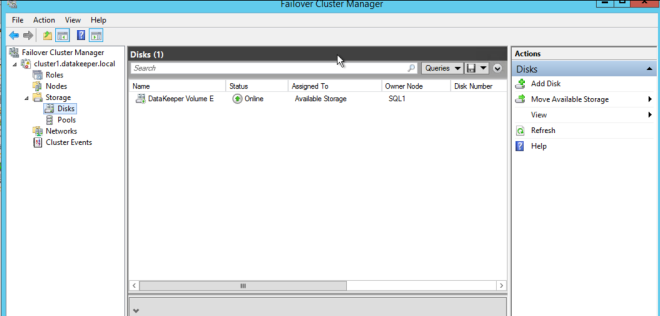
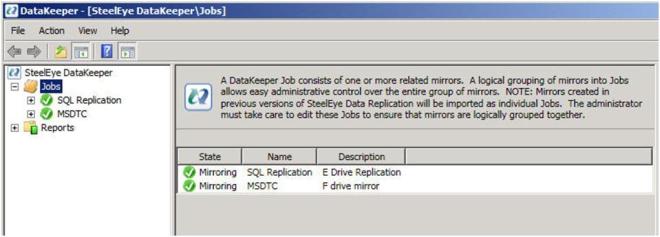
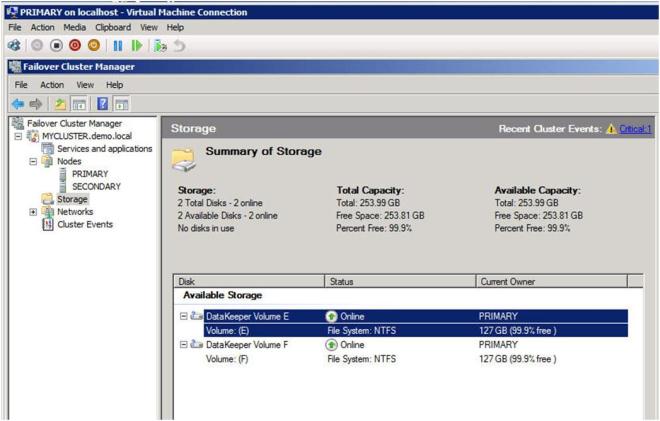
You are now going to repeat the above steps to add any additional mirrors that you will use in your cluster. In our case, we are going to create a mirror of the F drive and use it to cluster the MSDTC. After you have added your additional mirrors and added them to Available Storage, your DataKeeper GUI should look something like this.
And your Failover Cluster Manager GUI should look like this.
CLUSTERING MSDTC
IMPORTANT NOTE – There is a hotfix that is required in order to support DTC with 3rd party disk resources. Please see the following KB article and apply the howfix to all cluster nodes. http://support.microsoft.com/kb/978476
SQL 2008 is very dependent upon MSDTC, so it is highly recommended that you cluster the MSDTC resource before you cluster your SQL resource. The following articles are provided for your reference for configuration and management of your MSDTC resource.
http://technet.microsoft.com/en-us/library/cc770748(WS.10).aspx
http://technet.microsoft.com/en-us/library/cc771540(WS.10).aspx
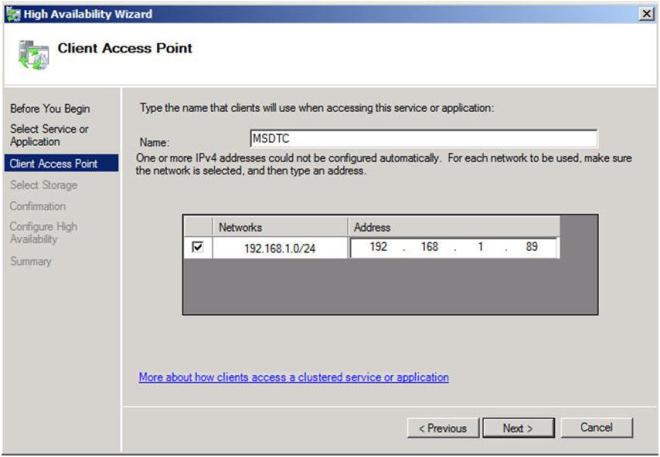
You will start by opening the Failover Cluster Manager GUI and then choose “Configure a Service or Application”.

You will then choose “Distributed Transaction Coordinator” and click Next

Give the MSDTC resource a name and unique IP address. These should be unique to MSDTC and not the same as you will use later when you create your SQL resource.
Choose the volume where you will store the data for the MSDTC resource. In our case we are choosing the replicated F drive.

Confirm your information and click Next to continue.

Congratulations, you have successfully configured the DTC resource. Click Finish.

We are just about ready to begin the installation of the first node of the SQL Server Cluster, however, there is one thing we need to do in preparation – Slip Stream SQL 2008 SP1 onto the SQL Server 2008 RTM install media.
SLIP STREAM SQL SP1 ONTO YOUR SQL 2008 INSTALL MEDIA
What I have discovered is that SQL Server 2008 will not install on Windows Server 2008 R2 without first slipstreaming SQL Server 2008 SP1 onto your SQL 2008 install media. Here is a great article that describes how to slipstream SQL Server 2008 RTM and Service Pack 1. After I read that article and successfully slipstream SP1 onto SQL 2008 RTM, I found the following Microsoft KB article that describes the same procedure. You may get an error that looks like the following if you try to install SQL without first slipstreaming SP1 onto the media.
There was an error setting private property ‘RequireKerberos’ to value ‘1’
I followed the instructions detailed in the first article and copied my SQL 2008 with SP1 install to the C:\ drive of both nodes in my cluster. In the instructions below, I will do the installation from the local disk of each cluster node.
INSTALLING YOUR FIRST CLUSTER NODE
Now that you have your SQL Server 2008 SP1 installation media ready to go, you are ready to install your first SQL node. There is one major “gotcha” when it comes to installing SQL on a multi-node cluster. In order for you to install SQL on a multi-node cluster, you must first pass the Windows Server 2008 Failover Cluster validate process. Unfortunately, a multi-site cluster is exempt from passing the storage related test, so you never are able to actually “pass” the validation as far as SQL is concerned. It took a little investigation on my part, but what I have come to find is that there is a command line parameter that allows you to skip the validation test on the SQL 2008 installation. Here is the command line.
Setup /SkipRules=Cluster_VerifyForErrors /Action=InstallFailoverCluster
To launch the SQL setup, open a Command window, browse to your SQL 2008 with SP1 install directory and type the command as shown below.

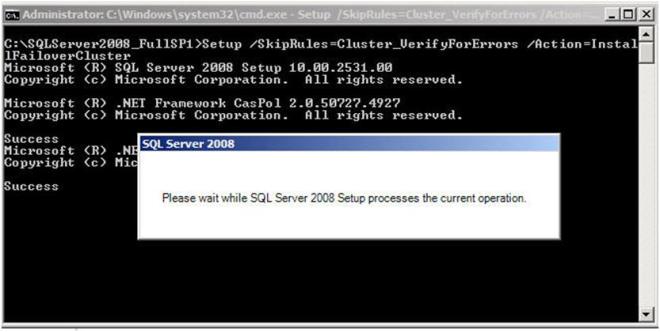
If everything goes as planned, you should see the screen below. Click OK to continue.

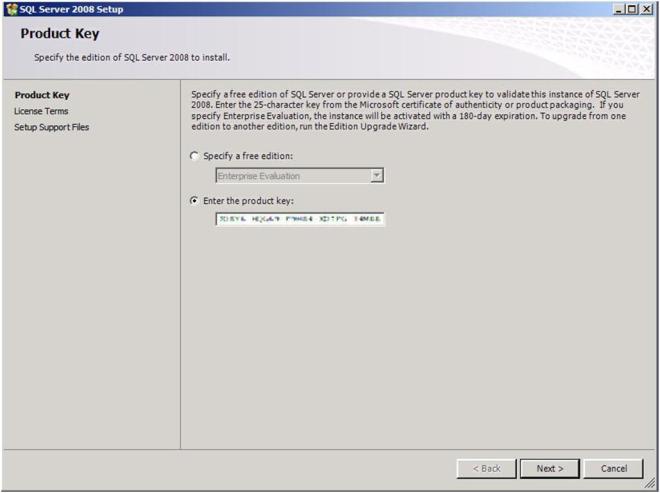
Enter your product key and click Next

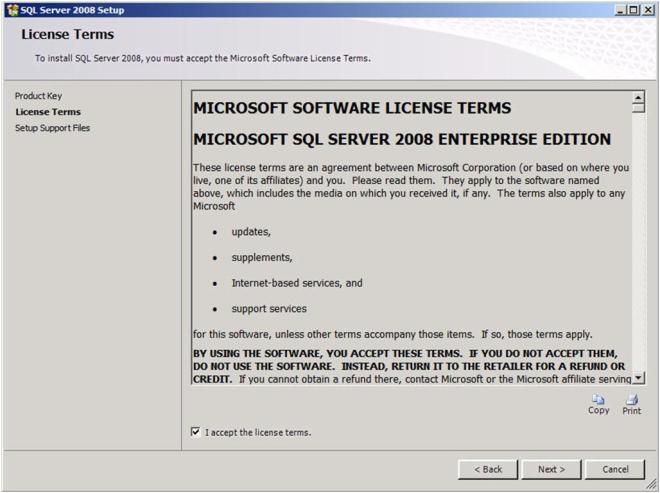
Accept the license agreement and click Next
Click Install to install the Setup Support Files

At the end of the Setup for the Support Files you will receive a warning. Click on Show details and you will see the message below. You can click Next, ignoring this message since it is expected in a multi-site or non-shared storage cluster.

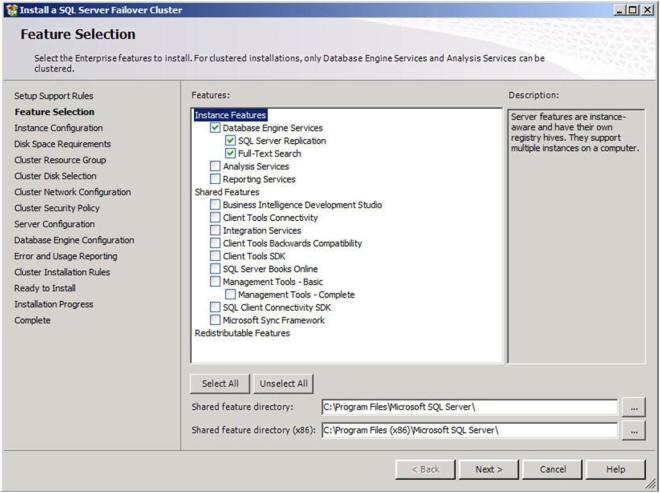
Choose the features you would like to install and click Next. Leave the “Shared Feature” directory set to the C drive as the SQL binaries should not be installed on the replicated volume.
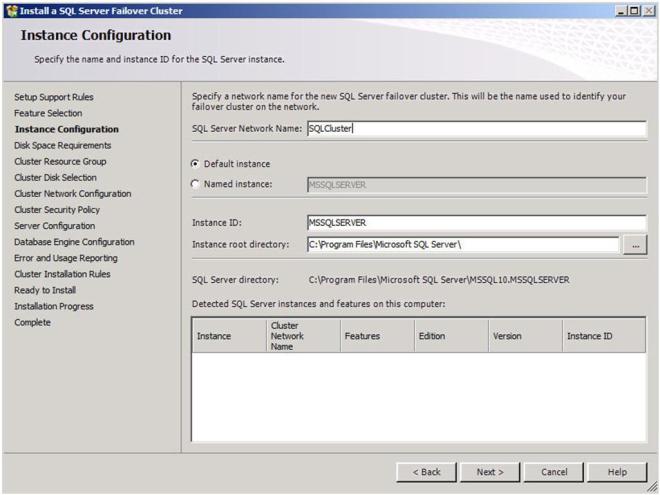
On the next screen, you will choose a network name for your SQL Server. This will be the name that all of the clients will connect to. Assuming this is the default instance, leave the Instance ID and Instance root directory set to the defaults. Do not move the instance root directory to the replicated volume.
It is recommended that you have separate domain accounts for SQLServer and SQLAgent. You can take the time to create these accounts now if you have not already done so. These accounts require no special permissions, as this install process will give them the permissions that they require.

Confirm you have enough disk space and click Next to continue.

Choose the default settings to allow a new cluster resource group named “SQL Server (MSSQLSERVER)” to be created.

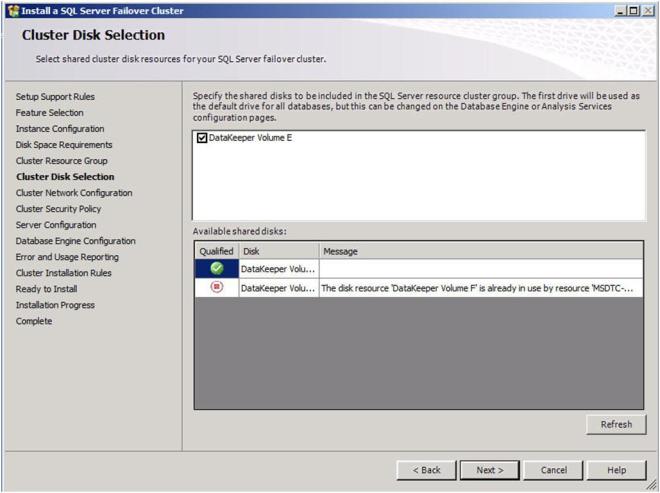
Choose a replicated volume that is still available, in our case the E:\ drive. Click Next to continue.
Now you will choose the IP address you want associated with the SQL cluster resource. You could leave it set to use DHCP if you wish.

Choose your security settings and click Next

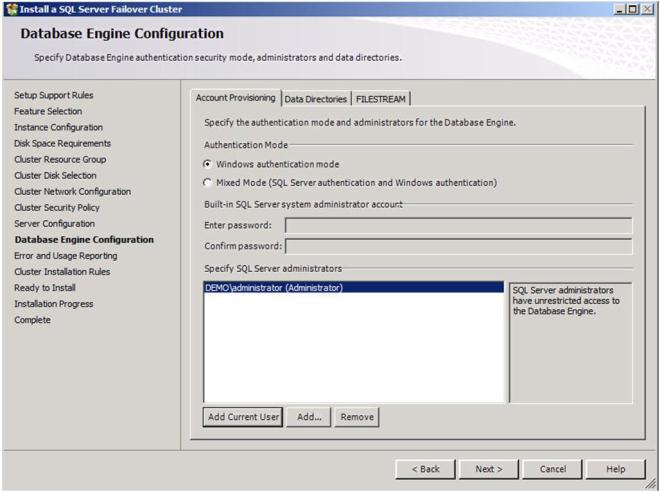
Add any SQL Server administrators and choose your authentication mode and then click Next
Choose your Error and Usage Reporting options and click Next

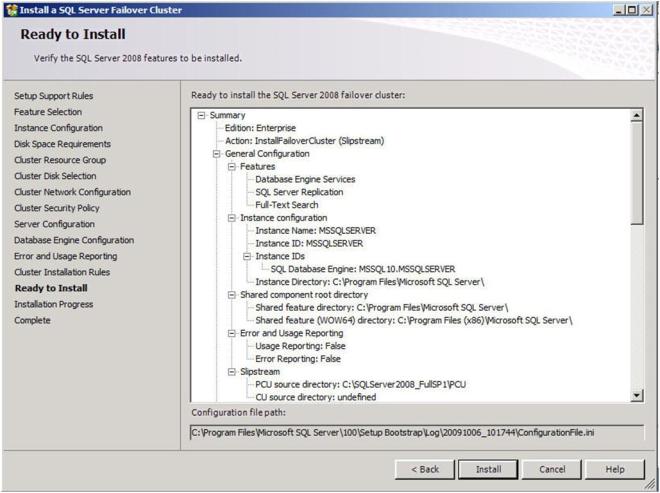
You will once again see some warnings related to the validation process. You can ignore those messages as they are to be expected in a multi-site SQL Server cluster.


Click Install to begin the installation process
If everything installs as expected, you should see the following screens. Click Next then Close to finish the installation.


Congratulations, you have successfully installed the first node of your multi-site SQL Server Cluster. Now we will install the second node of the cluster.
INSTALL THE SECOND CLUSTER NODE
Installing the second cluster node is similar to installing the first node. We need to run SQL Setup once again from the command line so that we can skip the Validate process. So, from the 2nd node, open up your command prompt and run the following command.
-
Install SQL 2008 SP1 (merged setup) on the 2nd node using the following command:
Setup /SkipRules=Cluster_VerifyForErrors /Action=AddNode /INSTANCENAME=”MSSQLSERVER”
*Note: This assumes you installed the default instance on the 1st node

That will launch the install wizard as shown below. Click OK to continue.

Enter your product key and click next.
Accept the license terms and click Next

Click install to install the Setup Support files.

You can once again ignore the warning that some cluster validation tests have been skipped. This is to be expected in a multi-site cluster and non-shared storage clusters.

Verify you are adding the node to the right instance and click Next.

Add the passwords to the service accounts and click Next

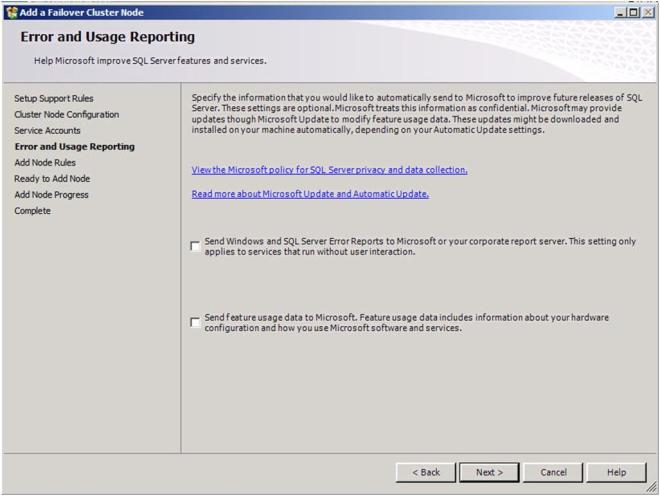
Choose your Error and Usage Reporting options and click Next
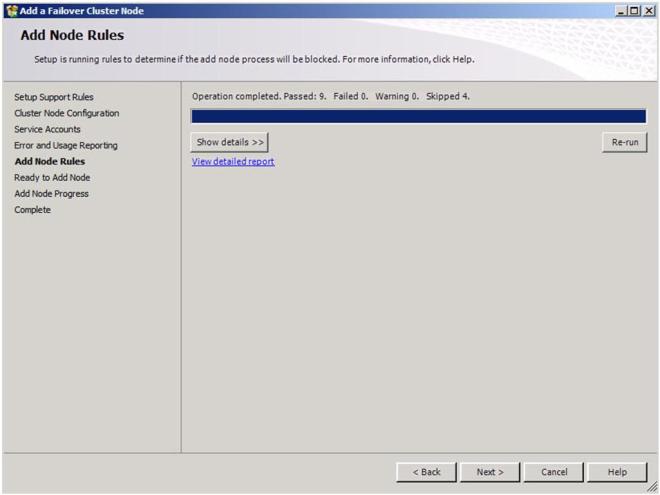
Once again, ignore the warning about the skipped operations.

Click Install to begin the installation process.

If everything goes as expected, you should see the following screen.

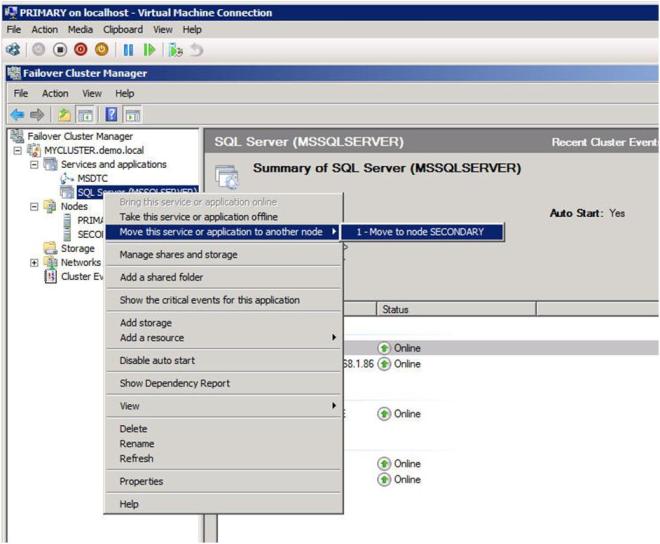
Now that you have a fully functional two node cluster, you probably should testing things out by doing some manual switchovers. Right click on the resource and choose “Move to node SECONDARY”.

If everything is configured properly, your Failover Cluster GUI should look as follows.

CONCLUSION
I believe that SQL clusters with replicated storage make a lot of sense. Storage has always been a single point of failure of traditional clusters. You can eliminate that single point of failure by deploying a SQL Server cluster with replicated storage from SteelEye or any other Microsoft Multi-Site Cluster replication partner. I hope you found this article informative. If you have any questions or suggestions, please add your comments!
Reproduced with permission from https://clusteringformeremortals.com/2009/10/07/step-by-step-configuring-a-2-node-multi-site-cluster-on-windows-server-2008-r2-%E2%80%93-part-3/


 Connect to SQL1