SIOS SANless clusters

SIOS SANless clusters High-availability Machine Learning monitoring

  • Home
  • Products
    • SIOS DataKeeper for Windows
    • SIOS Protection Suite for Linux
  • News and Events
  • Clustering Simplified
  • Success Stories
  • Contact Us
  • English
  • 中文 (中国)
  • 中文 (台灣)
  • 한국어
  • Bahasa Indonesia
  • ไทย

Windows Server Failover Cluster Quorum Types In Windows Server 2012 R2

February 21, 2018 by Jason Aw Leave a Comment

Cluster Quorum types? What Does It Do?

Before we get started with all the great new cluster quorum types in Windows Server 2012 R2, we should take a moment and understand what it does and how we got to where we are today. Rob Hindman describes quorum best in his blog post…

“The quorum configuration in a failover cluster determines the number of failures that the cluster can sustain while still remaining online.”

The Beginning: Disk Only

Prior to Windows Server 2003, there was only one quorum type, Disk Only. Now there are different cluster quorum types. Disk Only is still available today, but is not recommended as the quorum disk is a single point of failure. In Windows Server 2003 Microsoft introduce the Majority Node Set (MNS) quorum. This was an improvement as it eliminated the disk only quorum as a single point of failure in the cluster. However, it did have its limitations. As implied in its name, Majority Node Set must have a majority of nodes to form a quorum and stay online. So, this quorum model is not ideal for a two node cluster where the failure of one node would only leave one node remaining. One out of two is not a majority, so the remaining node would go offline.

The Introduction Of File Share Witness

Microsoft introduced a hotfix that allowed for the creation of a File Share Witness (FSW) on Windows Server 2003 SP1 and 2003 R2 clusters. Essentially the FSW is a simple file share on another server that is given a vote in a MNS cluster. The driving force behind this innovation was Exchange Server 2007 Continuous Cluster Replication (CCR), which allowed for clustering without shared storage. Of course, without shared storage a Disk Only Quorum was not an option. Effective MNS clusters would require three or more cluster nodes. Hence, the introduction of the FSW to support two node Exchange CCR clusters.

The New Disk Witness Keeps A Copy Of Cluster Database

Windows Server 2008 saw the introduction of a new witness type, Disk Witness. Unlike the old Disk Only quorum type, the Disk Witness allows the users to configure a small partition on a shared disk that acts as a vote in the cluster, similar to that of the FSW. However, the Disk Witness is preferable to the FSW. This is because it keeps a copy of the cluster database and eliminates the possibility of “partition in time”. If you’d like to read more about partition in time, I suggest you read the File Share Witness vs. Disk Witness for local clusters.

Improvements

Windows Server 2012 continued to improve upon quorum options. It is my belief that many of these new features were driven by two forces: Hyper-V and SQL Server AlwaysOn Availability Groups. With Hyper-V, we began to see clusters that contained many more nodes than we have typically seen in the past. In a majority node set, as soon as you lose a majority of your votes, the remaining nodes go offline. For example, if you have a Hyper-V cluster with seven nodes, and you were to lose four of those nodes, the remaining nodes would go offline, even though there are three nodes remaining. This might not be exactly what you want to happen. So in Windows Server 2012, Microsoft introduced Dynamic Quorum.

Dynamic Quorum

Dynamic Quorum does what its name implies. It adjusts the quorum dynamically. So in the scenario described about, assuming I didn’t lose all four servers at the same time, as servers in the cluster went offline, the number of votes in the quorum would adjust dynamically. When node one went offline, I would then in theory have a six node cluster. When node two went offline, I would then have a five node cluster, and so on. In reality, if I continued to lose cluster nodes one by one, I could go all the way down to a two node cluster and still remain online. And, if I had configured a witness (Disk or File Share) I could actually go all the way down to a single node and still remain online.

Read more about cluster quorum types at….

http://blogs.msdn.com/b/microsoft_press/archive/2014/04/28/from-the-mvps-understanding-the-windows-server-failover-cluster-quorum-in-windows-server-2012-r2.aspx

Reproduced with permission from https://clusteringformeremortals.com/2014/04/29/understanding-the-windows-server-failover-cluster-quorum-in-windows-server-2012-r2/

Filed Under: Clustering Simplified Tagged With: cluster, cluster quorum types, Disk Only, Disk Witness, File Share Witness, Quorum, Windows Server, Windows Server 2012 R2

Configure Sanless Hyper-V Failover Cluster With DataKeeper

February 19, 2018 by Jason Aw Leave a Comment

Configure Sanless Hyper-V Failover Cluster With DataKeeper

Questions about SANLess

Q. What is a SANLess cluster?
A. It is a cluster that uses local storage instead of a SAN.

Q. Why would I want to Configure Sanless Hyper-V Failover Cluster?
A. There are a few reasons:

  • Eliminate the cost of a SAN
  • Eliminate the SAN as a single point of failure
  • Take advantage of high speed storage options such a Fusion-io ioDrives and other high speed storage devices that plug in locally
  • Stretch the cluster across geographic locations for disaster recovery
  • Simplify management
  • Eliminate the need for a SAN administrator

Configure Sanless Hyper-V Failover Cluster with DataKeeper Cluster Edition is easy

If you know anything about Windows Server Failover Clustering, then you already know 99% of the solution. No need to worry if you have never built a Windows Server Failover Cluster before. Microsoft has made it easy and painless. For the beginners, I have written a step-by-step article that tells you how to build a Windows Server 2012 #SANLess cluster in my blog post here.

Two Options For Making A Highly Available Virtual Machine

If you have followed the steps in my post, you are ready to create your first highly available virtual machine. The first option assumes that you have an existing virtual machine that you want to make highly available. The second option assumes you are building a highly available virtual machine from scratch.

Configuring The DataKeeper Volume Cluster Resource

A SANLess Hyper-V cluster requires one VM per volume. Therefore, you will want to make sure you have your storage partitioned so that you have enough volumes for each VM. The storage on each cluster node should be configured identically in terms of drive letters and partition sizes. Have the partitions configured properly and your VM resides on the partition you want to replicate. Then, open the DataKeeper interface and walk through the three step wizard to create the DataKeeper Volume Resources as shown in below.

First, open the DataKeeper interface and click on Connect to Server. Do this twice to connect to both servers.

Configuring A Sanless Hyper-V Failover Cluster With DataKeeper Cluster Edition

Once you are connected, click on Create Job to create a mirror of the volume that contains the virtual machine you want to make highly available as shown below. In this example we will mirror the E drive.

Configuring A Sanless Hyper-V Failover Cluster With DataKeeper Cluster Edition

Whenever possible, keep replication traffic on a private network. In this case, we are using the 10.0.0.0/8 network for replication traffic. This can be a simple patch cable that connects the two servers across two unused NICs.

Configuring A Sanless Hyper-V Failover Cluster With DataKeeper Cluster Edition

Configuring A Sanless Hyper-V Failover Cluster With DataKeeper Cluster Edition

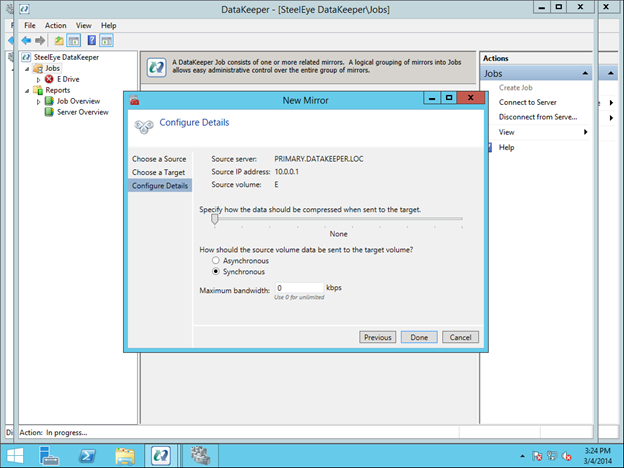
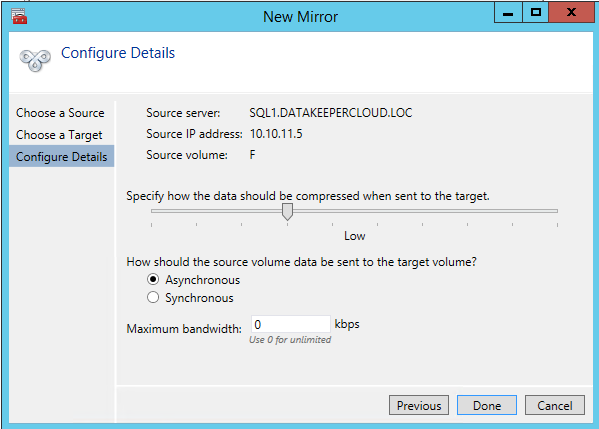
The final screen shows the options available for mirroring. For local area networks, Synchronous mirroring is preferred. When replicating across wide area networks, you will want to use Asynchronous replication and possibly enable compression. I would not limit the Maximum bandwidth. Because that could potentially cause your mirror to go out of sync if your rate of change (Disk Right Bytes/sec) exceeds the Maximum bandwidth specified. However, you may want to temporarily enable Maximum bandwidth during the initial mirror creation process. Otherwise, DataKeeper may flood the network with the initial replication traffic as it tries to get in sync as quickly as possible. Both Maximum bandwidth and Compression settings can be adjusted after the mirror is created. However, you cannot change between Synchronous and Asynchronous mirroring once the mirror has been created without deleting the mirror and recreating it.

Configuring A Sanless Hyper-V Failover Cluster With DataKeeper Cluster Edition

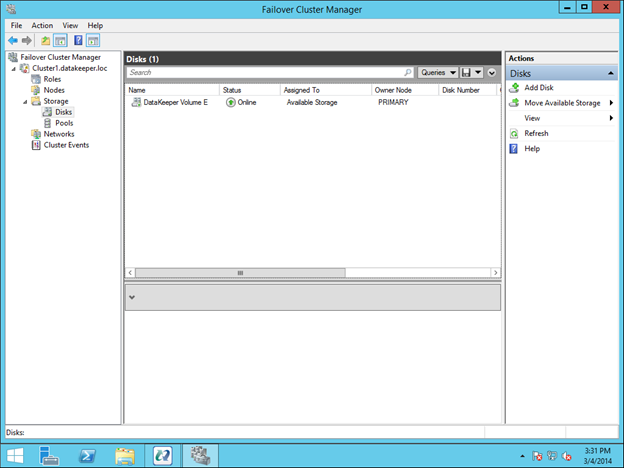
At the end of the mirror creation process you will see a popup asking if you want to auto-register this volume as a cluster volume. Select Yes, this will create a DataKeeper volume resource in Failover Clustering Available Storage.

Configuring A Sanless Hyper-V Failover Cluster With DataKeeper Cluster Edition

You are now ready to create your highly available VMs.

Option 1 – Clustering An Existing VM

Configuring A Sanless Hyper-V Failover Cluster With DataKeeper Cluster Edition

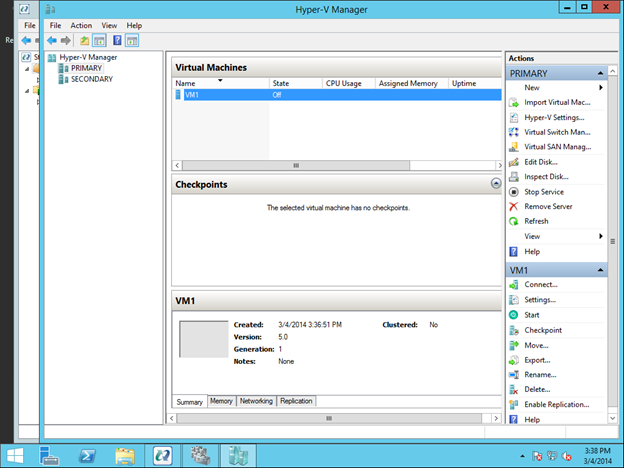
Once again, this procedure assumes you have an existing VM that you want to make highly available. If you do not have an existing VM, you will want to follow the procedure in Option 2 – Creating a Highly Available VM. Otherwise, you should have a VM when looking at Hyper-V Manager as shown below.

Configuring A Sanless Hyper-V Failover Cluster With DataKeeper Cluster Edition

All the VM files should already be located on the replicated volume, as shown below. If not, you will have to relocate the files before attempting to cluster the VM.

Configuring A Sanless Hyper-V Failover Cluster With DataKeeper Cluster Edition

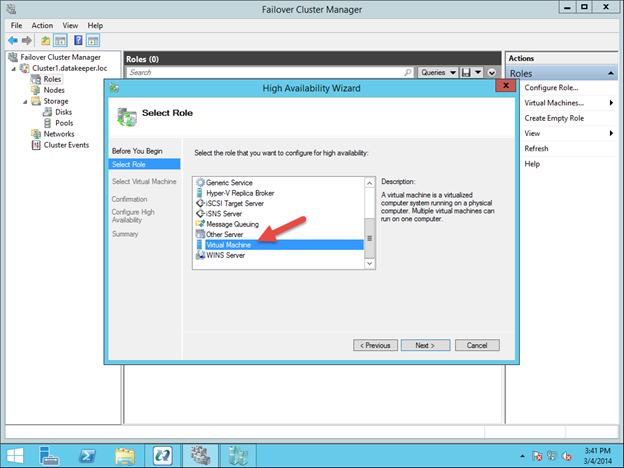
To begin the clustering process, open up Failover Cluster Manager. Right click on Configure Roles and choose Virtual Machine as the role you want to create.

Configuring A Sanless Hyper-V Failover Cluster With DataKeeper Cluster Edition

Configuring A Sanless Hyper-V Failover Cluster With DataKeeper Cluster Edition

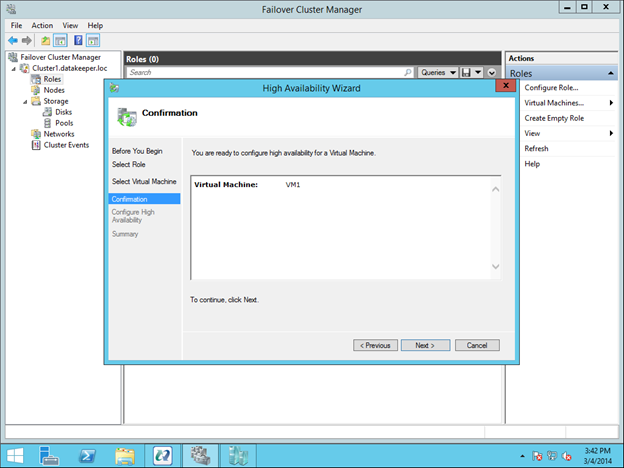
This will launch the High Availability Wizard. At this point you should select the VM that you want to cluster and step through the wizard as shown below.

Configuring A Sanless Hyper-V Failover Cluster With DataKeeper Cluster Edition

Configuring A Sanless Hyper-V Failover Cluster With DataKeeper Cluster Edition

Configuring A Sanless Hyper-V Failover Cluster With DataKeeper Cluster Edition

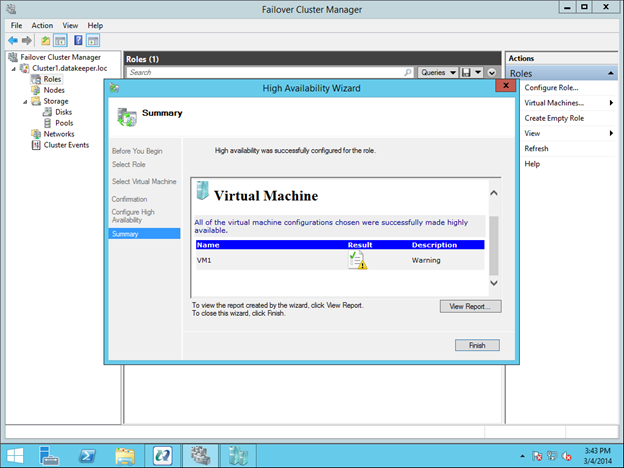
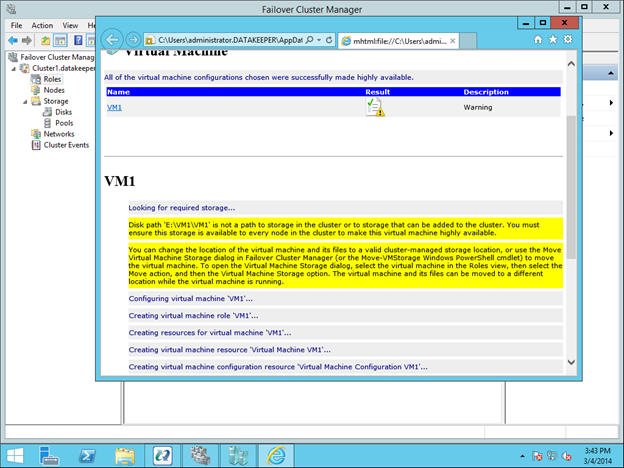
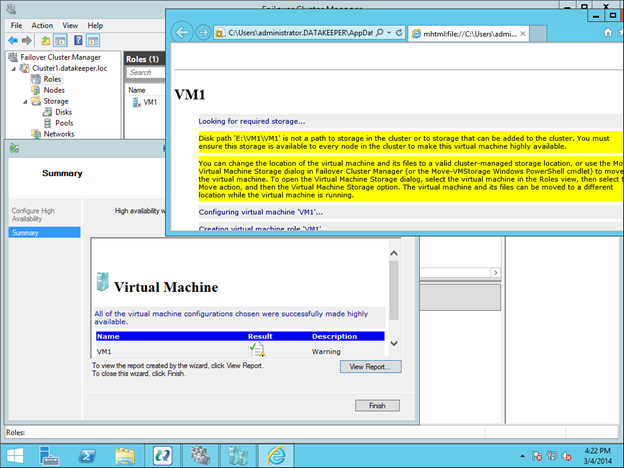
You will see that the VM resource will be created, but there will be some warnings. The warnings indicate that the E drive is not currently part of the VM Cluster Resource Group.

Configuring A Sanless Hyper-V Failover Cluster With DataKeeper Cluster Edition

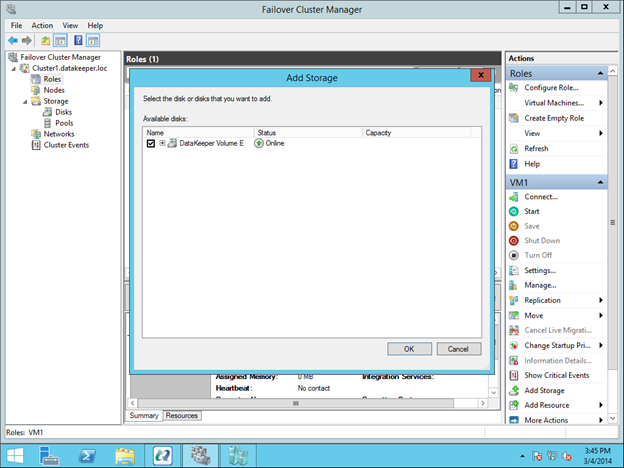
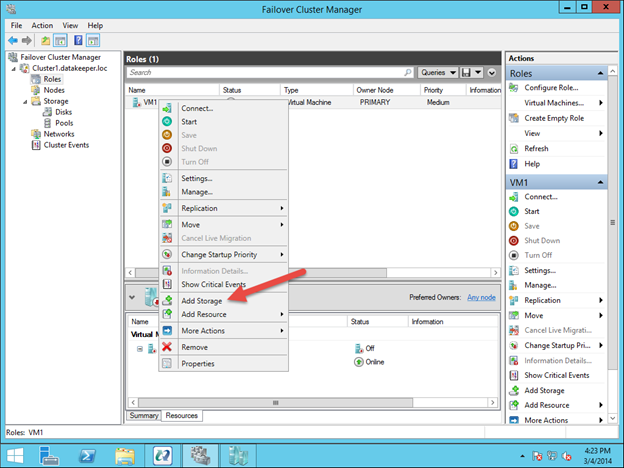
To make the DataKeeper Volume E part of the VM Cluster Resource Group, right click on the role and choose Add Storage. Add the DataKeeper Volume that you will see listed in Available Disks.

Configuring A Sanless Hyper-V Failover Cluster With DataKeeper Cluster Edition

Configuring A Sanless Hyper-V Failover Cluster With DataKeeper Cluster Edition

Configuring A Sanless Hyper-V Failover Cluster With DataKeeper Cluster Edition

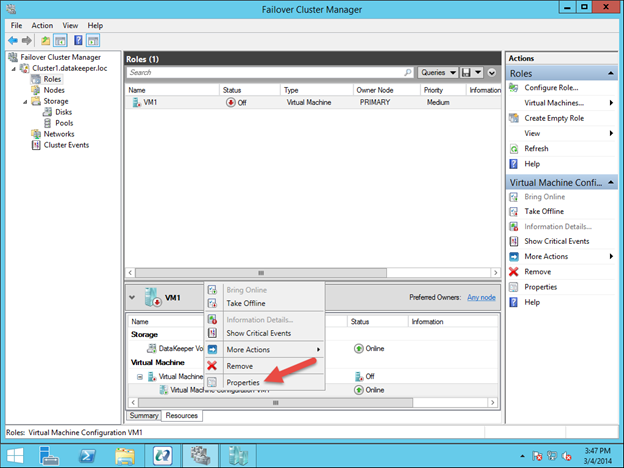
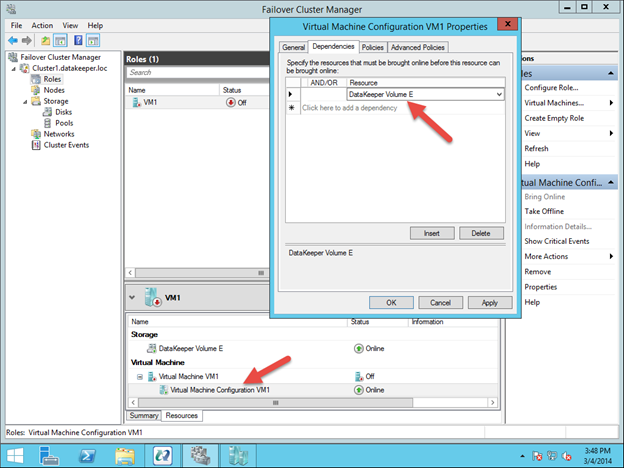
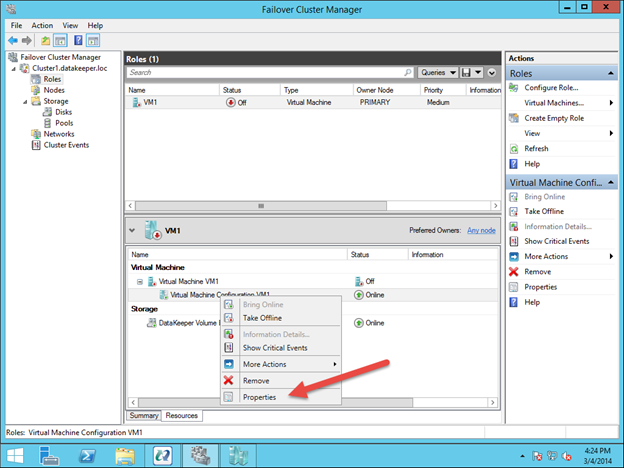
The last part is to choose the Properties of the Virtual Machine Configuration (not the Virtual Machine) resource and make it dependent upon the storage you just added to the resource group.

Configuring A Sanless Hyper-V Failover Cluster With DataKeeper Cluster Edition

Configuring A Sanless Hyper-V Failover Cluster With DataKeeper Cluster Edition

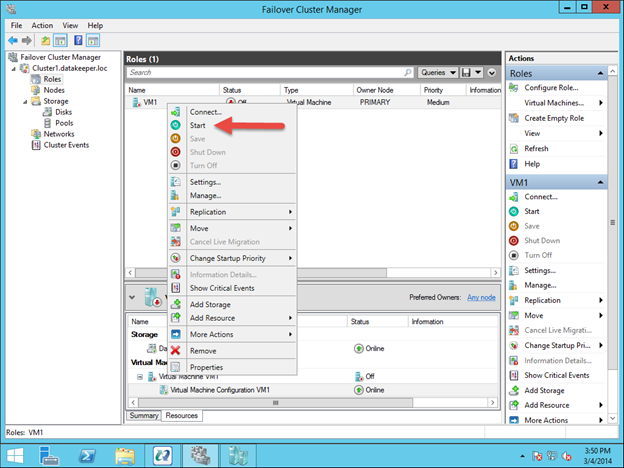
You should now be able to start the VM.

Configuring A Sanless Hyper-V Failover Cluster With DataKeeper Cluster Edition

Configuring A Sanless Hyper-V Failover Cluster With DataKeeper Cluster Edition

Option 2- Creating A Highly Available VM From Scratch

Assuming you want to create a highly available VM from scratch, you can complete this entire process from the Hyper-V Virtual Machine Manager as shown below. This step assumes that you have already created a mirror of the E drive using DataKeeper as described in Configuring the DataKeeper Volume Resource section.

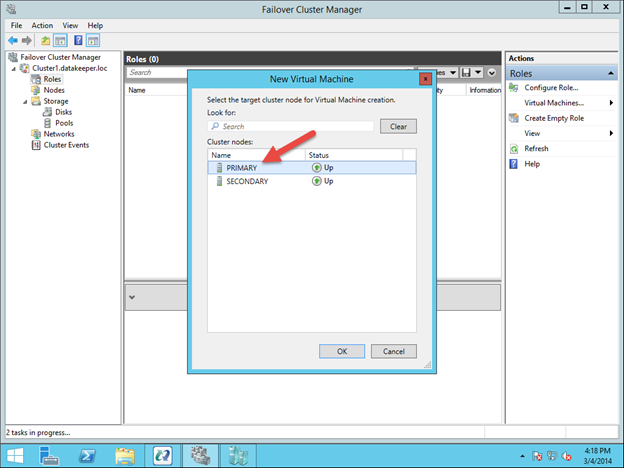
To get started, open the Failover Cluster Manager and right click on Roles and choose Virtual Machine – New Virtual Machine.

Configuring A Sanless Hyper-V Failover Cluster With DataKeeper Cluster Edition

Follow through with the steps of the wizard and select the options that you want to use for the VM. When choosing where to place the VM, select the cluster node that currently is the owner of Available Storage. It will also be the source of the mirror.

Configuring A Sanless Hyper-V Failover Cluster With DataKeeper Cluster Edition

Make sure when specifying the Name and Location of the VM, you select the location of the replicated volume.

Configuring A Sanless Hyper-V Failover Cluster With DataKeeper Cluster Edition

The rest of the options are up to you. Just make sure the VHD file is located on the replicated volume.

Configuring A Sanless Hyper-V Failover Cluster With DataKeeper Cluster Edition

Configuring A Sanless Hyper-V Failover Cluster With DataKeeper Cluster Edition

You will see the highly available VM is created, but there is a warning about the storage. You will need to add the DataKeeper Volume Resource to the VM Cluster Resource Group as shown below.

Configuring A Sanless Hyper-V Failover Cluster With DataKeeper Cluster Edition

Configuring A Sanless Hyper-V Failover Cluster With DataKeeper Cluster Edition

Configuring A Sanless Hyper-V Failover Cluster With DataKeeper Cluster Edition

After the DataKeeper Volume is added to the VM Cluster Resource Group, add the DataKeeper Volume as a dependency of the Virtual Machine Configuration resource.

Configuring A Sanless Hyper-V Failover Cluster With DataKeeper Cluster Edition

Configuring A Sanless Hyper-V Failover Cluster With DataKeeper Cluster Edition

You now have a highly available virtual machine.

Configuring A Sanless Hyper-V Failover Cluster With DataKeeper Cluster Edition

Summary

In this blog post, we discussed what constitutes a #SANLess cluster. We chose SIOS DataKeeper to Configure Sanless Hyper-V Failover Cluster. Once built, the cluster behaves exactly like a SAN based cluster, This includes having the ability to do Live Migration, Quick Migration and automated failover in the event of unexpected failures.

A #SANLess cluster eliminates the expense of a SAN as well as the single point of failure of a SAN. DataKeeper Cluster Edition supports multiple nodes in a SAN. So configurations that stretch both LAN and WAN are all possible solutions for Hyper-V high availability and disaster recovery. DataKeeper supports any local storage. This opens up the possibility of using high speed local attached SSD or NAND Flash storage for high performance without giving up high availability.

If you enjoy reading tips to Configure Sanless Hyper-V Failover Cluster, read more about clustering here

Reported with permission from https://clusteringformeremortals.com/2014/03/04/configuring-a-sanless-hyper-v-failover-cluster-with-datakeeper-cluster-edition/

Filed Under: Clustering Simplified, Datakeeper Tagged With: #SANLess, cluster, configure sanless hyper v failover cluster, Microsoft Windows Server Failover Clustering, SIOS DataKeeper Cluster Edition

Create Multi-Site Cluster In Windows Azure For DR With DataKeeper

February 15, 2018 by Jason Aw Leave a Comment

Create Multi-Site Cluster In Windows Azure For DR With DataKeeper

This is the 4th post in my series on High Availability and Disaster Recovery for Windows Azure with SIOS DataKeeper Cluster Edition. This is a step-by-step post on the processes to create multi-site cluster. It builds upon the Azure configuration that we built during my first three articles…

  1. How To Create A Site-To-Site VPN Tunnel To The Windows Azure Cloud
  2. Extending Your Data Centre To The Azure Cloud
  3. Create A SQL Server 2014 AlwaysOn Failover Cluster (FCI) Instance in Windows Azure Iaas With DataKeeper

We are now going to extend the existing cluster (SQL1 and SQL2) to your local data center, SQL3. This configuration will give you both high availability for your application within the Azure Cloud, as well as a disaster recovery solution should Azure suffer a major outage. You could configure this in reverse as well with your on premise datacenter as your primary site and use Windows Azure as your disaster recovery site. And of course this solution illustrates SQL Server as the application, but any cluster aware application can be protected in the same fashion.

At this point, if you have been following along your network should look like the illustration below.

Add SQL3 To The Cluster

To add SQL3 to the cluster, the first thing we need to do is make sure SQL3 is up and running, fully patched and added to the domain. We also need to make sure that it has an F:\ drive attached that is of the same size as the F:\ drives in use in Azure. And finally, if you relocated tempdb on the SQL cluster, make sure you have the directory structure where tempdb is located pre-configured on SQL1 as well.

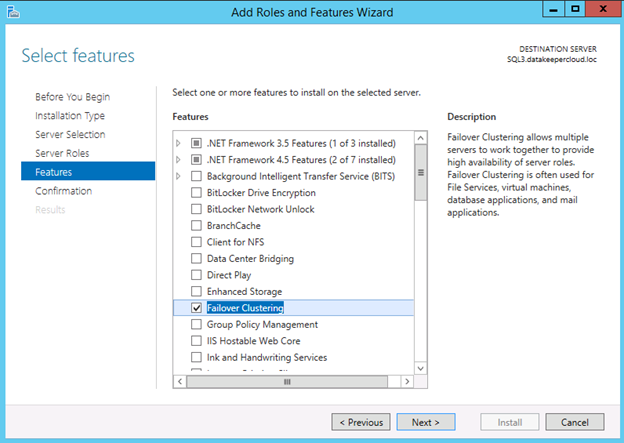
Next we will add the Failover Cluster feature to SQL3.

Create A Multi-Site Cluster In Windows Azure For DR With DataKeeper

Create A Multi-Site Cluster In Windows Azure For DR With DataKeeper

With failover clustering installed on SQL3, we will open Failover Cluster Manager on SQL1 and click Add Node

Create A Multi-Site Cluster In Windows Azure For DR With DataKeeper

Select SQL3 and click Next

Create A Multi-Site Cluster In Windows Azure For DR With DataKeeper

Run all the validation tests on SQL3

Create A Multi-Site Cluster In Windows Azure For DR With DataKeeper

Create A Multi-Site Cluster In Windows Azure For DR With DataKeeper

Create A Multi-Site Cluster In Windows Azure For DR With DataKeeper

Let’s take a look at some of the warnings in the validation report

The RegisterAllProvidersIP property is set to 1, which can be good when you intend to Create Multi-Site Cluster. You can read more about this setting here: http://technet.microsoft.com/en-us/library/ca35febe-9f0b-48a0-aa9b-a83725feb4ae

Create A Multi-Site Cluster In Windows Azure For DR With DataKeeper

This next warning talks about only having a single network between the cluster nodes. At this time Azure only supports a single network interface between VMs. Do note there is nothing you can do about this warning. However, this network interface is fully redundant behind the scenes. Safely ignore this message.

Create A Multi-Site Cluster In Windows Azure For DR With DataKeeper

Of course you are going to see a lot of warnings around storage. That’s because this cluster has no shared storage. Instead it relies on replicated storage by SIOS DataKeeper Cluster Edition. As stated below, this is perfectly fine as the database will be kept in sync with the replication software.

Create A Multi-Site Cluster In Windows Azure For DR With DataKeeper

We are now ready to add SQL3 to the cluster.

Create A Multi-Site Cluster In Windows Azure For DR With DataKeeper

Create A Multi-Site Cluster In Windows Azure For DR With DataKeeper

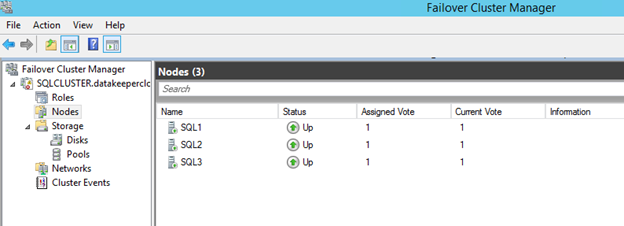
Once you click Finish, SQL3 will be added to the cluster as shown below.

Create A Multi-Site Cluster In Windows Azure For DR With DataKeeper

However, there are a few things we need to do to complete this installation. Next we will work of the following steps:

  • Add an additional IP address to the Cluster Name Object
  • Tune the heartbeat settings
  • Extend the DataKeeper mirror to SQL3
  • Install SQL 2014 on SQL3

Add An Additional IP Address To The Cluster Name Object

To Create Multi-Site Cluster, we added SQL3 to the cluster. So from a single site cluster, it becomes a multi-subnet cluster. If the cluster was originally created as a single site cluster and you later add a node that resides in a different subnet, you have to manually add a second IP address to the Cluster Name Object and create an OR dependency. For more information on this topic, view the following article. http://blogs.msdn.com/b/clustering/archive/2011/08/31/10204142.aspx

To add a second IP address to the Cluster Name Object (CNO), we must use the PowerShell commands described in the article mentioned above.

Create A Multi-Site Cluster In Windows Azure For DR With DataKeeper

Now if you are following along with the MSDN article I referenced, you would expect to see these “NewIP” somewhere in the GUI. However, at least with Windows 2012 R2 I am not currently seeing this resource in the GUI.

Create A Multi-Site Cluster In Windows Azure For DR With DataKeeper

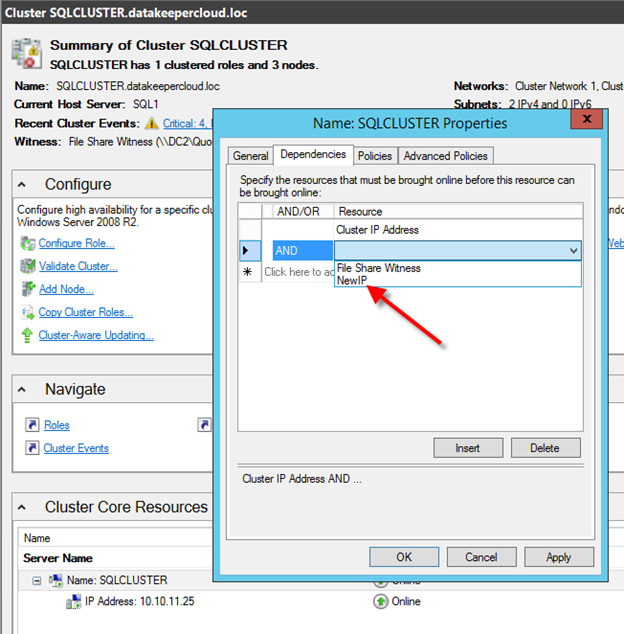
However, if I right click on the SQLCLUSTER name and choose properties and try to add NewIP as a dependency, I see it is listed as a possible resource.

Create A Multi-Site Cluster In Windows Azure For DR With DataKeeper

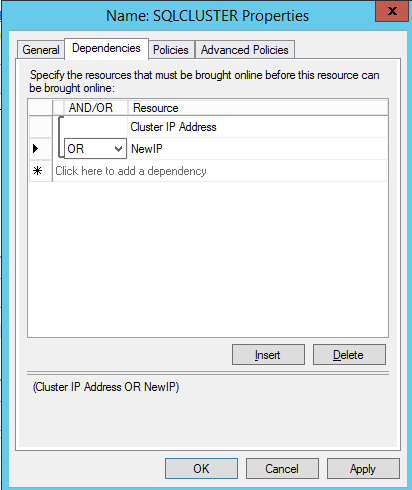
Choose “NewIP” and also make the dependency type “OR” as shown below.

Create A Multi-Site Cluster In Windows Azure For DR With DataKeeper

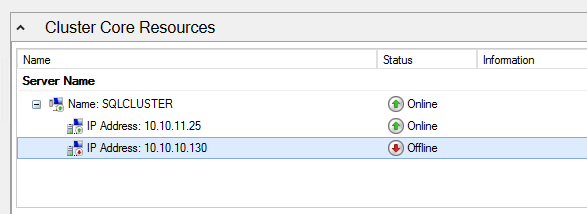
Once you click OK, it now appears in the GUI as an IP Address that needs to be configured.

Create A Multi-Site Cluster In Windows Azure For DR With DataKeeper

We can now choose the properties of this IP Address and configure the address to use an IP address that is not currently in use in the 10.10.10.0/24 subnet, which is the same subnet where SQL3 resides.

Create A Multi-Site Cluster In Windows Azure For DR With DataKeeper

Create A Multi-Site Cluster In Windows Azure For DR With DataKeeper

Tune The Heartbeat Settings

We now are ready to tune the heartbeat settings. Essentially, we are going to be a little more tolerant with network communication. Furthermore, since SQL3 is located across a VPN connection with some latency on the line and we only have the single network interface on the cluster nodes. I highly recommend you read this article by Elden Christensen to help you decide what the right settings for your requirements are:http://blogs.msdn.com/b/clustering/archive/2012/11/21/10370765.aspx

For our environment, we are going go to what he is calling the “Relaxed” setting by setting the SameSubnetThreshold to 10 heartbeats and the CrossSubnetThreshold to 20 heartbeats.

The commands are:

(get-cluster).SameSubnetThreshold = 10

(get-cluster).CrossSubnetThreshold = 20

Create A Multi-Site Cluster In Windows Azure For DR With DataKeeper

What this means is that heartbeats will continue to be sent every 1 second, but a SQL1 and SQL2 will only be considered dead after 10 missed heartbeats. SQL3 will be dead after 20 missed heartbeats. This will increase your Recovery Time Objective slightly (5-10 seconds), but it will also eliminate potential false failovers.

Extend The DataKeeper Mirror To SQL3

Before we can install SQL 2014 on SQL3 we must extend the DataKeeper mirror so that it includes SQL3 as a replication target. Of course you must install DataKeeper Cluster Edition on SQL3 first, and make sure that is has a F:\ drive at least as big as the source of the mirror. Once DataKeeper is installed

Create A Multi-Site Cluster In Windows Azure For DR With DataKeeper

Create A Multi-Site Cluster In Windows Azure For DR With DataKeeper

Create A Multi-Site Cluster In Windows Azure For DR With DataKeeper

Create A Multi-Site Cluster In Windows Azure For DR With DataKeeper

Create A Multi-Site Cluster In Windows Azure For DR With DataKeeper

Create A Multi-Site Cluster In Windows Azure For DR With DataKeeper

Create A Multi-Site Cluster In Windows Azure For DR With DataKeeper

Create A Multi-Site Cluster In Windows Azure For DR With DataKeeper

Install SQL 2014 On SQL3

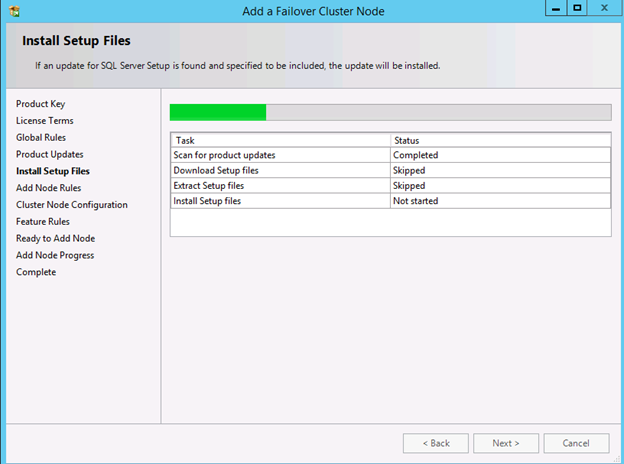
Now it is time to install SQL 2014 onto the 3rd node. The process is exactly the same as it was to install in on SQL2. Start by launching SQL Setup on SQL3.

Create A Multi-Site Cluster In Windows Azure For DR With DataKeeper

Run through all the steps…

Create A Multi-Site Cluster In Windows Azure For DR With DataKeeper

Create A Multi-Site Cluster In Windows Azure For DR With DataKeeper

Create A Multi-Site Cluster In Windows Azure For DR With DataKeeper

At this point in the installation you have to pick an IP address that is valid for SQL3’s subnet. The cluster will add this IP address with an “OR” dependency to the client access point.

Create A Multi-Site Cluster In Windows Azure For DR With DataKeeper

Enter the passwords for your service accounts

Create A Multi-Site Cluster In Windows Azure For DR With DataKeeper

Create A Multi-Site Cluster In Windows Azure For DR With DataKeeper

After you complete the installation let the fun begin. You now have a multisite SQL Server cluster that should look something like this.

Create A Multi-Site Cluster In Windows Azure For DR With DataKeeper

For information to Create Multi-Site Cluster or any clustering questions, read here to see how SIOS could help you achieve a better solution

Reproduced with permission from https://clusteringformeremortals.com/2014/01/14/creating-a-multi-site-cluster-in-windows-azure-for-disaster-recovery-azure-cloud/

Filed Under: Clustering Simplified Tagged With: cluster, create multi site cluster, DataKeeper, disaster recovery, High Availability, Windows Azure

Configure Windows Server 8 Beta ISCSI Target Software For Use In A Cluster

February 2, 2018 by Jason Aw Leave a Comment

But First, Do You Know Windows Server Failover Cluster Well?

So you just download the bits for Windows Server 8 Beta and you are anxious to try out all the exciting new features. Many of these features like Windows Storage Spaces, Continuously Available Fail Servers and Hyper-V Availability are going to require you become familiar with Windows Server Failover Cluster

Windows iSCSI Target Software is a great option to provide storage for Failover Clustering and Spaces in a lab environment to play around with these new features. Especially since things like Storage Spaces may need you to have access to additional storage to simulate JBODS.

This Step-by-Step Article assumes you have three Windows Server 8 servers running in a domain environment. My lab environment consists of the following:

Hardware
My three servers are all virtual machines running on VMware Workstation 8 on top of my Windows 7 laptop with 16 GB of RAM. See my article on how to install Windows Server 8 on VMware Workstation 8.

Server Names and Roles
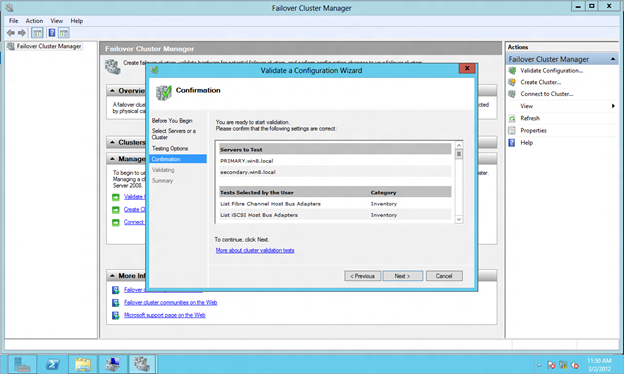
PRIMARY.win8.local – my cluster node 1
SECONDARY.win8.local – my cluster node 2
WIN-EHVIK0RFBIU.win8.local – my domain controller (guess who forgot to rename his DC before I promoted it to be a Domain ControllerJ)

Network
192.168.37.X/24 – my public network also used to carry iSCSI traffic
10.X.X.X /8– a private network defined just between PRIMARY and SECONDARY for cluster communication

This article is going to walk you through step-by-step on how to do the following:

  • INSTALL THE ISCSI TARGET ROLE ON YOUR DOMAIN CONTROLLER
  • Configure the iSCSI Target
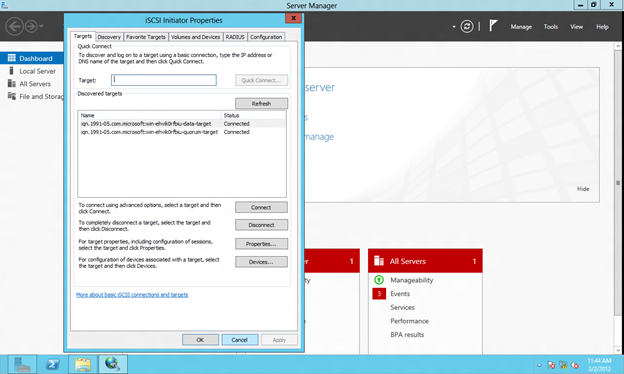
  • Connect to the iSCSI Target using the iSCSI Initiator
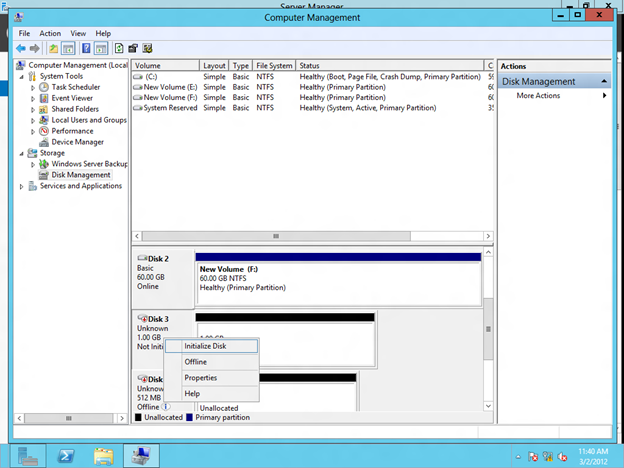
  • Format the iSCSI Target
  • Connect to the shared iSCSI Target from the SECONDARY Server
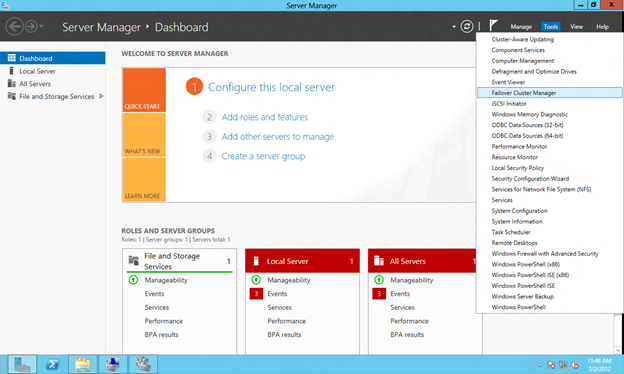
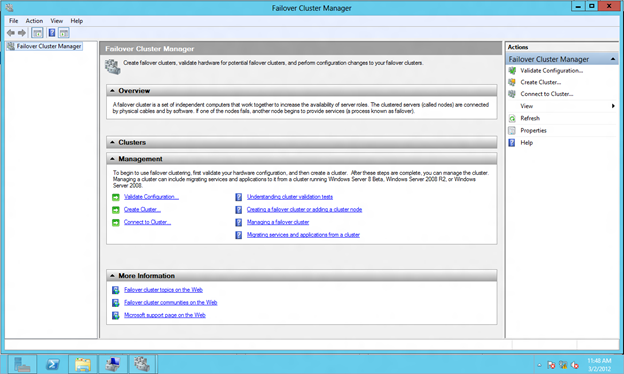
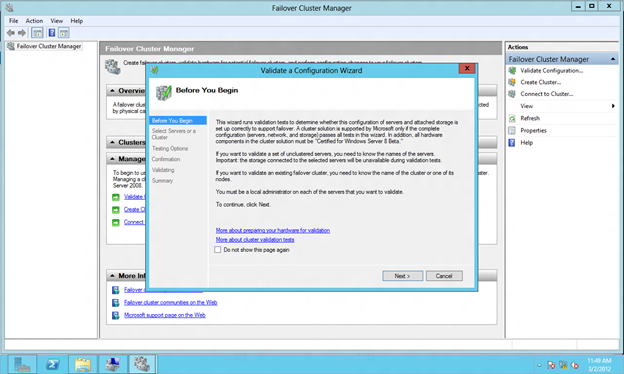
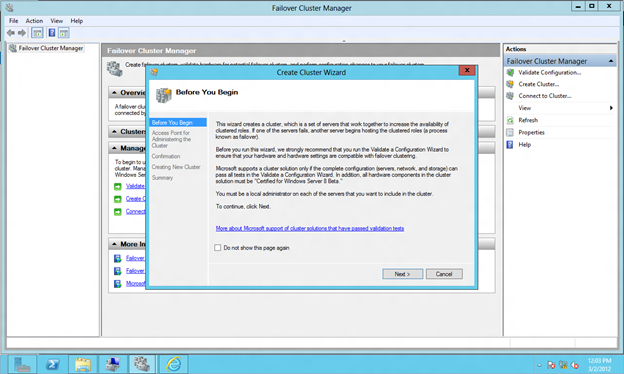
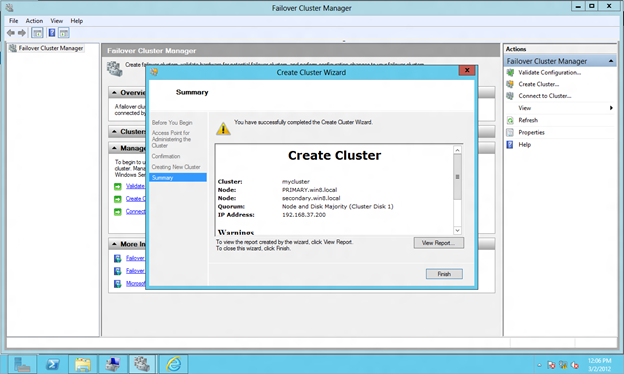
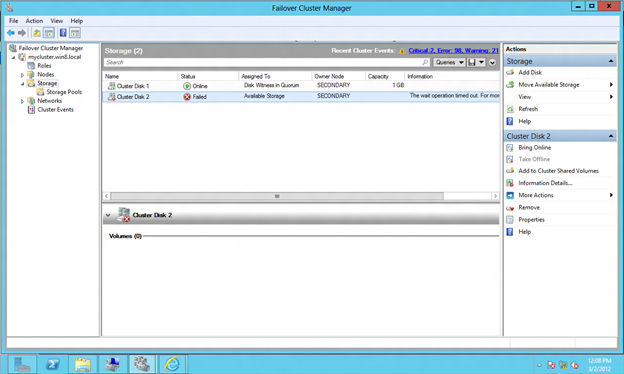
  • Configure Windows Server 8 Failover Clustering

The article consist mostly of screen shots, but I also add notes where needed.

INSTALL THE ISCSI TARGET ROLE ON YOUR DOMAIN CONTROLLER

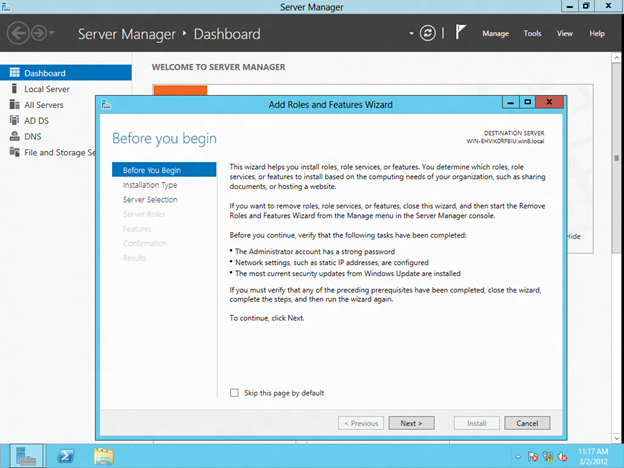
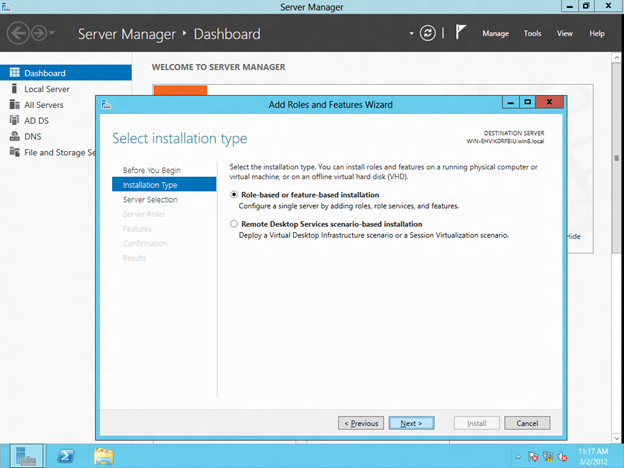
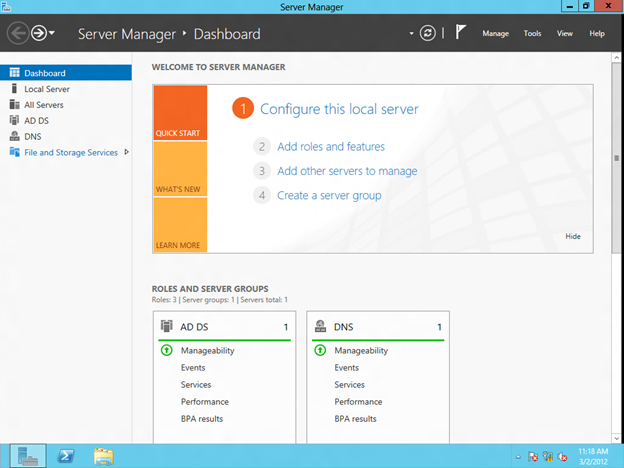
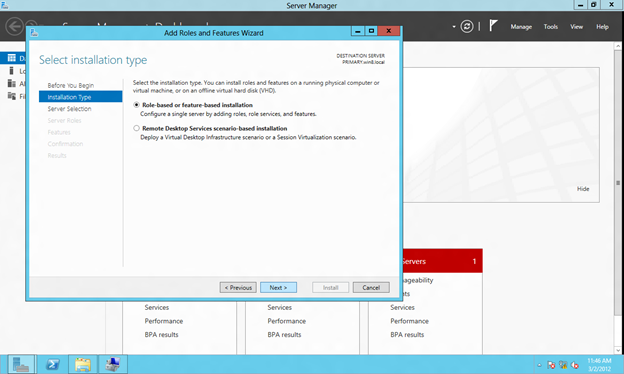
Click on Add roles and features to install the iSCSI target role.

Configure Windows Server 8 Beta ISCSI Target Software For Use In A Cluster

Configure Windows Server 8 Beta ISCSI Target Software For Use In A Cluster

Configure Windows Server 8 Beta ISCSI Target Software For Use In A Cluster

Configure Windows Server 8 Beta ISCSI Target Software For Use In A Cluster

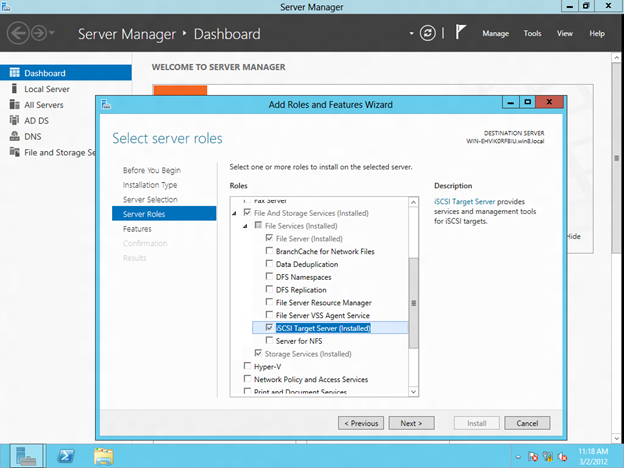
You will find that the iSCSI target role is a feature that is found under File And Storage Servers/File Services. Just select iSCSI Target Server and click Next to begin the installation of the iSCSI Target Server role.

Configure Windows Server 8 Beta ISCSI Target Software For Use In A Cluster

CONFIGURE THE ISCSI TARGET

The iSCSI target software is managed under File and Storage Services on the Server Manager Dashboard, click on that to continue

Configure Windows Server 8 Beta ISCSI Target Software For Use In A Cluster

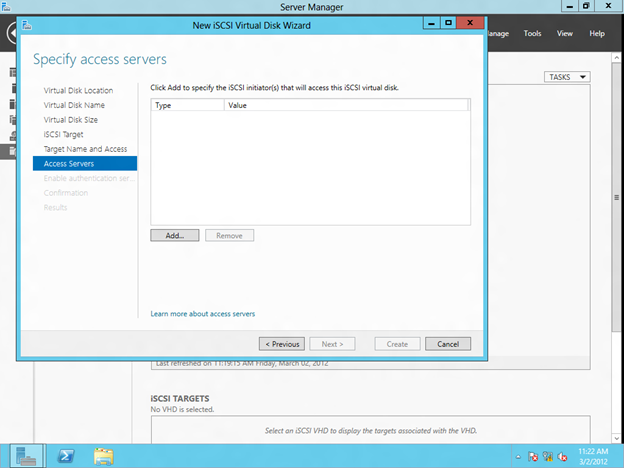
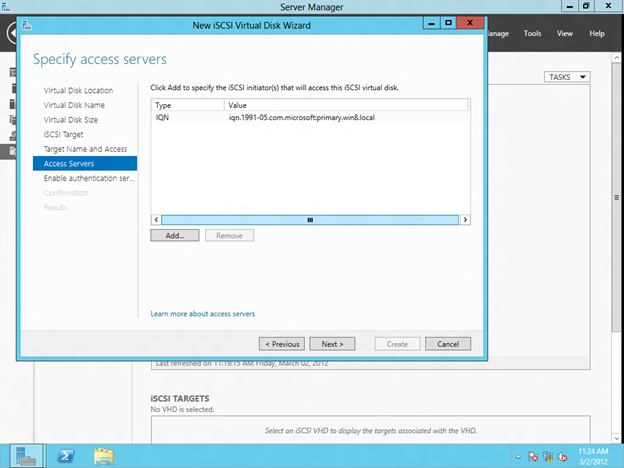
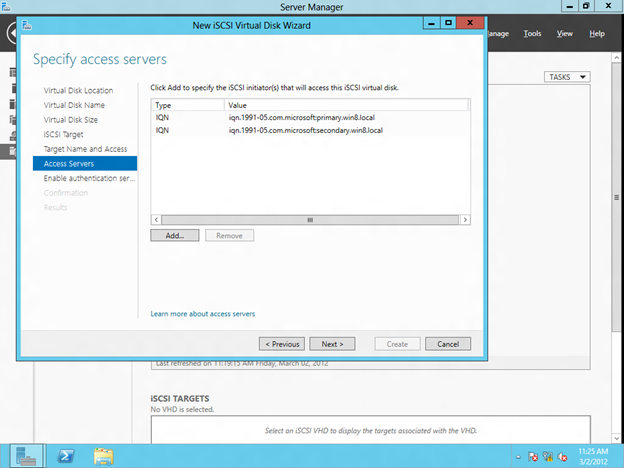
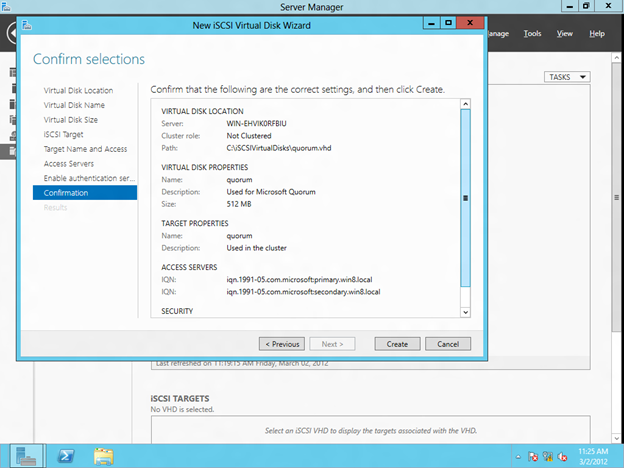
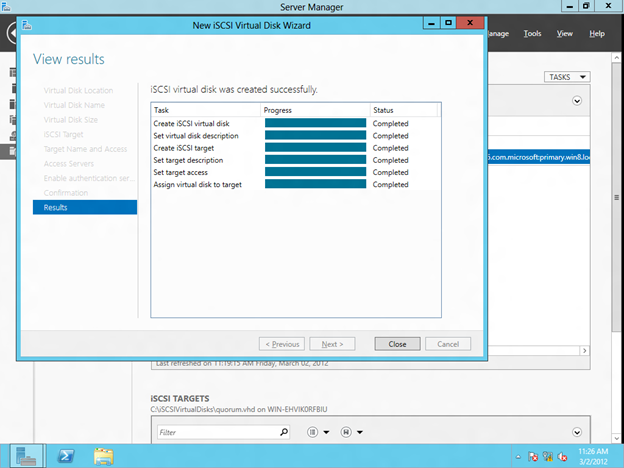
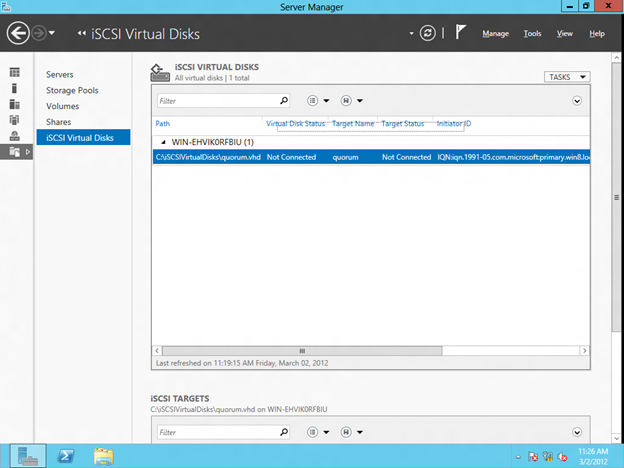
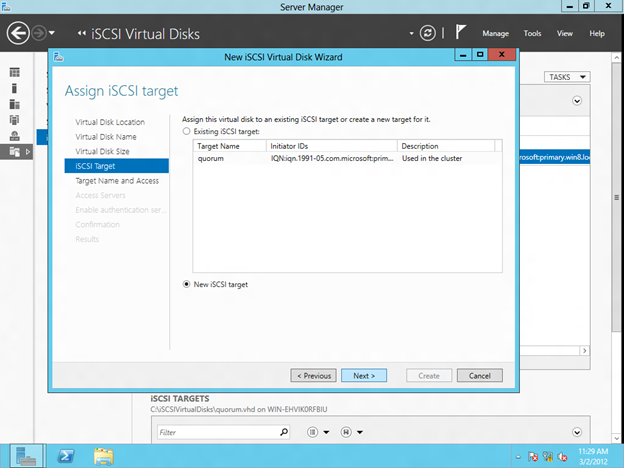
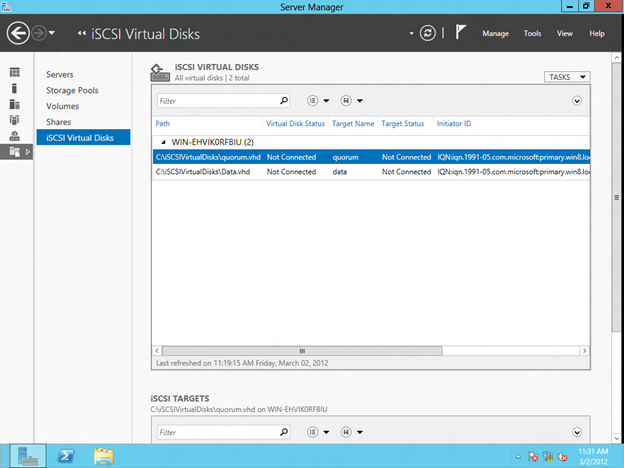
The first step in creating an iSCSI target is to create an iSCSI Virtual Disk. Click on Launch the New Virtual Disk wizard to create a virtual disk.

Configure Windows Server 8 Beta ISCSI Target Software For Use In A Cluster

Configure Windows Server 8 Beta ISCSI Target Software For Use In A Cluster

Configure Windows Server 8 Beta ISCSI Target Software For Use In A Cluster

Configure Windows Server 8 Beta ISCSI Target Software For Use In A Cluster

Configure Windows Server 8 Beta ISCSI Target Software For Use In A Cluster

Configure Windows Server 8 Beta ISCSI Target Software For Use In A Cluster

Configure Windows Server 8 Beta ISCSI Target Software For Use In A Cluster

Configure Windows Server 8 Beta ISCSI Target Software For Use In A Cluster

Configure Windows Server 8 Beta ISCSI Target Software For Use In A Cluster

Configure Windows Server 8 Beta ISCSI Target Software For Use In A Cluster

Configure Windows Server 8 Beta ISCSI Target Software For Use In A Cluster

Configure Windows Server 8 Beta ISCSI Target Software For Use In A Cluster

Configure Windows Server 8 Beta ISCSI Target Software For Use In A Cluster

Configure Windows Server 8 Beta ISCSI Target Software For Use In A Cluster

Configure Windows Server 8 Beta ISCSI Target Software For Use In A Cluster

Configure Windows Server 8 Beta ISCSI Target Software For Use In A Cluster

Configure Windows Server 8 Beta ISCSI Target Software For Use In A Cluster

Configure Windows Server 8 Beta ISCSI Target Software For Use In A Cluster

Configure Windows Server 8 Beta ISCSI Target Software For Use In A Cluster

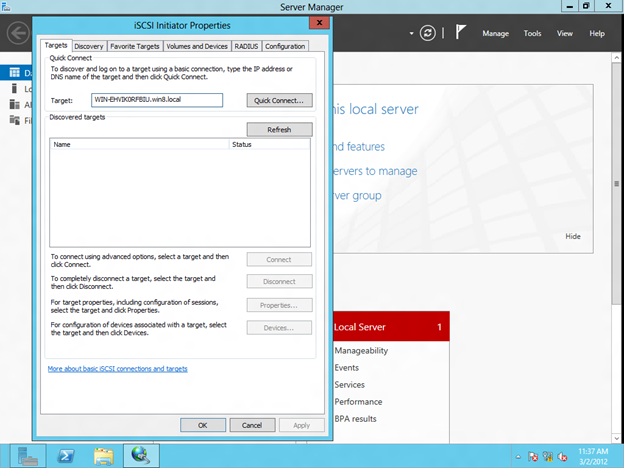
CONNECT TO THE ISCSI TARGET USING THE ISCSI INITIATOR

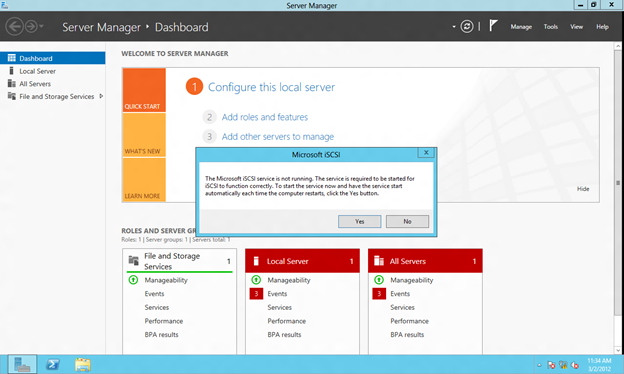
Configure Windows Server 8 Beta ISCSI Target Software For Use In A Cluster

Configure Windows Server 8 Beta ISCSI Target Software For Use In A Cluster

Configure Windows Server 8 Beta ISCSI Target Software For Use In A Cluster

Configure Windows Server 8 Beta ISCSI Target Software For Use In A Cluster

Configure Windows Server 8 Beta ISCSI Target Software For Use In A Cluster

Configure Windows Server 8 Beta ISCSI Target Software For Use In A Cluster

FORMAT THE ISCSI TARGET

Configure Windows Server 8 Beta ISCSI Target Software For Use In A Cluster

Configure Windows Server 8 Beta ISCSI Target Software For Use In A Cluster

Configure Windows Server 8 Beta ISCSI Target Software For Use In A Cluster

Configure Windows Server 8 Beta ISCSI Target Software For Use In A Cluster

Configure Windows Server 8 Beta ISCSI Target Software For Use In A Cluster

Configure Windows Server 8 Beta ISCSI Target Software For Use In A Cluster

Configure Windows Server 8 Beta ISCSI Target Software For Use In A Cluster

Configure Windows Server 8 Beta ISCSI Target Software For Use In A Cluster

Configure Windows Server 8 Beta ISCSI Target Software For Use In A Cluster

Configure Windows Server 8 Beta ISCSI Target Software For Use In A Cluster

Configure Windows Server 8 Beta ISCSI Target Software For Use In A Cluster

CONNECT TO THE SHARED ISCSI TARGET FROM THE SECONDARY SERVER

Configure Windows Server 8 Beta ISCSI Target Software For Use In A Cluster

Configure Windows Server 8 Beta ISCSI Target Software For Use In A Cluster

Configure Windows Server 8 Beta ISCSI Target Software For Use In A Cluster

CONFIGURE WINDOWS SERVER 8 FAILOVER CLUSTERING

Configure Windows Server 8 Beta ISCSI Target Software For Use In A Cluster

Configure Windows Server 8 Beta ISCSI Target Software For Use In A Cluster

Configure Windows Server 8 Beta ISCSI Target Software For Use In A Cluster

Configure Windows Server 8 Beta ISCSI Target Software For Use In A Cluster

Configure Windows Server 8 Beta ISCSI Target Software For Use In A Cluster

Configure Windows Server 8 Beta ISCSI Target Software For Use In A Cluster

Configure Windows Server 8 Beta ISCSI Target Software For Use In A Cluster

Configure Windows Server 8 Beta ISCSI Target Software For Use In A Cluster

Configure Windows Server 8 Beta ISCSI Target Software For Use In A Cluster

Configure Windows Server 8 Beta ISCSI Target Software For Use In A Cluster

Configure Windows Server 8 Beta ISCSI Target Software For Use In A Cluster

Configure Windows Server 8 Beta ISCSI Target Software For Use In A Cluster

Configure Windows Server 8 Beta ISCSI Target Software For Use In A Cluster

Configure Windows Server 8 Beta ISCSI Target Software For Use In A Cluster

Configure Windows Server 8 Beta ISCSI Target Software For Use In A Cluster

Configure Windows Server 8 Beta ISCSI Target Software For Use In A Cluster

Configure Windows Server 8 Beta ISCSI Target Software For Use In A Cluster

Configure Windows Server 8 Beta ISCSI Target Software For Use In A Cluster


Reproduced with permission from https://clusteringformeremortals.com/2012/03/05/step-by-step-configuring-windows-server-8-beta-iscsi-target-software-for-use-in-a-cluster/#Install the iSCSI Target Role on your Domain Controller

Filed Under: Clustering Simplified Tagged With: cluster, iSCSI Target, Storage Space, Windows Server 8

Failover Clustering & Hyper-V: Multi-Site Disaster Recovery

January 31, 2018 by Jason Aw Leave a Comment

Here is a great video from a friend of mine and former MVP Cluster Lead, Symon Perriman. It looks like he is enjoying his new job as Microsoft product evangelist.

Video: Failover Clustering & Hyper-V: Multi-Site Disaster Recovery

http://technet.microsoft.com/en-us/edge/Hh133452

Reproduced with permission from https://clusteringformeremortals.com/2011/05/11/failover-clustering-hyper-v-multi-site-disaster-recovery/

Filed Under: Clustering Simplified Tagged With: cluster, Clustering, failover clustering, Hyper V, Microsoft, Multi-Site Disaster Recovery

  • « Previous Page
  • 1
  • …
  • 3
  • 4
  • 5
  • 6
  • 7
  • …
  • 9
  • Next Page »

Recent Posts

  • How to Assess if My Network Card Needs Replacement
  • Application Intelligence in Relation to High Availability
  • Transitioning from VMware to Nutanix
  • Are my servers disposable? How High Availability software fits in cloud best practices
  • Data Recovery Strategies for a Disaster-Prone World

Most Popular Posts

Maximise replication performance for Linux Clustering with Fusion-io
Failover Clustering with VMware High Availability
create A 2-Node MySQL Cluster Without Shared Storage
SAP for High Availability Solutions For Linux
Bandwidth To Support Real-Time Replication
The Availability Equation – High Availability Solutions.jpg
Choosing Platforms To Replicate Data - Host-Based Or Storage-Based?
Guide To Connect To An iSCSI Target Using Open-iSCSI Initiator Software
Best Practices to Eliminate SPoF In Cluster Architecture
Step-By-Step How To Configure A Linux Failover Cluster In Microsoft Azure IaaS Without Shared Storage azure sanless
Take Action Before SQL Server 20082008 R2 Support Expires
How To Cluster MaxDB On Windows In The Cloud

Join Our Mailing List

Copyright © 2025 · Enterprise Pro Theme on Genesis Framework · WordPress · Log in